What material to make a draft floor. Draft floor in a wooden house: arrangement options, insulation, stages of work
Many novice builders who have just started building their home are already considering what kind of linoleum or laminate they will lay in the future room.
And soon, before them the question arises - How and on what to lay this linoleum. Of course, we all understand that first you need to make the so-called subfloor - the basis on which, in the future, you can lay any floor covering you like. But, how to make the floor “from scratch” correctly, so that it is reliable, even and, most importantly, warm. You will find the answer in this article.
To make a rough floor with your own hands, you do not need any professional skills or special tools. The main thing you need is good physical strength and a head on your shoulders, as well as some, the most common tool. But more on that later, first you need to decide what building material you will need to purchase for the construction of the subfloor. The choice of materials for the floor on the construction market is now huge, but we will consider the most common option - no less reliable and at the same time not expensive.
We use the following lumber:
- a wooden beam with dimensions of 100 by 150 mm (or 150 by 200 mm) and a length of 6000 mm;
- a wooden block with dimensions of 50 by 50 mm (or 60 by 60 mm) and a length of 3000 mm;
- planed boards 50 mm thick and 6000 mm long;
- OSB sheets with dimensions of 1250 by 2500 mm and a minimum thickness of 12 mm.
As a heater, it is desirable to use basalt insulation (in a simple way, glass wool). To protect lumber from mold and decay, you need to purchase a special solution (antiseptic). You may also need cement mortar during the construction of the floor. Now let's look at all the lumber used separately, as well as what role they play in the subfloor.
Lumber used.
Wooden beams, with dimensions of 100 by 150 mm, are used as load-bearing logs, on which, subsequently, the entire floor in the room will rest. 
Bars with dimensions of 50 by 50 mm are designed to accommodate insulation in the floor. 
The cost of timber, on average, is about 6,500 rubles per cubic meter. To calculate the total cubic capacity of all bars, you will need to calculate the volume of one bar and multiply by the required number of bars. The volume of any bar is considered as the volume of a parallelepiped.
Choosing the right board
The board plays an important role, therefore it is better to use planed larch as the base of the subfloor. The cost of one cube of such a board is about the same as that of the bars. Cubature is considered similar. 
All of the listed lumber should be made mainly from coniferous trees, such as larch, it is less afraid of moisture and dampness, which means it will last longer. By the way, the whole of St. Petersburg, which is already over 300 years old, was built from it!
When buying beams and boards, you will need to take into account that the drier the lumber, the better and more expensive it is. After all, the dried boards will no longer warp and will not go (by helicopter), for example, during the heating of the house. Therefore, lumber is selected based on the following criteria:
- the lower the humidity level, the better, you can take it straight from the dryer;
- timber or board should be smooth, surfaces without significant defects, cracks and delaminations.
Sheets (plates) OSB
These so-called OSB boards complete the construction of the subfloor. Subsequently, OSB panels will serve as the final basis for the flooring. Translated into Russian, OSB is translated as OSB - oriented strand board. The material itself is a board pressed from sawdust. 
Over the past 5 years, OSB boards have become increasingly used in the decoration of walls and floors and are considered a fairly good basis for almost all types of finishing materials.
The main advantages of OSB boards:
- high moisture resistance;
– high mechanical strength;
- the material is easy to install.
One sheet of OSB with dimensions of 1250 by 2500 mm and a thickness of 12 mm will cost you about 700 rubles. Many Russian manufacturers sell OSB boards for less than 500 rubles a piece. You should not lean towards a cheaper option, it is cheap OSB panels that have received bad reviews due to their low level of environmental friendliness.
We figured out the materials, now we will find out what tool you will need to install the subfloor. Prepare or buy the following tool with which you can simplify your work as much as possible:
- a hammer;
- electric jigsaw;
- hacksaw or electric saw;
- roulette;
- level 1.5 meters long;
- stationery knife;
- nails 50-100 mm long.
Stages of subfloor construction
Let's first figure out how to properly position the lags. Before we figure out the correct location of the lag, let's go back a little to the past. It is advisable to take care of the floor arrangement even before the construction of the main walls of the house, that is, immediately after preparing the foundation. After all, then it will be impossible to fix something in the location of the lag.
First, all the bars (for the first floor) are treated with a special solution (antiseptic) against mold and decay. The fact is that the logs are located near the ground, under the house and will always be exposed to a humid environment. 
After laying the beams, check that they do not touch the ground (the distance from the bottom of the beam to the ground must be at least 20 cm). That is why all the space inside the foundation is always cleared in advance.
So, we place the bars perpendicular to the direction of the longest side of the future room with a step of 80-100 cm. The more often you keep the step, the less the floor will wobble and play, but this will require more building materials, respectively, and costs.
We have all the bars with a “rib” to increase the rigidity of the floor and make it as high as possible from the ground level. Agree a room on the first floor with too low windows is not the best option. We have all the logs, strictly in a horizontal position, checking their level from the edges, in the middle and between adjacent bars. If necessary, the edge of the beam can be raised with cement mortar.
The bars should rest with their edges on almost the entire width of the foundation, and their ends should be smeared with cement mortar or closed from the street. It is not necessary to specially fix the logs to the foundation - we just lay them, but so that they stably adhere to the surface of the foundation and do not stagger.
All boards, even before the walls are erected, it is advisable to lay them out on logs and cover them with the same anti-mold solution. You can also adjust them to size and cut a little too long boards, so that later, indoors, it would be more convenient to work with them. 
Finally, we make the base of the floor after the erection of the walls. We measure all the boards so that there is a gap of 3-5 mm from the end between the wall and the board. This gap is needed so that the board does not rest against the walls during the shrinkage of the house. We lay the boards perpendicular to the direction of the lag.
We nail each board with nails “weaving”, through one or two logs. You should not hammer three nails into each beam - this will not win you anything. Boards, just do not press hard against each other. The first board lies with an indent of 3-5 mm from the wall, the last one is adjusted in size. You may need to adjust the last board and cut it lengthwise.
For floor insulation we use bars and basalt insulation. To insulate the floor, it is necessary to build a kind of frame in the form of a lattice of bars 50 by 50 mm. In the cells of this frame you will lay a heater with a thickness of 50-60 mm. The insulation in our case comes with plates, but if you don’t like it so much, you can insulate it with soft wool, just keep in mind that for the same soundproofing effect as from plates, you will need twice as much soft wool. For example, if you open a wooden floor in a Soviet apartment, you will see a similar grating, and in rare cases, even with a heater. 
The bars must be distributed in increments equal to: the width of the OSB board divided by two, that is, approximately 620-630 mm. Bars are also laid across, here you determine the step at your discretion.
Try to put all the bars in a horizontal level. This can be achieved with small wooden wedges. Wedges are not difficult to make yourself.
Important! We nail the bars to the boards with nails, as in the previous case.
We lay the insulation in small rectangles, cutting out the desired size with a clerical knife.
Important! When working with insulation, be sure to wear goggles and a mask.
A small digression.
There is another pretty good way to insulate the floor. Although it is used mainly for warming the floor of the second floor, it is also suitable for the first floor. Here, the insulation is placed in the space between the lags. In order for the insulation to hold, boards 80-100 cm long are nailed to the lags from below, you see, it’s not very convenient. Moreover, the boards should be tried to be nailed tightly to each other so that the insulation does not crumble over time and does not fall to the ground inside the foundation. However, in this case, you can lay the insulation in a thicker layer, and the floor will be better insulated as a result. With this method of insulation, the device of bars 50 by 50 mm will not be mandatory.
Before installing the subfloor in a wooden house with your own hands, you need to familiarize yourself with all the design nuances. In what ways can they be laid, depending on the architectural characteristics of the buildings? What are the requirements for installation? Read more below.
| Subfloor type | Technical features and brief characteristics |
|---|---|
| They are more often used as bases for finishing coatings: glued board, piece natural parquet, various types of laminate, linoleum, soft coatings. The main requirement for such structures is an even and solid base that can withstand the maximum design loads. OSB boards, plywood, planed boards are used for manufacturing. To protect the structure from the harmful effects of moisture, traditional or modern materials are used. Such floors are recommended to be used during the construction of interfloor ceilings. |
| The floors are installed under the logs on special cranial bars. Between the lags and the finished floor there is a space in which heaters can be laid. Small pieces and waste are used for manufacturing, which makes it possible to reduce financial losses. |
| The most economical and reliable method of erecting rough floors. Taking into account the place of attachment, the bases can be insulated or under the finishing flooring. The distance between the bearing beams is selected depending on the operational characteristics of the finishing coating. |


When choosing a specific option, it is necessary to take into account the purpose of the building, the number of storeys, the materials and technologies used.
General requirements for subfloors
Regardless of the type of structures, building codes and regulations require the following activities.
Fire protection. All fire-retardant materials are divided into two groups according to their resistance to fire. The first group is used for wooden houses with stove heating. In the implementation there is a wide range of solutions, impregnation is done with a pneumatic spray gun or paint brushes. A prerequisite is that the lumber must be dry. The number of layers is determined taking into account the purpose of the wood.

Protection against putrefactive processes and biological damage to wood. Work is recommended to be carried out with effective antiseptics, all of which reliably protect lumber from premature destruction due to high humidity. The disadvantage of such materials is the release of chemical compounds into the air. True, the concentration is considered safe for residents. For those who do not want to risk their health, there is a completely safe way to protect lumber - impregnation with natural industrial oils.

Important. All impregnations and treatments must be carried out before laying the lumber, and not after. Another nuance - great attention should be paid to the ends, they are most susceptible to moisture. Fresh propyls and ends are subject to additional impregnation.
Mandatory presence of vents to ensure natural ventilation of wooden structures. No impregnation will save the wood if it is not constantly ventilated. The parameters of the vents are specified in SNiP 31-01-2003, the diameter and location of the holes depends on the area and height of the underground. The protection of the underground from the penetration of rodents, the openings are made of metal gratings, the geometry of the products is not regulated.

Practical advice. Be sure to check the effectiveness of natural ventilation, if it is not, then the subfloors will not last the expected amount of time. To check, you can use smoke or open fire. In the absence of visible air currents, measures should be taken immediately to improve the performance of natural ventilation.
Compliance with the requirements of building codes guarantees long-term and safe operation of floor coverings. For example, we will consider two methods for arranging subfloors.
Draft floors on load-bearing wooden beams
The beams are laid on the foundation tape or strapping beam. There is no fundamental difference between the two methods, it all depends on the chosen method of building a house. A prerequisite is that between wooden structures and concrete elements there must be reliable waterproofing, most often two layers of roofing material are used. This is the cheapest material that provides reliable waterproofing. In addition, the timber must be treated with any antiseptics.

The beam must lie strictly in one plane, the installation is done using a level. On both sides, round logs need to be cut with an ax.
In the absence of experience with an ax, it is better to purchase ready-made material. But keep in mind that in terms of strength it will be inferior to hewn round timber, and in terms of cost it will significantly exceed it. The draft floor is attached to the lower base of the bars, the flooring will be made of OSB. But if you wish, you can use any materials at hand, and not only wood.
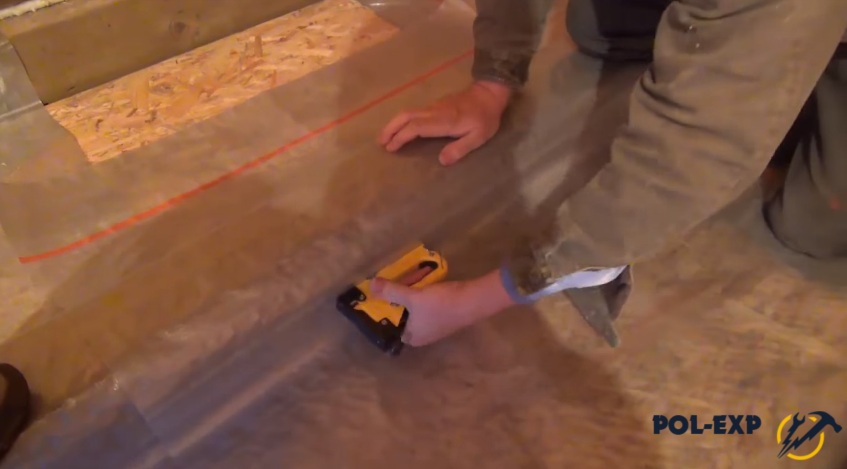
Step 1. Unscrew the beam fasteners. The bars are screwed to the harness using metal corners and long self-tapping screws. The draft floor is installed only on pre-exposed beams, in connection with this, their dismantling is required.

Step 2 Carefully remove the beam from the seat and turn it face down.


Step 3 Attach the OSB strip to the bottom of the beam with self-tapping screws or ordinary nails. The width of the strip should be 10–15 cm greater than the width of the flat area of the beam.

Important. The length of the screws should be ≈ 70% greater than the thickness of the plate, otherwise the fixation will not be reliable. This rule applies to all cases of fixing structures to each other.
While tightening the screws, press the drill with great force, the plate should not rise. Inexperienced builders do not press the screws with sufficient force during screwing, the screw rotates a little in the slab, due to which a gap appears between it and the beam. This greatly worsens the parameters of the subfloor.

Using the same technology, attach sheets to all beams.
Step 4 Install all dismantled beams in place, secure them with metal squares and self-tapping screws. Check the position again, if necessary, adjust them with pads of different thicknesses. Never use lumber for underlays, they will definitely sag over time, which will disrupt the horizontal finish of the floor covering. For linings, use durable moisture-resistant building materials. Another important condition is that the dimensions must be equal to or greater than the areas of the beam, which will allow you to evenly distribute the load.

Step 5 Lay pieces of OSB in prepared places. During the preparation of sheets, there is no need to take accurate measurements, small gaps not only simplify the laying process, but also improve the natural ventilation of the subfloor. Thus, by the way, you can save lumber.


Practical advice. Never walk on the subfloor, it is not designed for such a large weight. During the laying of the last row, you should walk along the beams. If you wish, you can foam the joints of sheets and beams, but this operation is not considered mandatory. We have already mentioned that the tree must be ventilated. As for the increase in heat losses, it is insignificant.

Step 6 Lay a vapor barrier, never use an ordinary high-density polyethylene film for this purpose. The fact is that it does not let steam through, as a result, water will always accumulate in the heat insulator, it is in the insulation layer that the condensation point is located. High humidity significantly reduces the heat saving performance of mineral wool and has a very negative effect on wooden structures. Moisture must be constantly removed from the insulation layer, and only modern membranes can provide this.

Fix the vapor barrier to the beams with a stapler, the overlap of the layers is at least 10 cm, the joints should be carefully sealed with adhesive tape.
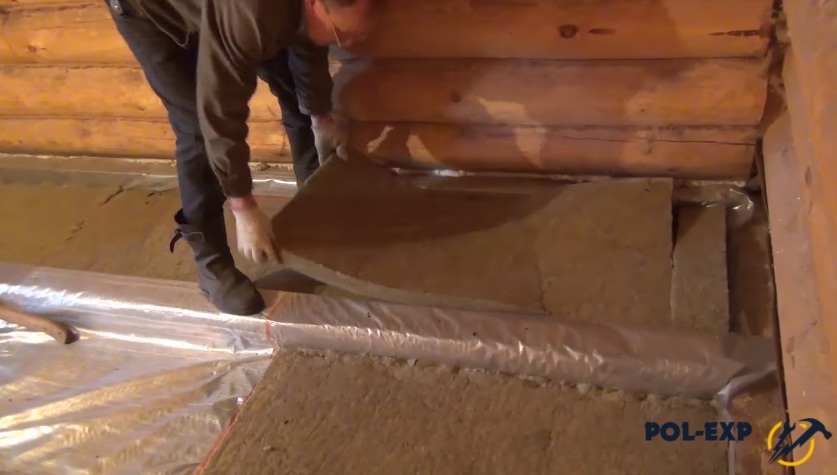
Step 7 Lay a layer of thermal insulation. For these purposes, you can use rolled and pressed mineral wool or. It is advisable to use mineral wool. Why?
- Minvata does not burn. In connection with such characteristics of resistance to fire, it is also used as a fire barrier.
- The material is completely safe. Mineral wool is made from basalt, which is natural glass of volcanic origin.
- Basalt wool is not afraid of rodents, which is very important for wooden houses.

Pressed and rolled wool is produced in standard sizes, it is recommended to take them into account during the installation of beams. The width of the wool is 60 cm, the distance between the beams is recommended to be ≈ 55–58 cm. Due to such dimensions, the insulation is tightly attached to the structures, heat losses are reduced, and the microclimate in the room is improved. In addition, the sheets do not need to be cut, which speeds up work and reduces waste.
The thickness of the insulation is at least 10 cm. Make the second layer with an offset to cover the joints. If a wooden house is built in a cold climate zone, then the insulation layer must be at least 15 cm thick.

Step 8 Close the thermal insulation with a waterproof membrane. The technology of its laying is no different from the algorithm for installing a vapor barrier membrane.

Step 9 Nail slats about 2 cm thick to the beams, they will serve as a log.

Practical advice. Professional builders strongly do not recommend laying the floor directly on the beams. Due to the bars, ventilation of the finish coating is provided, and it is needed regardless of the type of floor.
Further work depends on the technology you have chosen and the materials of the floor finish.
The device of draft floors on logs
Such options are used in wooden buildings built using the most modern technologies. The floor will be made of glued moisture-resistant plywood 2 cm thick, the flooring method will be on logs.
Step 1. Measure 120 cm from one side of the floor, this is the length of standard sheets. If the plywood is studded, then measurements must be taken very carefully, otherwise the studs will not enter the groove along one line. The use of studded plywood eliminates the appearance of drafts, which is very important for high-quality laying of the final coating. For proper laying of sheets, use coated thread.

Using a nail with thread (left) and coated thread (right) for marking
If the house is very large and the length of the thread is not enough, then a rope should be used first. Drive nails into the extreme logs, taking into account the dimensions of the plywood, and pull the rope between them. Based on the length of the coated rope, drive one or more additional nails into the joists along the line of the stretched rope. Now the marks can be applied without fear, they will all be accurately located on the same line.
Step 2 Lay out the first row of plywood on logs, while first marking the extra width.
Important. The thickness of plywood is selected taking into account the distance between the lags and the maximum load on the floor. This means that the sheets can be not only two centimeters in thickness.
Step 3 Apply liquid nails to the logs. They have several advantages: they significantly speed up the construction process, the subfloor will never creak and guarantee sufficient fixation strength. In addition, liquid nails allow you to easily correct small errors. Glue should be applied in the middle of the lag. If the edge of the sheet lies in the middle of the lag, then the glue, respectively, is applied only to a narrow section of the element.

Step 4 Turn over the plywood sheet and attach it with ordinary nails. According to the existing rules, the distance between them should be within ten centimeters along the perimeter of the building, and the length should be 6–7 cm. The distance between the hardware along the log is 15 cm, inside the building ≈30 cm.

Important. Plywood can expand from moisture, leave a gap of a few millimeters between the sheets. It is convenient to use nails as a template, insert them between the sheets, and remove them after fixing. There are situations when the edges of the sheet do not fall in the middle of the log. In these cases, the material must be carefully trimmed, taking into account the above requirements.
If the sheets fall on ventilation holes or other utilities, then measure their size and exact location, then, using a hand-held electric circular saw, cut off the excess.

Nails are much easier and faster to hammer with a pneumatic hammer. And how quickly to do it manually?
- Put several nails in your left hand, they are all mixed up, hats and points are located on different sides.
- With your right hand, grab the nails by the caps, carefully pull them out, turn them over to the desired position and put them with the rest. Now all the hats are on top.
- Pry the nails one at a time with your thumb, grab them with your index and middle fingers and set them with a point on a sheet of plywood. Do not forget that you need to drive in nails at a slight angle to the plywood veneer, otherwise it may crack.
- With the first light blow of the hammer, bait the nail, and with the second strong hammer it in until it stops.


You can be sure that after a few minutes of training, the speed of nailing will not differ from the machine, and the quality will not suffer.
Step 5 Cut the last sheet to size and fasten it to the logs.
The rows of joints should be staggered, for this the next one must start with half the sheet or the remaining segment. Docking tongue-and-groove plywood requires considerable effort. To do this, use a piece of the bar, apply it to the edge and connect the spike and groove with strong hammer blows. Apply blows alternately on each side, do not allow sheets to be skewed, remember about damper gaps.


Step 6 Mark the edges of the sheets protruding beyond the contour of the lag. It is better to use a coated thread, carefully cut off the excess along the line.
Important. Be very careful with electric woodworking tools. Injuries from them are complex, can cause disability. Tools must be serviceable and adjusted, and cutting devices must be sharp. Never remove factory guards.

Step 7 Proceed to sealing the opposite edge of the floor. The work will go faster if you do not take the dimensions of each sheet, but attach the whole ones. Then you should measure the width of the protruding pieces and transfer the lines to the front surface. Cut off the excess according to the marks with an electric saw.
For the final sheathing of the subfloor, you can use most of the previously obtained segments, due to this, the estimated cost of a wooden house will decrease.

How to avoid mistakes during the construction of the subfloor
The main advice - do not try to simplify existing technologies on your own. Only an amateur thinks that he is smarter than everyone else and can do the work faster and cheaper. All rules were developed taking into account many years of building experience, each technological operation has its own specific purpose. An improperly laid subfloor causes deflections and squeaks.
- Before starting work, check the position of the lag. The distance between the lags should not exceed 58 cm, this will allow you to tightly lay the insulation.

- No need to save on the size of the beams. During the operation of the house, it becomes necessary to install heavy furniture, the likelihood of increasing loads should be foreseen in advance.

- In the place of laying a brick oven, always reduce the distance between the logs or beams. During construction, use only healthy lumber without natural diseases and defects.
- Boards for the manufacture of the subfloor must have low relative humidity. If the draft floor is laid before the construction of the roof of the house, then work should be done only in good weather. Waterlogged boards not only lose their original bearing characteristics faster, but also shrink in size during drying. As a result, the fastening is weakened, while walking the floor sags and creaks. It is very difficult to fix problems, often it is necessary to completely dismantle the coating.

- If the draft floor is located between the floors of a wooden house, then the cranial bars should be stuffed along the beams. Stuffed across reduce the height of the premises.

- When laying membrane vapor or waterproofing, carefully read the instructions. The material indicates which side it should be to the insulation. The fact is that steam can only go out in one direction, if the fabric is laid incorrectly, then there will be no positive effect. As a result, the subfloor will be constantly wet, and the effectiveness of thermal insulation will noticeably deteriorate.

- Do not save on vapor barrier, cover the lags as well, attempts to cut the roll into small pieces always give a negative result. In terms of footage, the savings are scanty, and the negative consequences are noticeable.

- Always leave a ventilation gap between the rough and finish flooring. At the same time, consider the location for the air outlet vents.

- Practitioners recommend covering the soil under the floor of the first floor with plastic wrap or roofing material. Due to this, the amount of evaporated moisture decreases, the operating conditions of the building are significantly improved.
- A warm draft floor is recommended to be done only under the living quarters of the first floor. There is nothing to save in unheated ones, an expensive complex cake is not needed.
The unconditional implementation of building codes ensures that during the operation of wooden houses there will be no unpleasant situations. Elimination of the consequences of violation of technology in all cases is much more expensive than compliance with the rules for the construction of subfloors.
A high-quality and beautifully made floor is half the success of the repair being performed. There are a great many variations of floor coverings: tiled, linoleum, parquet.
One thing they have in common is that they are all placed on the subfloor.
What it is? By and large, this is any leveled base on which the flooring is laid. Therefore, without any exaggeration, we can say that those who want to lay the floor in the house with their own hands should know the structure of the subfloor as a multiplication table.
Who wants to walk on creaky parquet, stumble over bumps under linoleum, or see furniture shaped like the Leaning Tower of Pisa?
How to make rough floors? It depends on the structural features of the house, and on what type of floor the developer chooses. According to the manufacturing technology, they can be divided into "wet" and "dry" methods of floor installation.
Dry way
Draft floor on logs. Logs are wooden bars on which the floorboard or flooring is attached.
The installation of this floor takes much less time than the manufacture of a cement screed coating, and is much easier. Plus, the installation is carried out without the use of water. This means that the humidity in the room does not rise, which allows you to carry out other finishing work. Logs are placed on beams, or on a concrete base.

Installation of subfloors along the logs is not very difficult, but certain rules must be observed:
- We produce horizontal floor markings. You can pull the cord across the lag at the level found, and proceed with the installation. Or throughout the work, constantly check the horizontal level.
- Make sure that the wood to be worked on is well dried.
- Place the simplest waterproofing under the logs to protect the floors from condensation that can form on a concrete base.
- We determine the distance between the lags according to the expected load on future floors. For residential premises, this is 350-450 mm. The size of the lag varies: in width from 80 to 100 mm, and in thickness from 25 to 60 mm.
- If the reinforced concrete floor is uneven, then the logs are fixed on linings. For this, it is most convenient to use pieces of plywood. So that the linings do not slip out from under the lag, they are glued together with glue (such as PVA) after determining the desired thickness.
- A hole is drilled for the dowels in the base of the floor. A plastic dowel is hammered into the hole, after which the lag is screwed to the base with screws.
- If necessary, use a heater.
- Chipboard is most often used as subfloor flooring. For rolled floor coverings, it is better to take a solid slab. Under the laminate, you can take chipboard of medium hardness.
Draft floor on adjustable joists. This method of installation attracts more and more supporters. It is carried out with the help of plastic screw-racks, which are a development for our military industry.

They are very reliable and strong. Such floors do not creak, are quickly mounted (100 square meters in 2-3 days) and their verticality can be set like furniture legs. The lags do not touch the floor slab, which is undoubtedly a big plus.
It is mounted as follows:
- Each lag is prepared separately. A hole is drilled in it. Where does the screw stand go.
- The lag is placed in the required place. The distance from the wall to the log is 10 mm.
- Fastening the log to the base begins with the extreme screw-racks.
- The screw-stand is hollow. Through it, the base is drilled 45 mm deep, and a dowel is placed there. We hammer in the dowel nail. With a special tool, we adjust the desired position of the log, tightening those screw-racks that are necessary.
- Further, everything is as on a regular floor on logs.
As a variation of the floor on adjustable joists, the floor is made of plywood on special bushings with internal threads. They are inserted into holes drilled with a pen drill. On a standard sheet of plywood - 16 holes.
It turns out that the sheet of plywood stands, as it were, on legs. At the same time, it withstands about 5 tons per square meter.
Draft floors with dry screed. They are convenient in that they equalize the unevenness of the floor well. And you can mount it all year round, regardless of the temperature.

The technology of the device is as follows:
- A vapor barrier layer is laid on the base of the floor. Secure with adhesive tape. Near the walls, the film should rise to the level of the dry screed.
- Then the backfill is laid: perlite, silica or quartz sand, slag, etc. The size of the granules is 2-5 mm, the moisture content is not more than 1%.
- The backfill is leveled with a rail to the marked level.
- Dry screed boards are laid: chipboard boards, waterproof plywood, gypsum fiber sheets. They overlap with each other.
Wet mounting method
Floor screed. This method is quite common, since the materials are relatively inexpensive and are always on sale.

Perform them as follows:
- The base is cleared of debris. Lay hydro and thermal insulation.
- With a step of 2 m, beacons are fixed - special steel slats. With their help, the horizontal screed is maintained.
- The prepared solution is applied in portions, and leveled with a rule and a trowel.
- A top coat is required if the finished floor is made of delicate materials. Most often, self-levelling compounds up to 15 mm thick are used.
self-leveling floor. This is the name of the rough floor, when the rough and finish screed are performed in one process.

A fluid solution is poured onto the prepared base (cleaned and primed) and leveled with a special spiked roller that removes air bubbles.
The thickness of such a cement-polymer floor is from 0.5 to 3 mm, so the drying time is much less than that of a cement screed - from several days to two weeks.
Draft floor in a wooden house

Features of his device:
The underground must be well ventilated and dry. To do this, holes for ventilation are arranged in the foundation. It happens that the soil in the basement is damp, then it is necessary to lay a waterproofing layer of clay or concrete.
Waterproof the foundation with roofing felt, or other material with similar properties.
It is necessary to treat beams, crowns, logs, floorboards with an antiseptic. We must not be too lazy, and do it twice, with a break of 5 hours. Pre-wearing protective equipment.
Laying the subfloor in a wooden house is done using boards.
There are several methods for laying boards:
- In the grooves of the beams. Beams resemble the shape of the letter "H"
- Laying on the shoulders of the beams. In this embodiment, the beam is similar to the letter "T"
- Laying on cranial bars. The most common method, because the simplest. The bars are nailed to the edges of the beams, and boards are placed on them.
Instead of boards, slabs can also be used. He is able to withstand the load from the insulation.
On top of the boards, waterproofing, insulation, and at the end - vapor barrier are mounted. The draft floor is ready.
The load from the building falls on its foundation. The structure that precedes the finishing coat and serves as the basis for the insulation is the “subfloor”. The temperature regime of your room depends on how it is installed. If cracks remain in it, then cold air will begin to flow from below, dampness and the smell of rot will appear in the house.
Description
When choosing a material for the load-bearing beams of the floor structure as a whole, consider the area of \u200b\u200bthe room for which it will be intended. The larger it is, the thicker they are. This factor is explained by the fact that the finish coating and all materials that are involved in the installation process must be evenly distributed on them.

How to make a draft floor in a wooden house
There are several options for its formation, but more often they use the "dry" method.
The draft floor is formed according to the following principles:
- According to the lags.
- "Prefabricated", using a dry screed.
- "Adjustable" (on plywood and chipboard).

"Prefabricated" subfloor

"Adjustable" subfloor

If the boards are laid on logs, then they are laid on the following base:
- Beams.
- Reinforced concrete slab.
The adjustable floor is formed on the following grounds:
- Logs.
- Plywood.
What do you need to know?
It is laid on the floor main floor, using less hard woods. These include coniferous varieties. These are the following types:
- Cutting board.
- croaker

In order to achieve the expected results from the installation done, you need to know the following:
- The basis of the entire floor structure is a beam, which is laid on a waterproofing layer (two layers of roofing material).
- A rolled protective material or 2 layers of high-density polyethylene is spread on it.
- Logs are attached to the timber, which serve as a frame for mounting. They are not brought to the walls, leaving a gap of up to 30 mm. This distance will be insurance against possible shrinkage of the soil (changes in temperature and groundwater levels in the soil) and natural fluctuations in the moisture content of the log during its operation.
- The artificially created free area between the wall must be filled with mineral wool.
- The whole tree must be treated with antiseptics and fire retardants. If ready-to-use materials are purchased, then the cuts made must be protected from moisture and bark beetles.
Do-it-yourself draft floor in a wooden house
For work, a board with a thickness of 15 to 20 mm is used. Properly prepared on milling machines, the source material will create grooves and shoulders on its side. This option will eliminate the work with a hammer and nails, which will speed up the assembly process and the tightness of the connection. The rigidity of the structure will not create a creak.
The thickness of the board for the subfloor affects the distance (step) between the lags. The larger it is, the wider this gap. For example:
- With a board thickness of 40 mm, the step between the lags can reach one meter.
- With a thickness of 35 cm, the step between the lags should not exceed 850 cm.
- With a thickness of less than 35 cm, the step between the lags should not exceed 60 cm.
Of great importance is the correct location of the foundation pillars. They are located around the perimeter and in the central part of the building.
The thickness of the log is directly related to the step of placing the foundation pillars, since the main beam is attached to them.
The following ratios between the dimensions of the lag and the pitch of the foundation pillars, expressed in centimeters, should be observed:
- Logs 40 thick with a step no more than 900.
- Logs with a thickness of 50 at a step of 1100.
- Logs with a thickness of 60 at a step of 1300.

Subfloor installation using plywood
The sequence of work is as follows.
- Beams are placed on a layer of waterproofing.
- Roll material is laid on them, providing protection from moisture.
- The lags are fastening.
- They are lined with a plywood sheet 10 mm thick or moisture resistant boards (MDS, VAT).
- The seams of the connection are closed with construction tape or sealant is poured.
- Close the subfloor with a layer of vapor barrier.

For insulation from condensate from the side of the room, the following materials are used:
- cement mortar.
- Thick cellophane in 2 layers.
- Roll foamed polyethylene based on foil (lay foil to the room) and other materials.
An air barrier must remain between the vapor barrier and the floorboarding. Through the holes in the foundation (air), the subfloor must be ventilated.
Before applying, isolate pipes and meters with construction tape. Apply in layers using a brush, roller or rubber trowel. Pay special attention to hard-to-reach places. After the first layer, self-adhesive tape must be applied to all joints and joints. The second layer will close it. The composition should be partially applied to the wall (its lower part).
There are other materials for such work. Roll foil insulation can be used, which will simultaneously contribute to noise isolation and heat preservation in the room. They are overlapped with a metal part towards the room.
Video: Proper installation of the subfloor
Conclusion
This type of "dry subfloor" can serve as the basis for the formation of the main coating. In some cases, for laying a parquet board or laminate, the finished structure is covered with a layer of waterproof plasterboard.
Video: How to make a subfloor from plywood?


The arrangement of a wooden floor is recognized as the most time-consuming, expensive and complex, since any structure made of wood should be protected from direct contact with concrete. Otherwise, the floors will become unusable in a short time, and they will need to be replaced. Using some impregnation, you can protect the tree from decay. Chemical protection methods are very effective and prevent the process of material deterioration. However, a wooden structure impregnated with chemicals cannot be considered environmentally friendly. Considering that it is because of this indicator that a tree is chosen, few people use chemistry. When laying on concrete, waterproofing is required over the entire area between the layers. Fasten the wooden flooring using metal squares to create a gap between the bases and the joists.

The subfloor denotes certain bases, which by themselves form an ideal surface for laying the final floor. It is created to ensure the distribution of loads directed to the floor covering.
In wooden structures, draft floors are made by three methods:
- wooden on logs;
- pouring concrete;
- use of plywood flooring.

Wooden floors on logs
In a wooden house, the subfloor device does not differ from the installation of similar structures in a monolithic or brick structure. The only feature is how the lags are attached:
- There is no need to fasten the logs to various wooden boards. The best option is to strengthen them to the basement or grillage of the foundation, retreating a couple of centimeters from all the walls. The distance from the support must be at least 11 cm on all sides of the lag.
- Before laying the base, lay the strapping from below, which is made of a long and thin board. Logs are attached to it using metal anchors. They do not need to be rigidly strengthened with strapping. It should only be fixed so that they do not stagger while working on another layer of the floor. This design will have a few centimeters indent from the walls.
If the distance is less than 11 cm, then it is better to crash into the walls. But before that, it is necessary to make the initial laying on the base, then you should attach a choice of timber or logs. It is necessary to first measure the contour of the cutting site, then cut in the tree the dimensions necessary for the groove, which will be required for the support function.
Important: it is recommended to add about 2cm to further widen the lag. It must be remembered that the laying of the log and beams is done on the grillage or plinth when the laying of the waterproofing layer is completed.

The standard steps between two lags are 40-60 cm. However, when choosing, great emphasis is placed on the width of the insulation and the required load. Based on this, the choice of the lag section and the acting load is made. With small sizes, the sections should be approximately 15x10, with heavy loads - 15x20, with medium ones - 15x15 centimeters. In case of excessive load action, if the beams have a small section, it is desirable to provide section parameters of 30x40 cm.
Installation of subfloors on logs
When the installation is done, you will need to do the standard installation. It is carried out in several stages:
- It is necessary to fix the cranial bars. They have small sections (approximately 4 by 4), they are fixed in the lower parts of the log from the side. Professionals recommend replacing the cranial bar with boards that will have more lags in width. They will need to be nailed either along or below the lags.
- Boards should be laid. They need to be laid on the cranial bar, but not fastened. Considering that their main task is to fix the insulation, they are left to lie freely.
- Waterproofing. Lay it on the subfloor. This is done to avoid additional load. The waterproofing is laid so that it goes onto the wall at the level where the floor will be in the future. It is recommended to use film insulation, and use a stapler for fastening.
- Thermal insulation - laid on waterproofing.
- Vapor barrier. Lay in the same way as waterproofing.
- Ventilation. To create a ventilation gap, you only need to break through the counter rails along the lag on top of the vapor barrier.
- Coating. At the final stage, it is proposed to use chipboard sheets, as well as boards. From the wall, the logs must be separated by a gap of 2 cm. They will then be placed heaters.

On our site you can find contacts of construction companies that offer house design services. You can directly communicate with representatives by visiting the exhibition of houses "Low-Rise Country".
Video description
Read more about floor insulation in a wooden house - in this video:
Rough plywood floors
The floor in a wooden house is one of the most reliable options, because it has a high hardness. Plywood is also used for flooring. If it is well sanded and varnished, it looks expensive. But in most cases, it is then covered with linoleum or parquet flooring.
Plywood can be laid in one of two options:
- On a cement base. It will be necessary to provide a horizontal and even base or use leveling stands.
- Attach to the legs. The main thing is to correctly set the lags to ensure that the joint of the sheet hits them. The joists must be set in such a way that the top surface provides a straight line. They then remove the insulation and sound insulation.
Need to know! When laying plywood in 1 layer, it is necessary that it be at least 15mm thick, if there are 2 layers, the minimum thickness should be at least 9mm.

All debris and dust must be removed from the base prior to final laying. If possible, priming should also be done - primer treatment. Plywood must be fixed with glue, and the head of the self-tapping screw must be drowned.
Concrete floor
Like the draft and finishing floor in a wooden house, the concrete version is less common than the others. The concrete floor has one significant drawback - it is very cold. This problem can be solved with the help of thermal insulation material.
The advantages include durability and reliability. Compared to analogues, it is more even and durable. The concrete floor in a wooden house is also chosen because it is better preserved from destruction.

In a wooden house, a concrete floor is made in 11 stages:
- Lay on the lags.
- Lay on the ground.
- A concrete screed is made on top of the wooden floor.
- The floor horizon is set with marks (it is recommended to pull the cord for accuracy).
- Stakes less than 11 cm should be hammered into the ground, so that later gravel can be poured over them. After that, it should be tamped and the pegs removed.
- Next, the sand is poured.
- Then a large polyethylene film is laid, creating an overlap on the walls. It will act as waterproofing.
- Using slats, it is necessary to divide the room into equal strips. The width of each should be about 1 meter. The height of the installed rail must be equated with the height of the cord. The concrete is then poured onto the prepared surface.
- Concrete is leveled along the rails.
- Next, the concrete should be covered with a film and left to harden for several weeks. To avoid cracking, it is sometimes necessary to spray the mass with water.
- After the expiration of the term, it is covered with a screed of cement and sand.
Materials for processing lags
Some environmental factors, such as dampness, should not affect the lags. Therefore, when providing a floor in a wooden house, it is necessary to protect them from certain factors.
Bioprotective compounds
The drug with a bioprotective composition protects the tree from mold, decay, blue discoloration, beetles and fungi. One application of such funds will provide protection for 27-32 years. You can buy them in the form of a concentrate. Sometimes a pigmenting substance is added to the composition, which makes it possible to control the quality of application.

Bioprotective compounds are praised for:
- environmental friendliness;
- slight odor;
- absence of allergens.
It is necessary to apply preparations before the installation of the floor in a wooden house has begun.
Indelible antiseptic
A great option if the city has high humidity. It is also indicated for use in places with high rainfall, temperature fluctuations, in baths and saunas. Working with antiseptics is simple and not too time consuming. Approximate consumption per 1 meter is about 400 grams. Surface application can be achieved after 4 coats. After completion of work, the color of the tree will become pistachio.
Folk methods
Folk remedies for processing lags:
- Transformer oil. Due to deep penetration into the structure of the tree and embalming, this agent perfectly protects the material.
- Resin. From bugs, fungi and decay, birch resin will perfectly help. Its only disadvantage is the vulnerability to fire.
- Motor oil. Pros - low price, good protection. Cons - too strong smell, sometimes interfering for several months.

Before starting work, you should understand the layout of wooden floors, which consist of 4 “layers”:
- Draft coating.
- Heat and waterproofing layers.
- Clean floor.
- Finishing.
Therefore, when wondering what to make a finishing floor in a wooden house, you must first complete the first 2 stages, which were mentioned above, and start working on the finishing floor.

To make a finishing floor yourself, you need to buy milled boards.
Need to know! The finished floor in a wooden house is laid 5 centimeters above the subfloor.
The floor structure of the first floor in a wooden house is being built in 3 stages:
- Logs are laid - so that the boards can be laid perpendicular to them. The smallest thickness is 25mm.
- The board must be fixed closer to the wall.
- Next, you should use a hammer and a bar so that the boards are as close to each other as possible. With the help of a self-tapping screw, fasteners of each log are carried out through the comb.
Important! If there are plans to change the floor in the future, it is necessary to use a simple mounting option - all floorboards should be fixed from above to the logs using self-tapping screws.

Conclusion
We also recommend
 The longest war in the history of mankind: history, interesting facts Theories of the origin of wars
 Chewing candies ROSHEN Crazy bee
 Picodi: All discounts in one place!
 What is important for an accountant to know about a special assessment of jobs?
 P \ 'five-year plans in the USSR All five-year plans of the USSR
 Scary statistics from the besieged Leningrad