Fences for giving from flat slate. Do-it-yourself slate fence - a budget way to fence a site
Each owner of a summer cottage or the owner of a private house has a need to build a fence or replace an old fence. The costs of a much-needed undertaking are very significant, and this forces those who cannot afford the construction of expensive and solid fences to lean towards budgetary decisions.
An example of a classic slate fence
Budget construction option
A slate fence can be an excellent option if large expenses for such construction are not provided. Despite the fact that this building material is intended for roofing, its use in the construction of a fence is fully justified. Often, when replacing roofing material, an old slate begins a second life as a building envelope: it is in no way inferior to a new one, if painted.
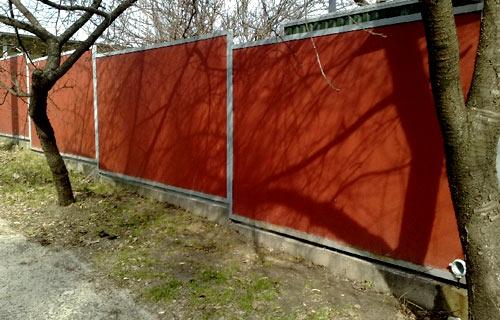
It looks like a painted fence made of slate and a metal corner
This material has a low cost, its installation does not require special skills and is available to everyone.
Therefore, the decision to build a slate fence with your own hands will help save money on the wages of employees. The surface of the slate is easy to paint, which makes it possible to harmonize with the house and the environment. Having settled on this option of fencing the site, the owner can be sure of the durability, cost-effectiveness of such construction.
disadvantages
For all its merits, slate is still a roofing material and cannot be an ideal choice in all respects. We list the main disadvantages of its use:

From the foregoing, we can conclude that the use of such a fence is expedient for delimitation with a neighboring site, but is of little use for the facade border.
Wave and flat slate
The industry produces two types of slate - wave and flat. One of the options for flat slate is pressed. It is heavier, but also able to withstand a greater load. A flat sheet, regardless of whether it is pressed or not, is best taken into a metal clip from the corners to improve the strength properties and give the fence a neat look.
The use of wave slate simplifies the installation process. In this case, you need to be careful and lay the sheets overlapping with the alignment of the waves.

An example of a flat slate fence
How to build a slate fence yourself
If you decide to build a slate fence with your own hands, then the first step is to decide what type of sheets for the fence will be used. After that, measure the length of the planned fence and calculate the required number of poles based on the fact that their step is 2.5–3.0 meters. The number of sheets can be calculated using the total length of the fence and the dimensions of the sheets. Sheets are best purchased with a small margin, because they are very fragile.
Preparation of materials
Before proceeding with the construction of the fence, you need to take care of providing yourself with materials, so that later you do not get distracted and do not buy the missing ones. Here is a list of the main materials:

It should immediately be noted that the given dimensions of the corners and bars are indicative and may be different. The main condition in this case is to ensure the strength and reliability of structures.
Corners should be cut into equal parts. The length of the segment must be equal to the diameter of the pipe, which is used as a column. On the larger side of the corner, holes are drilled for fastening.
Pipe sections that will be in concrete are protected by applying an anti-corrosion compound, then covered with molten bitumen, adding a solvent to it. When working with bitumen, precautions must be taken, since this material is flammable. After bituminous treatment, the pipe section is painted with oil paint.  To work, you will need the following tools:
- A hammer;
- Bulgarian (for cutting slate);
- Drill and drills;
- Spanners;
- Building level and cord;
- Welding machine (if it is decided to weld corners or mount a flat slate fence).
Installation of posts
With the help of a garden drill, it is necessary, observing the given step. In order not to stray from the line of the future fence, you can pull the construction cord and focus on it when drilling. To do this, you need to which the thread (or cord) will be tied.
The depth of the columns should be at least 50 cm.
This is necessary to ensure sufficient strength and stability of the support, since it has a considerable load from guide bars and slate sheets.
After a hole is dug with a drill, the soil must be compacted with a manual tamper (this is a log, at the end of which a bar is nailed like a handle, resembling the letter T).
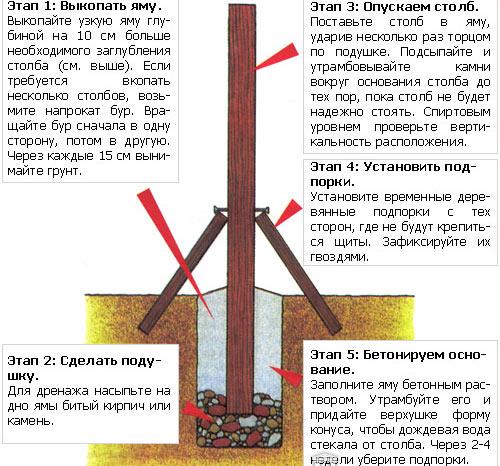
Installation steps for wooden fence posts
Then the column is set. It can be fixed in a hole with broken bricks, if any, or covered with gravel. When it is necessary to ensure its strictly vertical position, referring to the level or plumb. If, under its own weight, the column gives a roll, it must be strengthened with props until the concrete hardens.
How to attach a beam and a corner
After pouring concrete, it is better to wait a week so that it hardens well and acquires the necessary strength. If this is not possible, then it is necessary to withstand at least a day before the installation of the fence begins.
In the pipes above and below, at the level of attachment of the upper and lower bars, holes are drilled according to the size of the studs (bolts). After that, with the help of a hairpin, the corner is attached to the pipe so that its profile resembles the English capital letter L. This method has a positive effect on the rigidity of the structure.
Beam mounting options
The load from the weight of the fence and timber can be directly transferred to the column itself, if the latter is attached to the column at the same time as the corner with a hairpin. To do this, a hole is drilled in the timber, corresponding to the diameter of the stud, then all the elements are pulled together.
Another option is to attach the beam to the corner. In this case, additional holes are drilled in the corner, through which the beam is attracted to it. This operation should be preceded by fastening the corner itself to the post.
Between themselves, the end sides of the beams are connected using a connection, which is called end joiners. To do this, cuts are made at the ends of the bars for half their width.

Sample fastening bars to poles
When combining the bars, their ends are connected like a puzzle, the docking points are fastened with self-tapping screws or bolts.
There is a fence in almost every private house, well, or in almost every one. The owners thus protect their territory from prying eyes. Recently, a lot of new products have appeared, and a slate fence is one of them.
How to choose what you need for fencing?
"How to make a fence from improvised materials"? - You will probably be interested to know the answer to this question, especially if you have your own plot, but there is no fence on it. Many have already adopted the idea of newfangled material and were satisfied. So, for those who have decided in this way to protect their personal space from the prying eyes of strangers, we will talk about slate, which is in no way inferior to other materials that are used to install fences - brick, concrete slabs, wood, metal mesh or corrugated board.
This is a budget option for those who want the site to look beautiful and aesthetic, but do not have large sums for more expensive fencing material. By the way, many people use slate sheets as a fence not only in their summer cottage, but also within the city. And believe me, this option is in no way inferior to more expensive counterparts. And the thing is that now you can order different types of this material and different colors. So, in the construction market you can find ondulin (euro slate), asbestos-cement slate, plastic slate.
Sheets are used mainly as roofing, but no one bothers you to use your skills and imagination in order to install a fence from such a product. Choosing from varieties of slate material for these purposes, you can focus on one that has good plasticity (and is often used for roofs with irregular geometric shapes), or one that has such qualities as super rigidity and hardness. Many, of course, give preference to flexible slate, which is quite plastic - this is achieved by manufacturing products based on bitumen and fibers of various origins.
Flexible slate is similar in appearance to asbestos-cement sheets, is produced in a rectangular shape and may have a wavy surface. Its advantages, first of all, are that it does not rot and can withstand heavy loads, and it can be mounted taking into account the presence of an old fence. In addition, such material can be ordered in different colors and types. However, there are also disadvantages - a short service life - about 15 years, with the need to replace the protective layer after 5 years, as well as susceptibility to combustion.
What fencing options are available?
By the way, you can take a metal analogue as a basis. It is also available in a version with a wavy surface - it does not burn, it is quite reliable, it can withstand strong winds, but there are also disadvantages. It must be periodically treated with special anti-corrosion materials. If we take ordinary slate sheets as a basis, then they have the most significant drawback - they are afraid of mechanical damage, and with a strong impact of a stone, you risk being left with a hole or a crack in the fence. And if you still decide to install such material, then it is better to do this in places where there is less busy traffic.
You can safely protect some territory with such a product inside the yard - in this case, this option is more acceptable. But if you decide to protect your territory in this way, then this is clearly the wrong choice. Ordinary slate will not save your site from penetrations - this, of course, is another minus, and an additional plus is that this material is not afraid of high and low temperatures, heavy rainfall or constant direct sunlight.
So, dwelling on such an option as a fence made of wavy or flat slate, choose, first of all, based not on the appearance of the product, but on its composition and scope.
How to make a slate fence with your own hands - simple and easy!
We will give an example of how to put up a fence made of slate and materials left on the farm after the reconstruction of the roof of a house. This situation, for sure, is faced by many residents of summer cottages - after the repair, whole slate sheets remained, and you would like to use them with benefit in the household. So why not use them as a fence? For this workflow, you need to prepare metal pipes, beams, corners - then your fence will be stable, and you will not be afraid that it will be blown away by the wind.
How to make a slate fence with your own hands - a step by step diagram
Step 1: Prepare materials
We buy timber, corners, metal pipes. The latter will serve as the basis for the fence device. With such a set of materials, it will be stable and will last for many years. The base, of course, can be replaced, but professionals still advise using metal pipes as frame pillars.
Step 2: Mounting the poles
We prepare pits - they are needed for installing pipes. It is better to dig them to a depth of about 50-60 centimeters, and choose a distance of 2.5-3 meters from each other. Metal pipes are cut in advance according to the parameters you need - all of the same length. After that, special holes must be drilled in them - they will be needed for fasteners. In the future, with the help of a bar and a metal corner, you can fix your fence using flat slate or its wavy counterpart.
Do not forget to lubricate the lower part of the pipe, which will be in the ground, with an anti-corrosion coating, and then with bitumen (it must first be melted and diluted with a small amount of solvent). Pipes are placed in holes and filled with concrete. Do not forget, using the building level, be sure to check the correctness of their installation.
Step 3: First installation steps
First, we install two pipes on the sides, and between them we stretch the rope. If the fence is very long, then we recommend using several additional intermediate posts. The main thing is that the stretched cord does not sag. The rest of the pipes are placed, already focusing on the stretched rope. The concrete mortar itself will dry out within 14 days, but if you need to quickly install the fence, then you can continue work after 24 hours.
Next, bolts to the posts should be fixed bars and corners. The corners are pre-cut into pieces (for example, 10 cm long, with the same pipe diameter) and then holes are drilled in them for fasteners. Next, the beam should be fixed together with the metal corner at the same time. After that, all three parts - a corner, a bar and a metal pipe - are fixed to each other.
Step 4: Installing the slate
A bar for a fence made of flat or wavy slate is connected using the "end connection" method - a direct overlay in half a tree, screwed to the corners with ordinary self-tapping screws. Now you can proceed with the installation of the material itself - the sheets are fastened with self-tapping screws to a wooden beam, and first a thin rope or rope is pulled between the posts for a guide. Professionals advise to check the horizontal position with a device such as.
So, the first sheet is mounted very carefully - the final result will depend on the accuracy of installation at this stage (since the first sheet is the main guide vector for the entire fence). Sheets are fixed with screws. If you are installing a wave slate fence, then try to get a proper and strong overlap at the edges. Each installed sheet should align with the previous slight overlap, but on the surface it should look like the new slate sheet is a continuation of the previous one.
When constructing such a fence, it is necessary to leave a ventilated space below - it is not recommended to install sheets directly on the ground. You can leave the fence in a hinged version, or you can mount a small foundation. Just learn that these are additional funds and costs. Here is your fence and ready. Once the fence has been installed, it can be repainted in the desired color. Painting will additionally protect the asbestos cement from bad weather and partially help neutralize the influence of such an element as asbestos (although the harmfulness of this material is still in question).
How to cope with the task?
For those who are faced with such technology for the first time, we want to offer the following "cheat sheet":

Flat slate in everyday life is called sheet asbestos cement. Such products have been known for a long time and are used for the construction of various structures, including enclosing ones. A fence made of such material is considered one of the cheapest. In order to have no doubts about the advisability of using these products, let us briefly dwell on the advantages of such fences.
Features of slate fences

- The arrangement of the foundation is not required, as for brickwork.
- Small construction cost. If you focus on averaged data (they are different for each region), then, for example, about 720 rubles will have to be paid for a sheet measuring 3.5 x 1.5 (with a thickness of 10 mm). The same sample of 12 mm will cost around 1,000 rubles. And if we take into account that no special equipment or equipment is required, the services of professionals, then there is a cost-effectiveness of such an option for erecting a building envelope.
- During operation, flat slate does not need regular maintenance. Anyone who has encountered wood fences knows how much time and effort has to be spent on processing the material with various special compounds - flame retardants, antiseptics. Asbestos cement is only enough to paint, although some owners do not even do this. By the way, if you consider how much work it costs to paint a picket fence, then here the “plus” of flat slate is obvious.
- Maintainability. It makes no sense even to compare which is easier - to replace a slate sheet or a reinforced concrete slab in the fence. And the process of restoring the integrity of brickwork is even more difficult.
- For those who do not like the curious looks of their neighbors towards their site, such a fence will provide reliable protection in this regard.
Flat slate fence construction technology

We will not dwell on the process of preparing the route - how and with what to clean it, how to make markings. Each owner has his own piece of land, and he himself will determine the amount of work. Therefore, we will consider only the main stages of construction. A zealous owner himself will think of what and how can be improved.

As such, it is more convenient (in terms of fastening sheets of asbestos cement) to use metal pipes. The places for the holes are determined based on the dimensions of the products, since the greater their weight, the more often the posts should be placed. But at the same time, the length of the profile used must be taken into account.
The pipe installation process is very simple. At the bottom of the hole, a small layer of fine gravel (gravel) is poured interspersed with coarse sand. Such a "bedding" is well compacted. After that, a support is installed in the hole, aligned vertically, and the same gravel is backfilled. Moreover, it needs to be “loaded” in small parts, at the same time spilling cement + sand with a solution (preliminarily ramming the next portion of crushed stone).
By the way, this is not required. As a rule, its installation is carried out if it is planned to tile the area. But this work is also quite simple. A shallow trench is dug between the pillars and exactly the same “filling” is made as in the holes. The elements of the curb are laid on top and fixed according to the same method.

Since the slate fence is located in the open air, it is better to use "galvanization". The blanks are fixed on poles in such a way as to form a frame on which sheets of asbestos cement will be fixed. In fact, these are 2 horizontal guides going from support to support. As an option, at the bottom, additionally install a corner on which the sheets will rest. This will also protect the lower sections of the slate from mechanical damage.
For greater reliability of such a “skeleton”, it is advisable to install vertical racks from segments of this material between the profiles (at a certain distance).
As fasteners, the so-called farmer self-tapping screws are used.

Holes for fasteners are pre-marked and drilled in the material. Experts advise fixing the slate with roofing screws. The only thing that is useful from the special tool is a screwdriver. Given the massiveness of the sheets, the work is done with an assistant.
Its peculiarity is that, firstly, it is necessary to work only with well-dried products. Otherwise, after drying, the gap between the samples will become even larger, turning into a decent gap. Secondly, they should not be placed too tightly, since when wet, the slate slightly increases its dimensions. And the owner determines the specific interval between the sheets himself, taking into account these recommendations.
- Surface Finishing
- It is necessary to think over how to “disguise” the ends of the fasteners sticking out from the back of the slate fence. Most likely, a coat of paint will be enough.
- External finishing of sheets.

- Sheet asbestos cement has a porous structure. And since any fence is a structure placed outside buildings, in the open air, experts recommend painting flat slate. Acrylic paints are most suitable, as they have good water-repellent properties. In addition, their elasticity ensures that during operation the coating layer will not become covered with cracks and will not begin to “shaggy”. On sale there are even special compositions designed specifically for painting slate fences.
- There are recommendations to deepen the lower sections of the sheets, then you do not have to deal with the device of the curb. Of course, each owner himself decides the feasibility of just such an installation of slate, but one should not forget that the material is able to absorb moisture. Therefore, the usefulness of this advice is questionable. Including, in terms of the maintainability of such a fence. It is better to mount the sheets so that there is a small gap between them and the soil.
- Determining the depth of the holes, it is necessary to focus on the load that the supports will experience. This is not only the weight of the sheets, but also, for example, gusts of wind. Also, will lighting fixtures be attached to the poles? There are many nuances.
- To connect the fence with other structures (for example, a building), a corner is attached to their surface (vertically).
- It is not recommended to use a wooden beam (instead of a profile) for fixing sheets, since the service life of any wood is limited.
Do-it-yourself flat slate fence
Flat slate in everyday life is called sheet asbestos cement. Such products have been known for a long time and are used for the construction of various structures, including enclosing ones. A fence made of such material is considered one of the cheapest. In order to have no doubts about the advisability of using these products, let us briefly dwell on the advantages of such fences.
How to make a slate fence with your own hands
 Slate is not a very durable material, its direct purpose is installation on a roofing device.
Slate fences are most often erected for temporary site fencing or enclosures for pets.
Preparing to install a slate fence
Necessary material for the construction of a slate fence:
- Slate, wave or flat. Flat is easier to attach to the frame, unlike slate with waves.
- Steel pipe for racks, up to 100 mm in diameter. A larger diameter should not be used, a smaller one can, although this will be at the expense of structural strength.
- A wooden beam, 100 by 50 mm in size, to which slate sheets will be attached.
- The corner is metal, size 85 by 50 mm, it will serve as a frame for attaching a wooden beam.
- Fasteners - studs, self-tapping screws.
- Cement, sand, crushed stone for the preparation of concrete mortar and the installation of posts.
Installation of slate fence posts
Having marked the contours of the future fence, you need to install corner posts. We dig holes for posts, their depth should be at least two bayonets of a shovel.
Then you can immediately prepare concrete for pouring the first columns. Next - cut the pipe, which will act as columns, into identical pieces. The length of the pieces depends on the height you planned, plus the size that will go into the hole.
Then we proceed to the installation of the columns: we lower them into the pits and burst them with a boot. Immediately try to align the posts vertically with a building level. When the post is installed, you can fill the hole with concrete.
Having installed all the corner support structures, stretch a twine between them and prepare holes for the next supports along it.
We fix the corner and timber for the future fence
The concrete poured into the pits should set well, usually a week is enough for this.
After this time, you need to cut the corner into equal parts. The size of the parts should be equal to the diameter of the pipe used or slightly larger.
After that, you should drill holes in the pipe for the diameter of your studs. Holes are drilled at the top and bottom of the pipe and, accordingly, in the center of the corner piece.
Attach the corner to the support with a hairpin in such a way that a shelf is obtained, into which the beam will then lie. This fastening method makes slate fences strong and rigid.
There are two options for installing the beam. At the first, when you fasten the corner to the support with a hairpin, the beam should also be drilled to the diameter of the hairpin and immediately tighten the structure with a hairpin. The beam will be held directly on the support, pillar.
In the second option, secure the corner with a hairpin, tighten well. After that, drill holes in the corner shelf, which is adjacent to the post, and through these holes, pull the beam to the corner.
We fix the sheets of slate
When the frame is ready, you can start installing slate sheets. Self-tapping screws for corrugated board are suitable for their fastening.
Using a nozzle for the head of a self-tapping screw, a drill or a screwdriver, fasten the sheets to the timber. If you have a flat sheet, then join the ends and drill the sheet through into the timber. If the slate is wave, overlap one or two waves.
If you need to cut the sheet, use a grinder and a concrete disc. For the accuracy of fastening the sheets, it is recommended to pull the thread from the first installed sheet to the corner post. This will allow you to control the assembly of the fence and fasten the sheets evenly.
The slate fence should be painted, this will protect the sheets from the penetration of moisture and the settlement of the fungus there.
Do-it-yourself slate fence in one day (video), With Your Hands - How To Make Yourself
How to make a slate fence with your own hands Slate is not a very durable material, its direct
How to build a slate fence with your own hands
It is easy to build a fence from an inexpensive and reliable material. It is enough to deal with fasteners, markings and a plan for future construction. For example, a slate fence will last longer than an untreated board. Yes, and in the private sector they even try to use old roofing material - you can make a fence from the back of the site from it. It turns out that both new and already used slate is suitable for work.
Features of using slate for the construction of a fence
Slate is one of the simplest and most inexpensive materials for making a fence. Moreover, any side of the fence will look neat. Modern slate is suitable for both rural areas and for houses in the city.
The slate is made of asbestos cement, so there is no need to wait for maximum strength. It is easy to guess that even the thinnest iron is more stable. However, there are developments in the use of slate. It is advisable to place the front part of the fence away from the road so that random debris from under the wheels does not damage the sheets. And the usual barriers between neighboring areas are easiest to make from slate, even one person can handle such work.
This material has been known for a long time. It is obtained by mixing Portland cement, asbestos and water. Evenly distributed asbestos fibers form a strong mesh that increases the impact strength and tensile strength of the material.
Advantages and disadvantages of using slate fence
- low cost;
- average fire resistance;
- the possibility of decorative processing with any paint;
- simple installation.
- asbestos in the composition is not an environmentally friendly material;
- explodes when heated;
- service life depends on the specific location. And the lower the temperature in winter, the faster cracks will appear. If you protect with acrylic (paint), then the service life will increase;
- protection is required when working with slate. Construction respirators must be worn so that dust does not enter the respiratory tract.
Types of slate used for fences
Wave sheets created from asbestos cement have a curly shape. The material has the following advantages:

Flat sheets of slate have the same composition, the difference is only in the form.
Both types of slate have flaws that can be ironed out. The appearance of the material deteriorates somewhat over the years, fades, fades. However, if you cover it with special substances, this can be prevented.
Flat or wave slate for a fence is a weak, more precisely, material that is fragile in bending. Do not forget about the weight of such a building unit, it is quite large compared to the same metal sheet.
If you decide to buy slate, and not use the old one from the roof of a house or outbuilding, then you should keep in mind that it is easier to mount and ship flat sheets.
Do-it-yourself slate fence installation
Making a slate fence is easy. On a not very large area, such work can be done in a few days.
Preparation for construction: marking the territory
There is no important feature in the layout of the slate fence. This working moment is the same as the layout for any type of fence. To begin with, it is worth clearing the part of the territory where construction will be carried out. Next, you need to pull the thread and install it in such a way that along the entire length it repeats the line of the future fence. The markings are usually fixed to pegs, posts, steel reinforcement or any other remnant of building material. Accuracy in size and the location of the thread along the entire length of the future slate fence is the main requirement for marking.
When calculating the building material, it turns out the required number of pillars for the entire fence. In the process of marking, it is necessary to accurately put a landmark in their place. A specific distance is maintained between each pillar, with a careless attitude to this stage, further work will only become more difficult. After all, all sheets of slate have the same size. It is under him that they plan to mark the pillars.
When buying a new fence material, many prefer flexible slate. It certainly won't be blown away by strong winds. Such a building material has a rectangular shape, its surface is either flat or wavy. The downside is this: the declared service life is only 15 years, and every 5 years it is necessary to replace the protective layer. The interior of the flexible slate is subject to burning.
The standard dimensions of wave slate are 1750 by 1135 millimeters.
The long side of the sheet is usually attached horizontally. Wave material must be mounted on an overlapping fence, for which there is a margin of 125 mm. This makes it easier to calculate the length of the fence. It is easy to guess that for 1 meter of construction you will need one sheet, set horizontally by a wave.
Interestingly, it is when working with wave slate that you should not be afraid of incorrect marking, because the sheets can hide all the errors between the pillars.
Flat material is available in four sizes:
- Length 3 meters, width 1.5 meters.
- Length 2 meters, width 1.5 meters.
- Length 1.75 meters, width 1.13 meters.
- Length 1.5 meters, width 1 meter.
Most often they try to buy the third option, paying attention to the thickness. This parameter should be equal to 10 mm, then the sheet itself will weigh 40 kg. For comparison: a thickness of 8 mm is already lighter - 30 kg.
Calculating the amount of material is very simple: you need to measure the total length of the fence and divide by one sheet. More precisely, by the amount that remains without overlap. Having received the required number of units, it is necessary to purchase with a margin of 2 or 3 pieces.
An example of calculating the number of sheets of wave slate
Assume that the total length of the perimeter is 40 meters. The wave slate 1750 by 1135 mm in the amount of 40 units is being worked on (the working surface of one sheet is 1 m). With a margin, they buy not 40 sheets, but 42-43, because marriage and mistakes in construction are inevitable.
When installing on your own, it’s better to work in pairs, but you can’t do it without the following set of tools:
- grinder or screwdriver with a cutting nozzle;
- drill;
- welding machine;
- spanners;
- levels;
- plumb;
- construction hammers;
- fixing bolts.
Step by step guide to making a slate fence
The work is performed in the following sequence:
- Using a hand drill around the perimeter of the marking, arrange holes for the poles. When there is no such tool, they take an ordinary shovel to work and carefully dig deep, but not wide holes. They try to make sure that further pouring with a solution is economical. Pits are made one third of the length of the pillars.
Finishing and decorating a slate fence
It is not difficult to protect, decorate and maintain this type of fence. It is enough to follow some established rules:
- The slate sheet is not attached to the very surface of the earth. They maintain a distance of 10–15 centimeters from the lowest point, arranging a special backfill below. Thus, the material will remain dry.
Any mechanical damage to the slate is thought out in advance, otherwise its service life is reduced several times.
Slate was invented for roofing, but it is not always worth creating reliable fences or barriers from it. They stop at this material only if there is a large residue after construction or there is no suitable modern material in the store. Although in the backyards of the countryside, where the likelihood of theft of good material is too high, nailing old slate to the poles will be the best solution.
How to make a slate fence with your own hands - step by step instructions, construction options and decorations with photos and videos
How to choose the right slate for the fence. How to make measurements and calculations. Step-by-step instructions for installing a slate fence with your own hands.
How to make a slate fence with your own hands: installation options and features
 Asbestos-cement slate for site fencing is not often used. Bad publicity served him the habit of using the "residual principle". Many cottage owners put old roofing slate covered with moss and nail holes on the fences. Their neighbors, looking at its unpresentable appearance, choose other options for fences.
If, however, you approach the matter competently, without trying to save on the fence due to the outdated roof, then slate can successfully compete with other types of sheet materials.
We set the goal of this article to consider the advantages, features and examples of slate fences. We hope that after getting acquainted with them, many readers will change their attitude to this material.
Slate fence. More advantages than disadvantages
So, what is good about a fence built from flat or corrugated slate?
- Firstly, such a fence is durable and unpretentious in maintenance. The service life of high-quality slate is measured in decades. At the same time, it does not rot, does not rust, does not collapse under the influence of frost and heat.
- Secondly, the price of a slate fence is low.
- Thirdly, the installation of this material is quite simple and does not take much time.
- Fourthly, with a creative approach, the appearance of a slate fence is not inferior to more expensive materials (stone, wood, polycarbonate, metal).

The only serious drawback of asbestos-cement slate is its relative fragility. From a strong point impact, it bursts. You can restore a damaged sheet either by using steel plates (flat slate) or by replacing (wavy).
The choice of options for asbestos-cement slate for the fence is not too large. Anyone who wants to save money buys standard material with a sheet size of 1.75x1.125 m (8 waves) or 1.75x0.98 (7 waves).
In the nomenclature of flat slate used for fencing, sheets of 1.0x1.5 m in size are in greatest demand; 2.0x1.5 m; and 3.0x1.5 m.
Examples of slate fences
When deciding which slate is better to build a fence from, you need to familiarize yourself with the existing options for its installation and decoration.
Wavy slate is most often placed on horizontal runs from a profile pipe, a wooden bar, or a combination of "steel corner + wooden lath". Runs are fixed on steel (less often asbestos-cement) columns concreted in the ground or strip foundation. To fasten the runs (lag) to the racks, metal studs, self-tapping screws or welding are used.


Flat slate is mounted in two ways:
- On horizontal runs from a profile pipe.
- Within the framework of a steel corner.
The first installation method is no different from the installation of wave slate.

The frame mounting option is more reliable. The corner creates a frame that protects the edges of the sheet from chipping. Using a frame allows you to refuse to drill holes in the slate that weaken the sheet. The frame is welded to the post. After that, a sheet is inserted into it and fixed from falling out with short steel plates welded to the corner.


In this photo we see another option for mounting slate. No corner frame is used here. Sheets with pins are attached directly to the posts. From below and along the upper cut of the fence a corner was launched. The joints of the sheets are covered with a steel strip welded to the corner.
It should be noted one more, not the most successful, way of installing flat slate on a fence - the use of mounting eye plates. Holes in the edges of the sheet and the installation of a heavy 4-point slate increase the risk of chipping.

Everything is clear with the installation, but where is the promised beauty? the reader will ask. Indeed, it is time to move from the technical side to the aesthetic. It is not difficult to make a wave slate fence attractive and boring. To do this, it is enough to buy colored material.

Monochromatic fencing is not for everyone. Therefore, we recommend purchasing slate in different colors and fixing it on the fence, as on an artist's palette.
A good option is to paint the slate with special paints. They can be used not only for continuous tinting. The fence looks very nice, on the sections of which an ornament or a landscape is drawn.

If the family has small children, a nondescript fence can be painted by drawing fairy-tale characters. This decoration will certainly please the kids and create a cozy atmosphere.

Slate goes well with stone. You can find original types of fences in which these two materials are successfully combined.

In addition to asbestos cement, plastic and metal slate is actively used for fences. Plastic allows you to build a light translucent fence.

Metal slate is a well-known corrugated board. Unlike asbestos-cement sheets, it is not limited to a dimensional standard. This allows you to build fences of any height from it. The methods of attaching plastic and metal to the fence are similar to the technology for mounting slate from asbestos cement.

Features of self-installation of a slate fence
As we said at the beginning of the article, making a slate fence with your own hands is not difficult.
Preparatory operations include:
- Digging or drilling holes for posts. Their depth depends on the height of the fence, the type of soil, the strength of the wind prevailing in the area and can range from 60 cm to 1 meter. The size of the pits in the plan should be 20-30 cm larger than the cross section of the columns for high-quality concrete compaction.
- Concreting of racks in pits. This work begins with the installation of corner posts. Carefully leveling them in level and plumb, pour the concrete mixture. After it is set, a cord is pulled between the racks and ordinary posts are placed along it.
- The next stage is the installation of runs. They can be fixed to the outer plane of the posts or flush with it. Fastening is carried out with self-tapping screws or using welding.


How not to install slate?
Despite the ease of installation, in practice there are many errors and curious situations. We will consider a few of them. Runs for the installation of heavy slate must be rigid and durable. Despite this requirement, some site owners manage to use a thin plasterboard profile for this purpose.
Believing that the weakness of the profile can be compensated for by a large number of holes for fastening, they weaken the strength of the sheet.

The second typical mistake is the fastening of the slate not in the upper rigid part of the “wave”, but in the lower, most brittle one. For clarity, we present a diagram of the correct fastening of the sheet to the frame of the fence. It is taken from the technology of mounting roofs.

It can be seen from the figure that a self-tapping screw or a nail, with which the slate is attracted to the run, must have a rubber gasket to exclude the hard point pressure of the metal on the fragile sheet.
How to make a slate fence with your own hands: installation options and features
What is good about a slate fence? Examples of slate fences and their features, Features of installing such a fence with your own hands.
Installing a slate fence around the house with your own hands is within the power of every homeowner. This is one of the easiest to install and cost-effective options for fencing the site. The slate fence will look good both on the summer cottage and on city streets.
Varieties of material
When planning to install a slate fence on your site, it must be borne in mind that this material is quite fragile and is afraid of mechanical damage. In addition, it should be understood that such a fence is not a very reliable means of protection against unauthorized entry.
When installing a wave slate, the connection is overlapped by 1-2 waves, so that each subsequent sheet looks like a continuation of the previous one. For cutting sheets, a grinder and a disc for concrete are used. If flat slate is used, then each sheet can be “dressed” in a frame of metal corners. This will significantly strengthen the entire structure and give the finished fence a more aesthetic appearance.

Despite the fragility of the material, the fence can last for a long time, because slate is not afraid of precipitation, hot sunlight and sudden temperature fluctuations. It does not burn, does not deform, it is not afraid of corrosion and heavy loads. For a slate fence, you do not need to equip a solid foundation.
For the construction of the fence, you can use wave or flat slate. The choice will depend on the desire of the owner of the site. In terms of strength, they do not differ from each other. Only with flat sheets it is easier to work during the installation of the fence.
Even a small pebble that has flown out from under the wheel of a passing car can violate the integrity of the material and harm the appearance. Therefore, slate fences are best placed on those streets where there is no heavy traffic, or they can be used to delimit the territory of the site, for example, between the utility yard and the garden.
Back to index
Stages of building a fence
To build a slate fence with your own hands, you need a little time, a simple tool and simple materials that can be found anywhere.
At the next stage of construction, it is necessary to make the frame of the future fence. To do this, strips of timber or profiled pipes are attached horizontally to the supports. Wood screws are used as fasteners for the beam, and electric welding or bolts are used for the pipe.
For work you will need:
Types of slate: 1 - natural slate, 2 - flat slate, 3 - wavy slate of an ordinary profile, 4 - rubber slate, 5 - ondulin, 6 - nullin, 7 - gutta, 8 - ondura euro slate.
- Bulgarian.
- Drill and drill bits for it.
- Welding machine.
- Set of wrenches.
- Building level and plumb.
- A hammer.
- Cord.
- Slate (wavy or flat sheets).
- Metal corners.
- Metal pipes for supports.
- Bars made of wood.
- Fasteners (bolts, nuts and self-tapping screws with a hexagonal head).
- Bitumen.
- Anti-corrosion composition.
- Concrete.
Work begins with the installation of supports. To do this, holes are dug in the ground with a depth of about 50 cm. This is quite enough to securely fix the pillars. If the farm has a hand drill, then this task can be completed much faster. The optimal distance between the supports is 2.5 m.
Metal pipes, a channel or corners, which are cut into segments, can act as supports. Their length will depend on the planned height of the fence and its size.
Supports are installed in recesses and poured with concrete. It is necessary to pre-treat the metal supports with anti-corrosion compounds or coat them with oil paint in several layers. First, supports are installed at the corners of the site and a cord is pulled between them. Then the rest are placed with a guideline on the cord. The verticality of the installation is checked by a plumb line. Further work can be started only after the concrete has completely dried.
Slate fence elements: 1 - slate, 2 - column, 3 - concrete, 4 - concrete cushion, 5 - backfill, 6 - fastening, 7 - bolt, 8 - nut, 9 - bracket, 10 - plug.
The finished frame must be coated with an anti-corrosion compound. This will protect it from environmental influences and extend its service life.
Next, you should prepare a base that will hold the slate sheets and prevent them from breaking through at the attachment points. It can be a curb poured from concrete, stone or brick laid around pillars. The main thing is that the surface of the base is flat.
Next, you can proceed to the installation of slate sheets. The first is set especially carefully. Because he will set the direction for everyone else. When installing it, you must use the level. The sheets are fastened to the frame with self-tapping screws or slate nails. To make the fastening as accurate as possible, it is necessary to pull the thread from the first sheet to the corner support. This will allow you to control the assembly and fasten smoothly.
First, measurements should be taken to help accurately calculate the amount of material needed. A scheme of the future fence must also be drawn up, in accordance with which the marking of the territory will be carried out. Pegs, reinforcement or other suitable material are installed along the perimeter of the fenced area and thin twine is pulled. All elements of the future fencing will be installed along it. During marking, the installation locations of the supports should be noted.


It is easy to build a fence from an inexpensive and reliable material. It is enough to deal with fasteners, markings and a plan for future construction. For example, a slate fence will last longer than an untreated board. Yes, and in the private sector they even try to use old roofing material - you can make a fence from the back of the site from it. It turns out that both new and already used slate is suitable for work.
Features of using slate for the construction of a fence
Slate is one of the simplest and most inexpensive materials for making a fence. Moreover, any side of the fence will look neat. Modern slate is suitable for both rural areas and for houses in the city.
The slate is made of asbestos cement, so there is no need to wait for maximum strength. It is easy to guess that even the thinnest iron is more stable. However, there are developments in the use of slate. It is advisable to place the front part of the fence away from the road so that random debris from under the wheels does not damage the sheets. And the usual barriers between neighboring areas are easiest to make from slate, even one person can handle such work.
This material has been known for a long time. It is obtained by mixing Portland cement, asbestos and water. Evenly distributed asbestos fibers form a strong mesh that increases the impact strength and tensile strength of the material.
Advantages and disadvantages of using slate fence
Advantages:
- low cost;
- average fire resistance;
- the possibility of decorative processing with any paint;
- simple installation.
Of the shortcomings:
- asbestos in the composition is not an environmentally friendly material;
- explodes when heated;
- service life depends on the specific location. And the lower the temperature in winter, the faster cracks will appear. If you protect with acrylic (paint), then the service life will increase;
- protection is required when working with slate. Construction respirators must be worn so that dust does not enter the respiratory tract.
Types of slate used for fences
Wave sheets created from asbestos cement have a curly shape. The material has the following advantages:
Flat sheets of slate have the same composition, the difference is only in the form.
Both types of slate have flaws that can be ironed out. The appearance of the material deteriorates somewhat over the years, fades, fades. However, if you cover it with special substances, this can be prevented.
http://vamzabor.net/drugie-materialy/zabor-iz-shifera.html
Flat or wave slate for a fence is a weak, more precisely, material that is fragile in bending. Do not forget about the weight of such a building unit, it is quite large compared to the same metal sheet.
If you decide to buy slate, and not use the old one from the roof of a house or outbuilding, then you should keep in mind that it is easier to mount and ship flat sheets.
Do-it-yourself slate fence installation
Making a slate fence is easy. On a not very large area, such work can be done in a few days.
Preparation for construction: marking the territory
There is no important feature in the layout of the slate fence. This working moment is the same as the layout for any type of fence. To begin with, it is worth clearing the part of the territory where construction will be carried out. Next, you need to pull the thread and install it in such a way that along the entire length it repeats the line of the future fence. The markings are usually fixed to pegs, posts, steel reinforcement or any other remnant of building material. Accuracy in size and the location of the thread along the entire length of the future slate fence is the main requirement for marking.
When calculating the building material, it turns out the required number of pillars for the entire fence. In the process of marking, it is necessary to accurately put a landmark in their place. A specific distance is maintained between each pillar, with a careless attitude to this stage, further work will only become more difficult. After all, all sheets of slate have the same size. It is under him that they plan to mark the pillars.
The choice of material and its dimensions
A good construction market or supermarket can offer:
- euroslate, aka ondulin;
- asbestos cement slate;
- plastic slate.
All of these materials are designed for roofing, but are also great for fences. When choosing, you need to focus on the characteristics:
- plasticity;
- stiffness;
- hardness.
When buying a new fence material, many prefer flexible slate. It certainly won't be blown away by strong winds. Such a building material has a rectangular shape, its surface is either flat or wavy. The downside is this: the declared service life is only 15 years, and every 5 years it is necessary to replace the protective layer. The interior of the flexible slate is subject to burning.
Video: flexible polycarbonate slate
Calculation of the required amount of material
The standard dimensions of wave slate are 1750 by 1135 millimeters.
The long side of the sheet is usually attached horizontally. Wave material must be mounted on an overlapping fence, for which there is a margin of 125 mm. This makes it easier to calculate the length of the fence. It is easy to guess that for 1 meter of construction you will need one sheet, set horizontally by a wave.
Interestingly, it is when working with wave slate that you should not be afraid of incorrect marking, because the sheets can hide all the errors between the pillars.
Flat material is available in four sizes:
- Length 3 meters, width 1.5 meters.
- Length 2 meters, width 1.5 meters.
- Length 1.75 meters, width 1.13 meters.
- Length 1.5 meters, width 1 meter.
Most often they try to buy the third option, paying attention to the thickness. This parameter should be equal to 10 mm, then the sheet itself will weigh 40 kg. For comparison: a thickness of 8 mm is already lighter - 30 kg.
Calculating the amount of material is very simple: you need to measure the total length of the fence and divide by one sheet. More precisely, by the amount that remains without overlap. Having received the required number of units, it is necessary to purchase with a margin of 2 or 3 pieces.
An example of calculating the number of sheets of wave slate
Assume that the total length of the perimeter is 40 meters. The wave slate 1750 by 1135 mm in the amount of 40 units is being worked on (the working surface of one sheet is 1 m). With a margin, they buy not 40 sheets, but 42-43, because marriage and mistakes in construction are inevitable.
Necessary tools for building a fence
When installing on your own, it’s better to work in pairs, but you can’t do it without the following set of tools:
- grinder or screwdriver with a cutting nozzle;
- drill;
- welding machine;
- spanners;
- levels;
- plumb;
- construction hammers;
- fixing bolts.
Step by step guide to making a slate fence
The work is performed in the following sequence:
- Using a hand drill around the perimeter of the marking, arrange holes for the poles. When there is no such tool, they take an ordinary shovel to work and carefully dig deep, but not wide holes. They try to make sure that further pouring with a solution is economical. Pits are made one third of the length of the pillars.
- Install poles. Corners from a metal profile or pieces of pipes can serve as a support. These components, together with the pillar, must subsequently be poured with concrete or cement. The distance between the posts is no more than two and a half meters.
- Install veins. Between the pillars, you need to fix horizontal strips, which are usually made of timber, and in budget construction - from poles. These elements must be fixed with screws. If the veins are made from a profile pipe, they are mounted using a welding machine. In the absence of such a tool, you can drill holes in iron posts and fasten any kind of pole to the bolts. When this part of the work is done, it is desirable to protect the fence frame with automotive mastic. Usually they try to apply more than one layer, then the frame structure will be completely protected from corrosion.
- Lay out the preparatory base along the entire fence line. An old brick is being put into work, a special platform is being poured less often.
- Install the fence sheet. Sheets of slate are alternately fixed on the frame with nails or self-tapping screws.
Video: how to paint fence posts
Finishing and decorating a slate fence
It is not difficult to protect, decorate and maintain this type of fence. It is enough to follow some established rules:

Any mechanical damage to the slate is thought out in advance, otherwise its service life is reduced several times.
Video: installing a slate fence
Slate was invented for roofing, but it is not always worth creating reliable fences or barriers from it. They stop at this material only if there is a large residue after construction or there is no suitable modern material in the store. Although in the backyards of the countryside, where the likelihood of theft of good material is too high, nailing old slate to the poles will be the best solution.
We also recommend
 Productive and reproductive thinking
 Reasonable egoism - what is the theory of reasonable egoism?
 Boris Nikolaevich Yeltsin, the first President of Russia
 Underground fights. Underground kings. What is “fighting not for the masses”? Where can you fight for money?
 Yakov Pavlov and Other Heroes of Stalingrad You Need to Know
 Survive an accident at sea in a dream - in reality experience a new love