Spinner, fidget - what kind of toy is it, where to buy and how to make it yourself? How to make a do-it-yourself spinner without a bearing: the best master classes How to make a regular spinner.
If you are reluctant to buy spinners in the store, feel sorry for hard-earned money, too lazy to wait for delivery, or just a creative impulse plays in your soul, then you can try to assemble the turntable yourself.
With even hands, the toy will turn out no worse, and often even better than the purchased one - after all, you put a piece of yourself into it.
How to make a do-it-yourself spinner
1st method: we make a spinner from bearings
We need bearings, for example, from a skateboard. Before using the bearing in practice, it is necessary to clean it of grease, otherwise the turntable will rotate quietly, but not for long. This method is very simple, since you do not have to make a spinner body, all we need is four bearings.
They must be laid out in the correct form. In order to make this form accurately, use a squared notebook sheet. After we have a perfect triangle, we glue the bearings together with glue - best of all with superglue or cold welding.
Or you can draw a circle with a compass and divide it into 3 parts, like a Mercedes badge. Drawing and geometry lessons to help.

When the glue is dry, it is necessary to increase the bonding area, for this we sprinkle the glue with salt, then the area will increase and the bearings will hold each other better. At the end, we wrap the gluing points with any thread and impregnate it with glue, this will betray even more strength.
A few video instructions on how to make a spinner from bearings:
And another option without a rope:
2nd method: spinner with clamps
For the next method, we need two ties or clamps. They need to be inserted into each other. After that, we place three bearings in the center of the ties and tighten the ties until they are firmly held.

Cut off the protruding ends. In principle, at this stage, the spinner is ready, but it does not hold firmly. In the event of a turntable falling, everything will fly out of it. We don't need this, of course. Therefore, it is necessary with the help of glue to make it more reliable. In all places where the bearings interlock, where the ties touch the bearings, it is necessary to drip with glue.
Such a spinner, due to its high degree of gravity, spins for less time and not so fast, but it is easier to manufacture.
You can see in more detail how a spinner with ties is made in the video:
How to make a spinner without a bearing
We need: six plastic bottle caps, a toothpick, a large gel pen refill, coins and glue.
- To begin with, we take one of the covers and make a hole in it, using a burner or a soldering iron, in extreme cases, with a hot metal nail.
- Now we cut off a small part from the rod, about a centimeter long and paste it into the cork.
- After that, we take two more plugs and cut off the upper part.
- Then we take a toothpick and cut off the sharp ends so that a stick remains, about three centimeters long.
- Using glue, glue it to the top of the cork.
- After that, we pass it through part of the rods and glue the second cork. The middle plug should spin easily.
- In the end, it remains for us to glue the remaining three plugs.
To understand what we are talking about, watch the video where there will be step-by-step instructions on how to make a spinner from plastic bottle caps:
As a result, we already have a pretty good spinner, but in order for it to spin even better, it needs to be weighted. For this we will use coins. We take a coin and glue it to each of the corks. That's all, our spinner is ready.
How to make a paper spinner
1st way: from cardboard
We make a template for a spinner from cardboard using a plastic bottle cap.
- We circle it so that we get a triangle. We connect the circle with the rest of the circles with smooth lines and cut it out.
- We put the finished template on cardboard, circle it and cut it out.
- We also need four more circles of a smaller size, we make them.
- Now we need coins. We take them and glue them on the sides of the first half of the spinner, and glue the second half on top.
- Using nail scissors, make a hole in the center of the spinner.
- Next, we need to cut off about a centimeter of the rod from the handle, and make small holes in two small circles.
- All the details are ready, now you can paint our spinner with paints to give it a more beautiful look.
- Now we assemble our spinner from the resulting parts. We insert the axis into one circle and glue it, put it into the spinner and press it on the other side with another circle.
- Glue the remaining two circles on the sides. That's all, a homemade paper spinner without a bearing is ready.
For details, watch this video:
2nd method: paper spinner
To make such a spinner, we need two square sheets of paper and two pushpins. The assembly diagram will look like this:

We advise you to immediately watch the video, otherwise the instruction may seem too complicated:
- We fold the sheet in half, then open it, like a book, we bend both sides of the paper to the bend.
- Next, we fold the resulting rectangle again and get an even smaller rectangle.
- We fold the resulting figure in half to make a bend. Then we open it and put it vertically.
- We take from the lower left corner and bring it to the right side. You should get a figure similar to the English letter L.
- We repeat the same with the other part of the paper, only now we bend it to the left side.
- From the resulting figure, we bend each corner so that we get two triangles at two ends.
- We make a rhombus out of the resulting one, run our fingers several times along the bends and open it back to the previous figure.
- We repeat the same with the second sheet of paper, only at the fold stage we do the folds in the opposite direction.
- We connect the two resulting figures together. We put the ode vertically, the other, on top, horizontally. We fill the corner of the vertical figure into the corners of the horizontal one. As a result, you should get a figure that looks like a shuriken.
- Now we make a hole in the center of our star, using a pushpin so that it can spin with ease.
- Now we take the second button, heat the iron tip and take it out. We put on the remaining cap, on the other hand. Spinner is ready.
More interesting articles.
Article. And now we will tell you how easy it is to make a do-it-yourself spinner from cardboard or paper.
How to make a do-it-yourself spinner out of paper (cardboard)
Today, on sale in markets, shops and shopping centers, you can see many fashionable spinning toys - spinners.
They have long become interesting not only for children, but also for adults. The choice is huge: large and small, with and without a pattern, plastic and chrome.
Fortunately, each of us can not only buy a spinner, but also make it with our own hands from available materials: paper, cardboard, plastic covers, plywood. To begin with, I recommend that you read the article about the benefits and dangers of spinners.
In this article, you will learn how to make a cardboard spinner.

Advantages of the method:
- Cardboard spinner is easy to make. The process takes about 15-20 minutes. Even a child can handle this task.
- Most likely, you do not need to go to the store, the materials will be immediately found in the house.
- The author's approach and scope for creativity. Cardboard can be easily painted in any color, add a pattern, sparkles, decorative elements and so on.
Disadvantages:
The disadvantage of a cardboard spinner is its fragility, and it only spins for a couple of seconds. But you can immediately make a few pieces in reserve.
The process of making a cardboard spinner
Step 1.
We select the necessary materials:
- cardboard sheet,
- plastic bottle cap,
- scissors,
- ballpoint pen or fine marker
- glue,
- pen rod (preferably large diameter, for example, from a gel pen),
- 3 medium sized coins
- 1 small coin
- gouache,
- thick knitting needle or awl.
Step 2
We make a blank for the spinner. It can be downloaded from the Internet, printed and transferred to cardboard. You can download templates for the spinner.

Or use a cap from a plastic bottle - circle it 4 times to get the desired shape. Next, cut out the blank from the cardboard. In the same way, we prepare the second blank (copy).
Step 3
We circle a small coin on cardboard to make 4 small circles. We cut them out.
Step 4
Glue large coins onto 3 side circles of a cardboard spinner blank. Glue the second piece on top. Then you can paint the product in any color, draw something. Fantasy is not limited.
Step 5
Using a thick knitting needle or an awl, we make a hole in the center of the future spinner with a diameter of about 5 millimeters. We also make holes in two small circles.
Step 6
We cut off a piece 0.7-1.2 centimeters long from the handle shaft and insert it into a small circle, fixing it with glue.
We make sure that the glue does not get into the center of the toy, otherwise it will not spin.
Step 7
Glue the remaining 2 circles over the ends of the rod. They can also be colored.
A funny toy is ready!
Video instruction from YouTube channel Lum Planet
 (0)
(0)
Why do some countries want to ban the spinner? Adults may not know the name of this fancy toy. And any child who has already learned to speak will immediately answer: “This is a spinner! […] (0)
(0)
What are spinners? They are a small gadget, in the center of which there is a bearing, and around the circumference there are small blades. Spinners - a modern fitness tracker, […] (2)
(2)
Plasticine furniture for a toy house for children 4-5 years oldIn this step-by-step instruction, the kids and I will sculpt plasticine furniture. In the last lesson, we sculpted a cake and […] (1)
(1)
Plasticine craft for a child 3-4 years old. What will we do today? Modeling crafts from plasticine. After all, plasticine crafts are a fascinating activity that even children 3-4 years old can do […]
The Rubik's Cube is already in the past. Today's kids are obsessed with pocket sized toys that spin around. Spinners are so captivating for children that some schools have already banned bringing them with them. On the other hand, toys help relieve stress and calm children who have a special temperament.
Spinners are collectible now and they are something of a status. No child wants to show up to school without the most basic play device. If you're on a budget and want it to have a great toy that really stands out from the crowd, there's an easy solution: you can make your own spinner.
There are several different ways to make a spinner, such as cutting it out of cardboard or using old recycled lighters. However, if you try this at home, be aware that the spinner may cause damage to your skin. With that said, there are simple methods. The choice is yours.
How to make a spinner using plastic bottle caps
For this you need: 4 plastic caps, a box of cereal, a knife, super glue, a plastic mug, paint or glitter
Collect four bottle caps. Take four plastic caps from used bottles that are the same size. Glue them together so that all sides meet the middle cap, and then crease the hole in the middle cap of the bottle with a toothpick.
The weight of the adhesive inside the caps. Some prefer to stick pennies on the inside of the caps for extra weight, but household items like magnets will work the same way.
Replace bearings with paper. Place the bottle cap over the plastic cup and cut out the circle. Once the circle is cut out, poke a hole the size of a toothpick and place the plastic circle on the inside of the bottle cap to line up the empty space. Then take a dime draw 10 circles on the box and cut them out.
Make sure all holes line up with each other; this will be an important step towards proper rotation of the spinner.
Glue the circles together. Stick your toothpick in each circle and glue five cardboard circles together, lining up the small holes. Take two more penny circles, and this time avoid punching a hole through them and glue each circle on one side of each five.
Attach all parts together with glue. Take a toothpick and one stack of cardboard circles and glue the toothpick in the middle. Attach a toothpick to the center of a medium bottle cap and snip off the end. Leave some toothpick on the opposite end and glue that end in the middle of another stack of cardboard circles to act as a bearing. Your spinner should now spin like the original.
Decorate your creation. Now that your spinner is almost ready, paint or adding glitter to your toy will complete the job.
How to make a spinner using skateboard bearings
Materials needed: plain bearings, knife, thick rubber band, super glue.
- Assemble three skateboard bearings. Take the three skateboard bearings you chose and align them together horizontally. Take the middle bearing and pry out the middle tread with a knife to expose the wheel inside.
- Glue them together. Glue the three bearings together in a straight line with super glue and wait until they dry.
- Cover with rubber band. Wrap a thick rubber band around the outer edge of the three support bearings for support, and decorate the rubber band if you want to add some character to your new toy.
- Can do spinner alternative, which is more like a traditional spinner. You need to assemble four bearings for a skateboard and follow all the same steps. The middle bearing will have an open wheel and the other three should be glued proportionately around the center.
- Once your feeder is complete, place your thumb and middle finger in the center of the toy and let go of life's tension.
How to create a paper spinner
What do you need for this:
- Cardboard.
- Scissors.
- Safety pin.
- Toothpick.
- Glue.
- Stickers.
- Cut the cardboard into four small circles and one propeller shape.
- Poke holes in the center of each of the circles and propeller with a pin or pointer.
- Apply a patch of glue to the back of one of the circles and insert a toothpick through the hole. Add a second circle to the toothpick and press down on the pieces of paper to seal the glue and attach the pieces to a toothpick.
- Add propeller to toothpick.
- Repeat step 3 with the two remaining circles, leaving about 1/4 inch between the first circle set and this one (the propeller needs room to rotate).
- Remove the extra ends of the toothpick from the spinner and decorate with stickers.
Children and adults are delighted with the popular ball bearing toy - the spinner. There are many varieties of them from different materials. Learn how to make a spinner at home.

How to make a paper and cardboard spinner
To make a do-it-yourself spinner, you will need certain materials and skills to work with them. The simplest for execution are models made of cardboard and paper. Their only drawback is fragility and fragility.
You will need:
- cardboard;
- scissors;
- awl;
- marker;
- silicate glue;
- coins of the same denomination - 3 pcs.;
- empty rod from a ballpoint pen;
- gouache paints and glitter.

Step by step instructions on how to make a spinner:
- Draw a blank on the cardboard. To do this, circle the PET bottle cap with a marker, forming a triangle with a central (fourth) circle in the middle. Cut out two identical blanks.
- Glue three coins on the "blades".
- Glue the second piece of cardboard on top.
- Make a hole through the center of the workpiece with an awl.
- Cut off about a centimeter from an empty (without paste) ballpoint pen refill.
- Cut out four circles smaller than the lids. To do this, you can circle small coins. In two circles, make through holes with an awl.
- Insert a centimeter rod into one circle and glue. Then thread the free end of the rod through the central hole of the spinner blank, glue it. Insert the free end of the rod into the second cardboard circle.
- Hide the ends of the rod, to do this, glue the two remaining whole cardboard circles on top of them.
- Color the craft with paints and decorate with sparkles.
How to make a spinner from plastic caps
Spinners made of plastic are much stronger than cardboard ones. Children over 8-10 years old will be able to make a spinner out of caps with their own hands. The younger ones will need parental help.

To make a craft, you will need:
- lemonade lids - 4 pcs.;
- plasticine or clay;
- scissors;
- glue gun and glue stick;
- nail and lighter;
- toothpick.
Step by step description:
- Fill the hollow space inside the three covers with plasticine, and fill the top with glue from the gun.
- Poke a hole in the center of the fourth cover with a nail. To do this, heat the sharp end of the nail with a lighter.
- Glue three covers filled with plasticine on three sides of the fourth with a hole, creating a triangle shape.
- From the glue stick for the gun, cut two pieces one centimeter long.
- Break the toothpick exactly in the middle.
- Attach one end of the toothpick to the cut piece of glue stick.
- Insert the loose end of a toothpick through the hole in the center cap. Hide the remaining sharp tip in another piece of glue stick.
- If desired, paint the lids on top with acrylic paints or paste over with appliqués.
As you can see, spinners are quite easy to make yourself. This is a good opportunity to captivate the child for a while and enjoy the result with him.
To create a craft in the form of a fashionable spinner, you will need the usual improvised materials that you can always find at home. Good luck and creativity!
How to make a do-it-yourself spinner at home? - a lot of people are interested in this issue. And not surprisingly, today there is a real boom with spinners. Everyone already knows about them, and everyone wants to spin it. But the prices of normal spinners are puzzling because a piece of material and bearings do not cost that much. There is always a way out - to make a spinner with your own hands.
To be honest, at first I generally thought that a spinner was some kind of spinning toy for cats, and only recently I became interested in what it is and how to make a spinner myself.

The choice fell on the classic three-spinner model, which has a bearing both in the center and on each petal. Bearings along the edges are needed rather, like weights, twisting, holding on to them is not so interesting, and depending on the size of the spinner, not everyone has enough finger length.
spinner bearing
So, in order to make a high-quality do-it-yourself spinner, you first need to acquire bearings. Cheap spinners are most often made without bearings, which is somehow not ice. You can cut it out of cardboard, and twist it on the rod from the handle, but we want everything to be according to Feng Shui).
Most often, a bearing is used, designated as 608. This is not some kind of magic number, but simply a bearing brand, there are 607 (less) and 609 (more). The 608th bearing has an outer diameter of 22mm and an inner diameter of 7mm. It is 8 mm thick.
It is used most often at the anchor of the motors of rotary hammers and electric drills. Well, it was found in one of the auto shops. In the same place, by the way, they repaired a puncher with me.
Each bearing was packed in a bag and a small box claiming to be made in Russia. But as it turned out later from a familiar seller, the inscription "made in Russia", as a rule, indicates that he is Chinese ... (Clarification - I live in Tashkent, Uzbekistan, so I do not know how things are with this in Russia)
A high-quality bearing is a very important element of a spinner, because it depends on him how long the spinner will spin, and how stable it will be. Therefore, later the bearings were replaced with similar Korean ones.
Good bearings, but smaller (15mm in diameter and 5mm thick) were used in older hard drives. The rotational speed of the old generation hard drives was 5400 rpm, and the modern 7200 rpm. In modern hard drives, the bearing is located in the motor and is even smaller. On such a bearing, you can make a good high-speed spinner that can spin for a very long time.
Preparing bearings for a spinner
Bearings are sold sealed with dust rings and lubricated. No lubrication is required for the spinner, it will only get your hands dirty and slow down the rotation with its viscosity. Therefore, the lubricant must be removed. This will require 50-100 ml of gasoline.

We dissect the bearings, removing the dust rings from them with something sharp and thin. We throw the bearings into a jar and fill it with gasoline. We leave them in gasoline for a few minutes, then we chat with a jar so that the bearings slosh. Dipping an unnecessary toothbrush in gasoline, we remove the remaining grease from the bearings.
To get rid of the smell of gasoline, you can wash the bearings with soap using the same toothbrush. You can put back the dust rings if you want, but I like the combination of wood and metal more. Now the bearings are completely ready for use in the spinner.
spinner material
Plywood was chosen as the material, as it is the most convenient for processing. It can also be cut from a thick sheet of getinax or plexiglass, but it is easily scratched, so it is difficult to do it neatly. In the bins of the house, a piece of 10 mm plywood was found, from some dead Soviet tape recorder.
I did the markup using a compass, ruler, protractor and pencil. It is important to make a very accurate markup, otherwise the center of mass may then shift and the spinner will hit during rotation. It is more convenient to print a template from paper, cut it out and circle it, this will save both time and nerves.
Making a spinner case
Because Since the classic, curved shape was chosen, a 19mm hole saw was used to cut out the internal roundness and holes for the bearings. It is better, of course, to use 20 or 21 mm, but I simply could not find it on sale.

The crown has a special holder into which the centering drill is inserted. Before drilling large holes, it is better to drill guides of a smaller diameter in the centers of future holes, and then, having fixed the crown in the drill, we drill 6 large holes in a circle and one central one.
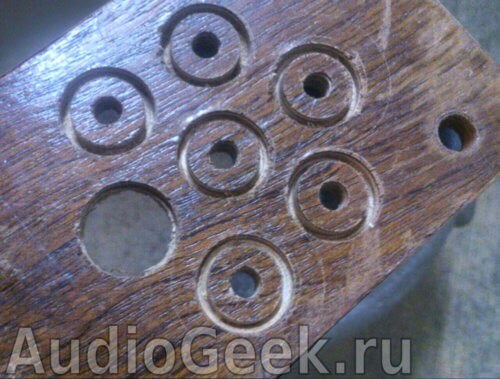
Wood crowns have fairly large teeth. They can easily peel off the top layers of plywood. Therefore, if you decide to make a do-it-yourself spinner from plywood, then it is better to drill to the middle, first on one side, and then on the other.

Cutting out the body of the spinner
Now we saw off the excess, of each petal. For this, a jigsaw was used, but you can also use a regular hacksaw. We try to cut as close as possible to the markup, so that later we have to grind less.

Drill holes for bearings
In addition to the outer part of the body, the inner part also needs to be improved, i.e. bearing holes. They turned out 3 mm less than required. Using a round file and guided by the markup, we bore the holes so that each bearing fits very tightly. Of course, it is better to do all this with a boron machine, if you have one.
We adjust the spinner in thickness and skin it
After everything was bored and turned, it was time to bring the found plywood to the thickness of the bearings, i.e. 8mm instead of 10. To do this, on each side of the workpiece, a layer of plywood was removed and it became exactly 8mm thick. Further, the entire workpiece was sanded first with large and then fine sandpaper.
Finished design:

Finger holder
After inserting the bearings and twisting, it was decided to make a holder for the fingers. When drilling holes, there were holey rounds, which just went to this business.
With a sharp knife, a column was cut out of the rail, along the inner diameter of the bearing. Kruglyashki were cut in layers up to 3. The ends of the column were filed off with a file so that round rounds were tightly worn on them. This is what the components of the holder look like:

It remains only to insert the holder into the central bearing, pre-lubricating the joints with glue and waiting for complete drying to enjoy a new toy - a do-it-yourself spinner)

Now you know how to make a do-it-yourself spinner - a rather useless thing, but cool.


