Chandeliers and lamps with their own hands. Master class on making a floor lamp from improvised means DIY decorative floor lamps
A DIY table lamp is one of the most affordable ways to decorate an interior and give it a personality. As soon as the designers of pros and amateurs do not scoff at them! The reason is simple: in relation to the functionality and possibilities of creative self-expression to the required costs of materials, labor and skill, the table lamp is firmly in the top of the leaders among household items. In this article, we will see what you can do with it without straining either your hands or your wallet. Just an invention.

What to do?
Rack table lamps (pos. 1 in the next figure) illuminate the work area that does not require the quick movement of the light spot on the table surface: a dressing table, a desk. The possibilities of decorative design in this case are the greatest. Technically, the design of a table lamp on a stand is the simplest. Opportunities for operational adjustment of the size of the illuminated area are practically absent. Adjusting the illumination of the working area is possible if there is a thyristor voltage regulator in the lamp, but the spectrum of the emitted light changes significantly.

The great advantage of rack-mounted table lamps is the possibility of obtaining the so-called. cosecant-square radiation pattern (RP) of the illuminator, see also at the end. The cosecant-square DN provides, within a certain angle φ, an almost uniform illumination of the working area (see the figure on the right), which drastically reduces fatigue from intense intellectual work.

Lamps on a breakable swivel arm (pos. 2) are more suitable for technical creativity. Lamps on a pantograph bracket at home are impractical and technologically complex, and making a lamp on a flexible bracket at home will cost more than buying a ready-made one.
The design of a table lamp on a breaking arm is limited to laconic and utilitarian forms. The design is more complicated than that of a lamp on a stand, primarily due to the requirement to ensure electrical safety, see below. Opportunities for operational adjustment of light in the working area are wide both in terms of the size of the illuminated area and in terms of its illumination with a constant spectrum.
Console table lamps (pos. 3) are less common in everyday life, because. for stability, they require a heavy base and, most often, a counterweight, which complicates and increases the cost of the structure. Cantilever lamps have fewer opportunities for operational adjustment of light in the working area than lamps on brackets, however, it is possible to obtain a cosecant-square DN.
Table lamps without an elevation of the light source above the supporting surface are no longer table lamps, but nightlights (pos. 4). The fundamental difference between the two is that the night light does not have a working area with certain requirements for light. Accordingly, the light from the night lamp can be anything, as long as it does not harm health.
Design
In a table lamp of any type, a trace can be distinguished. design elements:
- Electromechanical - ensures the stability of the lamp and a safe supply of power to the lamp holder.
- Reference - supports the illuminator or reflector and, possibly, allows you to change its position.
- Illuminator - an electric light bulb in a lampshade or reflector.
Electromechanics in the design of a table lamp plays a role only insofar as it can be hidden in the support of the illuminator. Design delights fall on the support and the illuminator. In rack lamps, as a rule, the lampshade carries the main aesthetic load, and the rack complements it; in articulated - on the contrary. But there are plenty of exceptions to this rule.
Electromechanics
The wiring diagram of a table lamp is simple: a mains plug, a cable, a switch, a light bulb holder. Sometimes a voltage regulator is added. The pendant lamp holder E27 (under the lamp base of a regular width, item 1 in the figure) can only be mounted on a threaded shank M10 or M12. The cartridge for the narrow E14 minion base is also mounted on a thread or on a lamella in the form of a steel strip; the nest under it is shown by a green arrow in pos. 2. For a table lamp, chandelier cartridges (pos. 3) with captive threaded flanges are best suited: between them you can clamp a steel faceplate with a lampshade frame or a clamp for hinge mounting. Drawings of the E27 chandelier electric cartridge of various modifications are given in pos. 4.

It is necessary to make a table lamp in such a way as to ensure its electrical safety. This is especially true for lamps on hinges and consoles. Achieving the safety of a table lamp is quite simple:
- The cable must be taken round in double insulation.
- The conductors of the cable are flexible, made of many wires. The cross section lived from 0.35 sq. mm.
- Places where the cable passes through conductive or damp parts of the structure must be protected by sufficiently strong flexible dielectric bushings, cuffs or elbows.
- The cable inside the lamp structure must not be taut.
The diagram of the mechanical part of the support with a load of a homemade rack table lamp is shown in the figure:

The cable from the inside before entering (highlighted in color) is tied in a knot or pulled through the holes of the dielectric fixing washer so that by pulling it from the outside, the cable cannot be torn inside. A decorative finish made of polymer clay (plastic, cold porcelain) on a dummy from a cut plastic bottle is the best option at home, but, of course, only one of many. If you want, for example, to carve a decorative shell of a wooden rack - please, if only the mechanics of the village fit properly. However, polymer clay as a material for a table lamp stand allows you to implement the most original ideas for its decor and fully meets the safety requirements: dried polymer clay is a mechanically strong non-wetting non-combustible dielectric.
original supports

It is not necessary to fence the support of a rack-mounted table lamp, which is quite complex and requires turning, if its lampshade is light, for example. from threads (see below) or thin hard plastic, and it is not supposed to place a light regulator and other electronics in the support. In this case, a fairly stable lamp support is obtained from a “pot-bellied” glass bottle with a wide bottom, pos. 1 in fig. A narrow bottle can be made heavier by throwing pebbles (pos. 2), steel balls, etc. into it. The lampshade holder is fixed to the neck with a standard screw plug or a piece of solid EPS foam, ground into the throat thread.
The hole for the cable in the bottle is drilled with a tubular thin-walled diamond drill. But glass is not at all like a tile, so you need to drill it in this way:
- The bottle is placed on its side and securely fastened.
- A plasticine board 2-3 cm high is molded around the future hole.
- Water is poured into the resulting hole.
- They drill under a layer of water at least at 2500 rpm with the gentlest and smoothest feed.
How a table lamp is made from a Jack Daniels whiskey bottle, see the video below:
Video: DIY bottle table lamp
Such a lamp will organically fit into, steampunk and other technogenic-utilitarian. Just don't make the mistake of trying to make her lampshade out of a flower pot or any other utensil. Technogenic-utilitarian styles are not a senseless heap of rubbish, their concepts are clearly thought out. Interior elements for them should be related to industrial, not agricultural or food production. A lampshade, for example, is needed from a tin reflector from an old production hanging lamp on a pantograph, a car headlight, a small spotlight, etc.
On fig. on the right is shown a very original version of the support of a “real large” table lamp made of ... rope! It is done in this way:

- The rope is taken from a natural organic layer 6 + 1, i.e. 1 strand along the axis and 6 along the circumference;
- A piece of rope is stretched by hand and loosened, turning at the same time in different directions against the direction of the twist of the strands;
- The axial strand is carefully pulled out and a thin-walled copper tube with a fishing line threaded into it to tighten the cable is inserted instead;
- The rope with the tube inside is pulled together by turning the hands in the direction of the twist of the strands;
- The ends of the rope are firmly fixed on the tube with a winding cord;
- Pull the cable into the tube;
- The workpiece is bent and knitted in a knot. You need to bend a little, carefully so that the tube does not break;
- The rope is tightened again, picking up the upturned strands, and impregnated with acrylic varnish.
Note: the tube must be taken for air conditioning systems, from oxygen-free copper. The red-copper gas or electrical tube in the assembly will most likely break.
Hinge Features
The mechanical part of a table lamp on a hinged arm is more complicated. The lamp shown on the left in the figure does not meet the requirements of electrical and fire safety: the cable is caught in combustible parts and can be pulled when manipulating the illuminator. Its loop hanging down can be hooked in the semi-darkness with a hand or a sharp object.

The cable to the light bulb holder in a table lamp on a hinged bracket should be run along dielectric fireproof knees either between the sides of its links, or, if the hinge link is solid, along its top, in the center and on the right in Fig. In this case, the cable on the hinge link must be fixed. If the hinge links are tubular, the cable is laid inside them. In any case, Ω-shaped cable loops with a diameter of 60 mm or more, but not less than 12 cable diameters, are made above the kinks of the hinge links. At the transition of the cable from the bracket to the illuminator, an Ω-loop is made from 90 mm, but not less than 20 cable diameters.

The balance of a table lamp on a hinge varies over a wide range and it is quite difficult to ensure its stability with a weight. Because of this, manufacturers sometimes invent such systems that it is easier to shine with a flashlight than to adjust the light from such a miracle, see fig. left. Therefore, table lamps on hinges are often provided with screw terminals.

As a screw clamp for fastening a homemade table lamp to a tabletop, a small carpenter's clamp is excellent, see fig. on right. Better than a lamp clip from a furniture store: cheaper, holds more securely. The grip of the clamp is wider, and the lamp can be attached to the countertop of any conceivable and unthinkable thickness. You need to ask exactly the carpentry, because. jaws of locksmith clamps without soft coating.
The clamp is turned into a lamp holder using a socket made of a steel tube with an inside diameter of 10 mm and a length of 120-150 mm. In the handset approx. at half the length, a longitudinal cut is made as wide as the thickness of the clamp clip. The nest is attached to the clamp with through bolts. A steel pin with an eyelet is inserted into the socket tightly, but not tightly, which is a fixed link in the lower hinge of the lamp bracket. Hooks for hanging chandeliers with an end bent into a ring fit well here; the thread does not prevent them from turning smoothly in the socket.
When adapting the clamp to the lamp holder, it must be remembered that its holder is made of heavily carburized steel; so it is necessary that the jaws of the clamp do not succumb under the counterpressure of the compressible parts. High-carbon steel is very hard and rather brittle, so you need to drill it with a carbide drill at 800-900 rpm with a not strong smooth feed. It is impossible to beat with hard objects and try to bend the clamp clip!
Illuminator
This table lamp assembly should give the right light to the work area and is often the main decorative element. First of all, it should be noted here that compact, lightweight and economical LED illuminators (see Fig.) Shine well only in 3D models. In reality, however, their light still does not satisfy the medical and sanitary requirements for local working lighting.

reflectors
Hinged table lamp illuminators are made reflex, the lampshade is too bulky and heavy for them. The reflector must be selected parabolic, it gives a fairly concentrated and even light. You can make a single conical reflector yourself, but the light from it is uneven, tiring your eyes, and a lot of it is “scattered” to the sides in vain. Reflectors of good hinged table lamps are made with a reflective surface of the 4th order of curvature (for example, the Hobby, which has not lost its popularity for more than 20 years), but it is unrealistic to build one on your own.
The way out, if a suitable reflector is not found, is to use a krypton incandescent lamp with an internal reflector, it is also from conscientious manufacturers of the 4th order of curvature. In this case, the manufacture of the illuminator is reduced to installing a shell of any shape around the light bulb from any sufficiently strong and lightweight material that protects the lamp from accidental impacts.
The reflector of the illuminator of a table lamp on a hinged bracket must necessarily have an opening or holes at the top for the exit of heated air. Fluorescent lamps-housekeepers and LEDs seem to heat up weakly, but from being in a heated air cushion, their resource is sharply reduced, and they are not cheap.
Shade
Illuminators of rack table lamps are made in the form of a light bulb under. Its purpose is not only to be a fertile field for decor, but also a partially translucent reflector that provides the necessary illumination of the working area of a given value. The lampshade for a table lamp can be made rigid frameless and soft on the frame. The frame of the lampshade is most often made of wire in the form of a truncated straight cone, on the left in the figure, with simple (in the center) and complex (on the right) curvilinear generatrices.

The simplest way to sheathe a straight conical lampshade is with pieces of tape. It is laborious, but good in that the outer surface is smoothly curved, without breaks. The seams on the rims of the lampshade are masked by ruffles (pos. 1 in the next figure), braid, fringe, etc.

It makes no sense to cut the fabric in the form of a truncated cone for covering a conical lampshade, because. as a result of tightening the material, the lampshade will turn out not to be conical, but faceted, pyramidal. It will be easier to sew a lampshade cover from wedges, the patterns of which are built step by step without the use of geometry:
- A sheet of thin cardboard or thick hard paper is applied to the frame section;
- Cardboard / paper is tied to the frame with an elastic band or tape;
- The contour of the pattern is outlined from the inside, this will give a lack of fabric necessary for tightly covering the lampshade with it;
- The fabric is taken in satin, twill or staple weave;
- Cut so that the warp threads of the fabric are oriented along the longitudinal axis of the pattern.
The finished lampshade is often decorated with rosettes, bows, etc. For such a case, there is an interesting design technique: the main fabric is taken thin, well-translucent, colorful, and the sockets are sewn in pale pastel colors or very light, poses. 2. In the light, the lamp stands modestly in the interior, but when it is turned on in the dark, everything becomes colored.
How to wrap a lampshade
On the lampshade frame with complex curvilinear ribs (with a "waist"), a sewn cover can simply be thrown over and pulled off with ribbons (pos. 3), thread, elastic band. But according to the rules, covering the lampshade with a cloth is done like this:

And in a different way?
There are other ways to make a table lamp shade, allowing you to embody a variety of original design ideas in the material. For example, a blank mandrel (item 1 in the figure) is glued from ordinary writing paper and impregnated twice with acrylic varnish. After the varnish has dried, lanolin is rubbed into the block several times until it ceases to be absorbed. A blank coated with lanolin is wrapped with a thread stretched through PVA glue, as in the manufacture of Christmas decorations with your own hands. The device for pulling the thread through the PVA is shown in fig. right below. The finished hard cover of the lampshade is fixed with drops of glue on the frame, which in this case can only consist of the lower rim, fastening ties and a faceplate for a chandelier cartridge.

On the same blank, a rigid seamless lampshade is made of thin synthetic fabric. Cut out like a scan of a truncated cone (with an allowance), a cut is wrapped around a blockhead. The fabric is fixed along the edges with paper clips and impregnated with acrylic varnish with a wide strip in the middle. When the varnish dries, the paper clips are removed and the edges are impregnated on the outside. The paper is torn out of the dried lampshade. The lapels are cut inside, a thick fishing line is put into the bends and fixed with drops of glue.

A frame with curved ribs can be braided horizontally with strips of fabric (pos. 3) or a narrow ribbon, newspaper tubes, straws, etc. In terms of lighting technology, ordinary propylene twine is excellent, but its aesthetics are that ... not very good ... Finally, a soft textile cover for the lampshade can be sewn with a simple straight sleeve along the diameter of the lower rim, and trimmed on top, pos. 4.
Quite original
The following 3 variants of the table lamp shade are among the outwardly extravagant, but provide very good lighting performance. Which, by the way, cannot be said about many home-made textile lampshades. For example, we buy (stealing is a sin, as Captain Barbosa from Pirates of the Caribbean would say) a milky plastic shade for a street lamp. Not too expensive, perfect light transmission with light diffusion, and does not break. And at the bottom there is a wide opening through which enough light will come out for local working lighting. We decorate the outer surface of the ceiling with decoupage on a transparent basis or paint it by hand. What happens as a result - see in fig. But this, of course, is an option for an amateur who is resistant to psychedelic influences.

A plywood or glued board lampshade (see the following figure) has good light transmission due to internal reflections and greatly softens the light. In a table lamp with it, you can even put an LED light bulb with a frosted bulb. Rims - hoops for embroidery of different diameters. In the same way, you can make a table lamp integrated with a lampshade (on the right in the figure). It will take up a lot of space on the table, but it looks original, “environmentally”, and the light gives a very soft, not tiring.

A table lamp integrated with a lampshade can also be made from the same wonderful material -; in a thin layer it is translucent. The jellyfish lamp (see the figure on the right) is made from it. The manufacturing procedure is as follows:

green lamp
Revisit old photos with Lenin, Stalin, Churchill, Roosevelt, Theodore or Franklin Delano, Mahatma Gandhi. Or, if you like, with Hitler, Mussolini, General Tojiyo, Chiang Kai-shek. And check out their table lamps. True, similar to the one on the left in the figure? Which in the USSR "general population" was not sold? And which gave rise to the popular expression "green lamp"?

“Green” luxury table lamps antique and modern
"Green lamps" are still being produced and sold well. True, judging by the prices (on the right in the figure), they have not become more accessible to ordinary citizens. The secret of the "green lamp" is in a lampshade made of green glass dyed in the mass, covered from the inside with a translucent (more precisely, 3/4 transparent) layer. The shape of the lampshade corresponds to a well-defined mathematical law. Within the wide, approx. 3 lampshade diameters, the working area of the "green lamp" DN is almost cosecant-square, and then its illumination very smoothly turns into a greenish twilight. Slightly raised his eyes from the papers - the eyes and mind are resting.

DIY lamps and lampshades. Ideas, master classes
Hello!
Creating or decorating lamps and lampshades is not only incredibly interesting, but also quite useful: it allows you not only to create a unique item, and in full accordance with the interior of your home, but also to save a lot of money. It is enough to purchase the simplest lamp for little money and beat it to your liking. And there are a lot of options for what and how to do, in a variety of techniques, using a variety of materials.
I picked up ideas for creating and decorating lamps for you and me, I hope you can choose the right option for yourself :) Enjoy watching!


The lampshade is decorated using decoupage technique, the base of the lamp is made of books

The decor of the metal frame of the lampshade with feathers is very stylish :)

Quite often, fabric or paper flowers are used to decorate lampshades, the result is very romantic :)
Fabric flowers with candle processing

Chintz convolutions are used as flowers here.

Twisted fabric flowers


Flowers used here


The flower is made of a cotton strip of fabric, strung on one side and gathered into a bud.

Spiral newspaper roses

The bottom of the lampshade is decorated with spiral paper roses.

Decor of an IKEA lampshade with paper flowers

Lampshades made of lace and knitted napkins look very beautiful.

Shaped with glue


A balloon is inflated and lace napkins are applied to it with glue. After drying, the ball is pierced, deflated and removed.


A very beautiful option: a birdcage is used as the base of the lamp, the lampshade is decorated using decoupage technique with obsolescence.

Even an umbrella can be used for a chandelier :)

Even shreds-trimmings of fabrics will go into action: wound, tied in a knot. This option will fit perfectly into the design of a country house or a children's room.

Buttons


For the manufacture of lamps, various glass containers are often and successfully used - jars, bottles. A little lower I gave a master class on the manufacture of such a lamp.

A bottle as the base of a lamp - below is also a similar master class

It is a little more complicated here - a hole is drilled at the bottom on the back of the bottle through which the cord is inserted.

The lamp is made of figured metal sheet


The origami technique has been successfully used to create lampshades


Fabric strips glued to the base of the lampshade

Lampshade from various retro leaves

Lampshade from a basket - why not? :)

The second life of a metal colander

Unnecessary forks-spoons created a very interesting version of the chandelier :)

A very nice solution: a metal mesh is stretched over the frame and a poultry house is beaten. I think for a child's room.

And here's another bird theme :)


Painting a lampshade with acrylic paints


Thin veneer lampshade

The base of the lamp is glued with seashells

Knitted lampshades - look very cozy :)


Lampshade decor with commemorative photos and slides


The flowers on this lamp are the bottom of plastic bottles :)

Lampshades covered with paper circles

Vegetable lampshade :) I think it’s still hot for the flower there :)

Lace lampshade

Decoupage technique is also applied here.

A very interesting solution - a wire as an art object :)

The lampshade is decorated with strips of fabric

branch lamp 
The lampshade is decorated with crumpled-compressed coffee filters (cupcake molds)

Glass vase lampshade

Lampshade base - unnecessary toy soldiers, glued and painted with spray paint

Creative lampshade made of strips of felt

Lampshade made of ping-pong balls :)

Floral decor

And many, many more ideas...


Master class on making a lamp from a jar with a metal lid from Tom & Brit (bestofinteriors.com)

Punch holes with a nail to create a hole

We insert the cartridge

Paint in one color

We screw the light bulb and insert it into the jar

The lamp is ready :)
Paper lamps from varrell.com


We need a picture of a castle


Cut out, cut through the windows, glue


Inside we place a spotlight on batteries

Rope chandelier by Sarah M. Dorsey (sarahmdorseydesigns.blogspot.com)

We will need a rope, Mod Podge glue (can be replaced with diluted PVA), a ball

To create the wavy shape, Sarah used wooden slats. We lay out the form, coat with glue for fixing.

After drying, lay out on a ball and coat with plenty of glue


After drying, remove the lampshade from the ball and paint it with white spray paint - Sarah has four layers


Very beautiful lampshade made of grandmother's squares from the author of the resource Aboutgoodness.com 


We cover the lampshade with fabric

Bend the strip of fabric in half lengthwise and twist it into a roll


Straighten slightly

Apply glue to the fold and glue to the base


Kiri's lampshade base tutorial (ilikethatlamp.com)

Required accessories

Thoroughly wash the bottle, disinfect and dry

Cover with spray paint


Mounting process


,


This is how a gin bottle turned into a base for a lampshade :)
As you can see, the case is quite simple and very interesting. Give free rein to your imagination, create and let your home be beautiful and cozy!
Well, for those who still prefer to buy ready-made lighting fixtures, I recommend looking into a specialized online store lampa.ua- where high-quality and stylish table lamps, chandeliers, sconces, accessories, etc. are presented in a huge assortment. from the best manufacturers and at very flexible pleasant prices:) By the way, according to Google statistics, this online store is the most popular among Ukrainian buyers:) Use it with pleasure!
I wish you all the best and good luck!!
In modern interior design, where things and colors are correctly selected, correctly installed lighting prevails most of all. Thanks to lighting devices, it is possible to highlight different areas of the premises, visually expand or reduce the space, while giving coziness and comfort in the living room or bedroom. Of course, you can buy a lamp or create a sconce with your own hands from improvised means. The last option is economical while allowing you to make the design at your discretion.
Fashion does not stand still, but moves in a circle, so now crystal sconces are no longer so popular, and wooden lamps are considered a sign of luxury. Not everyone knows that in the 16th century wooden structures were installed in palaces and churches. As you understand, there was no electricity at that time, so candles were used as a lighting element, which were installed on wooden stands. To date, it is possible to produce sconces at home, both for candles and for electric light bulbs.

As you know, any material has its pros and cons, and wood has its own special qualities that must be taken into account when making a lamp made of wood:
- Wood is considered the most environmentally friendly material, containing resins emit useful aromas, due to which the air in the room is filled with useful microelements, which, in turn, is beneficial for the respiratory tract of the human body.
- Easy processing of manufactory - for the production of steel and plastic elements for decorative lighting, special equipment is required, and this is a big expense. To make a sconce with your own hands from wood, you only need the usual tools that almost every home craftsman has.
- Wood has a special strength and durability, especially if the material is impregnated with special agents.
- From wood, you can create exclusive carved, prefabricated or combined lamps that will not only decorate your interior, but also stand out favorably, emphasizing the refined taste of their owners.
Disadvantages of wooden sconces

Before you start making wood with your own hands, you need to take into account and take all safety measures, as well as develop a future wall sconce project. It must be remembered that light bulbs should not come into contact with wood and other elements of the lamp. Let's take a closer look at several models of wall sconces.
Wooden structures for lighting fixtures

Other options for combining wood and metal have different directions. It can be a metal lampshade with a wooden base or a torch-shaped lamp and the hand that holds it. For connoisseurs of wood, we can offer the manufacture of sconces only from wood or plywood. It all depends on your imagination and the material at hand.
bamboo lamp
A beautiful lamp can be made from an old lamp and bamboo sticks tied with coconut fiber rope. The device is elementary, three bamboo sticks are connected to each other. Two are vertical, and one between them is horizontal and is attached to the wall. The lampshade from the old lamp is attached with a rope to a horizontal bamboo stick. This design can be placed in the house, on the porch or gazebo.
Lamps for a child's room or bedroom
A beautiful wall night light for a nursery can be made from a sheet of fiberboard or plywood. An example is the design of an ordinary birdhouse.

To do this, the details of the sidewalls, roof, bottom are cut with a manual or electric jigsaw. On the reverse side, self-made fasteners are installed, after which the product is painted and electrical components are installed.
The main features in the design of the lamp
- When working with wood, wear gloves and goggles.
- How to make and connect a sconce with one light bulb - in this case there should be two wires, the phase passes through the switch, and zero is connected to the blue output wire. The more lamps, the more wires, but the connection principle remains the same.

Location of wall lights:
- The height of the sconce from the floor in the bedroom should not exceed 1.6 meters.
- In the children's room, you need to hang lamps at an inaccessible distance for children.
- In corridors with a high ceiling, installation takes place at a height of two meters from the floor, if the room has a low ceiling, then lighting fixtures can be mounted at a distance of 1.8 meters. For the living room 1.4 meters.
In custody
You can make your own unique and unusual lamp from various improvised items that can be found in your garage or shed. As a result of such modifications of old things, you will get a stylish handmade lamp. As a result, you saved on the purchase of sconces and at the same time freed the shelves from old trash.
Lamp - the item is extremely practical, because, unlike a bulky chandelier, it is very compact and can be placed anywhere, even on the floor. In the process of creating an interior, it is quite often forgotten about, since it plays a secondary role. However, in the setting of a small apartment or room, it will be almost indispensable, and will also help add comfort and warmth to the room. In modern lighting equipment stores you can find a lamp for every taste, but isn't it more interesting to create it yourself? In this article, we will tell you how to make a beautiful and unusual lamp using completely ordinary materials that are in every home.
1. Lamp-garland
To create such a lamp, you will need a wire base, fishing line, paper or plastic bottles, as well as patience, patience and more patience.
From the wire you need to create a frame of the required shape, and cut out circles or figures from paper or bottles. Then you either simply attach them to the wire itself with glue, or string them onto a fishing line. The thinner the fishing line, the weightless your design will turn out, so from a distance it will seem that your butterflies are "fluttering" on their own.

2. Bead lamp
To create such a product, you will need wire, as well as, if desired, fabric. In a simpler version, you simply string multi-colored beads on a wire and bend it in a chaotic manner. Then a regular light bulb is fixed in the center.

If the soul desires something softer, with an oriental flavor, you can create unusual fabric shades decorated with beads. To do this, you will need old CDs, to which you will attach both fabric and beads strung all on the same wire. - an irreplaceable element, stock it up in abundance!

The fabric should be translucent: organza or tulle will do. It is sewn from one edge and fixed only from above. Then you can string a wire with beads on it. Please note that it is better to choose transparent or "chameleon" beads, otherwise they will look too gloomy when the light bulb is lit. Instead of a light bulb, you can place a flickering New Year's garland inside the lamp: this way you will create a festive atmosphere in the room.
3. Light cloud
Incredibly cute and gentle option that will suit both children and adults. It may seem that it is quite difficult to perform, but it is not at all the case.

To create it, you only need a paper "Japanese" lantern, cotton wool and a lot of glue. Cotton wool in large quantities is glued to the flashlight to make a lush lump. Additionally, it can be decorated with pendants in the form of stars, a crescent or raindrops. That, in fact, is all.

It is better if the cloud stays on a thin line, - in this way you will create the effect of weightlessness in the room. This is a great idea for a themed party, so stock up on some cotton and go!
4.Light lock
A similar solution is suitable for those who, as a child, liked to cut pictures from magazines. A surprisingly simple lamp that will create a mysterious, almost mystical atmosphere in the room.

You will need to find a photograph (or print a picture) of an old castle, carefully cut it out and roll it into a kind of tube. Then fix the structure with tape, and put a small light bulb inside. On dark evenings, your castle will be illuminated from the inside, and mysterious shadows will flicker against its background ... well, how can you not tell a scary tale? Also in the castle, you can cut out "windows" through which light will pour out.


5. Lamp from old things
Old dishes, fragments of furniture and even old, shabby lamps are in every home. It's good that you didn't throw them away, because now they will function again, you just need to decide on the style. In some cases, you don't even have to decorate anything, you just need to put the lamp (or what is left of it) in a suitable environment.


Most often, the case is limited to a drill or glue with a dead grip. Such lamps can be placed in any part of the apartment, the main thing is to observe the overall compatibility.

And a few last tips:
1. Use only energy-saving light bulbs in fixtures! You don't want to see flames in the place where your beautiful creation was just now?
2. Make sure that the material you choose does not hide the light - after all, first of all, the lamp should illuminate and only then decorate the room.
3. Do not be afraid to experiment, you will succeed! Who knows, suddenly a designer-decorator is dozing in you? It's time to wake him up!
Photo: homedit.com, millax.com, museum-design.ru, idejnik.ru, reduktor-union.ru, happy-giraffe.ru, magdekor.ru, secondstreet.ru, decorateme.com
Find out how to make a lamp out of wire, building mesh, so that flowers grow inside it. How to turn a snag into a lamp, and tree branches into a floor lamp?
How to make an original lamp?

A very interesting design item is obtained from the simplest materials, most of which are left over from a picnic. If you went with friends, relatives to nature, you must definitely remove the garbage behind you. This not always desirable job will be made more enjoyable if you ask to fold the plastic spoons separately. If children are traveling with you, arrange a competition to see who can throw more and faster spoons into a separate garbage bag or bag.
You will also need water canisters. After a fun picnic, after arriving home, after some time, you can make original lamps from the containers left after the feast. Hand them to your friends, leave them for yourself to hang in the hallway, in the kitchen or in the country.
So, here's how such a chandelier is created with your own hands or with the help of your home. First put side by side:
- 5 liter oval plastic bottle;
- disposable plastic spoons;
- cable with cartridge and plug;
- low power LED bulb;
- pliers;
- glue gun;
- screwdriver
- stationery knife.
So that such original lamps do not lead to a fire, take an LED, and not an ordinary Ilyich light bulb.
For information: 4–5 W of LED bulbs correspond to 40 W, and 8–10 W to 60 W of conventional electric ones.

Carefully, so as not to cut yourself, remove the bottom from the canister with a knife.
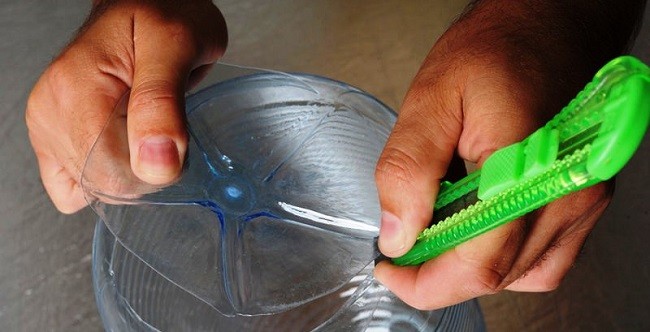
Also, observing safety precautions, so as not to get hurt, cut off the handles of each plastic spoon completely. Applying a little hot glue from a gun to the cuts of the “blades”, glue them to the bottom tier of the bottle. Usually 17 pieces go here. Then, overlapping, attach the second and subsequent rows, arranging the elements in a checkerboard pattern.

To cover the neck, glue 10-12 spoon blades together, forming them into a ring.

Pass the cartridge with a light bulb and cable through the cut bottom hole in the bottle. If this "electrical" part causes difficulty for women, call the husband. If you don't have one, buy a cable from the hardware store with the socket and plug already screwed to it. You can borrow this working part of the lamp from the old one.

Put a “ring” of spoons on top of the canister, screw on the lid. To do this, let the husband drill a hole in it with a drill, and you yourself can do this manipulation with a hot nail or self-tapping screw, holding it with pliers. The original lamp is ready.

3 models of designer lampshades with your own hands
Ideas are in the air. If you are in the country and this piece of furniture is not there, it is easy to make it yourself from what is at hand. Take:
- hollow dishes;
- wire;
- mounting foam;
- gloves;
- paint;
- brush;
- pliers.
As a basis, you can use unexpected things: an old pot, a planter, an already unnecessary children's pot.
Turn over any of these auxiliary items, put on a plane upside down. Wind the wire, its turns repeat the shape of the future product, should be the same as the lampshade. With your own hands, but with gloves, pick up a can, squeeze a little foam out of it onto the frame, close the wire, let it dry.
After that, make the contours more even with a knife, cutting off the excess. Paint in your favorite color, white looks airy and elegant. Such a lampshade, made with your own hands, will decorate a country gazebo. You can make a few and hang them here. By avoiding big expenses, this way you decorate the space.

This lampshade looks stylish and modern, while the next one has a classic look. For it use:
- thick wire;
- pliers;
- small plastic water bottle.
Now roll the large outer ring from the wire. We will fasten it. To do this, cut 4 identical pieces of wire with pliers, fasten the first end of each to the small, and the second edge to the large ring. The upper part of the lamp is ready.
The size of the lampshade depends on whether it is made for hanging from the ceiling or for a table lamp. The first is greater than the second.
Roll the bottom ring out of the wire, it is the largest. Connect it to the second top five pieces of wire, distributing them evenly. It remains to decorate the frame of the lampshade. To do this, pass the wire through the second ring, twisting it in a wave and twisting it through the base. Do the same for the second ring.

It remains to sheathe it with fabric. Attach the flap from the second top to the bottom ring, cut to size, adding to the seam. Hem the large sides of the resulting rectangle. Sew the canvas on the side right on the frame, decorating this place with braid. That's it, you made a wonderful lampshade with your own hands.
If you want to get acquainted with the most modern ideas on this topic - please! In skillful hands, the construction grid will turn into a stylish lampshade.

With your own hands or, having called on a man, cut a rectangle from it with metal scissors. To fix the cartridge, twist a circle from the wire, fix it on top of the lamp with four pieces of wire.
If you do not have coarse mesh, use pliers to cut off the excess sections so that the distance between the strips of wire becomes greater. Paint the lampshade, and its frame is ready.
And now the magic begins. You can make an original lamp, which will benefit not only people, but also plants. Attach a planter with a flower at the bottom of the lampshade. You can tie, woven using the macrame technique, for the lower turns of the wire with a thick rope. Check that the fastening is secure.
If there is a man and a welding machine in the house, call on this tandem to make a metal ring with "beams" that need to be welded to the bottom of the lamp.

If you have a home climbing plant, such as ivy, pass its lashes between the cells of the lattice. The original lamp will become a house for a flower. It is better not to use ordinary electric bulbs, as they are very hot and can burn the leaves of plants. In addition, the air around the flowers will be too hot. Screw in an LED or fluorescent light bulb.
For such an original lamp, you needed:
- construction mesh or strong wire;
- brush and paint (optional)
- pliers;
- light bulb with cartridge;
- flower.
You can well fix cups with seedlings on such a lampshade, thereby finding an additional place for growing it and conditions for lighting in the evening.
We make a floor lamp, a table lamp with our own hands
Walking in the forest, do not pass by a rolled ornate driftwood. Put it in a bag, take it with you. Wash at home, if there is bark, peel off with a knife. Go over the surface with fine sandpaper, if required. Finish with wood varnish.

In order for the table lamp to hold well, the snag must be screwed with self-tapping screws to a solid pedestal. It should be heavy enough. Oak is suitable for him. If you find a broken branch of this tree in the same forest, saw off a circle 5–7 cm thick from the thick part.
It will also need to be sanded and varnished. When these wooden blanks are dry, connect them with self-tapping screws of sufficient length, first passing them through an oak stand, and then plunging them into a snag. You can also use nuts and bolts.
How to make a lampshade with your own hands, you already know. Therefore, make it and attach it to a snag, wrapping it with wire.
If the old floor lamp stand is no longer happy or you just want to decorate it, also use wood for this. See how good the birch racks look. Attach a branch of this tree to the lamp and see what kind of floor lamp you could make with your own hands.

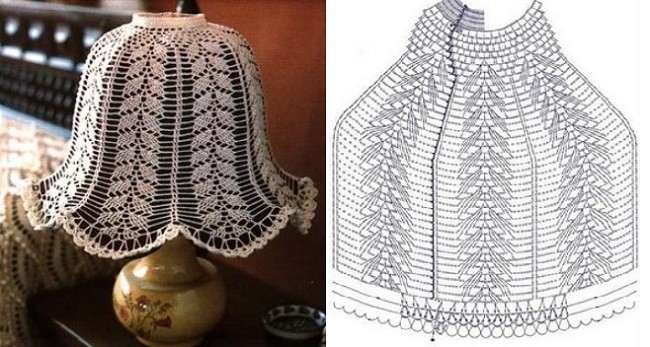
How to crochet a lampshade?
If you are fed up with an old floor lamp, you can transform it with your own hands, giving it a "zest". Take the openwork braid, sew it on the top and bottom of the fabric lampshade. You can decorate with glitter by gluing them in the form of a pattern, evenly or randomly.
A floor lamp or a chandelier will turn out unique if you knit a lampshade for them with your own hands. This can be done with a crochet or thin knitting needles. For the first option, you will need:
- hook;
- cotton threads;
- pattern for knitting napkins;
- water;
- starch;
- ribbons.

Measure the top circumference of the lampshade, we need its diameter. Tie a chain from the air loops. Next, knit in a circle, based on the napkin pattern. Measure the height of the lampshade and the diameter of its bottom circle. Based on these data, draw a trapezoid or a rectangle (depending on the shape of the lampshade). Crochet this pattern. Sew on the side.
With single crochets, tie the upper circle of the lamp and this trapezoidal or rectangular part.
Boil a glass of water, stirring, pour in 200 ml of cold water, in which 1.5 tbsp is diluted. l starch. Boil for 1 minute, remove from heat, cool. Drop a knitted lampshade here, soak well, then wring out, let the water drain, and the fabric will dry, but remain slightly damp.
Put it on the plafond. In order for the knitted lampshade to hold well, you can skip several ribbons or ribbons between the loops and tie them.

Plafonds look very nice if they are decorated with crocheted flowers.

A solution of starch or PVA will help shape the knitted lampshade. Put it on the frame, apply glue, let dry.
In the second case (when knitting needles are used), you need to make calculations for knitting, draw a pattern according to the standards of the lamp, knit a trapezoidal or rectangular lampshade. Similar models are suitable for floor lamps, chandeliers of a strict form. If you need to crochet a semi-circular lampshade, make wedges first, and then connect them with single crochets.

Here is another openwork chandelier. It is pleasant to make kisei with your own hands and decorate the bottom of the product in a circle. But first you need to create the lampshade itself. The crochet pattern for this beautiful thing is presented right there.

A table lamp will look amazing on the bedside table if there is such a lampshade on it, the knitting pattern of which is also given.
If your son or daughter does not let you finish the work, demanding attention, invite the children to make a lampshade too, let them twist strips of paper into tubes with their own hands. It is better to wind them on a thin pencil or a wooden sushi stick, and then glue the free edge so that it does not unfold.

Now you need to glue the resulting blanks, using an object of a suitable shape as a frame, for example, a 5-liter canister. Having made the first inner layer, let the child move on to the second. There should be several of them to close the gaps. When the PVA is dry, cover a table lamp with this lampshade or hang it from the ceiling. Looks original and extravagant.

If you are interested in other ideas on this topic, watch the video:
A very interesting version of the lamp from the disks:
We also recommend
 Productive and reproductive thinking
 Reasonable egoism - what is the theory of reasonable egoism?
 Boris Nikolaevich Yeltsin, the first President of Russia
 Underground fights. Underground kings. What is “fighting not for the masses”? Where can you fight for money?
 Yakov Pavlov and Other Heroes of Stalingrad You Need to Know
 Survive an accident at sea in a dream - in reality experience a new love