Beautiful shelves for flowers on the wall. Wall shelves for flowers
Fans of indoor floriculture often face the problem of lack of space for their pets. Keeping pots on the windowsill is not always convenient; putting them on the table is also not a good option. The real salvation in this case are the shelves on the wall. Making them with your own hands will take several hours of your time, but your flowers will have a permanent and comfortable place to live.
To make flower shelves with your own hands, a variety of materials will do. They can be made of metal and wood, plastic and drywall, glass and other durable materials. It is also important that the shelves on the wall fit into the interior and fit the conditions of the room.

- Drywall- it is used in the case when the shelf on the wall is going to be made in the form of a niche, and it becomes part of the overall design of the room.
- Wood- this is a classic option, which is easy to work with, and will last a long time with normal room humidity.
- Chipboard- resistant to moisture, deformation and temperature extremes, easy to use and is in an affordable price category.
- Metal- needs to be painted to protect the material from corrosion. In addition, a welding machine is required to work with it.
- Plastic- its advantages are affordability and resistance to mold, it is ideal for placing a shelf on a balcony or loggia.
- Glass- provides good light transmission, which can be extremely important for certain types of flowers.
- Plywood- moisture-resistant material, which, with a certain skill, can be given the most diverse shape with your own hands.


If one material is not enough to build a rack with your own hands, they can be combined. For example, make shelves for flowers, alternating plastic and glass or wood.
Plywood shelf
If there are several sheets of plywood lying around on the farm, and you know how to make smooth lines with a jigsaw, in one evening with your own hands this material can be turned into elegant shelves for flowers. To make such a design, in addition to plywood you will need:
- two galvanized or nickel-plated pipes;
- fastenings for shelves and self-tapping screws;
- paint or varnish;
- jigsaw;
- sandpaper;
- drill;
- tape measure and pencil.

Work order:
- Measurements are taken of the place for which the shelves are intended and a design drawing is created.
- The dimensions are transferred to a sheet of plywood, if desired, the cut can be decorated with curly edges.
- Shelves are cut out of plywood according to the drawing with an electric jigsaw.
- The edges of the blanks are polished with sandpaper.
- On each workpiece, holes for the pipe are sawn.
- Details are covered with paint or furniture varnish.
- Through the holes, the shelves are threaded onto the pipes parallel to each other, fastening near each plywood board.
- Make holes in the wall to which the shelves will be attached using self-tapping screws.
How to make a decorative plywood shelf (video)
Plastic rack
Window sills have become quite a familiar place for flowers. But since it is not always convenient to keep flowers by the window, the original solution would be to make a rack for them from the same plastic window sills with your own hands.


For work you will need:
- plastic window sill 3.9 m long;
- three galvanized or nickel-plated pipes;
- 9 flanges for fastening;
- 2 brackets.
Work order:
- The window sill is cut into 3 identical parts.
- In the blanks, 3 holes are drilled with a diameter of the pipe section: 1 at the front wall in the center, 2 at the rear along the edges.
- The pipes are cut to the height of the future rack.
- Window sills are put on pipes, fixing each shelf with flanges at the required height.
- The structure is flanged to the floor.
- Brackets are put on the upper ends of the pipes, which are attached to the wall with screws.
glass shelves
If you have the skills to work with your own hands with a glass cutter, it will not take much time to make a glass flower rack. But when there is suitable material, but there is no one to cut, the workshop will help out. You will only have to provide the necessary measurements and at home assemble with your own hands a structure of wooden slats on which the shelves will be held.
It is important that the glass be tempered, at least 0.5 cm thick. This fragile material must withstand significant stress from the pressure of flower pots.

For work you will need:
- glass cutter;
- hacksaw;
- 6 glasses;
- 8 iron corners;
- 2 wooden slats or boards.
Work order:
- Carry out the cutting of glass shelves of the required dimensions.
- In wooden slats, grooves are cut with a depth of at least ½ of the width of the glass shelf.
- Reiki with self-tapping screws on the corners are attached to the wall at the top and bottom of the rack on both sides of the wooden board.
- Glass shelves are inserted into the grooves.
wooden shelving
Wood is a malleable and relatively soft material. With only a saw, a hammer and a few nails, it’s easy to make corner flower shelves from a few scraps of board or a full-fledged shelving for the entire wall.
.jpg)
For work you will need:
- 2 bars 2 m long with a section of 20 × 20 mm;
- 6 wooden planks 2 m long with a section of 35 × 5 mm;
- nails 40 and 25 mm;
- sandpaper;
- a hammer;
- saw;
- roulette.
Work order:
- Planks are cut to a length of 60 cm.
- The bars are cut into 4 parts of 70 cm and 6 of 20 cm.
- The saw cuts are polished with sandpaper.
- 4 racks will be made of long bars.
- Short bars are nailed to the ends of the racks, on which the shelves will be held.
- Planks are laid on the bars and fastened with nails for structural strength.
- If desired, the rack is painted and varnished - this will save the tree from deformation and decay.
Making a shelf for flowers (video)
Conclusion
A little effort - and a functional exclusive little thing will appear in your house, which will not only provide your flower pots with a convenient location, but will also become the pride of the owner. One has only to turn on the fantasy and set aside a few hours of your free time for this.
What hostess does not want to transform the look of her room with the help of bright colors of blooming violets, begonias or geraniums? It is aesthetically pleasing, a little refreshing, and generally beautiful. But inevitably it is necessary to decide where to place these flowers in pots? Not on the floor. Need shelves. It is not always possible to find what you need in the store, and you want to save money. There is only one way out - to do it yourself, so that all this colored aesthetics, as they say, can be sorted out.
In this article, we will tell you how to make do-it-yourself flower shelves from wood and chipboard, consider options for wall and floor shelves, and also show photo and video instructions.
What material are the shelves made from? It can be plywood, chipboard, wood, metal, glass, drywall, etc. If you have wooden planks lying around on the farm, and you have not yet found a proper use for them, make a wooden flower shelf.
Let's start assembling a wooden structure

It will be very good if you have about 6 pieces of these wooden planks, and at least two meters high and 35 × 5 mm in size at the end. You will also need two bars of 20 × 20 mm, also 2 meters high.
Arm yourself with a pencil, a screwdriver (phillips) or a screwdriver, a tape measure, a saw and a jigsaw, as well as 25 and 40 mm self-tapping screws. Also, you can not do without an assistant who will simply support the structure when mounting the shelves to the racks. Now you can start manufacturing.
- Wooden planks for shelves are cut into 60 cm (12 pieces) and 64 cm (6 pieces) and, in general, we get 18 small planks - these are future shelves.
- The bars are cut by 70 cm and it turns out 4 pieces - these will be the side racks.
- From the remnants of the bars, we cut out six more small bars: four 23 cm each and two 19 cm each. This is the future mount for the shelves.
- On the bars that will serve us as racks, we make markings for the two lower shelves with a pencil. The markup is done with the calculation of the height of the flowers themselves in the pots that we plan to place on them.
- With the help of four bars (23 cm) we make two shelves. At both ends of the slats, bars are fastened across with 25 mm screws, which, in turn, connect the slats to each other.
- Using 70 mm self-tapping screws, we fasten the shelves to the vertical racks.
- Using the same self-tapping screws, we attach 19 cm internal bars to the upper parts of the rack between each pair of vertical racks.
- The third shelf is made in place by attaching each plank to the top of the product with 25 mm self-tapping screws.
This is how a small floor shelf or flower rack turned out.
From chipboard

If you prefer a chipboard shelf, then you probably have experience working with this material. Here you will have to tinker not so much with the manufacture of the structure itself, but with the preparatory work before assembly. You will need:
- Chipboard: workpieces with a size of 140 × 200 mm (the best is the waste of pieces from one sheet, although not essential)
- Fasteners (confirmations, self-tapping screws - 2 pieces for 45 mm and 6 pieces for 16 mm).
- Confirmation drill and regular drill.
- Mounted planks or awnings.
- Edge.
- Chopiki made of wood (dowels).
- PVA glue.
From tools:
- Iron.
- A hammer.
- Device for pasting with an edge (a regular bar with a groove a little more than 16 mm).
- Wooden block wrapped with sandpaper.
- Clamp.
As you can see, the list is considerable, and all this is necessary to prepare for the assembly.
First of all, we determine which ends of the parts will be visible, after which we begin to glue them with an edge. We use for this an ordinary household iron and a shoe knife to trim the excess edge. Using a special tool, we tightly smooth the glued melamine edge and grind the end corners with an emery bar. Those places that will be joined together should not be pasted over.

We are preparing the elements of the back base for future shelves that we have not pasted over with a paper edge for docking with each other. We drill two shallow holes and pour glue into them. We hammer chopsticks (dowels) into the holes, and in the joined part of the adjacent element we also drill two holes and fill them with glue.

To make the chopsticks coincide with the holes of the adjacent element, use special “jigs” or furniture taps for dowels. "Conductors" are put on dowels and pressed against the mating part, sharp taps will inevitably leave small indentations. Drill there.

We connect the parts together and press firmly. For this, a clamp will be an indispensable tool for us. Press the parts firmly with a clamp and leave to dry completely.

The back of the shelves is done. Now our task is to fix the shelves. To do this, first we make markup for confirmations.

We drill holes with a special confirmation drill, after which we proceed to fasten the shelves, alternating them on the right and left.
It is best to attach the hanging strips from above and below so that the shelf hangs vertically on the wall, even if someone accidentally touches it.
It remains to beautifully arrange the flowers and you can enjoy the work of your own hands.
You can dream up and make the shelves colorful. Or another option: round the free corners of the shelves and upholster them with a T-shaped plastic edge. It will be much more beautiful.
corner

Now is the time to talk about corner flower shelves.
Sometimes a place for flowers is only in the corner, therefore, we need a corner shelf. It can be either a bookcase or a hanging shelf. Everything is simple here, as mentioned above, the main thing is to prepare everything correctly. For example, if we want to make a corner bookcase from chipboard with elements of chrome pipes, then we need:
- 4 squares of chipboard, the size we need.
- T-shaped edge (it is possible to match the color of the product, although this is not so important).
- Chrome-plated pipe Ø 25 mm (usually three meters are on sale, so it will be better and cheaper to get the leftovers somewhere), 18 pipe flanges.
- Three plastic, chrome-plated legs.
- Melamine edge.
From tool:
- Drill with a nozzle.
- Iron.
- Shoe knife.
- Edge banding device.
- Sander.
- Electric jigsaw.
- Milling cutter.
- Pipe cutter.
- Rubber mallet.
- Self-tapping screws for wood (4×16) up to 70 pieces.
- Screwdriver.

We pre-prepare the shelves, making them radius. We can do this with a jigsaw and grinder. We cut off the excess with a jigsaw, and process the cut with a grinder. It is worth noting that a tool such as a jigsaw mercilessly cuts off the laminate when cutting. After grinding, these chips are practically removed. The next step is to glue the even ends of the shelves with a melamine edge. Then we will deal with the radius places of future shelves. We need a milling cutter and a milling cutter, which cuts a small groove at the end of the chipboard sheet, where we subsequently need to hammer the T-shaped profile with a rubber hammer. Next, we make a basting marker and drill 3 holes in the chipboard for the 25th pipe.
Holes are not drilled in the upper and lower shelves at all.
With a special pipe cutter, we cut off the parts of the chrome pipe we need to size. We fasten the legs to the bottom of the whatnot. Then we screw the flanges onto the holes of the two shelves on both sides (it is better to do this before installing the shelves into the product) and thread the tubes. We fix them with special screws on the flanges and, one might say, the whatnot is ready. This corner product with flowers will be a wonderful decoration for your corner.
Suspended

Now it's worth talking about light-loving plants that need to be installed closer to the window or even on the window. Naturally, we will not talk about flowers, but about window shelves for flowers. Of course, your desire to arrange flowers on the window can be caused not only by the light-loving nature of the plant, but also by the growth structure of its shoots. They can be, for example, flowing or curly. In this case, it would be better to think about how to arrange these flowers higher. How to make shelves for flowers in this case? To do this, you can use different materials.

You can also make it so that there are hanging plants in pots on the window. To do this, we need only a few anchor anchors with an 8x60 hook.
- We drill a hole in the upper part of the window with a puncher.
- We insert the anchor hook and screw it clockwise until it stops.
- We tie the ropes to the pots. It is better if it is an ordinary fishing line. It is not so visible and is quite strong. However, there is no limit to the imagination.

The anchor mechanism is designed in such a way that when it is screwed in, its spacer part expands and, thus, sits quite firmly in the concrete.
Glass shelf on the window

And if we talk about literal window shelves, then the next option is especially acceptable for those who want to do everything, firstly, quickly, secondly, reliably and, thirdly, beautifully. It is clear that we are not talking about placing flower pots on the windowsill. It is cumbersome, inconvenient, and in some cases not particularly beautiful.
These shelves can be mounted provided that the window itself is wooden.
 In any furniture store that sells accessories, you buy a chrome-plated shelf bracket (it is called an arched, concave bracket). On the household market, you can buy a one and a half meter lath about 3.5 cm wide and about 1.5 cm thick. As a rule, there is a glass store next to the market, and if you know the exact dimensions of your future shelf, then order glass with a thickness of 3 mm with grinding in a circle. For beauty, you can choose any tint, and if you have children, it will be important that the glass is necessarily tempered. Such glasses, when falling to the ground, shatter into small pieces with non-sharp ends, and your child will not get hurt on them.
Next, we measure the depth of the shelf support and cut small strips according to these dimensions. From below, on small screws, we fasten these strips to the brackets. The tree in this case will serve as a lining material between glass and iron. Just be sure to make sure that the screws do not come out from the other side. Therefore, your fasteners must be of the appropriate size. It remains the case for small: attach the brackets to the window frame. After that, you can put shelves on top and make sure that we did everything correctly and the plane is strictly horizontal (use the building level for this). The shelves are not attached to the brackets, but will be pressed against the flower pots. The convenience is that this entire glass structure can be easily dismantled in case of general cleaning, when it is necessary to wash the windows.

As you can see, there are quite a few variations on the flower shelf theme. Which one you prefer depends on your taste and your capabilities. The main thing is different: beautiful flowers will decorate your home, and beautiful original handmade shelves will say a lot about the owner and mistress of this house. Therefore, let there be many flowers in your house.
Video
This video is about making a flower shelf on a window sill from chipboard and pipes:
Learn how to make a tiered wooden flower rack:
A photo


When it comes to choosing a gift for a beloved woman, a man, first of all, has an association with jewelry or various elements of women's clothing. But for some reason, the moment is not taken into account that many of the fair sex really like to plant indoor flowers and take care of them in every possible way. Therefore, the idea with original flower shelves would be quite appropriate. The information below will tell you about easy ways to make your own flower shelves.
Plywood flower shelves
If there is a large plywood lying around in the workshop and there is a desire to please your soulmate, you can easily make flower shelves from the material with your own hands. Ordinary inexpensive plywood with a certain thickness will become a very convenient design on which you can put flower vases. A little imagination will turn such a shelf into an original design solution.
Instruments
To create a flower shelf, prepare the tools:
- a sheet of plywood of such a size that it is convenient to cut out all the necessary elements;
- a pair of nickel-plated or galvanized pipes of small diameter (the quantity is calculated by 2 pieces per shelf);
- paint or any kind of wood varnish; electric jigsaw;
- drill with a convenient nozzle for drilling holes for mounting pipes;
- construction tape and sandpaper.
Manufacturing
Shelves manufacturing process:
- After carefully examining the installation site of the flower rack, you need to choose the appropriate size for the shelves.
- On a sheet of plywood, based on the established measurements, make drawings of the shelves. When choosing the shape of the shelf, you can move away from the standard straight lines and complement the image of the structure with interesting bends of different depths. The main thing is that the general appearance of the rack organically fit into the interior of the room.
- When cutting out the intended parts with an electric jigsaw, you need to carefully monitor all the contours of the elements.
- Holes for mounting pipes are marked on the topmost workpiece.
- The cut blanks of the shelves are stacked on top of each other and holes of a certain diameter are carefully drilled to install pipe supports.
- Plywood blanks are cleaned with an emery sheet. It is necessary to carefully process the end parts of the shelves.
- This is followed by the stage of coating the finished elements of the rack with paint or varnish. This procedure must be repeated several times to form an even and dense layer of the applied substance.
- Mounting the finished rack to the wall is as follows. Specially designed brackets are attached to the back of the upper and lower shelves. Holes are drilled in the wall, according to the marks made. Rack shelves are fixed on the wall with self-tapping screws threaded into the holes of the brackets. It is necessary to check the suspended structure well for strength.
wooden shelving
Dimensions of wooden flower shelves can be 60 cm long, 23 cm wide, 70 cm high. This model has 3 flower shelves.
- For the manufacture of shelves, strips of small thickness are quite suitable. Since each shelf will consist of certain elements, it is necessary to cut out 18 such thin blanks. The length of each element should be 60 cm. And from the bars you can make racks for a flower rack.
- Wooden blocks of 20 × 20 mm in size are selected and cut every 70 cm in the amount of 4 pieces.
- From the cut bars with an electric jigsaw, elements of the future structure are cut out 23 cm in length.
- On the desktop, two racks are laid parallel to each other and marks are made in the places of future fastening of the shelves. Here, the important point will be to determine the required distance between the shelves, as this will affect the possibility of installing flowers of different heights there.
- At the next stage, 3 wooden flower shelves are installed, each of which consists of 6 planks. The shelves are connected to the end part with nails driven into bars 23 cm long. The length of each nail is 2.5 cm. Upon completion of the installation, it is necessary to process all uneven edges with an emery sheet.
- When mounting the shelves, you need to expose the entire structure in such a way that the master can comfortably hold the rack and hammer nails at the same time.
- The finished product is treated with paint or varnish for furniture in several layers.

Shelves for flowers made of wood and metal
The whole structure is fastened with the help of metal racks connected to each other by a welded jumper. This gives additional strength to the entire flower shelf on the wall. Bars of wood will act as coasters.
- If the whole structure is attached to the wall, then it is necessary to acquire metal rods with a cross section of 1 cm. And to install the finished structure, corners are mounted on the floor. Based on the chosen place for installing the rack, the dimensions of the shelves themselves are determined. After that, metal racks are welded. With the dimensions of the length and width of the side contours of 90 and 20 cm, respectively, it is possible to install 4 shelves with a distance of 30 cm from each other. Such dimensions are suitable for compact flower pots with small leaves of plants planted there. And the location of the top shelf allows you to install flowerpots with flowers of any height.
- The metal racks of the structure are connected using welded rods. This method of fastening will provide an additional metal base for the plane of the shelves themselves and make the entire rack more reliable.
- Metal strapping is used in 4 tiers. Finished welded elements are painted to match the interior.
- Wooden planks 25 × 15 mm are sawn along the length of the shelves of 60 cm. The finished elements are laid parallel on a flat surface and connected to each other with wooden bars 20 cm long.
- A wood-metal shelf is mounted to the wall using self-tapping screws. The distance between the marks for fastening should not be less than 50 cm. In order for the metal frame to be located on the wall parallel to the floor, a building level is used.
This will make it possible to evenly lay the planks for the shelves. The final step will be painting the wooden elements of the finished flower shelf.

Rack for flowers from a plastic window sill
Based on the very name of the design, the main component of such a creation will be a plastic window sill 3 m 90 cm long. You will also need 3 pipes in a nickel-plated or galvanized version, 9 flange mounts and brackets in the amount of 2 pieces.
- Each window sill is cut across into three pieces, each 1.3 m long. Thus, we get our shelves.
- 3 holes are drilled in each shelf for future metal racks. The location of the holes will be the vertices of an isosceles triangle, that is, one at each end closer to the back and one in the middle near the front edge. Hole locations in all shelves should not be combined.
- Measure and cut 3 pipes of the same length. The structure is fastened with lag screws for flanges.
- It is fixed to the floor using the same elements. The role of the lower fasteners for metal racks is performed by flanges and screws. And with the help of brackets mounted in the wall, the upper ends of the two pipes are fixed.
Corner shelves
Necessary blanks and materials for the work:
- Chipboard sheet.
- Metal pipes nickel-plated or galvanized.
- Screws and flanges in sufficient quantity.
Manufacturing process of corner shelves:
- The design is assembled in full analogy with the previous work. With an electric jigsaw, all the planned elements are cut out for the manufacture of triangular shelves.
- Marks are applied to each workpiece for cutting holes for metal racks. These holes are drilled in three places. This process is repeated for each shelf.
- All elements are interconnected by means of flanges and screws. The position of the rack is fixed with the help of brackets built into the wall, which are put on the upper parts of the pipes.
- And at the last stage of work, it remains to choose a color suitable for the overall interior for painting the structure.

Glass rack for flowers
A very original design of such a rack is achieved through the use of different glass and the use of LED lighting. Rays of light penetrating between the flowerpots magically illuminate the flowers from below, creating an overall radiant picture. To make such a rack, you need 6 glass shelves and a pair of wooden slats.
- The glass thickness must be at least 5 mm. Glass is selected tempered type.
- The support strips for the shelves are made in a wooden style. Based on the cross section of such strips, grooves are selected. Glass shelves are fixed in them. The grooves should be as strong and reliable as possible, as they hold all the elements of the glass flower rack.
- When choosing much smaller sizes of structural elements, it is better to use such a device not for flower vases, but for the exhibition of various figurines and souvenirs of small sizes. The manufacture of the lower shelf in wooden design will be more reliable.
- Glass structures are practiced for growing flowers on the windowsill. The rack does not absorb a lot of light and is compactly placed in the window opening.

Video
In this video, the master will show how to make a flower shelf on the windowsill from an old cabinet. Simple, comfortable, looks great.
Sometimes, there is not enough space on the windowsills to place your favorite flowers, seedlings. Of course, if you have extra money, you can buy a bookcase, a shelf for plants. To save money, make these devices to your liking, make such a system with your own hands.
How to make a plant shelf out of wood?
There are many options for such products, choose the one for which you have materials. You can make a high shelf or not.
Notice how beautiful this one looks. Here you will put several flower pots, each plant will be lit by the sun. To make such a miracle, you will need:
- plywood;
- jigsaw;
- acrylic or oil paints;
- brushes;
- self-tapping screws;
- boards;
- roulette.
Cut out the pattern with a jigsaw. Mark the distance from one edge of the shelf to the other, based on this figure, saw the boards of this length.
Paint them and the plywood sides white. When the coating dries, using a stencil, you can apply a pattern to the plywood with another paint. When it dries, then attach the boards to the sawn straight parts of the plywood using self-tapping screws, while two self-tapping screws must be screwed on one and the second side of each shelf. Work completed.
If you don’t have a jigsaw, don’t know how to use it, or are looking for an easier option, then another shelf will do.

To recreate this model, use:
- boards;
- bars of small section;
- paint;
- brush;
- small corners;
- self-tapping screws.
Saw off the first board so that it is as long as a window sill or a little shorter. The second tier will be above it. You can make this element the same length as the first one, or cut it by a third or half. Also determine the size of the top shelf yourself, depending on how many flower pots you need to place.
Pick up the bars of such a length that they are higher than the planter along with the plant planted in it, add a few more centimeters so that the flower does not rest against the shelf located above it and is well lit.

As you can see, on the right and left, the shelf rests on a base of bars, assemble each of the 4 planks, connect with flat corners and self-tapping screws. The left rectangle is high, fasten one more bar across it, in order to then attach the shelves here using the corners of the self-tapping screws.
On the right side, the middle shelf rests on two vertical bars, and the top one on one. Fix all the elements well, then leave the flower shelf the same or paint it. After it dries, you can install the plants and enjoy the vacated space.
If you do not have wide boards, this is not a reason to give up. Use subtle by studying the following master class. As you can see, the height of this shelf for flowers is 1 m 20 cm, its length is the same, and its width is 28 cm. The distance between the shelves, depending on the height of the plants, is 35–40 cm.

Here is a list of materials and tools you will need:
- boards;
- bars with a section of 20 cm;
- roulette;
- self-tapping screws;
- saw;
- stain or varnish for wood.
- Lay on the work surface in parallel, at a distance of 28 cm, two bars, if they are of different lengths, saw them off so that they become equal to 120 cm. Attach three bars of a length of 28 cm perpendicularly at the same distance.
- If some flowers are large and others are not, then arrange them according to their height, make some shelves more spacious in height and others less.
- Saw off the board so that its length becomes 28 cm or as large as the width of your window sill. For one shelf you will need 2 pieces.
- Lay them parallel to each other. From above, place perpendicular boards 120 cm long, stuff them into these two rivers, attaching them on one side and the other.
- Attach these shelves with self-tapping screws to the transverse bars that are on the vertical racks.
- Coat the wooden parts with stain or wood varnish, wait until they dry. Now you can arrange the plants.
- two straps for bags;
- 8 nails;
- wooden board;
- saw;
- a hammer.

Flower shelf made of plastic, glass

This model will allow you to place many small pots of violets, rooting cuttings and leaves. To make such a flower shelf, you need:
- plastic window sills;
- nickel-plated or galvanized pipes;
- two brackets;
- nine flange mounts.
Pass the pipes through the holes, fix the structure with slate fasteners. If the bookcase is near the wall, then attach it to it to fix the shelf. In this case, the plants will need lighting, using small screws, attach fluorescent or phytolamps under each shelf.
A great option is a shelf with glass railings. They will let in the light that plants need so much.

In order to make a glass flower shelf with your own hands, it is better to take tempered glass with a thickness of at least 5 mm. This one is more durable.
If you want to make an openwork, almost weightless-looking whatnot, then take:
- durable glass rectangles;
- openwork brackets;
- self-tapping screws;
- adhesive pads;
- screwdriver or screwdriver.

It is possible to fix glass elements on nickel or galvanized racks using flange fasteners.

When you walk in the woods, you can take home some snags, intricately curved branches, to then make a beautiful flower stand out of them.

Clean them from bark, dirt, sand with sandpaper. Assemble the composition by looking at how to connect the fragments, where to place the coasters. Combine snags, branches with bolts and screws, having previously made holes with a drill. Saw circles from plywood, fix them on the branches with self-tapping screws.
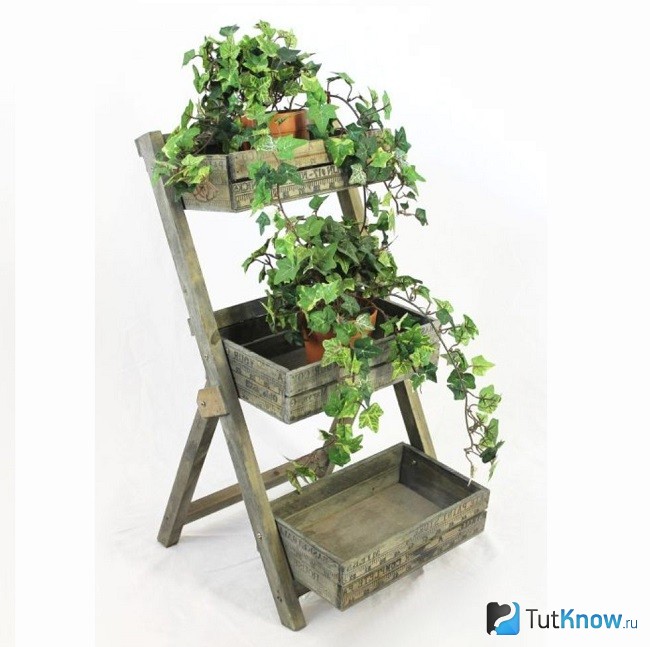
If you have wooden boxes, then the bookcase rack can turn out like this. The base is made like a ladder, then boxes are fixed on it.
If you have balusters on your farm, then make such a carved whatnot.

Even a wooden pallet can be turned into a flower shelf. Use it in whole or in part.

And here is another great option for using driftwood found in the forest. The basis for such a stand for flowers, shelves are made of plywood. Then the product is covered with yacht varnish.

We make a rack for seedlings with our own hands
It's time to grow it. Experienced gardeners know how often there is not enough space to sow the seeds of various crops. Therefore, vertical shelves will be a great solution to the problem.
You can buy a plastic rack to place all the containers and cups on it.

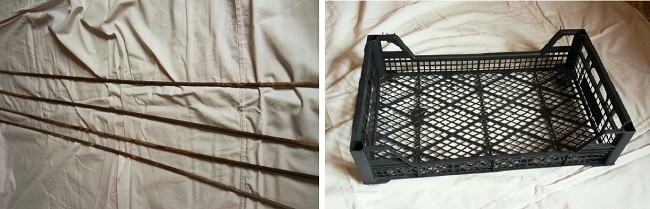
But it is better to make it with your own hands from plastic boxes for vegetables. See how little it takes to implement such an idea:
- four metal tubes;
- pieces of rubber hose;
- plastic boxes with low sides;
- secateurs or scissors.
If you wish, you can paint the boxes to make the design look festive. Or take ready-made colored storage containers.
In this case, 4 boxes were used, for them you will need 12 pieces of hose 15 centimeters long. Cut it with secateurs or scissors.

Put the first box on four rods. To prevent them from crawling out of the hole, attach one wine bottle cork to this place. If they are not available, then you can saw off pieces of branches, thread the rods through the side recesses of the plastic boxes, hammer these pieces of wood into their ends.
Now install one piece of hose on each rod, put the box on top, then the hose sections come again, then the plastic container. Thus, assemble the entire structure, put it on the windowsill. This planter rack will save space and be made to your individual measurements.

The room must be ventilated periodically. To prevent the seedlings from freezing, place pieces of cardboard on the side to eliminate drafts.

And if there are balusters, make a shelf out of them and wooden boards. This one will also accommodate a lot of seedlings. Sometimes the rack can be rotated 180 degrees so that it does not stretch in one direction.

To solve the problem of watering and the boards do not get wet from the water, put the cups in transparent plastic containers that sell marshmallows or cookies.
The next option is one of the easiest. To implement it, take:
- three boards;
- rope rope;
- drill with a wide drill;
- optionally - a means for processing wood.

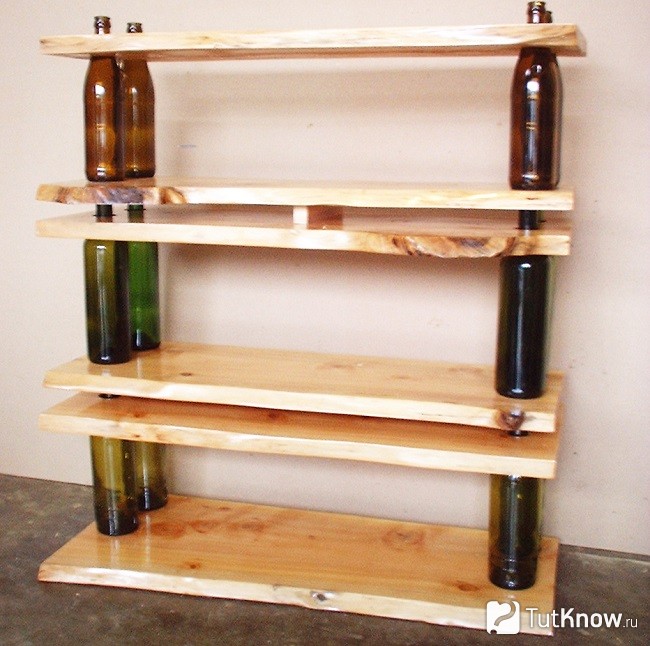
The next option is even more creative. For this rack you will need:
- empty glass bottles;
- wooden boards;
- fasteners in the form of screw-in brackets and links.

Drill 4 holes in each board so that the necks of the bottles pass through them, screw the fasteners.

Assemble the structure of two boards and 4 bottles, fix it with brackets.

If you make three of these fragments, then you get a wonderful bookcase or seedling rack.
But the next idea is very simple to implement. Even beginners can make such a rack for seedlings of flowers.

It is enough to fix two brackets on a wooden window frame, fix a pre-painted board on them.
Using the same elements, you can make corner shelves.


Making a flower stand: a detailed master class

To make one, take:
- plywood impregnated with a water-repellent agent, 15 mm thick;
- 17 pcs. flanges of the Joker system;
- chrome-plated tubes of the same system with a diameter of 25 mm;
- 4 things. furniture legs;
- self-tapping screws;
- screws;
- 5 pieces. threaded bushing;
- furniture edge;
- 5 pieces. furniture bolts;
- car enamel in a can;
- jigsaw;
- wood putty;
- drill;
- screwdriver;
- pipe cutter for metal;
- screwdriver
- grinder.

Using the presented drawings, make a pattern, transfer its outlines to plywood, cut it out, and sand the edges.

With a pencil, mark on the lower platform the place where the bolts will be attached, drill holes with a drill. On the elements of the rack, you need to determine where the flanges will be, make holes with a diameter of 2.5 cm. Apply putty to the blanks of the shelves, when it dries, sand these surfaces with a machine or manually using fine sandpaper. Paint the shelves in the desired color, apply two coats alternately, allowing each to dry. Now glue the edging to the ends of the plywood shelves.

With the help of a pipe cutter, we need to get: three tubes 1 m 20 cm long, one 60 cm, and another 90 cm.

When buying pipes, you need to purchase such that their total length is 5 m 10 cm. When sawing, it is better to use a saw so that the cut is more even.
Using the flanges on the lower platform, fix all the tubes, screw them to the base with self-tapping screws.

In the same way, secure the second and all subsequent tiers.

So that the flower stand can be moved, attach the wheels, if this is not necessary, then fix the furniture supports on the lower structure with self-tapping screws.

That's how many ways there are to make racks, whatnots, shelves for flowers and seedlings. But these are not all ideas that can be used. If you want to know even more about this topic, then open the video player.
The first story is for those who have the skills and tools to work with metal. It will turn out a beautiful openwork stand for flowers.
Here is another interesting and quick idea to implement.
In the third video you will learn how to make a seedling stand.

Flowers do not just decorate the interior and create comfort in the house. They perform a number of important functions: they attract positive energy into the house, create peace and harmony, save their owners from troubles and have a good effect on human health. Flowers also have healing properties. Aloe, for example, treats colds and wounds, and homemade geranium is useful for insomnia and nervous disorders.
Each plant is unique in its own way. And with careful attention and care, any flower will fill the house with joy and make the life of its owners happier.

But what if there are too many indoor flowers? They do not fit on the windowsill, they are placed on tables or even on the floor. It does not always look beautiful, besides, it gives the impression of cluttering up the room.

For the plants themselves, this is also bad. After all, most of them need a lot of light for normal growth and development. Some of them, like geraniums, for example, love the sun. And its lack will adversely affect the development of the flower.

To avoid these problems, to revive and decorate the interior of your home, buy plant stands. They can be purchased at a specialized store, via the Internet, and if desired, it is easy to do it yourself.

Types of plant stands
A flower stand serves several purposes: it provides the right conditions for plants, saves extra space, adds effect and style to the interior of the room.


Stands are floor, hanging (wall) and located on the windowsills. Which one to prefer depends on the plants in the house, the taste of the owners, the location of the room and the general decor of the room.

Floor stands for flowers have a diverse look and shape - very high and very low, wide and narrow, in the form of a ladder, flower bed or multi-tiered shelves. Multi-level shelves adapted to a group of colors. They are placed on different tiers so that they do not interfere with each other.

In the upper part they put flowers that love light. Plants that prefer partial shade can be placed under them. Single racks are intended, as a rule, for large plants: ficuses, palm trees, monstera, hibiscus, dracaena and others. Their pot is large and heavy, respectively, and the stand must be strong.

Recently, high floor structures are gaining popularity, occupying space from floor to ceiling. With the help of such racks, you can easily place a large number of plants in a small area of \u200b\u200bthe area. This will save space, which is very important for small city apartments. In addition, each flower will be presented in a favorable light.

Very often, decorative plant stands are left on the windowsill. As a flower stand on the windowsill, flat plastic or wooden lacquered structures are usually used.

Those who want to achieve originality and sophistication purchase forged products. They can be for each individual flower or for several plants.


Sometimes coasters are made in the form of a long rectangular metal box, in which many pots of flowers can be placed at the same time. This creates the appearance of a real flower garden. Such coasters are suitable for any, even the narrowest window sill.

The empty part of the wall is easy to decorate with a beautiful flower. For such purposes, special stands are sold that are attached to the wall. It is advisable to use hanging (wall) stands for placing ampelous plants.

Manufacturing materials
The main materials of flower stands are plastic, wood, metal, glass stone. Plastic coasters are light in weight. They are not exposed to the environment, they can be easily placed outdoors.

Another popular material is metal. Its advantage is strength and durability, as well as wide opportunities for creative ideas. More than 10 flowerpots can be placed on one metal rack. Forged coasters look especially elegant. Their shape and style are the most unusual.


So, jardinières are often found in the form of an elegant carriage, pyramid, barrel, ladder, cart, butterfly or treble clef. Professional craftsmen often create real masterpieces.


Metal flower stands are made in the traditional classic style, Provencal, hi-tech, or exotic, oriental. Such structures must be protected from moisture. Their disadvantages include a high price.

Wood is in great demand among flower lovers. Wooden flower stands are combined with country or Provence style. And the design of several steps will perfectly fit into the interior of a loft and high-tech. If desired, wooden products can be easily repainted in a different color, and this is a significant advantage.

If there are many plants of the same species in the room, for example, violets or streptocarpus, requiring the same conditions, wooden coasters are placed on the windowsill. In country or eco-style rooms, wicker wooden coasters will look good. But for such an exquisite composition, only small flowerpots are suitable.

DIY coasters
If you have the desire and time, you can make a flower stand with your own hands. The main thing is to get creative. For manufacturing, you can use any improvised material.


For example, make your own hanging flower stand:
- Take ordinary wooden boards and a strong rope.
- For each board, make one wide hole for a flower pot and small ones in the corners for a rope.
- Install the shelves, thread the rope through the holes, secure with knots.
- If desired, you can experiment and repaint the shelves in other colors.


This exciting process gives a lot of room for creativity and new ideas. A handmade item will be unique.

With the help of stands, you can easily place flowers indoors. In addition, properly selected jardinières will serve as a real decoration of the interior. A variety of photos of flower stands clearly demonstrate how significant and beautiful this small interior detail can be.


Photo of flower stands


We also recommend
 Productive and reproductive thinking
 Reasonable egoism - what is the theory of reasonable egoism?
 Boris Nikolaevich Yeltsin, the first President of Russia
 Underground fights. Underground kings. What is “fighting not for the masses”? Where can you fight for money?
 Yakov Pavlov and Other Heroes of Stalingrad You Need to Know
 Survive an accident at sea in a dream - in reality experience a new love