Do-it-yourself visors made of metal. Beautiful canopies over the porch
When there is no roof over the porch, it is constantly exposed to precipitation and sunlight. If you can still somehow put up with the sun, then a door constantly covered with snow is a serious problem. Therefore, in order not to fight the elements, we recommend building a solid metal roof for the porch. We will describe all the nuances of its manufacture below.
Design - we determine the dimensions and design
First of all, you need to decide what type of roof you need for your porch. Depending on the design of the frame, the roof is of two types:
- canopy - is an attached structure, which is attached to the wall on one side, and rests on racks on the opposite side;
- visor - is attached only to the wall, while the opposite edge simply hangs in the air, i.e. has a cantilever design.
Peaks are suitable for small porches, since their length rarely exceeds 50-60 cm. You should not make it longer, because in addition to its own weight, it will have to withstand a snow load. If you need a roof for a large porch or, for example, a terrace, you need to make a canopy. Therefore, in order to determine the type of construction, we measure the size of the porch itself. Keep in mind that the roof over the front door really protects the porch from precipitation only if its dimensions are slightly larger than the dimensions of the porch, i.e. it is necessary to provide a kind of overhangs on each side at least 25 centimeters.
Having decided on the dimensions of the future canopy or visor, we select the type of roof structure, which can be:
- lean-to;
- gable;
- arched.
Most often, visors and canopies are made single-sided or arched. In the first case, the frame consists of several interconnected triangles-brackets, on which the roofing material is laid. If the visor is arched, we make almost the same frame, but with an arched truss system. The choice of roof shape depends solely on your preferences and, of course, the design of the house. If, for example, the house is decorated in a classic style, and the porch is decorated with balustrades, the arched version covered with polycarbonate will look out of place. But a shed canopy can additionally decorate the entrance to such a house.

But regardless of the design option that you decide to make, be sure to draw it on paper and indicate the dimensions of all elements. A simple drawing can be "drawn" even by hand. Having it in front of your eyes will greatly simplify your work.
What is needed for construction - we buy a profile and cement
As we said above, the visor will be made of metal. For its manufacture we need the following materials:
- profiled pipes with a cross section of at least 50x50 mm; round pipes with a diameter of at least 50 mm can be used;
- profile pipe 20x20 mm;
- wooden slats;
- roofing material;
- materials for the preparation of concrete - cement, crushed stone and sand .;
- metal paint.
As a roofing material, it is desirable to use the same coating that is used for the house. For example, if the main roof is covered with metal tiles, then exactly the same metal tiles should be used for the visor. As a result, it will look the most harmonious. The exception is polycarbonate, which can be used regardless of what material the main roof is covered with. The only thing, as we have said, polycarbonate is not suitable for all types of houses.
If you do not have a welding machine, you can make a visor frame using special clamps for profiles and bolts.

We build a shed roof - the easiest and fastest way
Before we start building the porch shed, we mark out the construction site around the entrance to the house. We are interested in the outer corners of the site - here we dig holes 70-100 cm deep. We fill the bottom of the holes with crushed stone or gravel by 15-20 centimeters. Then we install the pillars in the holes, align them vertically and fill them with M200 grade concrete. In this position, the supports must be fixed with stretch marks or props until the concrete hardens. If the width of the structure exceeds 2 meters, we install additional intermediate supports.
While the concrete is curing, which takes 28 days under normal weather conditions, we proceed to the manufacture of brackets. First, we weld the corners of two pipe sections at an angle of 90 degrees. The length of one pipe should be equal to the length (depth) of the canopy, and the length of the second pipe should be 25-30 centimeters. We connect both ends of the resulting corner with another piece of pipe, which will serve as a rafter, as a result we get a rectangle. We make several such brackets, taking into account the fact that they will be located in increments of 50-60 cm.

We connect the installed poles with a jumper. Further opposite the jumper, i.e. in one horizontal plane, we draw a level on the wall at which the frame will be located. Align the brackets along the marked line and attach to the wall. To do this, first drill holes in the bracket rack. Then we attach the bracket to the wall with our own hands, align it vertically and relative to the intended line, after which we make notes through the mounting holes. Next, remove the bracket to the side and drill holes according to the marks. After that, we attach the bracket to the wall so that the holes match, and fix it with dowels or anchors.
All installed brackets must be connected with horizontal beams, which are welded above and below the bracket post, as shown in the diagram above. The top beam should be flush with the rafters. This point must be taken into account in the manufacture of brackets. Beams must also be attached to the wall with dowels or self-tapping screws. We weld the outer edge of the brackets to the jumper located between the supports.
On this, our canopy frame is ready. Now you need to do the crate. To do this, we fasten boards or bars to the rafters with bolts or self-tapping screws for metal, having previously drilled holes in the rafters. The step of the rails should be 200-300 mm.
If you want to cover the roof with flexible tiles, sheets of moisture-resistant plywood or OSB should be fixed on the frame.
At the end of the work, we fasten the roofing material to the crate with self-tapping screws or nails. This procedure is simple, performed according to the standard scheme, so it does not require any explanation. The only thing is to ensure a tight joint between the roofing material and the wall. We use a special corner junction bar. To fasten it, we cut a small groove into which we insert the upper side of the bar. We attach the bar itself to the wall with dowels, and fill the groove with building sealant. The plank is attached to the roofing material with self-tapping screws.

The space between the plank and the roofing material is filled with a special sealant. It is advisable to choose the latter individually for the profile of corrugated board, metal tiles or other roofing. If it was not possible to select the seal profile, a universal sealing tape should be used.
In the same way, you can make a wooden canopy from a bar. The only thing is that it is better not to concrete supports made of wood, but to fix them on top of concrete, i.e. on the surface of the earth with the help of special glasses or other embedded fasteners.
If the roof is small, as we have already said, you can make it in the same way, but without two supports. As a result, we will get a visor. Upon completion of work, all metal parts of the structure must be painted with paint for metal. First, we carefully process all welded seams with a file so that the product looks neat.

Arched roof - an interesting idea for lovers of original solutions
If you want the canopy over the porch to look unusual. At the same time, it was “light”, “airy”, make it arched and cover it with polycarbonate - this is a translucent sheet material that bends well. The construction is made quite simply - as in the previous case, we mark the site and install two supports at the corners.

Then we make a U-shaped frame from profiled pipes. The length of the lintel of the structure should be equal to the width of the canopy, and two parallel strips should be equal to the length of the roof (depth). We attach the jumper to the wall with anchors or dowels. In this case, the edges of the parallel strips are welded to the supports, as a result, the U-shaped frame must be installed horizontally. If you are making a visor, you need to weld two racks at least 30-40 cm long to the lintel along the edges and fix them on the wall. They will increase the bearing capacity of the structure.
As a result, we got a frame to which we need to weld an arched truss system. To make it, we need to make two arcs from pipe segments, the length of which must exceed the width of the visor. The longer these segments are, the smaller the bend radius will be. Pipes can be bent with a pipe bender. If you do not have such a tool, you can make a pipe bender yourself. To do this, we need a large sheet of plywood or OSB. On it we draw an arc of the required diameter and fasten the hooks along the markup. We make a latch near the extreme hook - just turn the same hook over and fasten it upside down. Then we insert the pipe into the retainer and bend it along the hooks.

To make it easier to bend the profile, it should be thoroughly heated.
There is another option for obtaining arcs, which does not even require a pipe bender - we take a pipe and make cuts. The smaller the bend diameter, the more often the notches should be located. Then we bend the pipe with our hands and weld the cuts. We attach the resulting arcs to the frame - one between the pillars, and the second near the wall. We fasten jumpers between the arcs in increments of 20-30 centimeters. On these jumpers we fix a sheet of polycarbonate, which will give the structure an "airy" look. We use self-tapping screws to mount the cover.

This completes the construction. The only thing to decorate the structure is to make patterns from a metal rod and weld them to the outer pipe, as in the photo above. At the end of the work, we paint the metal frame. It is desirable to deal with painting before installing polycarbonate.

I must say that there is another option for making an arched visor. Its principle is similar to the construction of a shed canopy, the only thing is the rafters, i.e. the hypotenuse of the brackets-rectangles is made not even, but arcuate.
The surest way to do the work with your own hands with high quality and "for centuries" is to work with material in the processing of which there is certain knowledge and skills. The easiest and most reliable way to build and install a canopy over the porch is using welded metal profiles and corrugated sheets.
In the garage of anyone who likes to work...
The surest way to do the work with your own hands with high quality and "for centuries" is to work with material in the processing of which there is certain knowledge and skills. The easiest and most reliable way to build and install a canopy over the porch is using welded metal profiles and corrugated sheets. In the garage of anyone who loves to work, build, or just tinker, there will always be a grinder and a welding machine.
Choosing a canopy design
Most of the most whimsical and elegant wrought iron porch canopies are, in fact, identical in functionality to welded steel frame structures made of metal profiles. They are, of course, more elegant and beautiful, but in terms of functionality they do not have any special advantages.
The most acceptable in construction, practical and affordable to make with your own hands is the design of a visor with a flat surface and a small slope angle:
- Welded metal structures can withstand even the weight of a person, therefore they are quite safe in any rain and gusts of wind;
- The small weight of the metal canopy does not require massive welded support beams, the entire system is placed cantilevered on the facade of the building;
- In comparison with other options, the cost of welded metal structures for the construction of a visor is simply miserable, it will not exceed several tens of dollars, while the bulk of the costs will go to acquiring a metal profile or metal tiles, a set of spillways with your own hands.
Important ! The dimensions of the metal structure and the cross section of the steel square profile were selected by hand empirically and tested repeatedly on practical built products.
Everything related to the size of the corrugated board and the design of the drainage system, everyone is free to choose independently from their own considerations, they do not particularly affect the safety of the visor.
Dimensions, tool and metal profile for the visor
First of all, we need a tubular metal profile with a section of 20-25 and a length of 11-12m. Next - three meters of steel strip 3x20mm, two or three sheets of corrugated board or metal tiles 120x90cm, metal corner No. 50 and a dozen bolts - dowels used to fasten metal to a concrete or brick wall, wooden planks or boards 20mm thick, self-tapping screws for fastening a metal profile .
From the tool you will need an angle machine with a cutting wheel for metal, an electric welding machine, a device for profiling a metal strip. Welds should be made using dried electrodes on black iron, 4 mm in diameter. Almost all of the listed materials are available at any hardware store.
We make the design of the visor
The design of the metal visor, as can be clearly seen in the photo, is an L-shaped frame structure. The flooring itself is based on two longitudinal and four transverse welded posts. Two lateral welded metal posts of the structure are welded to the flooring frame at a right angle, providing rigidity and strength of fastening of the canopy frame on the facade of the building.

Canopy welding work
We cut out longitudinal elements 200 cm long and transverse ribs 120 cm long from the metal profile blanks with a grinder. In addition, with our own hands we cut out two metal side racks 100 cm long. We mark all the elements and cut them off with a grinder with an allowance of half a centimeter, as in the photo.

We assemble the set with our own hands in the following sequence:

Important ! The complexity of the work lies in the location of the parts to be welded in the same plane and maintaining right angles between the segments. Sometimes, before final assembly, you have to cut the ends of the racks to fit in size with other elements.
After completing the assembly work of the canopy frame, perpendicular to the plane, as in the photo, the side metal racks of the visor are welded, with which the entire structure will be attached above the porch.

Installing side consoles
In the design of the canopy, designed for simple utility rooms, you can stop at the result and proceed to the process of fixing the flexible roof. But for the front porch, it would be nice to add small decorative elements with your own hands and be sure to install side arches or struts.
For each of the side racks, you will need one one and a half meter section of the profile. Both blanks are bent with an arc on a pipe bender, as in the photo, or using a manual machine along a radius of R = 3.5 m. If it is not possible to do it yourself, it is easier to order arcs in a locksmith's workshop. The arc can be fixed directly on the frame, to enhance the decorative effect it is better to use intermediate supports from the profile, 8-10 cm long, as in the photo.

Advice! Before assembling the arched struts, the side posts should be bent by 10-15 degrees so that the plane of the visor receives a slope or slope.
In the resulting space between the arc and the sides of the frame, you can insert several curls from segments of a strip of metal or scraps of wire rod. The drawing is selected with your own hands individually on a flat surface and, after assembly, is attached to the arc and the sides of the frame, as in the photo.


With a certain dexterity and imagination, they perfectly complement and decorate the appearance of the visor. After the assembly is completed, the structure should be primed and painted with “hammer” enamel with shades of old bronze.

Roof installation
At the final stage, the plane of the canopy is sewn up with a board with a section of 20x150mm every 15-20cm. This is enough to install corrugated board or sheets of metal. If you prefer to use a soft roof, then the plane of the visor will need to be additionally hammered end-to-end with clapboard or OSB sheets.
The lower part of the visor, if desired, can be sewn up with a PVC profile used for wall cladding in the bathroom.
Installation of a canopy on the facade of the building
The weight of the visor structure turned out to be not small, at least 12 kg, which implies the use of at least 6-8 points of anchor bolted connections for fastening. This version of the visor is best fixed on a prepared base of metal strips.
Let's assemble an intermediate metal mount
According to the measured dimensions of the metal visor, we mark the fastening line on the facade above the porch of the building and according to the markings, using a perforator and dowels, we fasten strips of metal in the shape of the letter P.
For each side metal strip, 3-4 attachment points must be made; for a vertical longitudinal strip of metal, at least 3 attachment points to the wall are needed.

Next, with assistants, we hang out the metal visor with the help of a block at the place of the future fastening of the structure and fix it with improvised material. Using the building level, we adjust the horizontal position of the visor so that its side metal racks fit snugly against the previously fixed metal strips.
The most reliable way to control the position of the visor above the porch is to move a dozen meters away and make sure that there are no distortions or tilts of the structure from afar. In the absence of comments, we weld the corner points of the side posts of the canopy to the prepared metal base on the facade by welding.

Installing gutters
Water flows are diverted from the surface of a metal canopy using a standard gutter made of plastic or metal with a set of fasteners. It is important not only to install the gutter, but also to properly adjust it.

The drain pipe is mounted directly on the metal longitudinal beam of the visor, it is not installed, as it often spoils the appearance of the structure. It is considered more reasonable to use a second metal gutter, which will divert the main part of the water flow to a more convenient catchment area and will not affect the appearance of the canopy above the porch. In any case, one 2-meter main gutter and a 1.2-meter side auxiliary with an adapter to the drain pipe will be needed.
Conclusion
The metal canopy over the porch made of metal turned out to be somewhat heavy, but the metal frame is a 100% guarantee of a long service life of the product, high strength and resistance to rain and heavy snow. With proper work, the metal frame, if necessary, can easily withstand the weight of a person.

A similar design can be made from an aluminum profile, but for interconnection, you will have to use additional corners or adapters made of more durable metal. The metal structure itself will be twice as light and beautiful.
Discuss the article on the forum


How to make a canopy over the porch with your own hands

Canopy over the porch of the house

Canopy over the entrance made of polycarbonate

How to make a canopy over the entrance of wood

Transparent canopies over the entrance

Canopy over the door
Do-it-yourself visor over the porch made of metal
An integral element of each entrance is a visor. Without it, the front door to a private house looks unfinished. In addition, it has an important practical purpose, which is a protective function. The article will discuss the varieties of designs, as well as the option for self-manufacturing a visor over the porch.

Visor requirements
The visor must be not only practical, but also safe, so there are a number of requirements that the design of the visor must meet:
- tightness;
- strength;
- attractiveness;
- sufficient width and length;
- compliance with the general mood of the building.

One of the main functions of the visor is protective. In this case, we are talking about both the residents and guests who will enter the house, and the front door itself. A good canopy is airtight, i.e. rain or melt water does not leak through the cracks in its flooring. This prolongs the life of the material from which the door is made. In addition, the visor casts a shadow on the porch, which prevents the rapid fading of the paintwork applied to the platbands and the door.

The construction of the visor must be strong enough. This means that it must withstand both its own weight and the wind load, which in some cases can be several times greater than the weight of the canopy structure, without much difficulty. In addition, in winter, with heavy snowfalls, part of the precipitation will linger on the peak. Its strength should be enough for the weight of the snow cover.

The visor is not a module that is made to simply be. It should be attractive and set the general mood. At the same time, the design of the canopy should not contradict the exterior of the building. This is expressed both in the lines of the frame and in the colors. The width of the visor must be such that the projection on each side of the door is at least 50 cm. Only in this case can we speak of a sufficient protective function.
Varieties of designs

The classification of visors is most often made according to the method of designing the roofing, and the names correspond to the name of the roof of a similar design. From this it follows that they can be:
- lean-to;
- gable;
- multi-slope;
- arched;
- domed;
- concave.
The first option requires the least amount of material for manufacturing and is light in weight. You can assemble such a structure without much effort with your own hands. It is a single plane, which is fixed to the wall at the required slope. This design has certain restrictions on the slope, therefore, with a long length, snow can accumulate on the visor. A visor with two slopes resembles a triangle. For the manufacture of such a design, two times more material will be required than for a single-sided one. In this case, the angle of each slope can be increased. This will make it possible to accelerate the removal of precipitation from above.

Multi-pitched canopies look great if they are installed on the porch of a house that has a hip or other roof of complex shape. It is quite difficult to make such a visor, so you will need to draw up a high-quality and thoughtful drawing, as well as the help of a specialist. Arched peaks represent a semicircular design. It should be chosen if the design of the house has rounded shapes with which the visor will be combined. In another case, it is better not to risk with experiments. This also applies to dome visors. They are somewhat similar to arched ones, but have an additional bend in the front of the structure.
Note! Concave structures are a type of single-pitched visors. Their disadvantage is poor drainage of precipitation, although they can be quite attractive in appearance.
roof deck

The choice of roof decking is an important step in designing an entrance canopy structure. All materials that are suitable for these purposes can be divided into two large groups:
- polymeric;
- metal.
From the first group, they most often opt for cellular polycarbonate. This is a really good material that has the following advantages:
- light weight;
- ease of installation;
- light transmittance;
- pleasant appearance;
- ease of giving a rounded shape;
- variety of colors;
- chemical resistance.

Polycarbonate is able to partially transmit light, which is useful for a visor. Before buying polycarbonate, you need to make sure that it has a protective film that minimizes exposure to ultraviolet rays. If there is no such film, then the material will quickly dry out and crack. Of the shortcomings of polycarbonate, its fragility can be critical. If hail is not uncommon in the area where the visor is planned to be installed, then it is better to choose a different type of flooring, since at the very first precipitation the polycarbonate will be completely damaged.

Of the metal roofing decks, the most common are corrugated board and metal tiles. They have similar properties, but the metal tile looks more attractive. Of the positive qualities of these materials, it is worth highlighting:
- mechanical strength;
- light weight;
- long service life;
- the possibility of self-installation;
- the possibility of giving a rounded shape;
- affordable price;
- wide choice of color schemes.

In terms of mechanical strength, metal decking is superior to polycarbonate. They can also be bent to a certain radius to get the desired shape of the visor. Metal tile and corrugated board are more resistant to wind loads. Strong hail is capable of leaving dents, but will not break through a metal sheet. Among the shortcomings of the material, its noise can be noted. Even a little rain will drum well on the visor.
Self-manufacturing
Any work begins with planning. It will help to correctly calculate the forces, means and take into account possible difficulties in achieving the goal. This is also true in the manufacture of a visor, so the first step will be its design.

Design

To make the design process easier for yourself, it is better to take a photo of the entrance beforehand. In the photo it is easier to choose the required dimensions and shape of the future design. This can be done both manually and in a graphical editor. When drawing up a drawing, there are several points to consider:
- construction width;
- extension length of the structure;
- number of supports;
- slope angle.

It has already been said above that the visor should be 50 cm wider on each side than the entrance, but this rule is not valid if there is a large porch. In this case, care must be taken that the visor closes the porch on the sides. The length of the stem can be adjusted according to your wishes. If the visor is too long, then additional supports are simply installed. The number of supports will depend on the complexity of the structure and its weight. Usually enough fastening to the wall and two supports. The angle of inclination is selected in the same way as for the roof that is on the house.

Preparatory work
The preparatory process is to purchase the necessary materials and missing tools. From the materials you will need:
- selected roofing;
- metal profile pipe with a size of 50 × 30 and 40 × 20 mm;
- fastening consumable;
- cement;
- sand.
From the tool you can not do without:
- grinders;
- screwdriver;
- perforator;
- roulettes;
- marker
- welding machine.
Do not forget about personal protective equipment, such as glasses, gloves and clothing made from natural fibers.
Mounting

First of all, from a profile pipe 40 × 20 mm, it is necessary to prepare the frame of the future structure. Workpieces are cut depending on the selected dimensions. Two of them should correspond to the height of the porch, the other two should correspond to its length. The size of two more blanks is selected in the process. These components should form a right triangle. First of all, details are welded together in pairs, the dimensions of which are known. They must be at right angles.

A special clamp or vise will allow this to be achieved. Boil the entire seam should not be in one pass, because the angle will be violated. It is better to make small tacks, level the workpiece, and then boil it completely. When everything is ready, you can measure the length of the hypotenuse. The grinder cuts out two more elements, and they are welded into place. Now you need to combine the triangles into the overall design of the visor. To do this, they are connected by strips in the corners. To increase the rigidity of the visor frame near the resulting rectangle, which will be adjacent to the wall, it is necessary to weld several transverse strips.

The next step is to mount metal elements under the crate, on which the porch roofing will be fixed. When the porch frame is ready, it can be installed on the wall. So it will be easier to fix it. In the legs of the triangle, which will be adjacent to the wall, several holes are drilled. They must match the diameter of the anchor with which the fastening will be made. The porch frame is leaned against the installation site and the location of the holes is transferred to the wall. A perforator drills holes in the wall.

Now you can clean up the porch frame. All rust must be removed from it. The easiest way to do this is with a grinder or grinder with the appropriate nozzle. After that, the porch frame is painted. When it dries, you can install the roofing material. If it is corrugated board or metal tiles, then they should be fixed with roofing screws with rubber seals. Polycarbonate can also be fixed with them, but you should not overdo it with respect to polycarbonate. If you tighten the screws too much, they will simply crush the flooring. Next, the visor rises and is fixed in place.

After installation, it is necessary to seal the junction of the visor to the wall. This can be done using various mastics or a piece of roofing material. With a large extension of the visor, racks are mounted. They must first be welded to the frame. Under them, two holes are dug 50 cm deep. The part of the visor racks that will be in the ground is covered with bituminous mastic, which will protect them from rusting. Racks are lowered into place and the space around them is filled with concrete mortar. Another version of the visor for self-assembly is in the video.
Summary
As you can see, making the simplest version of a single-sided visor will not be a problem even for an inexperienced craftsman. The main requirement is the ability to work with various power tools.
We make a canopy (visor) over the porch of a private house
In order not to get wet in the rain and not languish under the sun while you open the front doors, you need some kind of protection. Usually they make a visor above the porch or just above the door. In some cases, the canopy can also cover steps and even a path or part of it. How to make a similar design, from what materials and we'll talk further.
Species and types
If we talk about the structure as a whole, the canopy or canopy over the porch consists of a frame and roofing material (cladding). There may also be support posts that support the outer edge of the canopy. They are an optional element. They are needed when there is no certainty that the structure without additional supports will be able to hold precipitation.

Precipitation mainly means snow. In regions with a lot of snow, you can either make the slope of the visor steep - so that the snow quickly melts, or install additional supports. You can do both, as they usually do - the margin of reliability / strength reassures and inspires confidence.
Frame and stand materials
The frame and supports of the visor above the front door are made of:

Recently, the most popular material for the manufacture of a canopy frame over a porch is a profiled pipe. With equal dimensions and wall thickness with a round pipe (if we compare the diagonal and diameter), the profile has greater rigidity. At the same time, it has a variety of sections - a square and a rectangle with different sides, it can be bent into arcs, it is easier to weld and attach to walls, it goes well with elements of traditional or cold forging, the durability is the same as other steel products. In general, it is the profiled pipe that is in favor today.
What is the lining of the canopy over the porch made of?
If we talk about materials for facing the visor above the porch, then the choice is very wide. Very often, the canopy over the entrance to the house is made of the same material as the roof. And rightly so, because in this case, a harmonious design of the house is obtained. With this solution, any roofing material is used:

The second option is to use the material that is used in the fence. In this case, both the design style and the decor elements should be recognizable. This will create a single ensemble with the site. Here the materials can be:
- slate (usually flat, but not a fact);
- corrugated board;
- polycarbonate;
- wooden plank.
And the third design option for the visor above the porch is to put a canopy that is “neutral” in style and material. This may include:

Glass is rarely used. It is necessary to use reinforced types of triplex type, and not only are they expensive, they also weigh solidly, so additional suspensions or powerful support columns are definitely required. And if you consider that sheet polycarbonate or plastic in appearance is not much different from glass, it becomes clear why glass is unpopular.
Forms of canopies
There are more than a dozen forms of visors above the front door. The easiest to manufacture is a shed canopy. Requires a minimum of effort and materials, and can look very good. Its disadvantage is that when the snow melts, the snowdrift will be in front of your door and it will urgently need to be eliminated. The same "disease" affects other models with slopes tilted forward. These are excellent options for regions with little snowy winters, but with a hot sun - not quite for our latitudes. Although, if you are not afraid of the need for urgent snow removal, you can do any of the options.

It is a little more difficult to make a gable visor (which is a house) and a simple arch. They are good because the snow that has come down is on the sides of the entrance and, even with a large amount of it, there is no need to urgently remove it. So for regions with a lot of snow, these are the best models.
How to connect the canopy over the porch and the wall of the house
One of the most difficult moments is to dock the canopy cover over the porch so that water does not flow down the wall. Usually, standard methods of joining the roof are used - with the help of a baffle bar. This method is suitable for any roofing material, as well as sheet metal and wood. You just have to choose the right color. There are two approaches here: in tone with the wall or in tone with the roofing of the visor. The options are equivalent, so it's up to you to decide / choose.

A strobe is made under the baffle bar in the wall (5-7 mm deep). The edge of the plank is inserted into the recess, fastened, the seam is sealed with a moisture-resistant sealant for outdoor use. The other edge of the plank lies on the roofing material. When water runs down the wall, it flows to the plank, from it, bypassing the junction, to the roofing material and further into the storm drain system or directly to the ground - how is it done for someone.
If you use metal tiles, sellers have a special wall profile. It can also be used with other materials - it is important to choose the color. The regular assembly includes rubber seals, which are placed a couple of centimeters from the outer edge. In this case, with a strong wind, water and debris do not fall under the bar.

If the visor above the front door and porch is made of polycarbonate, glass or sheet plastic, the method described above is unacceptable - it looks too rough. In this case, there are two options:

There are no other good options. You can only combine both proposed for reliability.
How to fix if the wall is multilayer
Recently, more and more buildings have multilayer outer walls - ventilated facades, insulation ... The bearing part of the wall turns out to be closed by a couple of layers of materials, the bearing capacity of which is only enough to hold its own weight. Nothing can be attached to them. The entire load must fall on the load-bearing wall.

Even if the outer layer is a finishing brick, it costs nothing to attach to it. Masonry is usually carried out in half a brick. So it only looks solid on the outside. The mass of even the smallest and lightest canopy will not withstand, and the supporting columns do not help either.
Therefore, with any multilayer wall, holes are made in all finishing / insulating layers, structural elements are attached to the load-bearing wall.
Single-sided visor: design features
An inclined or straight single-sided visor is the simplest thing that can be. Straight lines are rare in our country - they are not very functional, but there are a lot of sloping inclined ones.
At the heart of an inclined single-pitched visor is a right-angled triangle. The right angle is adjacent to the wall, and the length of the sides depends on the desired slope.

In the simplest case, it is possible to weld three identical triangles from a profiled pipe (as in the figure above), make holes for fasteners in them (at least three). These three elements can be connected into a single whole with the help of a crate for roofing material - as in the figure. And you can weld the crossbars from the same pipe (but of a smaller section) or a strip, a corner. This option - with metal lintels - is more suitable for a canopy over a porch made of polycarbonate or plastic. It is also good for a metal sheet - it will be convenient to weld or screw in self-tapping screws.

There is also an option with a variable angle of inclination. This is a rectangular frame with lathing lintels, to which light roofing material is attached. This frame, with the help of a wall beam fixed on the wall, is attached above the entrance (we described how to make the connection above).

Depending on the required angle of inclination, struts are made. They can be made of metal or wood. Fixed to the frame.
If desired, this option can be made with an adjustable tilt angle. Make the fastening of the frame and struts to the wall movable (on hinges, for example), make several holes in the frame. By rearranging the struts in different holes, you can get a different angle of inclination. For doors, this possibility is not very relevant - except for glass ones - in order to close the too bright sun, but for windows it can come in handy.
Double canopy frame
There are at least two ways to assemble a canopy with two slopes: from two or more (depending on the length of the canopy) triangular rafters or from two rectangular frames with a crate, fixed with crossbars. The second option is shown in the figure below, and the first will be a little further.

Method one
Two quadrangles are assembled from a bar or thick board, which are combined with a ridge board. The angle of inclination of the slopes is set by saws on the ridge, fixed by crossbars - a spacer bar. Since the roofing material is laid from the ridge down, the battens of the batten are stuffed in the opposite direction. Under a soft tile the continuous flooring is required. It can be moisture resistant plywood or OSB.

Also, brackets are assembled on the ground - stops, which will transfer the load from the visor to a large area of \u200b\u200bthe wall. It is better to assemble the structure on the ground (without fixing the roofing material). In order to raise and secure the canopy, assistants or the services of a manipulator will be required.
Method two
The second option is the assembly of individual truss structures. Maybe this option will seem easier to you - all gable roofs are assembled according to this principle.

Here, too, a frame is assembled from a bar and brackets are needed. But the frame lies in a horizontal plane, supported by brackets. Two or three triangles are assembled from rafters, which rest on a ridge beam, and it rests on a rack, which is fixed to the frame with its second end. It turns out a mini-model of the usual truss system.
To improve the appearance, mowing is placed near the rack. In the photo above, they are curved, but this is far from necessary. You can simply make it from a bar, sawing it at the right angle. It is also better to assemble the system on the ground - it will not work to connect exactly at a height.
metal
If the visor frame is made of a metal pipe, everything is much simpler. The pipe has a large bearing capacity, so there are much fewer supporting and auxiliary elements.
Two identical triangles are brewed - according to the size of the future canopy. They are connected by jumpers, the length of which is determined by the "depth" of the visor. To prevent the lining from bending, additional crossbars are welded.

The finished structure of the canopy is complemented by brackets - stops. In the picture above, the canopy above the porch has only a stop without slopes. For regions with little snow in winter, this is enough, and in order to keep a solid mass of snow, you will need a mowing or stand. Or maybe both (as in the diagram below).

Decorative elements are an optional part. There may be a regular triangle.
Arched canopy over the porch: manufacturing features
A canopy over the front door in the form of an arch cannot be called difficult to manufacture. It is more convenient to make this form from a steel pipe, and from a profile, rectangular section. With the help of a pipe bender (it is also possible manually, but this is more difficult), several arches of the same size are made. They are connected by jumpers, the length of which is determined by the desired size of the roofing part.

The first and last arches are connected by horizontal jumpers, brackets are welded to the last or, as in the figure above, ordinary stops.
Often you can see double arches with decorative and not very filling. They are typical for large structures. Still, the windage and snow load turns out to be large and it is better to play it safe by making a margin of safety than to do everything all over again.
Photo Ideas


“The river begins from the blue stream”, and the entrance group in and a canopy above it. This is a kind of visiting card of every home owner. The canopy over the porch, see photo examples of successful solutions in the galleries, carries not only a huge aesthetic load, decorating the facade of the house, but also performs a lot of practical functions, the main of which is to protect the outdoor extension from atmospheric precipitation, making the entrance to the house more comfortable.
In this article, we will figure out what options for canopies over the porch are, what materials are used for, consider the most successful, beautiful and almost universal ones. And of course, we will focus on how to correctly calculate the size of the canopy for the porch, what parameters must be taken into account when designing, and how to make a canopy over the porch with your own hands.


Design features of canopies, roofs and canopies

Hip roof over the porch, covered with tiles
support for visor
Depending on how the extension is supported, the roof can be supported on vertical poles, or hung on special brackets on the wall of the house. The location of the support points depends mainly on the condition of the load-bearing wall of the state, on the dimensions and materials for the canopy. It also plays an important role for the type of support structure with a canopy, the photos demonstrate this well. Thus, the canopy can be attached to the house and be part of the building, or it can be an independent structure, with its own foundation and supports. In principle, supports for the canopy can be placed on the upper platform of the porch, fastening the structure with anchors, or dig separate holes and cement the pillars, having previously arranged a gravel-sand cushion.

Forged canopies over the porch, photo of a structure with complex geometry
Supports for visors are made of different materials, the simplest and lightest, of course, are made of wood, but they need to be pre-treated with an antiseptic and a fireproof composition. It is unlikely that anything can compare with the beauty of wood, and the possibilities of modern cutting make it possible to purchase beautiful openwork elements at a very reasonable price, the aesthetic effect of such decor fully compensates for all costs.

Canopy over the porch, photo of a wooden extension on poles

Semicircular canopy made of metal and polycarbonate, schematically the main load-bearing elements of the visor
As the basis of the visor, we take an independent wooden extension above the front door, on pillars, with a shed roof, a kind of veranda hut on chicken legs.
It is interesting: Do you know why the huts in fairy tales are on chicken legs? In fact, even in ancient times, people noticed that after fires, in swampy areas, the remains of coniferous trees stand as skeletons for centuries, do not rot, do not deteriorate. The people at that time were savvy, and immediately understood what was happening. It turns out that if a pine log is smoked in thick smoke on coals, then the resin under heat treatment forms a strong protective layer, the wood becomes practically invulnerable, it is not afraid of anything: not water, nor microorganisms, nor rot takes it. Therefore, during construction, the columnar foundation was made of such stoned logs, and houses stood on such a foundation for more than a century. It was only later, in fairy tales, that they came up with the idea of drawing emotional, running huts on giant chicken legs.First you need to transfer the drawings of the visor to the area, carefully measure the dimensions, hammer pegs around the perimeter, and remove the top layer of soil. To attach a canopy with a size of 2 * 1 m, a height of 2.2 m, you will need 2 pillars-logs, 2.5 m long, and 2 by 2.7 m, treated with antifungal antiseptics, water-repellent and flame retardants. Those parts of the supports that will be dug into the ground must be smoked or smeared with mastic.
To install vertical supports, pits 0.7 m deep are dug in the corners, a layer of 200 mm of sand is poured onto the bottom, a layer of crushed stone of 200 mm is poured on it, everything is rammed. Concrete interferes, a little solution is poured to the bottom, a pole is installed, leveled, strictly vertically, it is advisable to make struts to fix the poles in this position, the concrete mixture is added so that the hole is completely filled. After 7 days, when the concrete sets, the supports are sawn to the desired level, we remind you that the minimum height of the canopy should be 2.2 m.

Schemes of the main types of canopies for the porch
Further, from the bars, the posts are tied along the perimeter, be sure to check the geometry of the perimeter so that the logs do not fall to the sides. The façade posts are attached to the load-bearing wall of the main building with anchors or metal angles, so we tie the two structures together.
Logs are laid on top of the support logs, on which the rafters are attached, in increments of 200-300 mm; wooden bars with a cross section of 50 * 50 mm are quite suitable for these purposes.

A conical canopy on pillars reliably protects the porch from precipitation
Important: In order for the structure to be airtight, the gap between the facade of the house and the extension must be carefully sealed. For this, a strip of galvanized metal is suitable, which must be bent along, the part that adjoins the house must be recessed into the facade. The strip is coated with liquid bituminous resin, and screwed with self-tapping screws. Sometimes polyurethane foam is used for sealing, but it eventually breaks down from exposure to UV rays and moisture.


But then it all depends on your needs, you can cover the rafters with a profiled sheet, or slate, on this the manufacture of a canopy over the porch can be considered complete. But prudent owners understand that such a visor is not durable, therefore a layer of waterproofing is placed on the rafter system, it can be a roofing material or a vapor barrier membrane, it is attached to the rafters with the help of a crate - these can be slats 20 * 20 mm, and for a soft roof it is better to use boards tightly fitted to each other. Roofing material is laid on the crate.

Even a small forged visor can become a decoration of the facade
At the end we make a tide. The gutter is attached parallel to the facade of the building, to the outer edge of the roof, slightly sloping. A chain is fixed at the corner of the drain, along which water will gently drain to the ground. Next, you can proceed to the decoration of the canopy, its design depends on the design and budget for the visor.
Be sure to watch the video in which ready-made samples of canopies in front of the porch from different materials are selected.
Read more about choosing and installing a visor
What to make a light visor?
A canopy over a polycarbonate porch is the easiest option to protect the entrance group from precipitation. It looks easy and airy, you can make it yourself. Peaks and canopies over the entrance, the photo illustrates this well, it is better to make from colored, cellular polycarbonate, 10-12 mm thick. Durable material with stiffening ribs will withstand complex mechanical and climatic loads. Before buying, try to slightly twist the sheet if cracks have begun - the material is not of high quality. Bend only across so that the stiffeners are perpendicular to the bend.
The visor above the porch is often installed on a metal frame. Mensols are sold ready-made, you can also make them yourself from metal, for beauty add serial forged jewelry. For a polycarbonate canopy with a depth of 1-1.2 m, a bracket is sufficient with a fit to the wall by 0.6 m and a concave diagonal. The sheet is mounted on a special mount with a thermal washer, plugs should be installed on the ends. 
How to correctly calculate the size of the porch roof?
According to the regulatory regulations, the upper platform should be 1.5 times the width of the front door (1.2 1.5 m), a comfortable porch width of at least 0.8 m. The roof of the porch should extend beyond the dimensions of the steps by 0.2-0.3 m so that water does not flow onto the entrance group.
A porch with a polycarbonate roof, photo below, can be very modest in size, and vice versa, a whole indoor complex in front of the house. In order to save money, it is necessary to take into account the standard sheet dimensions: 6000
2050 mm, you can buy a half - 3000 mm / 2050 mm and a quarter - 1500/2050 mm, just enough for a small canopy to protect the upper platform from precipitation. The cut edge is recommended to be treated with a fine abrasive to ensure a better adjoining of the docking and end strips. When installing larger structures, do not forget to purchase a docking bar, with which you can seal the joint aesthetically and hermetically. To fix polycarbonate outside only with a resistant side to ultraviolet, the marking is indicated on the protective foam. 
What should be considered before making a canopy over the porch?
Before you make a visor over the porch, you need to decide on the size and materials for manufacturing. Peaks are cable-stayed (suspended on upper holders) - small-sized structures made of lightweight materials, cantilevered - fastened with the help of mortgages in the body of the wall and supporting - on poles, columns, walls, corner holders resting against the wall. Removal of struts is not less than a third of the removal of the canopy.
When you have decided on the parameters of the visor, it is necessary to organize a blind area around the porch so that storm water does not wash away the soil, and if the house is higher than 2 floors, then installation of a drainpipe is mandatory. For small canopies, the frame is made in the form of holders or a simple frame, for larger canopies it is recommended to make trusses with additional reinforcement, and with a width of 3.5 meters, a truss truss system is required. On ridge roofs and in places with high wind loads, additional fastenings for the roofing material are required. 
What canopies are in fashion now?
The usual canopy over the porch of a private house is increasingly being replaced by awnings. In fact, this is a roof made of durable fabric, moisture resistant, non-fading from UV rays, well protected from precipitation and withstanding hail. Stationary awnings have been known for a long time - canopies over the entrance with a fabric roof.
Of interest are modern retractable systems in which you can adjust the degree of opening and the angle of inclination. Canopies are adjusted depending on the intensity of the sun to control the illumination of the room. Awnings are installed not only above the door, but also above the windows. But this is not only a canopy for the house, if you additionally protect the porch with vertical awnings, you get a closed terrace, which, if necessary, easily turns into an open canopy. And if you buy vertical racks in the kit, which can be installed even in soft ground, then you will get a whole gazebo in front of the house. 
How to build a visor quickly with your own hands?
Do-it-yourself canopy over the porch is easiest to build from a bar. Making wood products does not require special equipment, a hacksaw and a hammer are enough. Drawings can be made by hand, after calculating the size of the extension.
The holders are made in the form of a right triangle, with legs 0.6 and 0.9 m, the short side is firmly attached to the wall with anchors. The structure is pulled together by transverse bars, the element near the wall is additionally attracted to the house. The tree is treated with protective compounds, painted. The roofing material will be slate, profiled sheet. You can also purchase ready-made holders made of pipes or forged ones on the market, attach them to the wall above the porch, laying a polycarbonate sheet on top. 
What roofing material to choose for a wooden canopy to the house?
The entrance group is a small architectural group that performs not only the practical function of protecting the porch, but also carries an aesthetic load, and should harmoniously fit into the overall architectural ensemble. According to the recommendations of experts, the roof on a wooden canopy to the house should be made of the same material that covers the main roof - this is ideal. Practical construction shows that the wooden canopy over the porch can be covered with any material that would delicately fit into the exterior. If unsure, take samples of the material and choose the roof on site.
For example, due to the transparency of polycarbonate, the roof made of it is airy and almost invisible, so this material is universal. A small visor can be covered with slate or corrugated board to match the color of the main roof. On a large wooden canopy to a house with supports and a gable roof, soft tiles are suitable, they also come in different colors, so you can choose a close color. 
How to seal the joint between the polycarbonate visor and the wall?
The visor above the porch made of polycarbonate does not provide a snug fit of the sheet to the wall, in order to avoid smudges on the facade, it is necessary to seal the joint. On sale you can find a special wall profile, as in the photo. Polycarbonate visors, according to reviews, still leak, the profile does not provide reliable sealing.
To cope with the problem, the joint must first be degreased, primed, then filled with a colorless silicone sealant and only then the bar should be fixed. The sealant can be mixed with mineral insulation and the joint is tightly caulked with this mixture. A large gap is sealed with facade rubber. Additionally, a galvanized steel outflow should be built. 
What metal is better to make a canopy?
A canopy over a metal porch is a practical and beautiful option to protect the entrance to the house. The metal frame is able to withstand any roof. The most beautiful is forged, the most practical is made of stainless steel, it is not subject to corrosion. With your own hands, a frame for small and medium-sized canopies up to 2 m wide should be cooked from a reinforced profile with a section of 20 * 20 mm, a wall of 2 mm. For large structures, a corner or pipe 40 * 40 mm, wall thickness of at least 2 mm.
To reduce weight, you can apply a 20 * 40 profile, but additional drawings and diagrams with the calculation of stiffeners will be required. The thickness of the profile is determined by the weight of the roofing material and snow loads. For light materials, such as polycarbonate, you can make more elegant metal canopies, photo. For the Polonso truss, steel, galvanized pipes and aluminum can be used. The calculation of the pipe section and wall thickness in each case is carried out individually, since these criteria depend on the dimensions of the building. 
What truss system to choose for a canopy?
The device of the truss system for the canopy depends on the design of the roof of the main house and the architectural features of the knowledge facade. Most often, they arrange a one- or two-pitched roof so as not to overload the exterior with designer excesses. In a country house or in a private house, it is advisable to build a shed canopy with your own hands, before making a frame, it is enough to calculate the angle of inclination of the roof. To calculate the structure, the cross section of the supporting elements, the wind load, one should be guided by section 2.01.07-85 of the SNiP, since with an increase in the steepness of the slope of the slopes and an increase in the size of the building, the loads also increase. The average angle of inclination of a shed roof over the porch is 20-25 o.
Depending on the slope, different roofing materials are used. For rolled tiles, 5 ° is also acceptable, the metal tile is placed on a slope with a slope of less than 30 °, in regions with high rainfall 45 °. The profiled sheet can be laid on the roof with a slope of 9-20 o. 
For which canopies is a metal tile suitable?
The canopy above the porch made of metal is suitable for all types of roofing of the main house. The metal tile comes in different colors, so choosing the right shade is not difficult. This is a very budget material, light and practical. Due to the low weight, the metal tile practically does not create loads, so the construction of a bulky frame is not required. But the material is very noisy, so extraneous sounds will disturb during hail and rain.
Do-it-yourself metal tile canopy is built in several stages. The rafter system is covered with a crate, slats or moisture-resistant plywood. The first sheet is placed with an offset of up to 40 mm, the second with a side overlap, without distortions and gaps. The next row is placed with a call to the previous one by at least 100 mm. For fixing, self-tapping screws with an EPDM gasket are used. At the junction of the slopes, seals are installed, on which the ridge bar is fixed. 
A canopy over the porch area will not only protect from bad weather, but also provide another opportunity to emphasize the style of the exterior. How not to make a mistake with the choice, to choose a high-quality canopy that is in harmony with the exterior finish of the building - later in our article.
Why do you need a canopy over the porch?
Canopies over the entrance space can take on a different form and be defined by a variety of properties, depending on the selected materials and type of construction. We will talk about this in more detail later. And now we will outline a few points why it is important to get a little shelter above the porch of your private house:
- First of all, it is the possibility of convenient entry and exit from the home. For example, when leaving or entering the house, it takes time to close the umbrella, get or put the keys, close or open the door, and if the weather does not favor the yard, then the canopy will definitely not become superfluous;
- In addition to the fact that you personally and the people entering your monastery will not be subjected to additional wetting, a high-quality visor will protect a wooden or metal door from liquid exposure;
And, of course, aesthetics. A harmonious canopy will complete and accentuate the exterior of your home and yard, especially if you choose a material that resonates with other design details.


Types of visors above the porch
So, you've decided to build a nice visor, but you're not sure which one yet. Let's look at two groups of possible options and types of construction:
Monolithic construction acts as one with the wall, so this view can be called solid and ready for a long service. But at the same time, this feature dictates the disadvantages of such a product. The structure cannot be partially repaired or moved to another location. Such a visor is quite difficult to install, and therefore you will probably have to seek help from specialists.
Modular products very popular lately. Their structure consists of several parts that are fastened together. The design is easy to assemble, and also amenable to partial or complete repair, and all these procedures, if desired, you can perform on your own. Among the advantages you can point to a wide range of colors of these products - it will allow you to choose the most optimal solution for the exterior of your home.
Canopies also differ among themselves depending on the method of attachment. Such an important design feature must be taken into account already at the planning stage.
Mounted options strong and reliable, but only if they were built with supports. The visors are fixed to the wall itself, and the supports in this case will provide stability, extending the service life.
Suspended structures are made from lightweight materials due to mounting on special suspensions. For example, glass canopies look very attractive, especially in the case of a building in a modern style.


Variety of materials
In addition to the type of construction and how it is attached, visors also differ depending on the material from which they are made. In order not to miscalculate the choice and choose an option that will really last a long time, let's look at the most common ones, evaluating their advantages and disadvantages.
Peaks from corrugated board
It is one of the most widely used materials for porch awnings. It is often preferred due to its low cost, as well as ease of installation and maintenance. Such a product is practical and has a long service life. One caveat - the corrugated board is not durable, and therefore it is worth picking up thick modifications and covering them with a layer of protection.


Visors made of polycarbonate
Manufacturers offer a wide range of colors, among which you can find transparent ones, so you will surely be able to choose the most suitable one for your case. A nice feature is that such models are flexible, which will allow them to be given the necessary configuration. A visor made from this material will be strong, durable and fireproof. However, it can become cloudy due to sun exposure, so be sure to apply a sunscreen to protect it.


Peaks from a metal tile
It should be selected to match the tone of the roof and install the coating already at the stage of building construction. The design will please with a long operational period, unpretentiousness in care, but it will heat up from the sun and will not provide good sound insulation.


Forged visors
Forged products will never go out of fashion and will always look incredibly attractive. Only the inappropriate style of the structure or the high cost of such a visor can push away from such a choice. You don’t have to worry much about the latter, because you can reduce the cost of construction if you order an option that combines forging and polycarbonate, or the same metal tile.


Wooden canopies
One of the most favorite materials for decorators. And this is really a beautiful and harmonious option for a house with a wooden finish. There is a wide field for experiments here - make a pergola, a carved visor, paint it in any color you like or leave it natural. The main thing is not to forget about special impregnations to protect against exposure to liquids. As for the shape of the structure, give preference to uncomplicated compositions - two- or single-sided.


Glass visors
A canopy made of triplex or tempered glass looks very light and airy and is perfect for buildings in a modern style. Why stop at these types of glass? The fact is that standard varieties will not be able to guarantee high strength and durability. But triplex, which is a pair of glasses interconnected or strong tempered glass, can. The only negative point is the price of high-quality material, as well as the complexity of maintenance and repair.


Installing a canopy over the porch is not as difficult as it might seem at first glance. In most cases, you will not need special skills and craftsmanship.
To begin with, you need to make a detailed diagram of the visor with dimensions, as well as an estimate with data on the amount of material needed. In the process of creating such a project, consider the technical points:
- The width of the structure is one and a half times the vastness of the doorway;
- Calculate the length so that it is at least a meter more than the width of the doorway;
- The corners of the slopes must be at least 20 degrees so that the product can cope with the load from snowdrifts;
- The distance from the facade of the main building to the outer edges of the canopy should allow the doors to open freely.
First measure the width of the porch, and then add 30 cm to it for each side - this will be the size of the canopy. Determine the distance for the desired shelter, the height is calculated taking into account the layout of the house and the degree of inclination of the slope. This sketch will help you understand how long you need.
Next, form wood or metal: a beam, slopes, rafters and struts. Slopes and rafters should be the same in length. Connect these elements together with self-tapping screws (in the case of wood) or welding (if you work with metal).
Fix the frame. Fix the beam adjacent to the wall with screws (preferably stainless steel), and the struts with anchors. Lay the crate on the rafters (use bars or edged boards). If you want to work with a metal sheet or slate, then leave 20-40 cm between the laths of the crate.
Lay the roof on the rafters, and then fix it. Fasten the eaves (at the bottom of the slope) and the adjoining plank on the upper slope or wall. Create a drainage system - it can be a gutter or a pipe.
If you are building a canopy on a multi-layered wall covering, then secure the structure with stainless steel shoes on the outer layer. So that the insulation does not get wet in the future, take care of sealing the junction of the beams and struts.

Canopy over the porch - photo ideas
We discussed the nuances that you should pay attention to when choosing a canopy design, materials, as well as how to build it on your own. Next, we will show even more photos with ideas for arranging this attractive part of the exterior of the house. We wish you inspiration for creative searches, strength for new building exploits and pleasant viewing!


It is currently quite difficult to meet houses without visors over the front door, this is not just an element of decor, but also a very important functional architectural structure that protects residents from the negative effects of precipitation. Consumers are offered several options for making a visor, each of them has its own advantages and features. In order to make it easier to make a final decision, developers should familiarize themselves with the possible options.
We will focus only on metal structures, the difference between them is in the coating material. The frame in all cases is metal, made from previously prepared elements, it can be welded or forged.

Most homemade canopies have welded frames, forged ones are made to order and are installed only on prestigious buildings.
Types of metal visors
This is a very conditional classification of products, but it allows you to choose the best for each specific situation.
Table. Varieties of coatings for visors
| Coating type | Brief description and performance characteristics |
|---|---|
| The most well-known coating at present, at a cost affordable to most developers. Polycarbonate has good strength and resistance to hard ultraviolet rays, it is easy to bend and cut. Mounting the coating on the metal frames of the canopies is not a big problem even for inexperienced builders. Sheets have different color schemes, thickness and shape of honeycombs. The disadvantage is that in all performance characteristics it is significantly inferior to other types of coatings. After hail, polycarbonate must be changed, after a few years, due to the harmful effects of UV rays, it loses plasticity, microcracks appear on the surface, which eventually acquire critical dimensions. At the slightest violation of tightness, mosses grow in the combs, which has an extremely negative effect on the appearance of the visor. It is impossible to remove vegetation from the combs. | |
| For the roof, impact-resistant glass is used, which can withstand significant physical loads, including shock. The service life of glass is practically unlimited, the material perfectly transmits sunlight and protects from atmospheric precipitation. The cost is in the elite category. Glass has several technological disadvantages: it does not bend, it is heavy, it requires accuracy and care during installation. | |
| Sheets of a metal profile, metal tiles or ordinary galvanized sheet steel are used for coating. The cheapest option for covering visors, in terms of all technical parameters and performance characteristics, fully meets the needs of consumers. Metal coatings have reliable protection against corrosion processes, surfaces are additionally coated with polymeric decorative and protective paints. Metal sheets have a small weight; in the manufacture of the frame, the mass of the coating is not taken into account. | |
| There are options for covering the visors with bituminous tiles. They look very original, have an attractive appearance, and are in the middle category in terms of cost. The disadvantage is that because of the stone chips, dust quickly settles on the front surface of the shingles, and mosses grow on it. It is very difficult to remove them from there, you have to use strong chemicals. | |
| It is rarely used, at a cost it belongs to the expensive category. Performance characteristics are not much different from glass. An important advantage is that the material is very technologically advanced. Monolithic plastic bends in any direction, cuts and drills without problems. It can be completely transparent or colored. |
Prices for various types of finished visors
Canopy over the porch
Step-by-step instructions for making a metal visor
For example, we will consider one of the most budgetary options: a frame welded from profiled pipes of square section 20 × 20 mm, a coating of cellular polycarbonate. All work is done independently using elementary bending devices. Welding is performed by a household welding machine, electrode diameter 2 mm.

Important. During the manufacture of the frame, it is imperative to comply with the requirements of safety regulations. It is strictly forbidden to engage in welding outdoors during rain.
Frame assembly
Step 1. Draw a sketch with the dimensions of the upcoming frame. Measurements must be done carefully, mistakes are then very difficult to correct. Buy metal, clean it from rust and technical oils. Cut the pipes to size into blanks according to the existing sketch. For the described visor, you will need approximately 4 m of a square pipe and 6 m of wire rod.


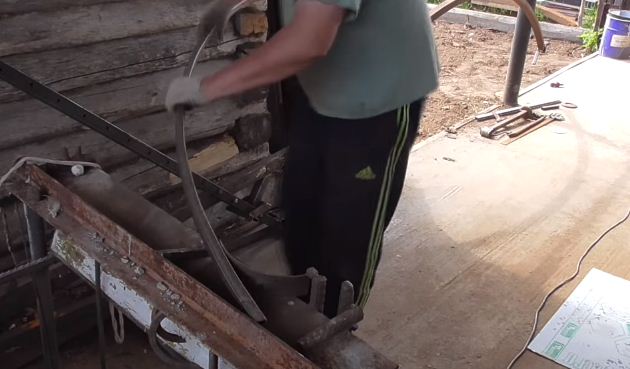
Step 2 Bend large arcs. This is the base of the frame, with them you need to start its manufacture. You can bend on the simplest device - a pipe segment with a diameter of about 500 mm, welded to a metal table. How to make arcs?
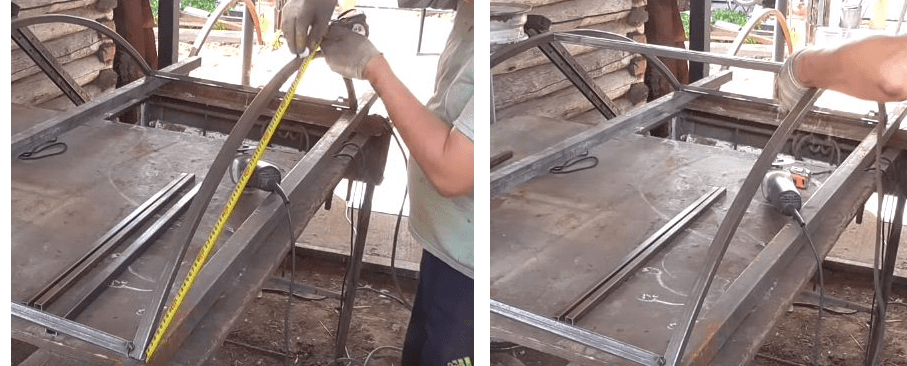
Important. Constantly control the distance between the ends of the pipe, this is a very important parameter, the width of the visor depends on it.
The more practical plumbing experience you have, the faster the arcs will be prepared. After one is done, proceed to bend the second. Now the first arc will be a template, all sizes should be checked against it. It is not necessary to achieve the perfect correctness of the form, it is almost impossible to do this.

If there is such a desire, then the arcs will have to be bent on special machines, but experienced craftsmen do not insist on perfect accuracy. In the future, the visor will have special decorative elements that will hide all small errors. The main thing to keep an eye on is the width and height of the visor, and these parameters depend on the bending radius of the arcs.

Practice shows that for an arc 25 cm high and 140 cm wide, you need to take a straight pipe section 160 cm long. You can build on these dimensions when preparing the sketch. The frame is small in size, two arcs along the perimeter are enough, the bearing capacity is enough to withstand wind and snow loads.

Step 3 Prepare the table for welding. Its surface must be strictly horizontal, summed up the mass of the welding machine. If it is not possible to level the surface according to the required standards, then sections will have to be placed under each visor pipe. They must be metal and free of rust, otherwise difficulties arise during the welding of individual elements into a single structure.

Step 4 Prepare tubes for longitudinal fastening of arcs between each other. The length of the tubes must correspond to the planned length of the visor. There should be at least five tubes: two at the bottom, one at the very top and two on the sides.
Step 5 Start welding the frame. This is done in several stages.
- Put the arc on a flat pipe, hold it with the elbow of your left hand. In the same hand, take the tube for the longitudinal fastening of the frame and weld it to the arc. Do not weld too much, you still have to correct the position of the elements.

- Grab the second arc to the second end of the segment. Check that all three elements lie strictly in the same horizontal plane. Now the design has three points of support and steadily holds a vertical position. Work becomes much easier. Of course, if you have an assistant, then involve him, together it is much easier and faster to do welding work.

- Grab a piece of pipe on the other side of the arcs, check the position again. Remember that at this stage only tacks are made, full-fledged welds are not yet applied. Pay attention that the planes of the longitudinal tubes are located in the same position to the planes of the arcs, then the cellular polycarbonate will be fixed to them.

- Find the axis of symmetry of the arcs. To do this, measure equal distances from the ends and put marks. In the center of the arcs, weld the upper short segment.
- Accurately mark the location of the side pipes and tack them. They should be symmetrical.

Check all frame dimensions and geometry. If everything is in order, then firmly weld it. Avoid burns, carefully adjust the amperage, hold the arc correctly and guide the electrode.

The frame is ready, you can start making decorative elements.
Production of decorative elements
Prices for popular models of welding machines
Welders
The process itself is not very difficult, but requires a lot of physical effort. If possible, various curly elements can be bought ready-made in specialized stores.
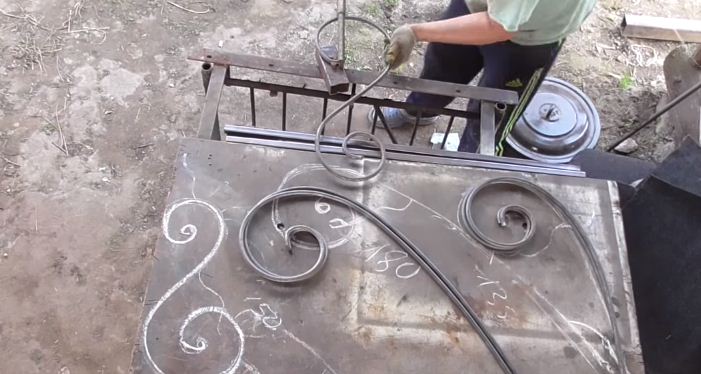
Step 1. Place the visor frame on edge and draw the arc configuration with chalk. According to this drawing, in the future, the arrangement of decor elements and the correction of their sizes will be done.
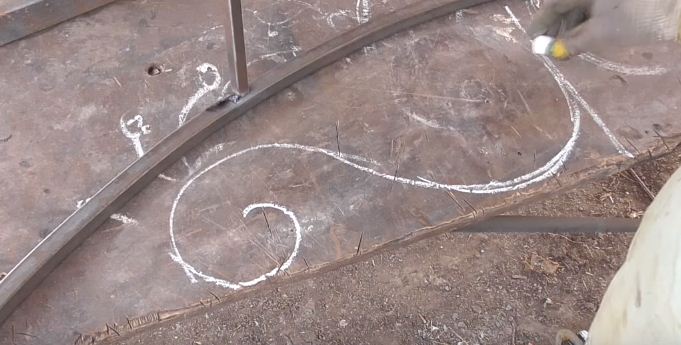
Step 2 Draw half of the decor picture. Keep in mind that the simpler it is, the easier it is to make. At this stage, you can show your artistic abilities. But always coordinate desires with possibilities.

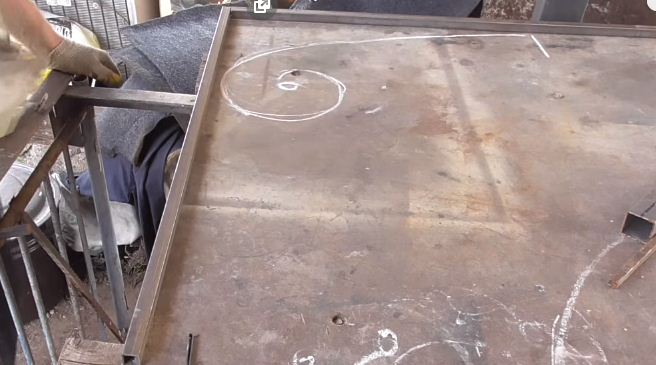
Step 3 Place blanks for the wall legs of the visor on the table. Draw a decorative element for them. Keep in mind that there are two wall legs, respectively, the number of elements is doubled.
Step 4 Using an ordinary rope, measure the size of the decor. To do this, apply it along the drawn contour, and then measure the total length. Cut the pieces of wire rod according to the obtained sizes.

Step 5 Start making curls. Ordinary devices will be required: stationary bending horns on the table and manual ones. It will take quite a lot of time to make curls, constantly check them against the pattern. Spreads of a few millimeters are not considered barracks, you should not waste time eliminating them.
After the curls are ready, you can weld metal washers of large diameter to them, they will decorate the ends of the wire rod.

Practical advice. For decoration, you can use any metal elements. Pick them up to your taste and place them symmetrically on the curls.
Step 6 Weld decorative elements to the visor.
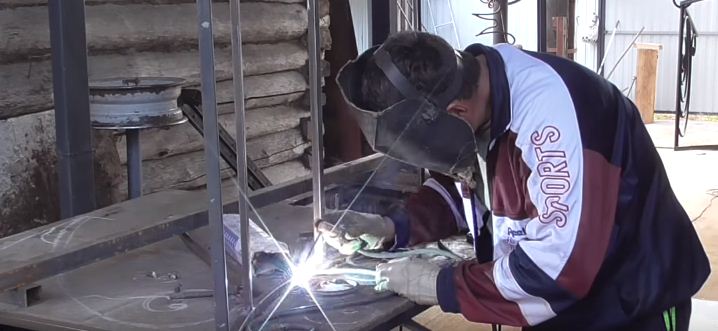
Step 7 Weld the legs. Make sure that the angles at all nodes are exactly 90 °. The end of the tubes for the legs should be cut with a grinder at an angle of 45 °, this will increase the strength of the connection. While the visor is in a comfortable position, immediately replace the decor. Then the operation should be repeated on the reverse side of the visor.
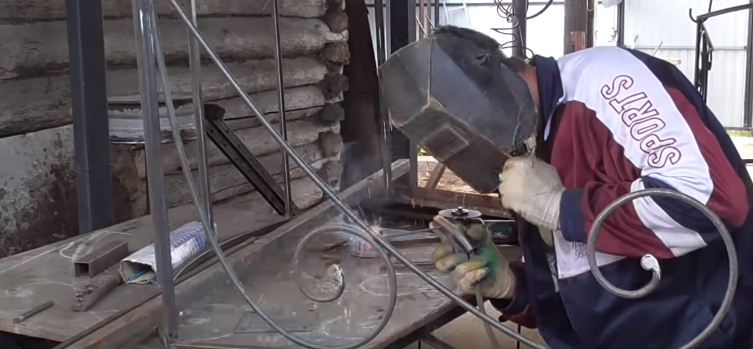
On this, the most difficult work on the manufacture of a metal visor is completed. Weld special ears for attaching the structure to.
Practical advice. Be sure to install one ear in the middle of the arc of the visor, with its help it is much easier to fix the structure to the wall.

The paint will dry - drill holes for fastening the cellular polycarbonate and install the visor in its place. If there is a little experience and a lot of desire, then such a design can be completely made within one working day.
Prices for cellular polycarbonate
Cellular polycarbonate

Video - Do-it-yourself visor over the porch made of metal
A metal visor can be mounted in a day, even without professional skills. The main thing is a responsible approach to work and exact observance of the installation conditions. You can read how to do other work, for example, install a drainage system yourself.


