Construction of garden and park roads from slabs. Landscape architecture and design
It would seem that in order to build such landscape elements as paths and platforms, a lot of mind is not needed. Laying paths is not building a house.
However, if you want them to serve you for more than one year, you must take into account all the nuances in the construction of such elements.
Otherwise, all your energy and time can be wasted.
What should be the tracks and platforms
The main requirements for these landscape elements:
Naturalness and harmony;
Strength and durability;
Ease of maintenance.
Tracks and grounds should look natural, i.e. match with the style of the house.
To make them strong and durable, great attention should be paid to the choice of material for paving.
Well, the properties of the material also affect the ease of care.
Types and purposes
There are 3 types of tracks:
Pleasure;
Auxiliary;
Transport.
First you need to decide what task each specific track will perform. Will a car pass through it, or will it be designed for walking in the garden.
The purpose depends on how the base (underlying layer), the type of coverage, as well as the width and height will be arranged.
Track and pad options
Each parameter is influenced by several factors. For example, the width of a particular track (as well as a pad) will depend on what function you define for it.
Width
Two people should fit freely on the walking path, i.e. the width should be 1-1.5 m. This also applies to the path that leads to the house.

A path of secondary importance (auxiliary) can be 80-100 cm wide. For example, a path connecting a house and a garage, a utility room, or a house and a recreation area. And for auxiliary paths in the garden between the beds, a width of 50-60 cm is sufficient.
The width of transport and access roads, first of all, depends on the size of the transport that will pass through them. It can vary from 2 to 3.5 m.
The dimensions of the transport platforms also depend on the size of the transport itself and its quantity. For one car, a place of about 2.5x4.5 m is allocated.
Height
As for the height, meaning the height relative to the level of the lawn, then there can be 2 options: above the level of the lawn or below. The calculation is made on the fact that the water that falls with precipitation must drain somewhere.
If you are going to arrange a runoff of water along the paths, then they must be built below the level of the lawn. At the same time, the design heights and other coatings must be strictly observed on the site in order to exclude the overlap of the drain.
Paths above lawn level can only be arranged if the site is well drained. Since they are built with a slight transverse slope, all the water will drain onto the adjacent lawn. And so that the water does not stagnate on it, the soil must be moisture-intensive.

slope
The entire road and path network in the garden should be designed with a slight slope to avoid the formation of puddles during precipitation or snow melt.
At the same time, the slope along the path can be 2-5%, and across - only 1-2%. In addition, the direction of the slope can be different: from the central axis to the sides or from one edge to the other.
The direction depends on many factors, such as whether the area is flat or has a general slope. In addition, so that water does not accumulate at any one point in the garden, the entire site must be planned with a “bending”. Thus, the slope line of the tracks also depends on this layout.

Coating types
Today, modern materials make it possible to make paths and playgrounds not only durable, but also beautiful, and in some cases even especially decorative.
Depending on the type of material, there are 3 types of coating:
Solid;
Combined.
borders
Not all paths and areas require curbs. As a rule, borders reinforce the edges of soft and combined coatings. And for hard surfaces, reinforcing the edges is optional.
For the border use the same material or in harmony with it in color and structure. Both low and high borders look good.
Curbs are laid in a groove located slightly below the level of the track, the bottom of which is covered with sand, and then with concrete. Bookmark produced before paving.

And finally some tips
So that the path does not become overgrown with weeds, a film should be laid under the backfill or under the “trough”. Of course, weeds can penetrate into the gaps between the slabs (with step-by-step paving). Therefore, as a preventive measure, gaps are planted with moss, lawn grass, ground cover plants, bryozoan, or treated with Roundup.
If you are going to buy expensive coating material, then it is better to entrust the construction of tracks and platforms to professionals, or at least read specialized literature. Paving technology has its own secrets, for example, how to properly create a foundation (trough) for paving. And even if you decide to make a simple path from wooden saw cuts, you still need a base for it.
If a good, durable material is chosen for paving and all the subtleties of the technology are observed when constructing the tracks, then their service life without repair will be about 15-20 years.
First of all, the arrangement of garden paths should include a plan with all the existing buildings on it. They are drawn on the plan to scale. The plan should also contain the location of existing trees on the site. Consider the stylistic direction of the garden: the appearance of the paths and the materials from which they are made should be in harmony with the overall concept. Decide on the patency of the site and, based on this, choose the width of the tracks. Barbecues, swimming pools or playgrounds for children must be wide enough for two people to walk freely on them. The width of these paths varies between 100 - 130 cm. The path leading to the gazebo, located in a secluded place in the garden, will be 50-70 cm wide. After determining the parameters of the paths (width, length, configuration), proceed to the choice of material for paving.
The purpose of garden paths depends on the loads that will affect the coating.
Back to index
Selection of material for tracks
It can be made from a wide variety of materials: small pebbles, gravel, artificial or natural stone, clinker tiles, wood. Naturally, tiles made of artificial stone, wood or gravel are much cheaper than those made of natural stone. But you should not approach the choice of material for based only on its price.
The purpose of the tracks depends on the loads that will affect the coating. In the case when garden paths are intended only for pedestrian traffic, any material can serve as their device - crushed stone or concrete paving slabs. If the surface will be affected by the weight of more than one person (for example, car paths), then the best solution would be to install such asphalt or paving stones.

When choosing material for tracks, it is necessary to pay special attention to the strength and thickness of the material.
When choosing material for tracks, it is necessary to pay special attention to the strength and thickness of the material. For example, a concrete road must meet the following requirements:
- footpaths must be made with a layer of concrete with a thickness of at least 50 mm;
- the paths along which movement will take place, for example, hand wheelbarrows, must be at least 7.5-8.0 cm thick concrete.
Back to index
Selection of track device technology
The technology of garden paths is divided into four types:
- soft;
- hard;
- special;
- combined.

Soft paths - paths that have a coating of gravel, screenings, crushed stone, as well as tree bark.
Soft paths - paths that have a coating of gravel, screenings, crushed stone, as well as tree bark.
Rigid paths - paths, the device of which is made of separate elements, for example, paving slabs, monolithic concrete or stone.
Special - paths with a decorative concrete coating.
Combined - paths, the device of which includes paving slabs and bulk materials.
Back to index
Advantages and disadvantages of various materials for garden paths
Natural stone (marble, granite, basalt, sandstone, limestone).
Advantages:
- durability of natural stone (more than 250 years);
- a variety of shapes and textures, allowing the use in large gardens and small areas.
Disadvantages:
- cost compared to other materials;
- travel insecurity.
Note: For garden paths of this type, experts advise using electric heating.
Artificial material (paving slabs, asphalt, rubble stone, concrete coatings).
Advantages:

- resistance to aggressive environment and UFL;
- practicality;
- variety of forms.
Disadvantages:
- poor quality of manufacture of such materials significantly reduces the service life;
- during the interseasonal movement of soils, cracking of the surface of the coating is possible (asphalt coating, monolithic concrete);
- paving slabs can settle, which will make the path inconvenient for movement and require its repair.
Bulk materials (gravel, crushed stone, screenings, pebbles, sand).
Advantages:
- low price;
- low labor intensity during installation;
- no slope required.
Disadvantages:
- the difficulty of cleaning;
- need .
First of all, you should think carefully about the design of your garden. If the garden is made in Japanese or Chinese style, you cannot do without tiles made from natural materials. Such gardens often have and therefore you will not need a large amount of natural stone material.
If you prefer the style of French apothecary gardens or the English style, then paving the paths with artificial paving slabs will be the most correct solution.
When choosing the material from which the paths for the garden will be made, you should think not only about the price of the material, but also about the costs of the preparatory period and work on direct laying.

The soil is the basis for the paths and, depending on the characteristics of the soil, all further work on the device is determined.
Back to index
Territory planning
The planning technology includes two stages: marking the territory of the site and excavation. To mark the site, it is necessary to make benchmarks (marks) that will determine the contours of garden paths, pits for planting trees, playgrounds and the terrain. Benchmarks are exposed according to the project. All marks must be tied to the boundaries of the site, buildings and trees. Pegs made of wood or small pieces of reinforcement can be used as benchmarks. Depending on the marks, the relief of the site is divided. The breakdown of such a plan can be done using a theodolite or level. After marking the entire area, the contours of the platforms and paths should be applied. To do this, sand is sprinkled along the contours. Seeing the real shapes of the tracks, it is easy to correct them. This is followed by earthworks or "dugout".
Back to index
Excavation work
First of all, it is necessary to determine the level of groundwater and soil composition. The soil is the basis for the paths and, depending on the characteristics of the soil, all further work on the device is determined.
The most optimal base is considered to be sandy soils, which consist of sand of medium and coarse fractions. Soils of such a plan are found near rivers and in alluvial areas. For the device, you only need to remove a small layer of sand, not forgetting to take into account that the path should be located 2-3 centimeters above ground level.
All other soils require the implementation of the so-called "trough" to create a solid foundation. Soil excavation should be carried out to a depth of 150 - 300 mm, followed by the placement of inert materials into it in the following order: gravel, crushed stone, sand.
Each layer must be compacted and carefully leveled.

To reduce the thickness and increase the quality of the underlying layer, geogrids and geotextiles are used today.
The topmost layer in the "trough" is made of sand and serves as a base for covering the track. The depth of excavation is directly proportional to the level of groundwater and the degree of moisture permeability. The greatest depth of excavation in wetlands and peat areas. If you do not use a powerful underlay on such soils, then in a few years the track will sag.
To reduce the thickness and increase the quality of the underlying layer, geogrids and geotextiles are used today. The geogrid is a construction made of inert polyester fiber. The geogrid helps form a strong cellular frame. All lattice cavities are filled with crushed stone, gravel and sand. Geotextiles can be placed between the sand and gravel layer. It prevents the germination of plants between the joints of the slabs of the path and the washing out of the masonry material. Geotextiles are also installed at the bottom of the trough. In such cases, it acts as a reinforcement.
Laying of artificial and natural stone pavement (piece materials) can be done on a dry mortar of cement and gravel, on a layer of cement mortar or spilled sand. In the first case, stone tiles are laid directly on a layer of gravel without a layer of sand. When laying, the slabs are compacted with a hammer with a rubber or wood head.
Wooden flooring must be laid on bars (logs). This is done in order to avoid the deck boards touching the ground.

Borders give the path not only an aesthetically finished look, but also carry functional loads - they prevent the spreading of paving slabs and the washing out of masonry material into the ground.
Pathways must be sloped to drain melt and rainwater. The slope on both sides is usually performed on flat areas, and one-sided slope - on relief areas. The slope is made in the direction of lowering the level of the relief.
Curbs give the finished look to the path. They give the path not only an aesthetically finished look, but also carry functional loads - they prevent the spreading of paving slabs and the washing out of masonry material into the ground. The most popular are plastic curbs, installed after laying the plates. Installation of plastic curbs does not require excavation. They are installed using special anchor-type fasteners.
It is best to combine excavation with the laying of drainage ditches, stormwater, lighting and irrigation systems. This approach will save you time and money. Proper placement of drainage grates and storm inlets will help calculate the slopes of the paths so that water from their surface enters the drainage system immediately, and does not stagnate on paved areas or lawns. In the "trough" for future paths, you can lay electrical cables and pipelines for the irrigation system. It is necessary to lay cables in special corrugated type hoses (plastic or metal). Paths on dirt slopes, passing along the edge of a terrace with a pronounced relief, need to be further strengthened. For such purposes, geogrids, which have already been mentioned above, are perfect.
To make the garden comfortable and beautiful, all its components must be functional and aesthetic. In this book, we are talking about such important objects of the garden landscape as paths with curbs along the sides, platforms and rock slides. The first 2 sections are devoted to the issues of creating paths, platforms and borders, as well as the selection of materials, and the third section details the construction of stone slides. At the end of each section, some considerations are given on how to best fit these objects into the overall design of the site.
A series: DIY
* * *
by the LitRes company.
PATHWAYS AND GROUNDS
General information
Some people may have an idea: why be smart with the paths, because their function is only to connect the objects of the garden or its different zones. It seems that it is enough to sketch an approximate scheme on paper with a ruler and a pencil, and then quickly implement it on the site, pouring concrete, scattering stones, laying paving stones or bricks. However, not everything is so simple, and those who think only about the utilitarian meaning of the paths without considering the aesthetic nuances will end up with boring, gray and alien elements of the garden setting. It is unlikely that such a situation can please. On the contrary, paths with graceful curves, emphasized by spectacular paving materials, organically fitting into the surrounding landscape, will become a real decoration of the site.
First of all, it should be said that the location and direction of garden paths must be considered at the planning stage of the site. On the plan, all the proposed buildings (house, barn, bathhouse, gazebo and others), infrastructure facilities (paths, sites), water bodies and trees already on the site should be noted. The link between all these elements of the garden will be the main path. Moreover, if in a garden of a regular style it will be straight, like an arrow, and, most likely, coinciding in orientation with the compositional axis (in landscape design, it is a conditional line on which its other elements seem to be “threaded”), then in landscape style the paths branch freely, gravitating towards the spatial compositional axis. Whatever style you choose, the main path (and others too) should not be overly wide and ornate. It is most reasonable to perform it where there is a trodden path.
If it is decided to combine approaches to garden design, then they usually do this: the compositional axis and the main path are laid from the main entrance to the site. The front part of the site, that is, the one on which visitors first find themselves, is decorated in a regular style with reference to geometric lines, and in the center of the site the main path is divided into many small paths leading to the periphery of the garden and implemented in a landscape style (they should provide an opportunity to get acquainted with the beautiful corners of the garden).
Thus, it is required to carefully consider the style of the tracks, because their shapes, directions, materials must complement the overall picture. To establish an acceptable width of the tracks, you should calculate the approximate traffic intensity in certain places on the site. As a rule, along the paths leading to the pool, barbecue area, playground, 2 people should freely pass shoulder to shoulder, respectively, their width will be 100, 120 or 150 cm. As for the path along which you can get into the gazebo, located in a secluded corner of the garden, then it does not need to be wide, and therefore 60-70 cm is enough (this width is also enough for paths in a small area). It turns out that the dimensions of the main paths are somewhat larger than the secondary ones, since they are made with the expectation of a lively traffic and, for example, the possibility of transporting a cart along them. A width of more than 2 m is unnecessary, because then the track will look like a track. In a small area, the width of the paths should be sufficient for a couple of people to disperse on them.
The creation of a network of paths requires the search for a competent solution regarding the chosen direction and the optimal distance, so that the lawn has to be crushed to a minimum, but at the same time, a convenient connection of all economic objects on the site is fully implemented. An extensive lawn will have to be cut with a path in any case, because you will need a passage to the well, bathhouse, gazebo, patio, etc.
The creation of a road and path network is not the easiest task, but it is the basic one in the planning of landscape architecture. An inexperienced user of gardening has the right to think that he has absolute freedom in terms of movement on his own plot, and does not even realize that around him there are entirely lines of a very real, but invisible web that determines the direction of human movement. For example, few people think that walking along the path to the gazebo is a movement along the transit route and the path was trodden precisely along this path is not at all accidental.
In the same way, people lay paths in public places, using only their intuitive instincts - and then one person passed, the next one followed, then the third, etc. However, the 1st traveler did not just choose the direction, but was guided by considerations of optimality. Any terrestrial surface has an invisible network of rational routes. However, when people walk on them, the routes become quite tangible.
Of course, optimality is often violated by the requirements of aesthetics, but in any case, rationality must be taken care of, so it's worth talking about it a bit. So, with the help of a well-designed and implemented road-path network, they both connect various objects of the site (for example, the porch of a house with a garage, greenhouse, playgrounds, barn, etc.), and provide convenient access to the site and walks around its territory .
It is impossible to give any universal advice suitable for creating any road networks, since all sections are different, and here one must take into account their area, configuration, topography, number and size of buildings, and volumes of green spaces. Moreover, in order to determine the paving areas of paths and playgrounds, you need to know the number of people engaged in gardening, the characteristics of their lifestyle, and how many visitors (on foot and by car) visit a particular garden on average. The road surface must be safe to use regardless of the weather, whether it be prolonged rains, slush or ice.
I must say that the site will require a large number of paths (unless, of course, it is quite small), otherwise it will not be possible to create conditions for convenient movement between 2 points and facilitate garden maintenance. It is better to provide access to all elements of the site at any time of the year and day.
Usually the paved surface on the territory of the site reaches 20% of its total area. At the same time, if there are too few paths in the garden, then the efficiency of its use will decrease, not to mention convenience. However, one should not go to the opposite extreme either. If there are numerous intersections in the garden, it is safe to say that erroneous planning is taking place.
The best option for a small plot of up to 20 acres would be the implementation of a circular walking path with secondary paths branching off from it.
When drawing up a road network map and looking for the best path direction, it is advisable to look for a competent solution with the most interesting route, as little lawn fragmentation as possible and shorter distances between garden objects and zones.
It will not be possible to first implement the road network, and then tie other elements of the garden interior to it, just as the implementation of these elements cannot be carried out before the moment comes to think about the paths - competent design and breakdown of the road and path network is quite difficult to perform. The pangs of creativity are necessary, but at the same time, the observance of certain strict conditions.
We can recall a classic example of the creation of a road system in the Artek pioneer camp: children were doing this, walking around the territory and trampling the most optimal and convenient routes. This technique is very effective, and therefore is actively used by people with a purely rational attitude to the organization of the space of their site. For such owners, everything is simple and ascetic: the paths reduce the distance, stretching out strictly in a straight line (a kind of garden highways). When leaving the house, the pragmatist calculates the direction in such a way that he will quickly reach his destination, not having the desire to waste time contemplating the beauties. For such people, the main condition is order. Accordingly, they prefer a regular style.
If the owner of the land is an esthete by nature and is inclined towards landscape style, then it will take him no less time to get from the house to the bathhouse than to go around the entire area around the perimeter. After all, he enjoys a walk along the most picturesque winding path, is constantly distracted by the bewitching view of a distant forest, listens to the soothing murmur of a stream and is not able to pass by a flower garden without absorbing the sweet aroma of each of several hundred flowers.
Obviously, both of these situations are extremes that should not be allowed, and the truth, as always, is somewhere in the middle. Thus, the most difficult thing in the design of the road network is to find harmony between the rational and aesthetic approaches.
To begin with, it is useful to draw a plan and try to imagine yourself moving along the paths indicated on it. In this way, it can be established that it is not so easy to navigate through them, and in practice the situation will be even worse. If it is difficult to imagine everything on paper, you can figure out how everything will be directly on the site. Why perform a rough marking of the tracks with the help of pegs and rope. Next, you need to take a leisurely walk in key areas, simultaneously assessing the degree of convenience and consistency of the walking route with the rest of the landscape. Gradually, correcting the shortcomings, taking into account the opinions of loved ones and making the turns smoother, they achieve a suitable option.
When creating tracks, the main conditions can be considered their versatility, convenience and pleasant appearance. They are simply obliged to lead people to the goal, without depriving them of the opportunity to admire the surrounding views. Moreover, they should not be duplicated: they usually converge only at the entrance to the house, and in other cases they scatter (Fig. 1).
Rice. 1. Convergence of paths near the house: a - incorrect; b - correct
It is highly desirable not to cross beautiful open spaces with paths, since such areas are likely to cease to be attractive (Fig. 2).
Rice. 2. Decoration of open spaces with paths: a - correct; b - wrong
In addition, it is better not to lay paths too close to fences and green areas (Fig. 3).
Rice. 3. Paths along the fence: a, b, c, d - correct; d is wrong
When planning paths, it is important to leave the opportunity to admire not only the views that open in the garden, but also the landscapes beyond its borders. Any object on the site that is of interest from an aesthetic point of view should be easily accessible from any position. Tracks should not be rotated unnecessarily; as a rule, their bends are needed in order to make it possible to contemplate an object in the distance (Fig. 4). Examples of perfection in the use of curves are Japanese gardens, which will be discussed in the corresponding chapter.
Rice. 4. Review track
The fact that all paths and paths must eventually meet in one place can be called the main rule in designing their network. Moreover, this place is perceived as a compositional, and not a topographic or geometric center of the garden. What exactly to choose as such a center and how to design it depends on the preferences of the owners: it can be a patio, gazebo, rock garden, etc. You just need to remember that the compositional center should not overwhelm everything else on the site with its dimensions (Fig. 5 ).
Rice. 5. Center of convergence of tracks: a, b - correct; c - wrong
When laying the path, it is necessary to do it so that it protrudes at least 50 mm above the ground, as the growing grass gradually raises the ground, as a result of which the path will be below ground level. In addition, whatever the path, it must be made with a slope for water flow (if the width is quite large, then the slope from the middle of the path to the edges must be a couple of centimeters per linear meter) or equipped with special drainage systems.
On paths with a slope of more than 50 mm per 1 m of their length, steps cannot be dispensed with, which are performed taking into account the fact that their double height, as well as depth with width, cannot be less than 60–70 cm, which is equal to the step length. At the walking path, the same distance should be between the centers of tiles or stones, while the sides of the covering elements do not exceed 40 cm.
The actual laying of the pavement is preceded by studies to determine what type of soil is typical for the site as a whole and its individual zones in particular, after which it is already necessary to take into account the expected intensity of use of the path and select the appropriate material for the pavement.
First, the composition of the soil and how deep the groundwater is are established - the reliability of the foundation and the required amount of work depend on these parameters. Sandy soil is considered the best, which is found on plots of land that were once washed over by water or located near rivers. The labor costs for arranging the tracks will be insignificant: you only need to remove a layer of sand corresponding to the expected thickness of the track, plus a few centimeters so that it rises above the ground.
The remaining soils will provide a stable base for the track when buried in the ground by several tens of centimeters. At the same time, crushed stone, gravel and coarse-grained sand must be successively poured into the formed ditch, each layer must be leveled and compacted. The actual road surface is laid on top of the sand. The specific depth of the ditch is determined based on the existing groundwater level and the ability of the soil to absorb moisture. The second characteristic is the lower, the higher the first; and the less moisture permeability, the deeper the ditch should be.
Excavation of land on peat and marshy soils is carried out to the maximum depth. In the absence of a thick underlayment, the track will only take a couple of years to sink underground. A rather effective means of strengthening weak soils is the pouring of a concrete base, on which a coating is laid, for example, tiles on cement.
Assume that the area is clay soil. In order to make paths in such conditions, it will be necessary to dig a ditch up to 40 cm deep, otherwise the clay may swell in winter and nullify the efforts to paving the path or platform. It is recommended to completely remove the fertile layer from the ditch, which is difficult to compact. The bottom of the ditch is carefully tamped, after which it is necessary to make a carrier layer: fill in crushed stone or coarse gravel with a layer of 15 cm and tamp again. Then coarse-grained sand should go, directly on the layer of which the road surface is laid. The gaps between its individual elements are filled with sand and rammed.
When buying paving material, in addition to its aesthetic and technical characteristics, you need to take into account the cost, along with other considerations (service life, maintenance costs, etc.). For example, expensive natural stone turns out to be more profitable than cheap concrete, as it serves for a long time, becoming only more beautiful over time, small defects on it do not spoil the overall impression, and it can be laid repeatedly.
High-tech materials are now on sale, with the help of which you can make the underlying layer better and more efficient. We are talking, for example, about geotextiles. Sheets of material are placed on a layer of gravel - this will protect the road surface from the germination of weeds in the cracks between its elements.
Sand is already poured onto geotextiles. If fine gravel is used when arranging the track, then it is advisable to lay sheets of geotextile under it. In this case, the geotextile will serve to reinforce the backfill structure, representing something like reinforcement. In addition, sheets of material will not allow gravel to sink into the ground, which will prevent erosion of the sand layer.
Instead of geotextiles, materials similar to lutrasil or spunbond are often used, which are a dense non-woven "spread". When used, it is folded into several layers. Moreover, there should not be polyethylene at the base of the track, because of it there will be a threat of stagnant water.
To reduce the thickness of the base, geogrids are also used - honeycomb structures made of polyester fiber that is not subject to chemical attack. When stretched, such a lattice turns into a strong frame with multiple cells, each of which is filled with crushed stone, gravel, sand.
With all this, keep in mind that what the base will become depends primarily on the type of decorative coating used for paving the paths. So, if it is supposed to use piece elements (natural stone, etc.), then a serious reason is not required - moistened sand, dry cement-gravel mixture or cement mortar, which does not involve sand, is quite enough, so the coating is placed on gravel. Stone tiles need to be knocked out with a rubber, plastic or wooden mallet.
So that the boards of wooden flooring do not come into contact with the ground, they are placed on joists. As a rule, the slope for water runoff is double-sided if the track section is flat, and one-sided if it is embossed. In the latter case, the slope is made downward.
In sandy soils, any types of paths are laid out: both from stone and from wood. The fact is that sand has an excellent draining ability, thanks to which the tree will be well protected and will not rot from moisture. When using paving stones made of natural, artificial or rubble stone, you will have to go deep into the sand by about 14 cm plus or minus a few more centimeters, which is determined by the thickness of the selected material. Suitable soils are sandy and light loamy. On them, paths can be made of any natural or artificial stone, as well as gravel or poured concrete.
To begin with, a layer of turf is removed (usually up to 15 cm thick), after which the ditch is deepened to easily fill it with an 8 cm layer of coarse gravel or crushed stone, a 5 cm layer of fine gravel and a 3 cm layer of sand. If the soils are heavy clayey, peaty or marshy, then you will first need to arrange a drainage system to drain ground, rain and melt water. In this case, a 20 cm layer of coarse gravel, an 8 cm layer of fine gravel and a 5 cm layer of sand are covered. Here, the gravel-sand layer will serve as a foundation and at the same time take on the functions of drainage. Be sure to follow the rule that the edge of the track should protrude above the ground by at least 50 mm. It is not worth choosing sand as a masonry material; instead, it is better to use a dry 2-component mixture (cement, lime or gypsum mixed with sand, dolomite, etc.) or a cement pad.
Simultaneously with the digging of the earth for the paths, it is recommended to lay drainage systems, such as special ditches or a storm system, as well as to introduce the necessary elements of garden infrastructure, in particular lighting and irrigation systems. Thanks to such an integrated approach, you can significantly save time and money, because if you know where the drainage grates and storm water inlets will be, then by simple calculations it is easy to accurately determine the parameters of the path, during which water will not linger on the lawn and playgrounds. In addition, electrical cables (“dressed” in plastic or metal corrugated hoses) and irrigation system pipes are often pulled in ditches under the bases of the tracks. If the territory has a relief with fairly sharp elevation changes, then you need to think about strengthening the earthen slopes (with the help of geogrids), which is especially important for paths laid along the edge of the terrace.
Curbs are often installed along the sides of the paths, which give them integrity, play the role of a decorative element and prevent erosion, but they are not always appropriate.
Having completed the paving, the work done should be checked for the presence of small defects, fill the gaps between the slabs with sand, if any were used, make sure the wooden flooring is stable, level the sand, gravel, bark, crushed stone, etc. If the path is paved with stone, then with it is necessary to remove debris or wash off excess used materials by directing a stream of water from a hose under low pressure onto the coating.
After understanding the technology for creating and the characteristics of the tracks (length, width, shape, height, the presence of borders), there comes a moment when you need to choose the coating material that suits you from a huge variety.
By combining the elements of the coating with different patterns, you can create a real mosaic picture under your feet. Of course, the main factors to be guided by when choosing a coating will be:
♦ whether it organically fits into the surrounding landscape and the overall design of the garden;
♦ how often specific lanes will be driven (estimated);
♦ how burdensome the material is for the owner's pocket.
As a first approximation, the pavement materials of tracks and grounds can be grouped into 2 categories: hard and soft. In the first case, these are materials such as natural and artificial stone, brick, paving stones, cement slabs, ceramic or paving slabs, concrete, asphalt, etc. The main advantages of hard coatings are considered to be their strength and visual appeal (although, again, it all depends on general garden design). In the second case, sand, wood, crushed bark, gravel, turf, etc. are used. Usually, paths made of such materials reach remote corners of the site, where people go infrequently. By making part of the paths from soft materials, you can reduce the cost of creating a garden road network.
It should be noted that it will be most effective if different types of paving are used. So you can create a unique landscape composition that visually enlarges the space.
When choosing materials for covering paths, you need to know that there are “donor” materials that contribute to the activation of the body, which are used in places of active recreation (pebbles, gravel, paving slabs, oak, birch), and there are “relaxant” materials used in places for a relaxing holiday and helping to relax (sand, brick, tree bark, pine, aspen). There are also materials that do not belong to these types - monolithic concrete, which over time simply merges with the surrounding landscape, as well as ash, linden, alder.
Among the traditional styles of landscape design, there are those that are simply unthinkable without natural stone. First of all, this applies to Japanese gardens. However, in this case, the paths are usually step-by-step and therefore not too much stone material will be required. When using natural stone, it is necessary to pay special attention to the natural shades of colors characteristic of various breeds.
With the help of a competent selection of materials with the appropriate texture and color, they achieve the creation of classic patterns like fish scales, various mosaics, unique ornaments that turn the path into a work of art that makes an indelible impression on the audience. Natural stone organically and effectively looks in the "company" of objects made of similar material: flower pots, flowerpots, bird houses, benches, retaining walls and pillars, etc.
Due to its highest hardness and decorativeness, the leading role among natural stone pavements of paths and platforms rightfully belongs to granite, which also has the widest range of different color shades, which elevates it to the rank of an ideal material for landscape (and not only landscape) design. One can imagine how whitish-greenish moss breaks through the cracks between large stone slabs - such a coating will emphasize the natural charm of the garden. With the onset of autumn, the wind picturesquely drives yellow foliage over the stones, raising small whirlwinds and hammering it into the gaps between the plates ...
If you want to make a Mediterranean-style relaxation area, then it is better to use yellow and red sandstone slabs for this. Arbitrary break lines at the edges of the slabs will be favorably set off by river pebbles or rubble. To emphasize the naturalness of the picture, plants are planted in the cracks between the plates.
If the soil is clayey, water-resistant, then the pavement must be placed on a carefully leveled sand foundation. Further, slabs and stones are already tightly laid on this base in such a way that they do not move and do not break under pressure when they move along them. The gaps between the coating elements are filled with sand. Wide paths usually have large enough gaps between the slabs or stones, so the gaps can be filled with cement - you just need to remember to completely clean the surface of the paths from excess mortar before it dries.
Rigid materials are naturally used as paving for driveways and grounds, and the paving is essentially standard brickwork. Such paths, like platforms, require a well-prepared foundation, so the ground is carefully tamped, covered with a layer of sand about 3 cm thick, and then a cement mortar is placed on the base and a brick is installed or the mortar is smeared on its edges. After laying, the gaps between the bricks can be filled with mortar or a dry cement-sand mixture, subsequently moistened. It is necessary to mix sand with medium-sized grains in a ratio of approximately 1: 5 into the cement mortar, it also makes sense to add lime to the solution. The prepared solution should be used no later than 2 hours after its preparation.
When using a lawn mower, it should not touch the road surface, so make sure that the lawn rises at least 3 cm above it. You can do it differently: leave a strip of unsown earth several centimeters wide between the lawn and the path.
As a rule, the platforms serve as a logical completion (continuation) of the garden path and it doesn’t matter whether they are located in front of the entrance to the house or to the site, or are intended to be the basis for benches, a barbecue or a parking lot. The technology of their creation is basically similar to the paths, since the site must serve as a natural continuation of the path or beautifully crown it.
If the garden is made in a regular style, then it is better to pave the site with bricks, regular-shaped concrete slabs, rounded natural stone. By combining different types of coating, you can get very interesting results, for example, by composing a composition of stones of various textures and colors. In landscape gardens, the same material is used, but it is distributed randomly, without straight lines and angles.
Undoubtedly, the view of the sites is much “heavier” than that of the paths, and therefore the former require competent and rich decoration with plants. If there are shrubs along the side of the paths, then it is also desirable to plant plants around the site, but of greater height. There is no need to search for the same type of shrubs - plants similar in outline, color or shape of leaves are quite suitable. This technique will allow you to connect the track and the site, even despite the different surfaces.
To fully fit paths and playgrounds into the surrounding landscape, it is not enough to choose the right coatings and borders. Only the well-thought-out nature of green spaces along the edges of paths, paths and platforms will give the desired effect. Proper selection of plants will provide a favorable impression that the path will have on visitors, giving it a picturesque look, emphasizing the sophistication of the material, hiding minor flaws, if any.
If the garden is supposed to be decorated in a regular style, then a lawn or rabatka with annual plants is enough. In a landscape garden, this will not be enough - a variety of vegetation will be required, ranging from conifers to ornamental mosses.
When selecting plants, they are guided both by their external decorative qualities and botanical characteristics, especially those related to growing conditions. For example, if you plant light-loving plants in deep shade, they will stretch out and lose their attractiveness, which will be clearly visible from the path.
A few words should be said about such a specific type of landscape garden as the Japanese garden. It's no secret that there are several ways to get to the right place: short, direct and purposeful, as well as long, which at first glance is not the most convenient, as it goes along a curve. The Japanese traditionally believe that the second option is preferable, so in the eastern gardens the paths are often winding. When walking along them, regardless of the size of the garden, there is a feeling that something new, unexpected and wonderful will surely open around the next turn. Driving along a curve is most consistent with natural natural forms and lines - smooth bends of the riverbed, coastline, animal trail, etc.
The Japanese have learned very well that the design of the path is determined by both its surface and the environment, including the views that open from it. The main thing is to ensure that the overhanging branches of trees do not interfere with the movement along the path.
Also in the Japanese garden, they try not to lay paths through the center of the site - the middle must certainly remain free. It is recommended to divide the road network into side zones, and some experts even advise using the western part of the accessible territory for tracks.
The width of the tracks plays an important role. As already mentioned, the path to the main entrance to the house and the path to the beds are not comparable, but the excessive width is also not good, because it provokes clutter - it turns out to be a kind of platform on which it is very convenient to put various items, such as bicycles or garden tools. Such a path can also turn into a playground.
The width of the paths on the periphery of the site should correspond to the size of the given territory. Narrow paths in a vast space look like an unsuccessful solution, but wide paths in a small one, to put it mildly, are inappropriate: they violate the comfort of the garden and take up extra space.
For all the hassle of organizing the tracks, one should not forget about their safety. The main path from the garden to the house should be adequately lit both during the day and at night (it is necessary at least to provide for the inclusion of the light when leaving the house). The paths are carefully inspected to identify unacceptable potholes, potholes, and their surface should not be slippery even in the rain.
The paths are laid in such a way that the movement around the garden is carried out without the forced need to get dirty or wet feet, respectively, the coating must pass water or effectively drain it. Many garden plots can "boast" of unaesthetic passages between buildings, for example, between a house and a garage. In this case, by some tricks, it is easy to achieve a favorable impression by attracting the attention of the person going to one side of the path, then to the other. Why do you need to put climbing plants up the wall, decorate it with tapestries, bas-reliefs or mosaics. It is not out of place to install pots or flowerpots with flowers on opposite sides of the path.
At dusk and at night, attention can be drawn by installing lamps on the walls of buildings adjacent to the path. With a sufficient width of the passage, small bushes or perennials are planted in flowerpots; they must also be placed unevenly so that the eye has something to catch on and the person does not walk in a straight line. In this way, the impression will be created that the track has bends.
In any case, when choosing plants, you need to consider which of them feel good in this particular area. In addition, in narrow passages, as a rule, there is little light and constant drafts, and in such places really hardy plants survive, for example, various varieties of evergreens (pyracanthus, etc.) or climbing varieties (ivy, hydrangea, actinidia, etc.) .
Types and arrangement of tracks
Bulk
Bulk paths have long been the most popular. To a large extent, this is due to the fact that their installation presents almost no difficulty and is available to the gardener, regardless of his experience in landscape design. In addition, the device of the bulk track will take very little time.
Any bulk materials are used as a coating, for example, crushed stone, sand, gravel, crushed bark, stone chips, pebbles, nutshells, etc. Before creating a path, markup and carry out appropriate preparatory actions. The advantage of bulk paths in the first place is the ease of their creation, and the foundation for them is sandstone. The coating material is evenly scattered and compacted, after which you can already enjoy walking along the finished path.
Usually in garden construction, gravel, which is crushed stone from quarries, is used to cover driveways and pedestrian paths and small areas. If you need to decorate individual sections of the path, you can take marble chips, pebbles or bark, but gravel compares favorably with many similar materials not only for its low cost, but also for its versatility in use, because it looks good both at the entrance to the house and in remote corners of the territory garden.
Gravel pavements require little to no attention from the owners in terms of maintenance, but at the same time they look very naturalistic, easily combined with buildings in any style. The advantages of gravel, as well as similar pebbles and crushed stone, are especially pronounced in small gardens. Where paving seems to be a difficult procedure due to the features of the relief, a layer of gravel will be very useful. Light gravel, sprinkled in dark places, will create a feeling of illumination.
In Japanese gardens, traditional gravel pads on which to create an image with a rake are common. In this case, wavy lines symbolize the sea or river flow. This is one of the tricks used to designate the water element in a garden when there is no way to have a real pond or stream. After all, flowing water traditionally symbolizes change, movement.
Unlike wavy lines, concentric circles on a loose coating around an object, such as a stone, symbolize the earth. The only disadvantage of such colorful patterns on gravel and other similar coatings can be considered the need for their periodic renewal with a rake. However, you can always use larger stones of gravel or crushed stone as backfill.
The device of the bulk path is as follows: first, the turf is removed, a groove about 30 cm deep is dug, then the bottom is filled with a 20-cm layer of backfill material larger than what is prepared for coating, it is rammed, not forgetting to moisten it thoroughly with water. If possible, greasy clay should be laid on the resulting base with a layer of up to 2 cm for moisture protection, although this is not necessary. Then they fill up the finer material with a layer of several centimeters, for example, sand, small gravel and others, and tamp it down, watering it abundantly. To prevent a situation with weeds growing from the middle of the path, geotextiles can be spread on the foundation.
Along the edges of the path, stone or brick curbs of sufficient height are installed, which are necessary so that the coating does not simply “spread” in different directions onto the lawn and flower beds (on the other hand, curbs rising above the ground impair water flow). Of course, here you need to take into account the intensity of the intended movement along the track, but if it is often used for its intended purpose, then it is recommended to do at least something similar to curbs. An alternative option is to fill the trench up to 20 cm deep with only gravel - then the path will not need curbs.
The future intensity of movement along the path also requires the placement of a lower layer in the ditch, formed from large rubble or broken brick, on which sand is first poured and rammed, and then fine gravel with a layer of about 4 cm and also compacted. Then you can already install the curb stone. If the path is rarely used, then it will be enough to remove the sod and fill the resulting trench with gravel, followed by ramming. The material used is poured into the pits that appear during the compaction process.
There are gravel coatings and disadvantages. First of all, this is the need for periodic restoration of the upper layer, which in practice means a banal leveling of the surface with a rake, since the track tends to be pressed in places from moving along it. In addition, in the absence of geotextiles, numerous weeds will spoil the appearance of the track. The obligatory presence of rigid curbs and the associated deterioration of the drain also refers to the minuses of the bulk coating. In summer, a lot of dust rises from such paths into the air, so they need to be regularly moistened with water. It is often quite problematic to use bulk paths, since they are difficult to compact and lose their attractive appearance over time.
However, for the sake of fairness, it should be recognized that a well-arranged road surface made of bulk materials can be so effective that you can drive a car along it without any problems.
In terms of landscape design, the use of bulk materials has its advantage - it becomes possible to choose a cover for the garden, regardless of its style specifics, because in the total mass of gravel, crushed stone or pebbles there are a huge variety of different fractions and shades. Such materials are most in demand in areas decorated in rustic and oriental styles.
At the same time, no one forces the use of only bulk materials. It is possible and even necessary to combine them both with each other and with other materials like paving slabs or stone. The paths with stepwise distributed tiles are very expressive, the gaps between which are filled with loose material of fine fraction.
The site is a more serious structure than the track. You can sit on it with furniture or barbecue equipment, make a fire, so you need high-quality drainage so that rain or melt water leaves quickly, and an inclined platform cannot be, by definition.
Very good free-flowing materials are suitable for use as covering side and hidden paths laid in places with ornamental plants. Since people rarely appear in such corners, the road surface can even be made from crushed tree bark, nut shells, wood shavings. The visual impression will be enhanced by planters with annual plants located along the side of the paths. The sizes of individual fractions in such a coating should be quite small (up to 2 cm) so that it is pleasant to walk on it.
Natural stone
Bulk coating, of course, deservedly enjoys great popularity, however, the tracks equipped with it are completely unsuitable for regular loads, and in fact, in addition to the aesthetic impression, the solution to the problem of the road network should be practical. Therefore, when choosing a coating for paving paths, it is recommended to pay attention to natural stone.
Most of the stones are strong and durable, except, perhaps, marble, which is exposed to sub-zero temperatures and moisture. In all other cases, natural stone paths will serve the gardener faithfully: they will not become limp from the rain, they will be cleared of snow without problems, they will withstand a lot of weight (you can pave them with a parking lot or a driveway). Also, stone coatings compare favorably with loose coatings in that the latter must be regularly sprinkled.
For a stone path, you can find material in nature, for example, somewhere in the forest, but at present, artificial stone is more often used, which is no less convenient and beautiful than natural. Statistics show that sales of natural stone are now declining, while the demand for artificial is increasing. In general, some of the bulk materials, such as gravel, crushed stone, pebbles, also belong to the category of natural stones, and this must be taken into account so as not to be confused in the names, but classic stone paths are distinguished by hard paving of a hard surface - stone itself, paving stones, various stone slabs.
Technological progress has reached the point that artificially created facing materials have some advantage over natural stone: first of all, this concerns the greater ease of installation, which does not require serious labor for fastening, and secondly, their lower cost is meant. However, from an aesthetic point of view, natural stone is in any case more expressive.
If the gardener came up with the idea to lay out the main part of the road surface with cobblestones (rounded stones with a diameter of more than 3 cm), then experts will recommend him to think 100 times before putting the idea into practice, since this wild stone is best used as a decorative element with which to decorate paths (for example, in the form of geometric inserts that diversify the dullness of a monotonous coating). It must be admitted that the cobblestone path really looks very natural and impresses with its medieval flavor. Despite this, it is not suitable for covering the driveway, as well as for paths with high traffic intensity, since walking on it is not only inconvenient, but also elementary dangerous, especially for children and the elderly.
In general, a cobblestone path is laid as follows. First, the base is prepared, then a layer of concrete is poured, into which stones are sunk back to back or at some distance from each other, pressing them down with a board and ensuring that they are in the same plane. The stone should protrude from the concrete by about 2 cm. It must be said that the creation of a cobblestone pavement is troublesome and there are no easy ways to do this. You should not lay cobblestones on the sand in the hope of getting a soft coating - nothing will come of it anyway.
An alternative to cobblestone is the use of a very durable and exotic natural stone called porphyry, which is a type of granite. However, it is not mined in Russia, but delivered from abroad, and therefore it will cost a lot.
Natural stone for garden paths is sold both in processed and unprocessed form. Such laying material is cut out from basalt, quartzite, diabesis, gabbro. As a rule, these rocks are used to create paving stones and paving slabs, and their main advantage is that they require very superficial care, as they are well resistant to atmospheric, chemical and mechanical influences. Dolomite, sandstone and granite are used raw, which are used in a crushed state or in the form of slabs. River, sea or lake pebbles are quite common among gardeners.
Among other things, sedimentary rocks, such as slate and limestone, are used in garden construction, which are used in paving paths in the form of slabs with a thickness of 40 mm or more. A feature of these materials is a porous structure, and certain rocks (tuff, limestone) absorb moisture well, and therefore the road surface of such material should be covered with water-repellent compounds, which will also increase the strength of the plates and protect them from ultraviolet radiation.
Of course, the strength of the stone is not the only factor influencing the life of the walkway. So, in the absence of a well-made foundation, it will quickly become unusable, regardless of what kind of coverage it has.
So, the process of making a coating of natural stone from the very beginning does not differ from that described above: first, markings are applied (with pegs with a rope - for straight paths and sand sprinkled - for winding paths), then the turf and a layer of earth are removed (taking into account the expected operating conditions of the path), then lay the required number of base layers (the simplest foundation is from a layer of crushed stone and a layer of sand with cement). Only after that they are accepted for the natural stone coating itself.
If the gardener believes that the operation of the paths will take place in adverse weather conditions, then any brick cannot be used to create them. For paving, you will have to purchase special paving bricks (in general, they are recommended for all brick paths).
A standard silicate solid brick after some time (usually after the 1st season) will begin to crumble due to rain and low temperatures, and an unburned or burnt brick simply will not survive the winter and will break. In addition, it is easy to slip on a wet surface made of dense facing bricks. Therefore, it is better not to save on trying to pave the path with inappropriate types of bricks, as in the end it will cost a pretty penny and cause inconvenience.
When choosing a brick for paving, it is advisable to give preference only to trusted manufacturers (Fig. 6).
In terms of its properties, paving slabs are similar to paving bricks, however, using it for paving paths is not a very good idea due to the small area of individual tiled elements, as a result of which the path will be covered with a network of seams, which will violate the integrity of the picture.
Rice. 6. Brick road, general view
When laying a coating on a garden path, close attention should be paid to the place where its edges border the lawn, since the strength and reliability of the joints directly affect the possibility of bricks spreading in different directions from the path, which can eventually destroy it. For this reason, it is better to lay the extreme bricks of the path on a long end, and from the outside, additionally support them with an ordinary board up to 3 cm thick, dug into the ground so that the upper edge is flush with the surface of the lawn and the outer brick of the path. The board should be fixed with pegs driven into the ground close to it. In addition, it must be treated with an antiseptic composition.
It must be said that as the track completely subsides, it is advisable to remove the board and pour granite chips into the resulting cavity. If you intend to put a more reliable curb, you can initially dig a ditch a little deeper to lay cement mortar under the curb bricks.
During the laying of the pavement, the board will serve as a guide for an even layer of sand, which is the basis for the subsequent placement of paving bricks on it (Fig. 7).
Rice. 7. Brick path, scheme
The direct device of the path, as always, is preceded by the planning stage, when it is necessary to make sure that it runs at some distance from large trees, since they can easily lift the coating with their roots, breaking it. However, the main danger comes not from vegetation, but from water, which, in addition to actually washing away the path, is able to concentrate near the bricks and soak into them, which in winter will lead to tearing of the frozen brick. These considerations should be taken into account, therefore, if the features of the relief do not contribute to the unhindered flow of water, then trenches must be made on the sides of the path.
As a foundation for the track, 2 layers are laid. The lower one is created from sand with gravel or from granite chips. Why is the soil removed from the ditch, then filled with sand and gravel and well tamped. If the compaction is carried out manually, then for greater effectiveness, the base must be moistened abundantly. The thickness of this layer may vary depending on the type of soil, terrain, and the presence or absence of a drainage system. In any case, the minimum thickness under favorable conditions is 50 mm or more. Usually in practice this value is 100–150 mm.
Next should be the 2nd layer of the base, for which you will need coarse sand (preferably alluvial). The thickness of the layer can be determined by subtracting its thickness from the height of the outer (laid on the end) brick of the track and adding approximately 30 mm. The sand should be thoroughly moistened before filling into the ditch.
The surface of the resulting sand cushion should be as even as possible, so it is carefully smoothed out with a specially prepared long bar (rule), while the usual leveling (back and forth) is not enough - you must first press down the freely scattered sand and only then level it with the rule itself. You should not try to capture large areas at a time, it is better to consistently process small areas of 50-100 mm wide.
In each case, the approach must be individual, and the master must take into account the width of the track, the moisture content of the sand and the size of its grain. It should be noted that at this stage of creating the path, there is no need for high-quality sand compaction, since this is done when the bricks are directly laid (Fig. 8).
Rice. 8. Brick path, sand leveling
Now the path has a sand base. Then, sand is carefully removed from the inside of the path near the guide boards with a small spatula, leaving free space for laying bricks, intended to be a kind of curb, on the end. They are inserted with sharp jerks, but without strenuous effort, until they are flush with the top edge of the board (Fig. 9).
Rice. 9. Brick path, curb
Now it's time to start laying the main canvas of the track. If some kind of image is supposed to be on the surface, then you should think about it in advance and develop a sequence in which you need to lay bricks to get a pattern. It is not recommended to “swing” at ornate patterns, because they are troublesome to make, and the effect can be small, because beauty does not always depend on complexity. In addition, standard brick elements are not suitable for creating detailed paintings.
After placing each brick with the help of a level, check its horizontalness. Why take a rubber or wooden hammer (sometimes it is advisable to use a gasoline vibrator) and lightly without haste begin to drive a brick into the base, evenly distributing blows over its surface. It is important here not to overdo it and not to deepen the brick below the mark, otherwise it will squeeze out the sand, and then you will have to remove the brick, re-level the sand, and then install the same brick again (Fig. 10).
Rice. 10. Brick path, laying the main plane
It is desirable to lay bricks with transverse rows, i.e., the bricks are laid with the long side parallel to the board and with the end joints offset, which should fall in the middle of the long side of neighboring bricks. However, in addition to bonded masonry, other types of masonry are also used: simple, braided, parquet, offset braided.
The final stage of laying is filling the gaps between the bricks with fine-grained sand. The work is not dusty and somewhat even enjoyable. Sand is poured onto the surface of the finished coating and dispersed with a mop in different directions until all the cracks are clogged (Fig. 11).
Rice. 11. Brick path, filling joints
Post-laying work consists in watering the path with water, after which it can already be used.
When talking about brick coating, one cannot fail to mention such a popular variety as clinker, which is a brick made by firing clay at high temperatures. This is a very high quality and promising material, characterized by increased strength and long service life. The clinker is not subject to the damaging effects of low temperatures, high humidity, sunlight, it perfectly resists mechanical pressure and aggressive media: alkalis, salts, acids contained in rainwater.
The combination of advantages has led to the fact that clinker bricks are often used to cover paths, parking lots, driveways, playgrounds, patios, etc. - wherever the clinker is laid, everywhere it falls into place, perfectly fitting into the garden landscape design . Better clinker brick is suitable for such a common style as country.
On sale there are a lot of varieties of brick material with a wide range of shapes and colors, so there will be no problems with the selection of a suitable brick. Clinker looks great in combination with natural stone.
A few recommendations: in order to avoid damage to the coating of the track, you should not leave any recesses on its surface, otherwise ice will form there in winter. The path adjacent to the wall of the house must be at least 15 cm below the waterproofing layer of the house. For a driveway leading to a highway, a building permit must be obtained from the relevant state road authorities.
This material also has disadvantages: the process of laying it is quite difficult and requires specific skills. If the clinker is not laid correctly, then the paths are threatened with destruction. To create a harmonious color scheme without sharp transitions, bricks are taken from different packages.
More often in the coating of the tracks there are square and rectangular shapes, which are placed on the edge or flat. With the help of different laying methods, different patterns are created. By combining them, they achieve the effect of a freely looping track. If you need an element of a special geometric shape, you can use a circular saw (grinder) to cut clinker.
As always, at the 1st stage of work, they dig a trench about 15 cm deep, the bottom of which is carefully leveled and well rammed. Next, a layer of fine-grained gravel 50 mm thick and the same layer of sand are poured into the pit, after which they are checked for horizontal level, if necessary, leveled and trampled down. There should not be any depressions, as this will affect the coating: it will fail in places, kinks will form on the pattern.
Bricklaying is started from the edges, which are already reinforced with curbs, the wall of the house, and stair steps. To begin with, outside the track on a small area, lay out several rows of the intended coating with a pattern in the desired style, fix what has been done and, using cords, transfer your creation to the surface of the track, marking the seam lines of the future coating. The width of the gaps is at least 30–50 mm.
In order to avoid unforeseen displacements of the coating elements, it is recommended to fill the joints with sand, fine gravel or dry cement-sand mixture in parallel with the laying process. In any case, it is necessary to fill the gaps after some periods of time, otherwise the reliability of the installation will be in doubt. Clinkers along the edges of the track are placed on a cement mortar to form a curb.
For some time now, the fashion for wood has been rapidly reviving, and many aesthetes are trying to use this natural material wherever possible, including as a covering for garden paths. Even the obvious shortcomings of wood do not spoil the overall picture: fragility and susceptibility to wear, and therefore wood is far from the most practical material. Nevertheless, the plus in the form of exceptional decorativeness of such a coating outweighs any minuses. Probably, wooden paths can be considered the most original and expressive, thanks to which they will fit perfectly into almost any design, but they are especially appropriate in a landscape-style garden.
It's no secret that wood is a "warm" and soft material, so the paths from it will give the garden design features of special comfort. The undoubted advantage of a wooden coating is its financial availability, regardless of the amount of money resources accumulated by the gardener. Wealthy citizens can use garden parquet (decking) for wooden paths, covered with special impregnation and equipped with convenient fasteners - such a pleasure is expensive. People with more modest incomes are able to pave paths in their garden, for example, with boards from euro pallets, which will not be difficult to obtain, and it is not necessary to look for pallets - you can use any presentable boards.
When creating garden paths, both soft and hard types of wood are used. You can do the following: get a tree trunk, cut it and thick branches into circles up to 15 cm thick with different diameters, which depend on the size of the branches and the trunk. Then they take drying oil, heat it to a boil and process the resulting saw cuts from all sides, after which they leave it alone until it dries, doing another thing, namely: organizing a place for a path.
By this time, the stage of planning the size and direction of the tracks should have already been completed, so you need to remove about 40 cm of soil, place polyethylene in the trench, throw sand on it, carefully compact and lay wooden rounds on the sand, placing them close to each other (for better docking, you will have to select rounds of the desired diameter, filling in the free gaps). Then the path should be well sprinkled with sand and poured with plenty of water to fill all the cavities with sand. Now you can admire a simple but aesthetic path.
You can do otherwise: dig a trench 20 cm deep, fill it with a layer of gravel or crushed stone with a thickness of 15 cm and a layer of sand 5 cm thick, which must be abundantly moistened with water and carefully compacted, lay the saw cuts as tightly as in the previous version, or at a step distance, creating a step-by-step path.
As consumables for wooden paths, not only saw cuts are used, but also whole logs, hemp, railway sleepers. The latter option is applicable both for the construction of paths and bridges, stairs, platforms, patios, etc. However, in hot weather, creosote will ooze from them, so the feasibility of using sleepers remains in question.
The main condition for the safety of a wooden path is that it should not come into contact with the ground, otherwise it will simply rot. To prevent rotting of boards used for paving, it is required to lay a high-quality drainage layer that actively removes moisture. For this reason, a gravel cushion is often made, on which longitudinal and transverse wooden logs are laid crosswise, and a wooden flooring is already attached to them, which serves as a track covering. The joists and the underside of the deck should be treated with bituminous mastic or other protective compounds such as silicate and clay pastes. Instead of gravel, it is permissible to use roofing material - it is placed directly on the compacted layer of sand, and on top - paving boards.
If the path has sharp enough turns, then rectangular wooden blocks or sleepers come into play. First, they are protected from rotting with special compounds, then they dig holes, surround them with wooden sides, for example, from boards, fill the trench with sand or gravel, on which bars or sleepers are placed. To make the track look more spectacular, it is better to place them not close to each other, but at a distance of approximately 50 mm from each other. Next, the bars need to be knocked out with a hammer for alignment in one plane. Gravel is poured into the gaps between the individual elements of such a coating, followed by its compaction.
I must say that wet wooden paths are very slippery, so it is easy to get injured on them - this is the most unpleasant minus of such a coating. Therefore, you will have to take care of security measures, in particular, sprinkling the paths with sand, gravel and planting grass in the cracks between saw cuts or boards.
Rot, mold and insects will not infect the tree if antiseptic compounds are periodically applied to it, for example, a non-concentrated bleach solution (it must be cleaned with a wire brush before surface treatment).
For a change in the flower garden, it is easy to make a very expressive path from colored bark, shavings or pebbles. Such a path will serve as a decoration of the garden until the first vegetation and flowers appear. You can use a very useful cedar shell as a backfill, which releases phytoncides, that is, special substances that are deadly to bacteria and other malicious microorganisms, thus disinfecting the air. However, shell coatings have obvious disadvantages: firstly, their quick failure, and secondly, the very small weight of the shells, which leads to their scattering by the wind even in the presence of curbs, which are necessary for such paths by default.
Tracks made of small materials such as bark, shavings, shells should not be laid in damp places or in areas with poor drainage, as they will always be wet. On top of that, the gardener should always have a supply of loose woody material, as such paths require regular backfilling due to settling of their coating.
Grass, earth
The path, formed by vegetation or simply earthen, is most in demand by lovers of nature and everything natural. In principle, greenery is valued quite justifiably, because, in addition to aesthetic pleasure, like nothing else, it can create a microclimate that promotes peace, improves mood and, accordingly, well-being, overcomes stress, which everyone in the city gets guaranteed, which is why they choose to go into the garden to relax their souls for work or just contemplating beauty.
In addition, vegetated and earthen paths and platforms actually form a microclimate, for example, stabilizing the temperature and significantly reducing it in hot weather. Observations have shown the following fact: if there are no concrete, stone or other artificial materials paths and platforms in the garden, then the air temperature in the area is about 2.5 ° C lower than in the garden, where there are quite a lot of such structures. This is not surprising, since stone and concrete in the sun heat up instantly, and are extremely reluctant to part with the heat. Trimmed plants evaporate soil moisture, which leads to a decrease in air temperature and an increase in the humidity of the surface air layer.
The undoubted advantage of lawn grasses is that they provide faster processes in the soil associated with the mineralization of organic substances, which significantly reduces the number of harmful microorganisms and germinating weeds developing in the ground. In addition, plants absorb dust, purifying the air, and synthesize oxygen, which is so important for humans.
Grass is grass, but it is still better to combine green paths with traditional ones, because in rainy weather the grassy surfaces will become limp and uncomfortable to walk on, so it is much more comfortable to have a paved path nearby.
The first step in creating a grass path is to make an accurate marking of its location. Why do they take pegs with a cord, stick them into the ground and pull the cords between them, imitating the edges. Then, using a bayonet shovel, the soil is dug up to a depth of one bayonet and all weeds are removed along with the roots. Now they sprinkle the ground with ash with a layer of 30 mm and lay a layer of compost on top. It is advisable to carry out this stage in the fall, so that by spring the soil is ready for sowing seeds. Accordingly, when the snow melts and the soil becomes dry enough, work on creating a grass path must be resumed: using pegs as beacons and a building level, the ground is carefully leveled until all holes and bumps disappear, as they will interfere with normal movement along the path (Fig. 12).
After preparing the land, it should be well compacted - to facilitate work, it is recommended to purchase a wooden roller designed for working with lawns. However, a gardener with some skills can make such a device with his own hands: all you need is a wooden roller, slats and metal fasteners.
Rice. 12. Leveling the soil under the grass path: 1 - lighthouses; 2 - cut of soil; 3 - wooden board; 4 - building level
As soon as the earth is compacted, it must be loosened shallowly, for example, using the same roller on which the spiked roller is placed. Next, they take the harvested seeds of lawn grasses, mix them with fine-grained sand, walk along the future path and sow the seeds with a fan-shaped movement of the hand. Then, with a rake, the seeds are carefully covered with earth so that they are at least 20 mm deep, and the soil is again compacted.
It will be possible to test the paths not earlier than the seeds germinate and the seedlings become strong enough. Up to this point, young grass needs special care. So, surface watering is necessary, not too much water is needed, and it should not be directed to the young shoots with a jet, otherwise it will wash the seeds out of the ground, and therefore watering is carried out only with a watering can or through a sprayer worn on the end of the hose. If the ambient temperature is not high, then the water is heated to a warm state. Usually lawn grass is watered once every 2 weeks, but regularly and efficiently - the soil should be well saturated with moisture. In the event that watering is repeated and superficial, the water will not reach the root system of grasses, located deep enough, and the greens will grow very reluctantly.
As a rule, the first sprouts appear 2 weeks after sowing. Poorly growing grass needs to be supported by feeding it with some organic fertilizers, as well as throwing a thin layer of rotted manure on top of the soil. The grown grass will withstand the pressure of a person, which means that it will be possible to move freely along the path. If the grass has grown by about 80 mm, then it should be cut to a height of 40 mm.
Sometimes it becomes necessary to lay a temporary path to get to a certain place, while a solid path is completely unnecessary. Usually long boards are thrown in such situations, but they are too bulky. A more convenient option would be to use a propylene portable track that can be rolled up like a carpet.
A day before mowing the grass, you need to walk on it with a lawn roller, without pressing down hard. After mowing, it is not recommended to remove the grass - at least a day it should lie down on the path to protect the soil from too intense evaporation of moisture. Depending on the height of the cut grass, it may be wiser not to cut it at all, as it will serve as a wonderful fertilizer.
It is permissible to mow the grass manually with a secateurs (an undesirable option, because it is tedious and time-consuming) or a lawn mower, which can be either manual or mechanical. It is more expedient to mow a rather narrow path along, and it is more convenient to move along a wide path with a lawn mower (pruner) across.
They cut the grass from spring to the end of summer, until autumn comes and the air temperature drops to +10 ° C. If the grass meets the winter too low (less than 100-150 mm in height), then its root system may not survive the freezing temperature.
Proper care of grass paths, in which perennials usually act as coatings, will allow you to enjoy them for at least 5-6 seasons or even much longer, if you do not forget to fertilize the ground, tamp and loosen it in time.
The lawn needs proper care, which will be different in each case, because it depends on the purpose of the grass: if it serves as a cover for a heavily used path, then the lawn must be well looked after (weeded, cut, etc.). To prevent the grass track from “going bald” from the constant friction of many feet, the number of seeds sown should be 50% more than on a moderately used track. It is better to use “hard” herbs, for example, white bent grass, meadow or red fescue, pasture grass, meadow bluegrass, etc. As a rule, not one type of plant is sown, but a combination of them.
Since the lawn grass on the path is heavily trampled, and from constant pressure it eventually becomes “reinforced concrete” (which is highly undesirable, since it makes it difficult for oxygen to reach the deep layers of the earth, and the plants suffocate), it is necessary to periodically aerate the soil. Why its top layer is raked, cut through and pierced, for example, using a standard pitchfork or a skating rink with a studded roller. The first tool will do an excellent job of piercing the turf to the depth of the bayonet, and the 2nd one will rake it up. Carrying out these simple operations with a herbal path, you can achieve its rejuvenation and greater expressiveness. The frequency of events is determined by the condition of the lawn, but, as a rule, they are carried out 1 time in 2 weeks before watering.
It should be noted that, no matter how competent grass care is, in any case, it can face death. For example, if, with the onset of spring, frozen or rotten grass is found on the path. Naturally, it must be removed immediately, after which the soil should be thoroughly loosened, wait a week until the soil subsides and re-sow the greens. After that, the soil should be covered with a layer of compost soil, passed through a sieve, and spilled with water from a watering can with a fine strainer. Next, the track is pressed down with a roller and sprinkled with wood ash and other organic fertilizers.
Quite often it happens that unsightly moss grows along the sides of the grassy paths, breaking the idyllic picture of an even green canvas. In this case, it can be advised to spray the track with a solution of iron sulfate (based on 50–70 g / m 2). A path laid through shady thickets will require more of the substance used, as is the case with high-moisture soil. The operation is carried out as soon as the snow melts and the sprouts have not yet broken out of the ground. Moss usually turns black and dies off a week after exposure to vitriol. What is left of it should be raked up and burned.
The winter time significantly impoverishes the soil, depriving it of nutrients, therefore, the grass left to itself will unpleasantly surprise the gardener with lethargy and dryness in the future. In order to avoid such misunderstandings, it is necessary to take appropriate measures to improve the chemical composition of the earth - after the snow melts, it is recommended to cover the path with a thin layer of fertile soil or peat, to aerate the soil that has compacted and compacted over the winter, and aeration of the young path is carried out less often (1 time in spring is enough) than older.
In addition to paths with a green coating, the simplest type of paths is also used in horticultural practice - from rammed earth, however, it is more correct to call them simply paths. Despite the primitive appearance without any decorations, such paths sometimes surprisingly effectively fit into the landscape design.
In the frame of plants, earthen paths can take on an exceptionally soft natural organic look, and they are the easiest to create: you just need to select weeds and stones from the soil in the selected area, press down the earth with a roller until it is thoroughly compacted. The degree of compaction depends on how often the gardener is willing to weed the path. It remains to build curbs of stones, boulders or bricks along the sides of the path. After which she will be ready.
Now one of the most popular coatings for decorative paving of paths and courtyards are cast slabs, which can be of different shapes (square, rectangular, hexagonal, triangular, round, etc.) and sizes. As a material for plates, artificial stone or concrete is used. The first option is naturally more expensive than the second.
The great advantage of limestone is a huge selection of all shapes, sizes and colors, which allows you to choose the material for every taste. At the same time, one should not forget about the purpose of the track. For example, if it is driveway, then large slabs with sides up to half a meter are used in its coating, laying them on a rigid base. You should also take into account the physical possibility of installation, since the plates are quite heavy and you can not cope with them alone.
At the planning stage, it is worth considering how to use solid slabs to the maximum in the coating, but it is better to get by with only them, since chopping limestone is not the easiest task, and unsuitable residues will chip off, which will require more material.
It is not so difficult to make concrete slabs - if desired, the gardener himself is able to do this, if, of course, he knows how. If vast surfaces can be made of monolithic concrete, then why not cast individual parts for paving from it - various shapes, dimensions and reliefs?
Paving slabs (paving stones) have undeniable advantages - they are durable, serve for a long time, and are quite cheap. The paving stone garden route will make walks especially pleasant, and the realization that they are made by one's own hands will only enhance positive emotions.
Under the paving slabs, there is usually a foundation of sand and gravel, or of the usual dry composition, in which 1 part of river sand is mixed with 3-6 parts of cement. In the case of sand and gravel in the cushion, first there is a layer of river sand 30–40 mm thick on average, then a layer of fine gravel 20 mm and again a layer of river sand 30–40 mm thick.
The process of laying paving stones is similar to that of road bricks. As a rule, tiled blocks are figured, so that they are laid out in the form of a dense flooring, and thanks to the protrusions and recesses, the individual elements are qualitatively paired. For example, stacking, herringbone, brickwork, and combinations of different methods are often used. As a result, the path will delight the gardener's eye and amaze guests with its originality. As for paving slabs, they are laid either close to each other, or at intervals in which resistant plants or lawn grass can be planted.
Often used is the method of laying tiles with jointing from mortar. The sandy foundation is prepared in the same way, the tiles are placed leaving gaps up to 30 mm wide. With the help of a level, they constantly check the horizontalness of their laying - they must be in the same plane. In order for the coating elements to sit firmly in their places, they are knocked out with a wooden or rubber mallet.
When the coating is formed, the joints are grouted, i.e., the gaps between the plates are filled with a special solution, which consists of 5 parts of fine-grained sand passed through a sieve and 1 part of Portland cement. While stirring the solution, water is gradually added to it. As a result, the mixture with its viscosity should resemble thick sour cream of increased compliance.
The composition is used to cover the gaps between the tiles - the solution must be flush with the surface of the tiles. After leveling the mortar, you need to switch to some other business, returning to the tiles after 3 days, when the mortar dries. It is recommended to lay a damp cloth on the surface of the track.
In addition to the described method, when the tiles are laid close to each other, they can be placed with a mosaic of multi-colored elements, as well as at a distance of a step with filling in the gaps with gravel or sowing grass.
Pedestrian paths paved with irregularly shaped slabs look very expressive, and it is desirable to provide natural gaps on them in order to place small natural stones in them. Although the plates can have any shape, even the most bizarre, it is necessary to ensure that their outer surface is always even. During the installation process, the edges of the slabs are joined not randomly - the effect should be created that the massive stones were split into component parts, between which there were quite small gaps. If there are significant cavities in the corners, they are usually clogged with fragments of stones.
If you need to arrange a path with a coating of natural slate, and the soil is sandy, then this is not difficult to do, since the material is laid directly on the sand, that is, it is enough to remove a layer of sandy soil 50 mm thick, lay the slabs directly on the sand, fill the cracks again with sand , take a hose (watering can) and spill water (pressure - weak) seams. After the sand subsides, sand is again poured into the gaps and filled with water. This is done until the cracks are completely clogged with sand, which must be flush with the surface of the plates.
Limestone slabs of completely different shapes are also used in paving paths. Typically, the thickness of the coating elements is 50–100 mm, and their dimensions correspond to the width of the track or the pattern planned on it.
According to the manufacturing technology, tiles can be vibrocast and vibropressed. The second type has advantages in terms of decorativeness, but is more prone to wear, as it is less tolerant of mechanical stress, does not cope well with low temperatures, is afraid of water from drains, and requires curbs and a solid foundation of sand.
As for vibrocasting products, their price is higher, but at the same time they are stronger (thanks to plasticizers and granite chips as opposed to crushed stone or gravel in vibropressed tiles and, of course, a more laborious manufacturing process), therefore they are used in places where significant loads are expected and intensive use. For example, in winter, ice can be removed from such a path with an ordinary shovel. The surface of such plates is very smooth and shiny, and the seams between them must be carefully sealed with cement (or create a substrate of sand), otherwise the water that thaws and then freezes will spoil the coating. It is advisable to create a slope from the center of the tile path to the edges, leaving a drainage groove between the edge of the path and the curb or lawn. If the tile is laid correctly, it will last a long time.
You can find paths lined with ceramic floor tiles, but this is far from the best choice, because such a coating is very fragile and subject to changes in ambient temperature. Due to the nature of thermal expansion coefficients, ceramic tiles designed for domestic floors on garden paths will flake off the surface.
Shungite flagstone is sometimes used as a covering for garden paths, which is especially suitable for a Japanese-style garden landscape - this stone is so self-sufficient. The specificity of shungite lies in the fact that the thickness of individual slabs is quite different (from 20 to 70 mm), which makes it possible to cover paths in different parts of the garden, even with a relief with strong height differences. If for the entrance area to the area the loads on the path are quite high and it is justified to use stones of sufficiently large thickness, then on the paths in the depths of the garden with a low intensity of their operation, flagstone of small thickness is suitable. In addition, shungite slabs have a rough surface and it is difficult to slip on it, which is very useful from a safety point of view. This material has high characteristics of water repellency and wear resistance - undoubted advantages; but the disadvantage is that shungite is quite expensive.
The pavement made of concrete or reinforced concrete slabs is characterized by increased reliability and strength. At the same time, they must be placed on a sand foundation with a layer of at least 30 mm with a lateral soil stop. There should not be any gaps in the foundation - a rail will help to identify them, with which they check the horizontalness of the surface. Concrete slabs can be placed close to each other or at intervals up to 60 mm wide, which are then filled with earth, sown with or without grass.
Smooth decorative flagstone is the cheapest, while polished and marbled ones are more expensive than others. Its corrugation will not allow slipping on wet and icy tiles. Chipped tiles, which have a very natural look, are widely used. There are also tiles with deep embossing for brick, mosaic or smaller tiles on sale.
Concrete tiles often lay out a special type of track - step-by-step. Their coating can also be made of stone: limestone, slate, granite saw cuts - at least 30 mm thick. In addition, large format tiles are made from cement, sand and additives designed to increase the wear resistance of the material.
Since the slabs are usually rectangular in shape, it seems that they are more suitable for regular-style gardens, however, when placing even large slabs at some distance from each other (15-30 cm) with the obligatory sowing of lawn grass or ground cover plants in between them, you will get a picturesque path overgrown with greenery, which will smooth out the artificial forms of the coating. Such a path will look great in a landscape style garden, as the vegetation blends harmoniously with the rare stone surfaces.
Step paths have other advantages, for example, that they do not require drainage, since for the most part there is no place for water to stagnate, and the cost of a step path is much lower than a solid one - much less material is used. There is no need to lay the foundation under the entire path, and if it is done, then it is enough to lay it under a specific slab (stone).
Whatever the material of the track, you should not use excessively small individual elements of the coating. They should be chosen taking into account that the pedestrian's foot is freely and comfortably placed on them. The recommended length of the plates is from 40 cm, and the width is from 30 cm.
To implement the idea, the place for the path is marked and distributed over the surface of the earth slabs (stones), keeping the distance between their centers equal to about 60 cm. After unfolding them, you need to walk around and evaluate the comfort of movement. When a satisfactory option is reached, the contours of each slab (stone) are outlined on the ground, they are removed, the turf is cut along the contour line with a knife and the soil is selected from the hole (its depth should be at least 20 cm). Then the resulting recess is filled with crushed stone, fine gravel and sand, the track cover (tile or stone) is directly laid on top. If there is a natural sandy layer in the soil, then gravel can be omitted by placing the tiles directly on the sand.
Despite the fact that concrete is considered too simple and rather “boring” material, it is still the most common and familiar for paving paths and playgrounds, as it is versatile and allows you to make both a monolithic garden highway and lay paths with separate paving slabs or paving stones.
The main advantages of concrete are long service life, low cost, no restrictions on the form of the coating or its individual elements. In addition, well-poured concrete does not require maintenance. However, its significant drawback lies in the fact that preparing the foundation for such a path is in itself a rather laborious task, not to mention the pouring process, for which some skill and increased concentration of attention are required.
You can mix a small amount of concrete for a small area manually, but large areas require a significant amount of concrete, so it is advisable to purchase or rent a concrete mixer for mixing it (you can buy a ready-made solution). Be that as it may, pouring concrete paths alone is very difficult, because it must be done quickly.
Usually, concreting a walkway is considered a fast-paced process, which is not surprising, given the need to have time to do everything before the mortar begins to set, and this happens quite quickly. Preparation for concreting, i.e. the creation of formwork and mixing of concrete, seems to be a very important stage, which must be approached with the utmost responsibility. An assistant in this matter will not interfere, although an experienced person is able to single-handedly fill in a short straight track. It should be remembered that it is impossible to mix concrete at temperatures below zero, when buying ready-made concrete, you need to order more than the quantity required, by about 10%, you need to mix the mortar on your own as close as possible to the place of pouring, and after work you must immediately clean and wash all tools.
In general, operations with concrete look like this: first, a trench is torn off, large-fraction crushed stone is poured onto its bottom and covered with roofing material so that the path does not sag and is not washed away. Next, boards are made of boards supported by reinforcement props - in this way a container is created into which concrete must be poured and sand added in a ratio of 1: 2 (1 part concrete and 2 parts sand).
The strength of concrete depends on the ratio of its parts, for example, very strong concrete will be obtained from 3 parts of coarse sand, 1 part of cement and 3 parts of crushed stone, and the composition of 3 parts of sand, 1 part of cement and 6 parts of crushed stone; will be less durable. When the concrete of the required quality is ready, it must be thrown into the pit with a shovel, evenly distributing it over the entire area. Then, observing the utmost accuracy, smooth it with a trowel, achieving the most even surface possible. As a rule, the work on creating a concrete path is not limited to this: you need to wait a few hours for the mortar to harden, and then decorate the resulting path with fragments of tiles, pebbles or banal plastic bottle caps.
When creating a monolithic concrete garden path, one should remember about expansion joints, the simplest of which are grooves about 10 mm wide made across the roadway at intervals of 3–5 m to the full depth of the coating and filled with a special elastic bituminous sealant. Such seams are designed not only to protect the track from cracking, but also allow you to create patterns on its surface - you just need to deliberately make seams with different intervals and with different orientations.
If the soil on the site contains heavy clays, then it is better not to try to lay monolithic concrete paths, since water lingers in such soil, freezes in winter, squeezes out and deforms the coating - in this case, expansion joints will not help either.
If there are no tiles of the desired shapes, types or sizes on sale, it is not so difficult to make them on your own. Why do you need to put together a formwork from timber or boards (to obtain angular shapes) or roll it from metal strips (for rounded shapes). In the standard version for the manufacture of a square slab, formwork parts 50 mm thick are fastened together with metal brackets 2 mm thick made of strip iron, which are screwed to the tree with screws. A sheet of iron can act as the bottom of the mold. The mold is filled with concrete. You can use this option: 1 part of cement, 1.5 parts of sand and 6 parts of crushed stone.
In order for concrete tiles to please the eye with their diversity, mineral oxide dyes with a plasticizer are mixed into the dry concrete composition (300 g per 25 kg of the mixture). Then the composition is diluted with water until a thick pliable substance is formed. To reinforce the plates, they can be equipped with a reinforcing cage made of metal wire with a cross section of 1 mm or more. The concrete poured into the mold is covered with a coarse household cloth or covered with a layer of sawdust. If the weather is warm with an air temperature of at least 20 ° C, then during the week the concrete product should be moistened with water, preventing it from drying out. Then the wooden formwork is removed, and the resulting concrete slabs are placed in the place prepared for them.
These forms can be placed in specially dug holes. The bottom of the pits should be well compacted with a massive wooden log, covered with rubble and filled with concrete or cement-gravel mortar (4 parts of gravel to 1 part of cement). It is recommended to mix plasticizers into the solution. It remains to trim the surface of the concrete with a trowel and wait until it hardens.
When making concrete tiles with your own hands, you can decorate it as you like. For example, take a sheet of paper, stick multi-colored fragments of any materials on it with glue, put it under the form and pour it with concrete. When the composition hardens, remove the paper with warm water, and finish the opposite upper side with dry cement, which will fill all small cracks, increasing the strength of the tile and its resistance to low temperatures.
If the garden path has bends, it can be made of monolithic concrete, but you can’t do without formwork here either. A trench about 14–20 cm deep is dug along the contour of the proposed trajectory, in which 8–12 cm are allocated to a layer of rubble and 6–8 cm to a layer of concrete, and 20 cm wide more than the expected width of the coating (10 cm on each side ). The bottom of the trench is carefully rammed, then the so-called lighthouses are prepared, that is, wooden pegs 4 cm long and 3 cm in diameter, sharpen them and drive them into the ground in the trench. Do this first from one end so that the tops of the pegs are flush with the ground. Pegs are stuck from the opposite edge, the top of which is 10 mm lower than the pegs on the opposite side - so the future track covering will have some transverse slope. Boards 30 mm thick are nailed to the pegs with nails, for example, old floorboards are perfect - their upper edge should be flush with the top of the pegs.
Next, a layer of crushed stone is poured into the formwork (for a footpath, the thickness can be taken to a minimum, and for a driveway - to the maximum), level it with a brush with metal bristles, fill the cavities between the fractions with coarse sand and thoroughly compact the resulting base. Provide for temperature (expansion) seams, for which they saw a rail 10 mm thick and a width corresponding to the width of the concrete layer, and fix them in the formwork.
The time has come to lay the concrete composition (the layer thickness for footpaths is at a minimum, and for driveways - at a maximum), distributing it in the formwork with a shovel in all directions so that there are no air pockets left - this is extremely important. However, excessive efforts to spread the solution should not be applied. The surface of the concrete layer must rise above the top of the formwork by 10–20 mm.
Then you need to tamp the concrete - at this stage, the assistant will be very helpful. The rammer looks like this: a massive board with a thickness of about 50 mm is placed across the formwork, taken by its ends and evenly moved along the path, tamping the concrete with sharp up and down movements, and then removing the excess concrete protruding from the formwork with a sliding movement. The resulting cavities are filled with concrete and the operation is repeated. Concrete is prepared in portions, so the concreting of the path is a cyclic process (Fig. 13).
Rice. 13. Concrete track
The concrete surface left after tamping is rather nondescript, so if desired, the coating should be decorated, which requires some skills.
The aesthetic features of the path depend on the preferences of the gardener, however, in terms of safety, a wet or icy rough surface is better than a smooth one. When the concrete surface of the path dries a little, you can diversify its dull look with some kind of pattern or pattern. I must say that in this case, the use of various household items can give unexpected results, for example, prints of a tin can or slate look very interesting.
A clean, hard-packed concrete surface is sufficient for a path that fulfills a strictly functional (and limited) role in the garden, while a sloppy finish will only ruin it. A corrugated surface can be obtained by brushing the concrete with a metal bristle brush, applying slight pressure and holding it at an acute angle, with the stripes oriented across the path. A smooth surface is obtained by rubbing a little hardened concrete with a trowel. You can generally paint the surface with a stick and achieve any visual effect, but this can be quite a tedious task.
To avoid monotony, it is not at all necessary to use a wide variety of materials or perform fancy patterns, it is enough that the coating elements are laid with their different orientations. Moreover, it is not recommended to use many different materials in one coating.
Concrete must harden gradually, so after laying it should be covered with polyethylene for a week, pressing the coating along the edges with bricks. The footpath is now traversable, but the access road can be used for at least another week. When the concrete cover is ready, the formwork can be removed. Before removing the boards, they need to be tapped so that they move away from the concrete. It remains to fill the groove from the former formwork with earth and compact it.
The concrete coating interspersed with sea pebbles (diameter 70–120 mm) looks very impressive. Combining different types of coverage, and even more so harmoniously planting them with plants and furnishing garden furniture, you can turn your garden into a very picturesque corner.
Since we are talking about concrete, it is worth saying a few words about concreting sites. In fact, there are practically no differences between the sites and tracks in this regard - the materials and technologies are the same (moreover, the sites are preferably made from the same materials as the tracks, or in similar ways). Most importantly, sites need a high-quality water drainage system. The slope of the site should be approximately 10–20 mm per 1 linear meter.
In order to complete the slope, use the level and beacons. The latter are installed at intervals of 1.5 m, after which they are leveled: they put the board on several neighboring beacons, and a level is placed on top. On peg beacons, marks are made for the thickness of the foundation for the site and the concrete coating or base, the mortar layer and concrete slabs. The pegs located at the corners of the perimeter of the future site are not removed until the laying work is completed, and other beacons are removed along the way.
The first plate is placed at the highest point of the site along pre-tensioned ropes, which must intersect strictly perpendicularly. Subsequent plates continue to be installed in the same way. When the site is finished, it should be moistened from time to time with plenty of water, and also protected from direct sunlight, partially or completely covered with a coarse cloth or poured with sawdust. It is not recommended to move on the slabs during their paving, and if this cannot be avoided, then it is better to walk on a thick board with supports laid on the construction site. The gaps between the slabs are sealed with concrete when it hardens somewhat (this will take about 4 hours).
Before sealing the seams, it is necessary to make sure with the help of a rail and a level that the surface of the site is even and the slabs have the correct slope. Gutters are provided along the edges of the site (it is better to make them from monolithic concrete), oriented towards the lowest part of the garden or connected to a common drainage system. If this is a parking lot, then it will need a ramp, for which 2 parallel strips about 60 cm wide are cast from concrete.
A mosaic technique will help to decorate a monochromatic coating, which makes it quite easy to lay out a panel, some simple drawing, symbol, emblem. In this case, all family members can show creativity. Typically, mosaic elements are placed on a concrete solution. First, a place is determined for a decorative coating and boards smeared with drying oil limit the perimeter of the selected area. Then they take a sheet of thick paper, put an image on it (the dimensions correspond to the real ones) and distribute colored pebbles or stone chips over it in order to have a clearer idea of \u200b\u200bthe image and its color scheme. Now you can start work.
The concrete mortar is kneaded from 1 part of cement and 2 parts of sand, the consistency of sour cream is achieved by adding water to the solution (about 2.5 liters per 1 kg of cement). The space limited by the boards is filled with a concrete mortar with a layer of 15–20 mm and they begin to create a mosaic, starting from the corners and adding concrete if necessary. In order for the pebbles to better adhere to the concrete, it should be moistened.
You should not lay out an image of stones for more than 2 hours, since during this time the concrete will lose its plasticity. Of course, it is not necessary to do all the work in 1 day, then every day you will need to knead a new solution.
Cement soil and soil asphalt
It is easy to guess that the composition of the cement soil includes cement and soil, which are diluted with water. The scope of such a solution is very diverse and includes foundations, walls, sidewalks, substrates for paths, etc. To prepare it, you need to buy cement of a grade of at least 300 and a soil with a high content of calcium compounds, which determines the strength of the composition.
If you calculate, it turns out that about 120–180 kg of cement should be spent on 1 m 3 of soil (the strength of the cement soil varies depending on the amount of cement added). The soil removed from the soil must be dried, thoroughly crushed, passed through a fine sieve (with cells 4 × 4 mm), cement added to it and stirred until the composition becomes homogeneous. Then you can pour in water (about 300 liters). Next, the solution is stirred and compacted for a long time, so that as a result a substance is formed that is similar in quality to low-grade concrete, while the creation of a cement soil will take several times less money than in the case of concrete. In addition, the cement soil is distinguished by high strength, quite comparable to concrete (about 200 kg / cm 2), is not afraid of low temperatures, is water resistant, and the grade of cement soil depends on the degree of compaction (the more it is compacted, the higher the grade, and over time it only rises).
The composition is prepared for use in layers 20 cm thick. Its optimal humidity is easy to establish: a normal mixture, when compressed in the palm of your hand, will not break into small pieces and will not stain it. A collapsed lump indicates that there is not enough water, and sticking to the palm indicates that there is too much water.
If we talk about soil asphalt, then the situation is even simpler: it is used, among other things, for laying low-class paths and is made from bitumen of certain grades (about 9-11% bitumen) and loam (about 89-91%). The ingredients are added by weight. The loam should first be thoroughly crushed, passed through a fine sieve (with cells 3 × 3 or 4 × 4 mm) and dried thoroughly in the sun. After that, the bitumen is melted and loam is added in small portions, not forgetting to stir intensively.
The coating for tracks from cement soil and soil asphalt is made in about 5 layers. The foundation is sand, crushed stone, concrete, rammed earth. Since the cement soil needs serious compaction using a heavy tamper, there is a big difference in the layer thickness before and after tamping (the coating becomes 1.5 times thinner), which must be taken into account when preparing the mortar, installing the formwork and laying the composition on the base.
Ground asphalt is thrown onto the prepared foundation while hot, carefully and carefully leveled with a planed board or wooden roller.
Asphalt consists of stone chips bonded into a single substance using bitumen or tar. In gardening, it is usually used to organize access roads, since within the site its frequent use looks very dull and too urban.
Of course, you won’t have to spend a lot to create an asphalt path and it will last a long time, but it won’t be very attractive from an aesthetic point of view. True, in some exceptional cases, an asphalt-paved path seems quite suitable, for example, for the main road from the gate to the garage. In this situation, it is recommended to use hot asphalt, the laying of which is best entrusted to knowledgeable people with the appropriate skills.
On a foundation of medium-grained sand 10 cm thick and gravel 12 cm thick, the hot mixture is distributed in a layer of 4 cm and passed by a road roller. Asphalt walkway completed.
The variant with colored asphalt is more expressive, while it is used cold for its intended purpose. It is sold in specialized stores in bags, the color of the composition can be green or red. When covering a track (platform) with such asphalt, it is taken into account that it is better to make the foundation under it rigid, covered with a layer of bituminous mastic. When it thickens (after about 20 minutes), it is necessary to lay colored asphalt with a layer of 25 mm, which is leveled and compacted with a heavy roller, regularly wetting its working part with water. The presence of white stone chips in the asphalt will allow you to get an interesting colorful coating.
End of introductory segment.
* * *
The given introductory fragment of the book Paths and platforms, curbs, stone slides, walls, steps made of stone, tiles, gravel, pebbles on your site (M. S. Zhmakin, 2012) was provided by our book partner -
K category: Landscape construction
Installation of garden paths and playgrounds
Classification of tracks and grounds
Paths and platforms are one of the main elements of the layout of the landscaping object. The paths are used for walking, and visitors have a rest on the sites. Paths and platforms are also designed to drain surface storm and melt water.
Types of garden paths. The dimensions and length of the road and path network are determined by the purpose of the landscaping object. There are only five classes of landscape gardening paths.
The first class includes the main paths along which the main flows of visitors are distributed, the second class includes secondary paths designed for a more even distribution of visitors throughout the facility and connecting the main paths to each other. The third class is additional paths that, as it were, “penetrate” the entire territory, connect individual elements of the layout with each other (platforms, viewpoints, etc.). The fourth class includes trails intended for the single movement of visitors. Fifth class - economic roads along which traffic is carried out for the purpose of transporting materials and equipment for the repair of plantations or structures, as well as food for canteens, cafes, etc.
All five classes of roads and paths are typical for city parks and forest parks. On boulevards, in squares, small gardens arrange paths of the first three classes. In micro-district territories, secondary paths are laid - the third and fourth grades, which play the role of connecting individual elements of the layout with each other. In the general balance of the distribution of the territory of the object, alleys and paths can occupy from 5 to 20% of its area.
In accordance with the purpose of certain sections of the object and its attendance, the class of tracks, as well as the types of their structures, are determined. An important indicator is the load from the movement of visitors, who are distributed throughout the facility far from evenly. High-traffic main lanes should be moderately wide and have strong, low-wear and durable structures. In addition, they must meet aesthetic and sanitary requirements. It is very important (at the design stage) to determine a sufficient track width. Often, too narrow a path provided in the visited part of the object leads to trampling of the lawn edges and damage to the plantings.
Rice. 1. Types of profiles of garden paths and their designs a - single-pitched, with a concrete open tray; b - gable
In large parks, the width of the main paths, depending on the attendance, can be 15-20 m or more, the width of the secondary, walking, is usually taken within 4.5-15 m, and the additional paths - 2.5-5 m. The width of the paths can be from 0.5 to 1.5 m, depending on the planning features of the plots.
Since the paths play the role of a drainage system, their surfaces are given certain slopes depending on the materials from which the coatings are made. The more perfect the materials from which the coating is made, the easier it will be for water to drain from the track and the smaller the transverse slope should be. So, for coatings made of hard materials - concrete, asphalt, tiles - the slope is taken in the amount of 0.015-0.02, for coatings made of fine gravel - in the amount of 0.03-0.06 (depending on the width of the track). All tracks are arranged with a convex gable or single-slope profile. A convex gable profile is usually made on walking paths of the first and second classes. A single-slope profile is provided for paths designed on slopes (Fig. 1).
When arranging tracks, longitudinal slopes are important. The maximum allowable longitudinal slope of the track is 0.07 (i.e., for every 10 m of the length of the section, the relief difference is 70 cm). With slopes over 0.07 (for ease of movement), landscape gardening stairs are arranged.
It is important to connect the paths with the surrounding areas of plantations. In the northern, northwestern and central regions of the country, where there is a significant amount of precipitation, paths are usually arranged below or at the same level as the surrounding territory, while along the paths along their borders, open trays are arranged to collect water. This is necessary for drainage of sites and collection of excess surface moisture, which contributes to better growth and development of vegetation and the prevention of waterlogging of territories.
In the southern and southeastern regions of the country, where there is relatively little rainfall, paths are arranged somewhat higher than the surrounding area and without open trays. This allows atmospheric water to be diverted from the surface of the path to areas of plantations that need moisture. In both cases, the tracks must have a convex gable or single-slope profile.
Types of garden and park areas. The sites are important elements of the planning of the landscaping object and are intended for recreation, public events and household needs. All landscape gardening sites can be divided into two categories: recreational sites and utility sites. Sports grounds are classified as a special category (see below).
Recreation areas, in turn, are divided into several types depending on their use by different age groups of visitors. So, the following types of playgrounds are distinguished: children's playgrounds, playgrounds for quiet rest of adult visitors, playgrounds (or meadows) for mass games and festivities.
Areas for quiet rest of the adult population are typical for all landscaping objects. Household areas are arranged on various landscaping objects.
All playgrounds, especially children's playgrounds, are recommended to be arranged on dry, slightly elevated places. The surface of the sites must be flat and have a slope in one or two directions of at least 0.006 and not more than 0.03. Such slopes, firstly, create favorable conditions for the surface runoff of rain and melt water, and, secondly, they are convenient for movement and recreation. It is considered that slopes steeper than 0.03 are already unfavorable for constant movement and stay on the site.
In some cases, in areas with a high level of standing groundwater, drainage of the sites is provided. Over-lean runoff is organized so that water is quickly discharged into storm water wells and then into storm sewers.
The main types of construction of tracks and platforms. Garden paths and playgrounds consist of subgrade, clothing and drainage (Fig. 1).
A subgrade is a deepening prepared by excavation in accordance with the dimensions of the paths and platforms and the thickness of the pavement. The subgrade is the support of all elements of clothing and perceives the loads from the movement of pedestrians, transferring them to the earth's surface. The road pavement consists of an underlying layer, a base and a pavement. The underlying layer is made of sand and serves to reduce the loads arising from the movement of pedestrians, and also acts as a drainage, especially on soils that are impermeable to water.
The base is the main structural element of clothing, which is the main bearing part and determines the degree of durability and strength. The base serves to evenly distribute the loads from clothing and external loads on the subgrade. As a rule, the base is made of crushed stone, which is used as broken brick, crushed granite or metallurgical slag.
Coating - the upper structural element of clothing, directly perceiving the load from movement; important qualities of coatings are their durability, decorative effect, lack of dustiness in dry weather, soaking during rain.
Coverings of roads, paths and sites, depending on the materials, are improved and simple. Improved pavements include pavements made of stone, concrete and ceramic slabs, as well as clinker, brick and, in some cases, monolithic concrete or asphalt. The simplest coatings are crushed stone, gravel, soil mixed with cement powder. On fig. 2 shows the construction of tracks with the simplest coating of crushed stone materials.
Improved coatings are usually provided on paths and platforms in the most visited and critical parts of the landscaping object. Currently, coatings from prefabricated or "piece" elements are widely used in gardens and parks (Fig. 3). Such coatings are very convenient and economical in operation. The use of industrially manufactured plates of various shapes and sizes makes it possible to create the necessary decorative effect (Fig. 4, 5). The advantage of prefabricated coatings from concrete and ceramic slabs is that the slabs do not soften, like asphalt, in hot weather, the coatings from them do not become dusty, and during rain they do not become slippery.

Rice. 2. Designs of garden paths a - with a coating of the simplest type and an edge from the ground; b - the same, with a curbstone
The tiled coating is not continuous, like asphalt, and air and moisture enter the soil through the gaps between the tiles, thereby improving the microclimate of the site.
Currently, the USSR produces slabs of various shapes and sizes, which are used both for road pavements and for pavements of playgrounds, paths in gardens and parks. The state standard for concrete slabs has been established. The standard provides for the following sizes of plates: square 25X25, 37.5X37.5, 50×50 cm; rectangular 37.5X25, 50X25, 50x37.5, 75x37.5, 75x50 cm; hexagonal 25X43.2, 37.5 × 64.8, 50 × 86.5 cm. The thickness of the slabs varies depending on the nature of the load and the thickness of the base and is 5-6 cm. 3.5 cm. For squares, boulevards and sites in public centers, tiles are produced in various colors - with dyes.

Rice. 3. Types of slab layout on garden paths

Rice. 4. General view of a garden path made of tiles with joints filled with soil and sown with grass seeds

Rice. 5. General view of the site with a lawn-tiled surface
Ceramic tiles 20X20 cm in size and 1.5 cm thick are also widely used. These tiles can be used to create durable decorative coatings of various colors and patterns.
Coatings made of natural stone slabs are highly decorative and durable. They are common in areas where stone is a locally available building material.
Brick chips in their pure form cannot be used for coatings, since the coating turns out to be “movable”, dusty, and stains the shoes of pedestrians.
Drainage facilities are an important auxiliary element of paths and platforms. An open flume of the simplest type is a structure designed to collect and drain surface water into storm water inlets and consisting of a side stone and part of a walkway or platform. Open trays of more complex types can be made of bricks laid flat along the borders of the track, or from special concrete products. Trays of the simplest type are arranged on most secondary and additional paths, and more complex types - on paths with a pronounced relief, on slopes, near slopes and retaining walls, etc.
As a border, stones of the correct form are used, cut from granite or made in special forms of concrete. On the simplest paths, instead of a curb, edges of soil and turf are arranged. The side stone and the curb are the interface elements between the path or platform and the adjacent areas of the lawn.
Technology for the construction of paths and platforms
The construction of the roadbed is carried out using motor graders or bulldozers (Fig. 7). The bottom of the canvas is given a convex profile with transverse slopes. The bottom profile of the trough is checked using a special wooden template, and the longitudinal slopes are checked with geodetic instruments.
The bottom of the trough is compacted with a roller weighing up to 5 tons, starting from the edges to the middle of the canvas with an overlap of the roller track by 20-30 cm. Sandy and sandy loamy soils are compacted with moisture (watering at the rate of 5 liters per 1 m2 of surface).
The underlying layer of sand (10-20 cm) is scattered along the bottom, then it is planned and compacted with a roller. It should be taken into account that the sand compaction coefficient is 1.1-1.15, so the layer to be laid must be thicker (by about 4-5 cm) than the design one, taking into account future compaction. After that, proceed to the device of the eyebrows or curb.

Rice. 7. Work on the arrangement of the garden path
When arranging the main paths, a side stone or curb is installed along their edges. Secondary and additional tracks are arranged without a border, but with edges. When transferring the project to nature, it is necessary to clearly define the boundaries of the tracks and sites. Eyebrows are arranged strictly along the cord along the borders by adding a layer of vegetable earth. The earth is evenly spread and planned. Then the soil is compacted with the help of rammers and the edge is “trimmed” along the border line with a shovel. The height of the edge is set by the project and must be at least 10 cm above the surface of the coating. The finished earthen curb is covered with turf.
Prior to the installation of the side stone, the sections are divided along the boundaries using special metal pins and a cord. After the breakdown, grooves are dug with a width and depth, depending on the size of the side stone. Cement mortar or concrete mixture is placed in the grooves. Following this, a side stone is laid on the mortar or mixture. Laying is carried out strictly in accordance with the breakdown. The side stone is sunk into the solution or mixture and "upset" with the help of wooden rammers (Fig. 8). For a strong connection of the side stones, the seams are poured with a solution, and the concrete mixture is poured from the sides at the base and rammed. After laying the side stone, they proceed to the device of the base.
The device is conducted in a certain sequence. First, crushed stone is brought in and its layer-by-layer laying, planning and checking of transverse slopes are carried out. Then the laid gravel is rolled with a roller. After rolling, it is necessary to check the slope again.

Rice. 8. Work on the installation of a curbstone a - installation on a concrete base; b - "deposition" with wooden rammers
It should be borne in mind that first a layer of crushed stone with large fractions is laid, and then the second layer. Each layer is rolled 8-10 times, passing along one track and overlapping it by 0.2-0.3 of the width of the roller cylinder from the edges to the middle. When rolling, the track bed should be watered at the same time based on the calculation of 5 liters per 1 m2. A sign of the end of rolling is the absence of a noticeable trace after the passage of the roller, as well as the mobility of crushed stone. If crushed stone grains 3-4 cm in size thrown under the rear cylinder of the roller are easily pressed into the base, then rolling should be continued. Then proceed to the coating device.
Slab coverings can be laid on a base of crushed stone or sand, to which dry cement has been added (the ratio of cement and sand is 1:10); the sand-cement base is made with a layer of 10-12 cm. When laying the slabs, they are “upset” with special wooden rammers and sunk into the sand-cement mixture by about 1/3 of their thickness. Subsequently, when the base is moistened, the slabs “seize” with cement, and the coating becomes durable. Small tiles are laid by hand, large tiles - by truck crane. In order to avoid erosion of tile joints by rainwater, tiled paths should always have a one-sided slope without any breaks in their profile. When laying the slabs, care must be taken to ensure that the coating is even and that the slabs do not protrude with their edges above the surface. To do this, they are laid using a special rail or wooden template, which checks the correct laying and slopes of the surface of the entire coating in different directions.
Coatings from special mixtures (debris screenings, granite and brick chips, slaked lime, soil and sand, etc.) are laid in one layer on a crushed stone base, planned and checked with a template. Then the surface is watered and after drying, after about 2-3 days, it is rolled with a light roller weighing 1-2 tons. Sand is sprinkled on top with a layer of 1 cm and rolled again with a light roller.
Ground-cement coatings are laid directly on the compacted subgrade according to the same principle. At the same time, one part of cement is added to 10 parts of soil. Then wetting, careful profiling and rolling of the surface of the tracks and platforms are carried out.

Rice. 9. Works on laying slabs on garden paths and areas a, b - laying the slab on the base; c, d - laying and compaction, checking the slope and leveling the surface with a template
Gravel-sand paths are suitable in cases where appropriate materials of the required quality are available, for example, if there is a quarry with gravel and sand near the object,
When arranging dirt paths, the fertile soil layer is cut off, and barren soil is poured into the resulting “trough”. Then, in accordance with the project, profiling and subsequent rolling of the web are carried out. If the soils are barren, then the canvas of the path is loosened within its boundaries, and then profiled and rolled. Dry crushed clay should be added to loose sandy soil at the rate of 0.2 m3 per 1 m2 in order to increase the cohesion of the particles, and sand or gravel in the same amount should be added to heavy clay to reduce slip.
Coatings from the ends of wood or clinker are arranged on a well-prepared and planned sand-cement base 10-15 cm thick. The ends or bricks are sunk into the base, lightly tapping with a sledgehammer. Alignment is carried out with a wooden lath. The ends are laid close to each other, the seams are covered with cement. Bricks are laid on the edge close to each other and the seams are poured with cement mortar.
- Installation of garden paths and playgrounds
From the website www.ecosystem.ru
Chapter 3
V.V. Komov, Ya.I. Orestov
3.1 Walkways, stairs and platforms
General requirements
The choice of material and width of the track depends on the functional and natural features of the route. It is most expedient to use local materials for road construction.
In the practice of landscaping parks and forest parks, standard path widths are adopted, multiples of 0.75 m. A width of 75 cm is intended for the passage of one person, and with a width of 1.5 m, two people can comfortably move along the path. When building eco-trails, the width of the paths can be approached less strictly.
“Establishing a trail starts with getting down on your knees and exploring the ground. Look carefully at what kind of soil you are dealing with, what the soil consists of, what can happen to it during rain. Determine where the water comes from on the trail and where it drains. Your main concern should be to control the speed and direction of the water flow.”
Mark Edwards, Route Coordinator, Iowa Department of Natural Resources
The efficiency of the functioning of ecological trails and routes largely depends on the technical condition of the roadway. One of the main problems is the drainage of the track. It is carried out by adding crushed stone, sand or other materials with good culvert capacity to its base, as well as by giving a transverse and longitudinal slope to the upper covering of the trail.
On the surface of an incorrectly formed trail surface, water stagnates. Visitors to the park bypass wetlands, resulting in detour paths.
Trails that run along the slope can turn into ditches through which water will flow. If the slope is more than 7–10%, then to prevent soil erosion, it is necessary to build steps, platforms and barriers for the water flow.
The slope of the trail is usually expressed as a percentage: a slope of 1 percent corresponds to a decrease / increase of 1 centimeter per meter of roadway.
Sometimes, instead of percent, another unit is used - ppm, which is equal to one tenth of a percent.
A surface slope of up to 5% is optimal for lifting visitors (5% corresponds to a climb of 1.5 m for a 30 m track).
The recommended longitudinal slopes are from 0.5 to 8%, in some cases the slopes can reach 20%. With large slopes, lifting sections should alternate with horizontal platforms, and there are certain recommendations for alternating horizontal sections and sections with different slopes, which can be done to make the climb comfortable.
The following diagram shows a section with alternating sloping and horizontal sections.
Rice. 3.1. Longitudinal slopes of footpaths
1 - Horizontal sections, 2 - Slopes with slope 1-1, 1-2…, A - starting point of the path
Longitudinal slopes in the ascent sections should be increased gradually, at the same time coordinating their length with the magnitude of the slope (see table):
| Longitudinal slope, % (i) | 1 | 2 | 3 | 4 | 5 | 6 | 7 | 8 | 9 | 10 | 11 | 12 | 13 | 14 |
| Section length, m | 1130 | 840 | 630 | 480 | 370 | 280 | 220 | 170 | 130 | 105 | 88 | 67 | 53 | 43 |
The application of the table can be explained by the following example: if we have a hill, on the top of which we need to lay a path, then it is advisable to arrange the first ascent from the foot as gently as possible - suppose that this is a site with a slope of 3% (3 cm of ascent per 1 m of the trail ). The length of such a section should not exceed 630 m (see table). The road should be traced so that after the rise there is a horizontal section. Usually, for this, the route is laid in a serpentine or spiral around a hill.
The next climb can be made steeper - say, with a slope of 9%, no more than 130 m long, and so on, up to the top, with a gradual increase in the steepness of the sections and a decrease in their length.
This combination of slopes and horizontal sections allows you to alternate physical effort and rest and corresponds to the natural distribution of relief heights.
The device of stairs
Slopes of more than 20% are equipped with stairs with railings. Stairs can be wooden, ground, metal or natural stone. The most durable, but also expensive to manufacture - metal structures. Steps and landings, welded from reinforcing bar with an interval of 15-25 mm, ice up less and do not reduce insolation (intensity of sunlight falling on the surface) under the stairs. In addition, metal supports are thinner, which causes less damage to plant roots during installation.
A convenient staircase is calculated as follows:
value 2h+S, where h is the height of the steps in cm and S is the width of the step in cm (tread), should be between 60 and 67.
For example, if you have a step height of 13 cm, then the width of the step can be from 34 cm (60 - 13 x 2) to 41 cm (67 - 13 x 2).
The horizontal part of the step is called the tread, and the vertical (frontal) part is called the riser.
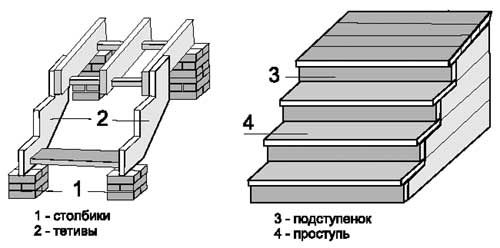
Rice. 3.2. Wooden staircase device
A simple and economical type of stairs - bulk. They require the preparation of an inclined base in the ground or building up the base from the backfill. The slope in the ground should have a drainage layer 50–80 mm thick from the backfill. Slag, sand, gravel, crushed stone, dolomite are used for backfilling.
The risers fastened to the sidewalls in advance are placed in an inclined recess between the two levels of the site, and then slag or sand is poured up to the upper edge of the riser board and rammed. The possibility of board deflection is prevented by using pegs, which are best driven from the inside (filled) side of the board. The board in this case is nailed to the pegs. The location of the pegs in the backfill gives the structure a more perfect and finished look (Fig. 3.3). The boards in this version are a permanent element of the staircase design.
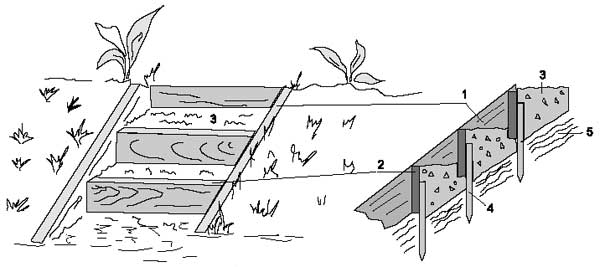
Rice. 3.3. Bulk staircase device
1 - bowstring; 4 - pegs; 2 - riser; 5 - drainage layer 3 - backfill;
As a material for strengthening the risers, natural stone, transversely laid or vertically dug logs can be used. If necessary, the side walls of the steps are also strengthened.
Concrete steps are easy to make on an inclined surface in a wooden formwork of sidewalls and retaining boards. Retaining boards are installed vertically or with a slight slope. They form the surface of the riser. The formwork is removed after the concrete has hardened. Sheet iron can be used for formwork.
Arrangement of paths and platforms
Delicious "road pie" filling
Just like an ordinary pie consists of dough and filling, so the road has several layers. The top one, the “brown crust of the pie”, is asphalt or tile or gravel, the layer that our feet walk on. Underneath is the "stuffing" - we do not see it, but it is she who makes the road dry and durable. The term "road pie" has firmly entered the language of builders.
And who invented the "road pie"? The Roman legions conquered the ancient world not only by force of arms, but also by roads that have survived two millennia later. And no wonder - sometimes the layer of the "stuffing" of the road "pie" reached 5 meters!
The canvas of the track should be as even and flat as possible throughout its entire length, without holes and protruding bumps, roots and other obstacles. In order to prevent the formation of puddles, the level of the trail should be elevated above ground level and have a slightly convex (3–5%) cross-sectional shape with a gable cross profile or slope towards the runoff with the same slope.
To prevent damage to the soil and vegetation adjacent to the trail, it is recommended to sow the so-called "sports lawn" along the path - a mixture of grasses that are resistant to trampling. If necessary, you can plant a low hedge along the canvas. This is especially necessary at the intersection of the trail with undesirable spontaneously formed paths.

Rice. 3.4. Staircase with concrete steps
1 - formwork sidewalls; 4 - support for a step with a canopy; 2 - retaining boards; 5 - pillow base 3 - stops (bars);
Canvas from gravel-sand mixture
If the trail goes along earthen, sandy and other “soft” soils, it is advisable to cover it with a sand-gravel mixture (SGM). For the device of such a canvas, a trench is formed with a depth of 25–30 cm, the width of the future path. If necessary, its sides can be filled, which will make the bottom as gentle as possible, without sharp drops and steps. A layer of sand 7–10 cm thick is poured onto the bottom. The sand is moistened and rammed. Options for the arrangement of such tracks are shown in Fig. 3.5, 3.6.
A layer of large - 40-70 mm - gravel or crushed stone is laid and rammed on the sand to the ground level. This layer is the main drainage system of the trail. The stability and durability of the future path will depend on the degree of compaction of this layer. Above the ground level, 5–7 cm high sides are formed (made of earth, turf, boards, etc.), the space between them is filled with ASG. This mixture consists of sand (up to 30% by volume), fine gravel or pebbles 10–20 mm in size and a binder component - powdered clay (15–30% by volume) or cement (up to 10%). This layer is also compacted, finally forming the road surface. The difference in height between the edge of the edge board and the natural soil is equalized by laying sod or simply adding soil. If necessary, on one of the sides to which the surface runoff goes, it is possible to make associated drainage: strengthen the side with a log, curb stone, etc. waterproof materials, installing bypass pipes with a diameter of 100–150 mm every 30–50 m under the roadway so that the water does not wash out the path.

Rice. 3.6. PGS coating: with side stone (above), with hidden edging (below). cross section
Construction of gates and decks
... There was and is in Russia another element unknown in the West - impassability.
Even in the presence of stone and rubble, it is no small matter to lay hundreds and thousands of miles of paved roads. And in Russia there was just no stone at hand, there was nothing to fill the “bed” with, so that the granite cobblestone of the primitive cobblestone highway would not sink in muddy clay. And the collection of these cobblestones from the fields (such a duty was assigned in some places to the peasants both in pre-revolutionary and Soviet times) did not provide the required amount of material. Therefore, in Russia there was such a difficult typology of roads: there were paved highways, and there were unpaved, but well-maintained post roads, there were winding country roads full of peasant carts, and there were slightly marked, overgrown with grass field roads.
Original methods of paving roads were developed in Russia - gati, plank beds and end pavements. Damp areas were covered with bundles of twigs and poles, and on completely impassable swamps lay beds: thick logs were laid along the route in two rows, they were laid one to another, slightly cutting, transverse logs that made up the roadbed, and two rows of logs were again laid on top along the edges, fastening the bed. On such "roads", which still lie in some places from the cutting areas, the spokes of the cart wheels flew out, the rims diverged, the axles and tremors broke, and the soul of the rider could hardly hold on in the body. In the cities, the central streets were paved with wooden ends - logs, log trimmings, sometimes hewn into six faces, and more often remaining in round timber. On a sandy bed (well, if there was sand nearby), tarred ends were placed tightly, one to another, filled with resin from above and sprinkled with sand. In the first months, such a pavement was quite smooth, although the cart wheels rumbled slightly on it, and a year later some ends sagged, others warped, others began to rot and were knocked out by the iron tires of the wheels, so that, driving off the "comfortable" street into the alley, where there were no ends, the rider sighed with relief from the bottom of his heart. And a year later it was necessary to pave the street again. The author of this book, who grew up in a small northern town, had to travel both along the end pavement on the main street, and along the gatyas and log beds in the damp Vyatka forests, and the impressions from these trips, from how teeth chattered and bones beat against the cart's irradiation, to still fresh in my mind...
(A.V. Belovinsky "Izba and mansions. From the history of Russian everyday life" http://www.booksite.ru/fulltext/izb/aih/oro/my/index.htm)
When the trail goes through wet wetlands, it is advisable to build gates and beds. Gatyu used to be called a flooring made of branches, wood residues, on lightly compacted peat soil, and bedding- a road through a swamp, the base of which was longitudinal or transverse logs.
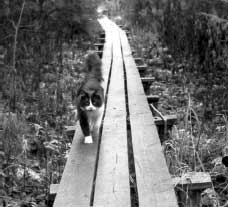
Photo 3.1.
In the definition of these terms, different authors have differences, but we can agree that both types of roads are raised above the ground flooring - and this gives us the opportunity not only to comfortably pass through the area with excessive moisture, but also to help protect tree roots from damage, preserve interesting species of mosses and lichens and other ground cover objects.
It is advisable to make flooring lying on the ground from wooden blocks with a thickness not less than 40 mm or half logs. It is possible to use old tires from wheels instead of transverse logs. They are durable, hold well on the swamp surface and, with a sufficient width of the flooring, can be completely hidden under it. From the point of view of ecology, they are quite safe due to the high chemical inertness of the material.

Rice. 3.7. One of the possible floor designs
Floorings raised above the ground on pillars (wooden or asbestos-cement with mortar filling) look very nice. As a rule, they are quite durable.
It is expedient to make the width of the gates and beds about 1 m. The laying of the flooring should be transverse, from tightly fitting boards, with small gaps (up to 1 cm) between them for water drainage.
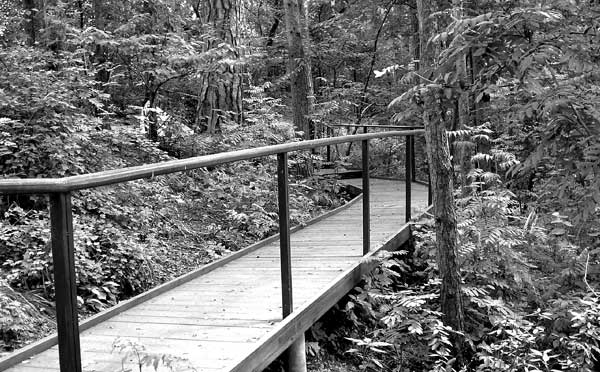
Photo 3.2. Flooring using asbestos-cement pillars
Step tracks
Walkways look like individual flat stones or tiles spaced one step apart. They fit perfectly into the natural environment and are quite durable with the right technology and good quality limestone.
The advantages of such paths include the fact that they do not interfere with surface runoff at all, since the base under them can be made not solid, but along the contour of each tile. The disadvantages include low bandwidth: you have to follow such a path one after another. At the same time, such paths can be used for getting off the main route of the ecological route to individual attractions.

Photo 3.3.
For step-by-step paths, a tile called a “die” is most often used, about 30 mm thick, and about 40x40 cm in size.
Tiles should be located at a distance of 60-65 cm (between the centers of the tiles). The tile is first laid out on the ground and they try to walk along the intended path. Unsuccessfully located tiles can be immediately corrected and after that, the most convenient contours of the future road pie can be outlined. Most often, this can be done without a formwork device.
Very decorative and natural look and ladders from the plate. In this case, each next tile rises relative to the previous one to a height of 12–14 cm. As a rule, it is necessary to use temporary formwork to form steps.
Laying the plate directly on the ground is only permissible in conditions of sandy or sandy loamy soil, with preliminary moistening and tamping of the soil where the load on the track will be insignificant.

Rice. 3.8. Step track technology
End paths and platforms
In a forest environment, the end path, at first glance, seems like the most obvious option. And beautiful, and the material is at hand. In fact, the end track is one of the most difficult options for the roadway. Indeed, the butt - a cylindrical segment of the trunk 10-30 cm high - is actually a piece of wood, in which all conductive vessels are open from below and from above. It is clear that the rotting and destruction of wood go pretty quickly.
Only two species can maintain strength under such conditions without thorough processing: oak and larch. Firms that deal with the installation of end coatings give long-term guarantees only for such breeds. Pine saw cuts, even well processed, serve on end paths up to 3-5 years. And the cost of a larch end cover can be up to 50 euros per 1 m 2. The device of the end coating is laborious and can be compared with the device of the pavement path. In this case, the problem of the appearance of the coating arises, since the ends are easily rubbed with dirt and are practically not cleaned off.
In addition, as the operation progresses, the ends, as a rule, loosen and the track becomes less passable than just a dirt track.
Therefore, end coatings should be used with great care. It is advisable to arrange them only in dry places and limit them in area, not forgetting that this type of work requires significant labor costs.
The "trough" under the end path is dug in such a way that the bottom of the ends lies on a sandy base 15–20 cm thick. The usual height of saw cuts is from 10 to 30 cm. The ends are laid on a compacted base and adjusted to each other, and the gaps between them are filled with smaller cuts. In this case, the extreme ends must necessarily rest on the edging (the edges of the "trough", even rammed ones, must be additionally reinforced with a board or other material). Then the gaps between the cuts wake up with sand and are additionally rammed.
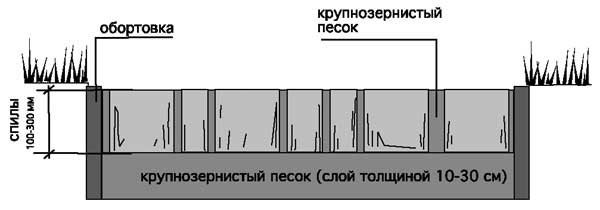
Rice. 3.9. Exemplary End Cover Design
On the sections of the trail passing along the traverses of the slopes, it is necessary to provide for the construction of terraces. It is desirable that the canvas lay on a natural base, while the terrace cuts into the slope to the width of the future path. The pavement on the terraces must be solid - wooden or stone. The side walls of the terrace made of loose material are reinforced with a retaining wall made of stone, wood or planting of easily rooted plants. It is advisable to lay the railing in two threads: at a height of 75–80 cm for adults, and 45–50 cm for children.
To comply with the permissible slopes, it is advisable to lay the path according to the serpentine principle.
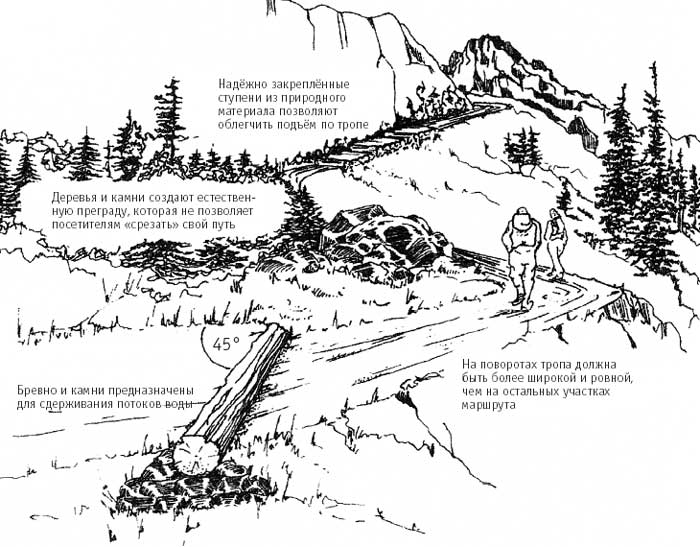
* This page contains information from the collection [" Trail in harmony with nature". Collection of Russian and foreign experience in creating ecological trails. M .: "R. Valent", 2007. - 176 p.], prepared by our colleagues from ecological center "Zapovedniki", who kindly provided us with the opportunity to post this extremely useful information for all environmental educators on our website.
We also recommend
 Productive and reproductive thinking
 Reasonable egoism - what is the theory of reasonable egoism?
 Boris Nikolaevich Yeltsin, the first President of Russia
 Underground fights. Underground kings. What is “fighting not for the masses”? Where can you fight for money?
 Yakov Pavlov and Other Heroes of Stalingrad You Need to Know
 Survive an accident at sea in a dream - in reality experience a new love