How to align the seams between tiles. How to update the seams between tiles
Such troubles as the formation of gaps between the floor slabs on the ceiling, or simply the manifestation of once not entirely successfully sealed seams, are very common in panel high-rise buildings. Therefore, at the first sign of such phenomena, action must be taken. And for this you need to have information on how to seal the seams between the panels on the ceiling on your own, without resorting to calling finishing specialists.
If the apartment is located on the last, top floor, and there is a gap between the plates on the ceiling, then it is possible that it will soon start to drip, which means that the rooms may have a persistent smell of dampness and stains of mold or fungus, and besides this , the heat will quickly leave the room. These circumstances are especially unpleasant in the cold months of the year. Therefore, in such a case, repairs should begin with a revision of the roof, since if you do not cope with the flaws in the roofing, then sealing the cracks from the inside and leveling the ceiling is a waste of time.
If the inspection of the roof suggests that everything is in order with the roof, then you can safely proceed to repair the ceiling. In the case when it is found that the waterproofing roofing material is damaged, then first you need to to take steps its repair, for example, to replace sheets of roofing material, which is usually used to cover the roof in multi-storey buildings with a flat "soft" roof.
However, seams can crack not only on the upper floors, but also on any others. This is a common consequence home shrinkage processes.
So, making sure that no external factors will spoil t labor-intensive work on sealing the ceiling, you can proceed to repair activities inside the apartment.
Ceiling seam seal
If a small crack has formed between the plates, then you should start by expanding it. It often happens that the process of cutting even a small crack or gap suddenly opens up “big horizons” of work. Therefore, since the hands have already reached this repair measure, it must be done immediately in good conscience, in full, so as not to return to this issue for a long time.
If you want to solve two issues at once - sealing the seam and leveling the ceiling, you need to clean the entire seam from old concrete. Usually, this is not difficult to do, since during the construction of houses, not too strong cement mortar is used to seal the seams.
Materials and tools
In order not to repeat the mistakes of the masters who, when building a house, worked on the seams of the ceilings without due diligence, you need to purchase high-quality materials and all the tools necessary for the job. It is necessary not only to cover up, but to carefully embroider the seam and carefully seal it when sealing.
So, starting work you need to purchase:
1. From the tools you will need a medium, wide and narrow spatula, a spray gun, a narrow metal brush, a wide brush, a container for mixing the solution, a construction knife and a drill with a perforator.
2. You can close gaps using different materials, and it is worth listing all that may come in handy.
- Deep penetration concrete primer - necessary for better adhesion of the surface and the material that will seal the joint between the plates.
- NTs, which is designed for sealing deep seams. This material tends to expand during hardening, densely filling the entire space of seams and joints.
- If a wide seam is found that requires sealing, it is necessary to purchase dense insulation materials made of polyurethane or polyethylene foam. Instead, foam can be used.
- Requires latex elastic putty.
- Reinforcement required. Its width will depend on the width of the seam - the tape should extend beyond its borders by 40 ÷ 50 mm on both sides.
- For final finishing, primary and finishing putty for the entire ceiling area will be required.
Prices for mixtures for leveling walls and ceilings
Mixtures for leveling walls and ceilings
How to seal the seams between the panels on the ceiling - we do it ourselves
Repairing the seams between the floor slabs will definitely entail bringing the entire ceiling in order, so you should start by completely cleaning the surface of paint, whitewash and, possibly, plaster.
- Using a spray gun, the ceiling is sprayed with water. It is better to spray not the entire ceiling at once, but in parts. A well-moistened area is left for 10 ÷ 15 minutes to soak, and then the old coating is removed using wide and medium spatulas. After that, you can move on to the next section, on which you need to carry out the entire procedure from the beginning. Such work is carried out until the entire plane of the ceiling is completely cleaned.
- Having removed the old coating in this place, the owner will immediately see the amount of work to be done. Usually there are two or three joints of floor slabs per room. Sometimes they are patched up very inaccurately and act as ugly humps. These bulges need to be eliminated and the ceiling made perfectly flat.
To do this, you need to take a puncher, install the desired nozzle on it, switch to impact mode without rotation, and step by step release the joint from the old frozen mortar.
The joint and the slab around it must be completely cleaned, and the gap itself must be deepened by at least 50 mm.
- Next, you need to take a narrow iron brush or a wide brush and carefully clean the gap from dust and small pieces of concrete.
- The next step is to treat the gap with a primer in several layers, each of which must dry. The primer will make the solidified solution remaining inside the joint stronger, will not allow dampness and fungus to form in it, and will provide good contact with the repair compound, which will be applied later.
- If the gap between the joints is wide enough and is more than 30 ÷ 35 mm, then you first need to fill it with mounting foam. It will be well fixed on the primed surface and, expanding, will fill the entire opening.
When it hardens, the foam will come out of the seam, and when it is completely dry, it is carefully cut off so that at the joint of the plates in the foam a groove is formed, 30 ÷ 50 mm deep, tapering inwards, like a triangle.
- If during cleaning a joint is deep, but at the same time narrow, then it is worth doing the following.
Having chosen a sealant made of foamed polyethylene of the required thickness, on it one side a strip of sealant is applied and filled into the cleaned and primed joint with a spatula, leaving room for filling with concrete.
- Further, the joint is sealed with a solution of expanding concrete, but it is imperative to leave a small recess in the joint to expand the mortar and decorative plaster.
- After the solution has dried or the groove has been prepared in the dried mounting foam, an elastic latex-based is applied to the joint. Work is best done using two spatulas - wide and medium or narrow. A solution is taken from a container on a wide spatula, and with a narrow one it is applied to the joint between the plates, compacting into a seam and leveling to the level of the ceiling surface, while removing excess putty.
- After 2 hours, which will be required for drying, they begin to reinforce the seams. To do this, with a spatula, a thin layer of putty is applied to the seam and the ceiling next to it in a strip of 50 ÷ 60 mm, a sickle mesh is fixed on it, pressing it into the solution and removing its excess with a spatula.
- After the joints have dried, the entire ceiling is treated with a primer, applying it with a roller. It is better to cover the surface with two layers of the composition.
- When the ceiling is dry, you can proceed to it. First, a thin layer of primary plaster is applied, and after it dries, a finishing final smooth layer is applied. It is applied with a wide spatula and at the same time leveled to the ideal.
- After the finish layer has dried, paint, whitewash or wallpaper can be applied to the ceiling.
Video: repair of seams between floor slabs
Fixing a hole in the ceiling
Sometimes it also happens that when cleaning the seam from the old mortar, not just a narrow gap opens, but a large hole - a defect in the floor slab. In this case, this hole can be repaired in two ways.
Sometimes such a “surprise” may appear on the ceiling when cutting seams.In any case, the first thing to do is to carefully clean the inside of the resulting hole. This process is best done with a narrow brush.
1. Having freed the inside of the hole from dirt, it must be well sprayed with a primer. After waiting for the first layer to dry, it is necessary to apply the second.
- Next, the hole is filled with mounting foam.
- Then, after it dries and expands, the excess is cut off, and a cone is cut from the inside of the hole, at the base the size of a hole, and 40 ÷ 50 mm high.
- This cutout is necessary to fix the cement mortar in it, which is applied in the next step. It is leveled with a spatula and left to dry completely.
- Then putty is applied to the place where the hole was and around it for 50 ÷ 70 mm, and a sickle mesh is glued on it, which is pressed into the applied layer of the solution, smoothed and left to dry.
- Further work proceeds in the same way as when sealing seams.
2. Another termination method differs from the first, and it is used if a large void is found in the ceiling.
- In this case, you will need a piece of plywood (you can use scraps of laminate) about 100 mm larger than the dimensions of the hole.
- Then, it is necessary to strengthen the wire grate in the hole, which must be fixed to the sealant or cement mortar inside the hole. After the mortar has dried, the wire must be securely fastened inside the opening. The grate will serve as reinforcement for the repair mortar, with which they create a kind stove.
- Mixed concrete is laid out on the prepared plywood, it must be uniform and not excessively thick.
- The plywood platform with the solution is lifted and pressed tightly against the hole so that the solution completely fills the remaining cavity. We will have to come up with a reliable support for this kind of formwork, which will hold it until the repair composition dries completely. For this, a thick branch, a bar or a pyramid of a table and chairs is suitable.
- After the mortar dries in the opening, a perfectly flat ceiling surface will be obtained.
- Next, you can begin to work on putting in order the entire surface of the ceiling.
Video: sealing a volumetric hole in a floor slab
It should be noted that the joint between the plates is quite possible to update independently. But the complete one is quite a difficult job, so it is better to entrust it to an experienced master finisher. However, if there is a desire and self-confidence, and this is quite doable.
Show something different from the tables on the blog, otherwise I haven’t been for a long time.
Children's themes have recently captured me not childishly. Various items were asked to make in the kindergarten.
The first subject, educational, necessary and useful. This is a traffic light, by which children will learn the rules of the road, a paramount thing.
I’ll make a reservation right away, they also made a version of the pedestrian with little men, but simpler from cardboard.
In principle, this three eyes were also asked to make a cardboard-simple one, but how can I do it without problems)) I thought, why not make a reliable academic subject right away, and I did. How much is enough.
The concept of the figure is as follows, large enough for everyone to see, stable, durable and with a swivel mechanism, the meaning is that there are 4 sides, one side shows all the signals for a general understanding of the device.
The other three sides on one signal, the teacher can turn and show any color from 3 and ask the kids about its purpose.
In general, I thought it would be right
The initial thoughts about color circles on magnets and other light bulbs had to be canceled, we need a simple, understandable solution that is difficult to break, magnet circles can be lost, battery bulbs fail.
I don't know if it worked out, but time will tell.
The whole base is MDF, which glued the pva, for a temporary tack, also fastened it with a micro-pin.
Separately, I note that it is possible to make circles of various diameters on the circular and, most importantly, of the same size, using a non-tricky device, first we cut square blanks, and then on the device, rotating the part, cut off the corners to the polyhedron, and then rotating the part, we add to the circle.
I glued the box, the visors are halves of the eyes of the circles, I made a groove under them with a milling cutter, so such things cannot be reliably glued into the end.
The whole thing revolves on a pipe from the Joker system, in my opinion, for shelving, so that the stops do not fall out and fail, which I fixed with bedbugs.
I made the base massive and wide from thick layers of MDF, with such a base it is not so easy to tilt the traffic light on its side.
I played the fool and drilled through the pipe, I had to slap a plate from the return line.
I painted everything from a spray can, then varnished it, the thing is ready.
I did not paint the signal mugs, they are cut out of self-adhesive paper, so it is easier to update the demonstration item.
Who has read, look at the slides
Dear Builders. I would like to know the detailed process of the CORRECT alignment of the walls (reinforced concrete), with a composition such as Knauf ... In this business I am a teapot, but I want to make my daughter’s bedroom beautifully, but there is not much money to pay professionals for the work, and there is no guarantee that they will get caught good pros ... So I want to know what and how, and how much a pound is dashing. Thanks in advance for the advice. The walls will be leveled for further painting with Sherwin Williams paint.
- 1 877 replies

What should I do if I don't know how to install bathtubs? Options 2 - ask how, or come up with your own. I chose the second one. And I didn’t just like this option, but very much!
GO!
A frame is required for an acrylic or iron bath. I have thin-walled iron. I wanted plastic, and concrete, but did not have time. As I thought about this frame, it became so sick! Sales designs are somehow lousy and material-intensive. I limited myself to one pipe 20x40 under the edge and two levers.

Hello brothers in repair! For a long time I didn’t write anything here, and in general I rarely began to come in, everything was somehow lacking: now drinking, now partying, and now a new “attack” has attacked me. But knowing that you, in spite of everything, stubbornly do not forget me, I decided not to be a piglet, and to tell you about my new hobby. I'll start from afar: almost all my conscious life I worked as an electronic engineer, moreover, an engineer-developer of electronic and electrical devices of the widest class and purpose, and at the same time purely in the defense industry. It is clear that the scope of my amateur radio interests was limited only by my laziness, there were simply no restrictions in radio components for me, I had EVERYTHING! Well, following the trends of the then amateur radio fashion, I mainly focus on radios and amplifiers, essno, on transistors and microcircuits. I haven’t been working in this area for a long time, and I threw everything into a landfill for a long time, but in my soul all this time a dream was glimmering - to make a tube power amplifier, and not simple, but such that everyone gasped. And I must say, at work, for most of my time, I dealt with electric vacuum devices, radio tubes, if in a simple way, so this topic was well known to me. And then there is this fashion for a "warm tube sound", for which people literally go crazy. In short, a year ago I decided to make my dream come true. I immediately decided: the mainstream, conventional tube amplifiers with an output transformer, are not interesting to me, this is not a royal business! Why not invent a TRANSFORMERless tube amplifier for me. Well, I well imagined the difficulties along the way, and I had some thoughts of my own on this matter, but still I decided to consult with the radio amateurs. I found a suitable group on Facebook, began to publish in it myself, and somehow asked a question on the topic: would anyone tell me the circuit of such an amplifier. And they immediately give me a link: http://hifisound.com.ua...a-6s33s-otl/ (I hope I did not violate any Forum rules by providing a direct link here, especially since it is from a completely different area? ). I won’t talk about this scheme, if anyone is interested, I can later explain what’s what, I’ll just say that this scheme immediately interested me, both in its unusualness and in the potential opportunities that I saw in it. Decided to start. And where to start: parts - 0, there is a soldering iron, still Soviet, and a Chinese tester. But, dashing trouble is the beginning: I got used to Avito, Ali Express, went a couple of times to the Mitinsky radio market, began to grow into amateur radio junk. ..
Now I’m going, I’ll walk Tinka, and I’ll continue, if you’re interested, already with pictures ...)))

If you plan to lay tiles on surfaces with height differences, then you need to level the tiles. To do this, use both specialized devices, and carry out the process independently. On the methods of leveling tiles and the technology for their implementation, we will consider further.
Tile leveling system: device, advantages and disadvantages
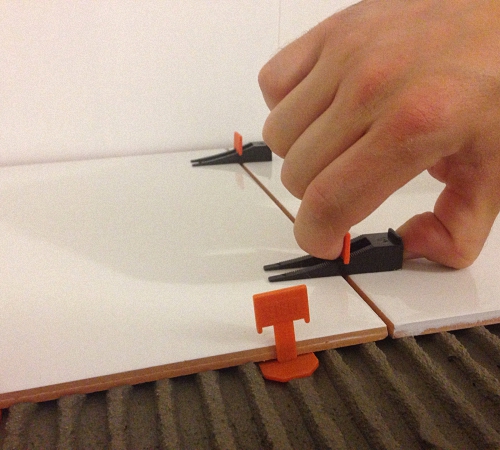
With the help of the tile leveling system, it is possible to perform laying much faster, and the surface at the same time, is characterized by evenness and the absence of drops. This system, according to the principle of operation, replaces the crosses that were previously installed in the seams, and has the form of wedges on which there are clamps. The main part of the system is wedges in the form of spacers, with the help of which it is possible to adjust the location of the tiles on the surface. To fix the position of these elements, the second version of the wedges is used - clamping. Thus, it is possible to install and fix the tile in a certain position. Thus, the surface, after laying the tiles, becomes perfectly flat.
When laying large tile parts, they should be covered with two layers of glue. This system has a large number of advantages and is becoming quite popular among both beginners and professionals. In order to study the feasibility of using a tile leveling system, we propose to study its advantages:
1. Getting a perfectly flat floor. With this advantage, it is possible to achieve perfectly even floor tiles. The appearance of the masonry is improved, and the quality of operation of the floor covering is also improved. The process of installing tiles is accelerated, and the work on its implementation becomes easier.
2. On the surface of the floor there are seams of the same size, the tiles look perfect. At the same time, the use of crosses for seams becomes impractical. The distance between the tiles is the same on any part of the floor.
3. The glue is evenly distributed over the entire surface of the floor, to level the uneven surface of the floor, an adhesive composition is used, distributed over the surface. With the help of the solution, it is possible to fill all the voids that form on the floor. Without this system, ideal distribution of glue on the surface cannot be achieved.

4. Laying the tiles in this way prevents the tiles from sagging during use. Even heavy loads on the floor surface do not lead to its subsidence.
5. Fixing tiles in position is another advantage of this system, which is difficult to achieve when laying tiles by hand. After the tiles laid in the usual way have dried, displaced or sagging areas appear on the floor. By using a tile leveling clamp, this shortcoming can be eliminated. The tile is installed in the position necessary for us and is in it until completely dry.
Despite this, this system has certain disadvantages, namely:
- time spent on installing and removing clamps;
- the seams, in this case, are filled with glue and need additional cleaning;
- to purchase a system, you will need to spend additional funds, which is not always profitable, especially if you need to install tiles in a room with a small area.

Varieties of do-it-yourself tile leveling systems
There are two options for systems for leveling tiles. The first one is the cheapest and most commonly used. It is used if the surface is characterized by the presence of small differences in height. In this case, a wedge is used to clamp the base element, and the tile itself is installed on a flat base.
The cost of the second version of the tile leveling system is much higher. This system has a peculiar structure, the shape of the inserts is curved. Thus, it is possible to achieve self-alignment, without additional manual intervention. The leveling of the plate occurs automatically, while laying tiles on the floor with a large number of defects is allowed.
Video tile alignment system:
The application of this system is simple, although it requires additional time for its installation. However, the result is worth it. To install this system, follow these steps:
- apply adhesive to the tile with a notched trowel;
- install the tile and attach the leveling system to it;
- lay the second tile;
- use wedges to fix the inserts;
- install inserts on both sides of the tile;
- adjust the clamp until the inserts are firmly fixed;
- calculate the seams in relation to the adhesive composition that has come through.
Please note that the adhesive must be cleaned from the joints during the tiling process. Otherwise, it will take a lot of time and effort to remove it.

The technology of using the system of laying and leveling tiles
We suggest that you familiarize yourself with the step-by-step instructions for laying tiles with your own hands using the leveling system:
1. Initially, the surface should be prepared, it should be cleaned of dust and dirt, and also degreased.
2. In order to increase the level of adhesion of the adhesive to the surface, the floor should be treated with a primer.
3. Glue, you need to prepare using the instructions. Since otherwise, there may be problems with its drying and strength.
4. Apply glue to the floor, according to the thickness specified in the instructions. Before installing the tile, install two clamps on the floor, stepping back from the edge of the tile one centimeter.
5. Install the second tile in the same way, between them is a wedge-shaped element installed between the upper and lower parts of the clips. Fix the wedge in the desired position.
6. Note that the bottom of the wedge must be firmly fixed to the surface. It is with its help that alignment is carried out.
7. In the same way, install other wedges under each tile. The wedges are removed only after the glue has completely dried.

8. In order to get rid of wedges, a tool is used in the form of a hammer, chisel. Make removal of clips in the longitudinal direction in relation to seams. After removing the wedge, the lower elements remain under the tile.
9. Waste clips are used only once, after removal they are thrown away. Wedges can be used many times. Please note that for successful alignment, the room should create optimal conditions for temperature and humidity conditions. The presence of temperature less than 15 degrees and the presence of high humidity is not allowed.

Floor preparation and leveling
Before you start laying tiles, you should prepare the base for this process. First of all, the floor or walls on which the tiles are laid must be perfectly even. Only in this case, it will be possible to avoid swelling or deformation of this finishing material.
If the condition of the floor is critical, then it is necessary to remove the old floor covering and install a new screed. Preparing the floor for laying tiles is accompanied by the need to use tools in the form of:
- spatula;
- instruments for measuring the floor;
- putties;
- hammer;
- spatula;
- chisels;
- gloves.

Before leveling, the room must be ventilated. Next, you should take out all the furniture and other items that are on the floor. To remove dirt, dust or grease from the floor, use a blowtorch. To remove cracks or other defects, use putty. Next, you should wait until the putty is completely dry.
Next, close all windows and doors in the room. The optimum temperature for further work is 20 degrees. Most often, tiles are laid on a concrete base. However, it must be perfectly even. If there are differences in height of more than 3-4 cm, you should first level the floor.
Wooden base - very rarely used as a carrier for tiles. Wood - prone to high moisture and temperature changes. Also, the wood is not as rigid as to be the base for the tiles. Therefore, during the operation of the tile on the floor, its deformation is possible.
Laying tiles on old wood flooring is unacceptable. Before laying tiles, the old wood flooring should be removed. Next, install a new concrete screed.
To check the floor before leveling the floor tiles, you should use a special device - a level. There are two variants of it:
- water device;
- laser level.

Using a level allows you to determine the highest part of a floor or wall. This point is the main point for leveling the surface. The entire floor is aligned in relation to this point.
The laser level allows you to quickly determine the level of curvature of the floor. Using a water level requires the use of a pencil and a ruler to mark for alignment.
Floor preparation and leveling is carried out in this way:
- the highest point in the room is initially determined;
- then you should draw lines on the walls from it, based on them alignment will be carried out.
1. Self-levelling compounds - the first and most popular method. These compositions are in the form of a dry powder, they have a cement base. These compositions allow you to prepare the base for laying decorative flooring.
There are two variants of these compositions:
- the first - less fluid, allow you to get rid of differences in height up to 4 cm;
- the second - should be applied with a thin layer, with their help, the final alignment is performed.

Each of the compositions needs a thorough cleaning of the floor from dirt and a primer on their surface. To prepare the composition, you should study the instructions and combine the dry composition with water in the desired proportion.
For the sake of improving the smoothness of the composition, one should not violate the proportion. Since these operations will negatively affect the quality of the coating obtained. The composition will thicken very quickly, so it is recommended to cook it in portions.
Work is carried out in a completely closed room. A spatula is used to level the mixture. These compositions are easy to use, I quickly level the floor. However, their only drawback is their high cost. Therefore, in order to save money, another way of leveling the floor is used, which we will discuss later.
2. The second leveling method is to use a cement-based screed. This method is appropriate if the height differences are more than five centimeters.
The use of this method is relevant if the floor is quite uneven. In order to correct the curvature, it will take a lot of work. In addition, with the help of cement mortar, it will be possible to save a lot.

After preparing the floor and marking, the beacons should be installed. Most often, they have the form of an ordinary flat wooden beam. The first beacon is installed at a distance of 2-3 cm from the wall. The second beacon is installed at a distance of 60-70 cm.
To check the evenness of the installation of each of the beacons, use the level. If there are differences between the beacons, a bar is supplied under them. After installing the beacons, a cement mortar should be prepared. To do this, you will need Portland cement and clean, dry sand. The proportions for their connection are one to three. Start work on alignment should be from the far corner in the room.
Please note that the presence of moisture in the sand will adversely affect its quality characteristics. Therefore, sand for the manufacture of screeds must be absolutely dry. Next, you should cover the floor with a plastic film.
If you plan to level the floor made of wood, then for the manufacture of the screed you will need to mix glue with sawdust. If the floor has deformed over time, then this composition is the ideal solution. After that, you should wait for the self-leveling compounds to dry, this will take from 1 to 5 days. After the floor has dried, proceed to laying the tiles. For additional floor leveling, leveling tile crosses should be used.
Using the above methods, you can also align the walls in the bathroom under the tiles. However, a simpler and more reliable way is to use special floor leveling systems for tiles.
Video tile alignment:
The modern market of building and finishing materials pleases with a variety of choices, however, the undoubted leaders in this area have been determined for a long time. Ceramic tiles are one of the best time-tested facing materials. The tiled surface is practical and lasts a long time, and the presence of a material with an unlimited color palette allows you to realize the most sophisticated design projects. In addition, the popularity of tiles is also explained by the fact that, in principle, you can tile the walls yourself, and the necessary recommendations can be easily found on the global network. For example, we want to offer you the most useful information on how to grout tile joints.
Grout for tile joints - the offer of the modern market
After laying ceramic tiles, the final touch is grouting; without this procedure, finishing the walls and floors with tiles cannot be considered complete. In addition to practical significance, the seam also has a decorative feature - it complements the overall pattern on the wall or floor. Moreover, manufacturers produce many color additives.
Two types of grouts: based on cement or epoxy resin
Cement based grout Supplied as a dry mix, which is brought to working condition by dilution with water or liquid latex. Although ready-made grouts can also be found in the retail network, their price is an order of magnitude higher. Cement grout for tile joints in the vast majority of cases is made on the basis of Portland cement, and the special additives that make up the composition are the distinguishing components. All grouts of this type are divided into three groups:
- based on industrial Portland cement;
- based on dry hardener;
- based on a mixture of latex with Portland cement.
Interesting! Portland cement is a special type of cement that got its name because it was very similar in color to building stone, which was mined on the English island of Portland.
Epoxy grout includes epoxy resin and hardener, and gives the seams increased impact resistance and resistance to various chemical influences. Such a grout is characterized by a high cost and, as a rule, is used in the arrangement of premises for industrial or commercial purposes.
In addition, epoxy grout is characterized by excessive viscosity, so only a specialist can successfully work with it. Moreover, there are certain restrictions on its use: the thickness of the tile is from 12 mm, and the minimum joint width is 6 mm. Otherwise, such grout will simply not be able to properly penetrate into narrower seams.
Attention! To avoid serious problems when doing the work yourself, carefully read the manufacturer's instructions. This is the only way you can determine which tile grout is best for your particular situation.
Is it necessary to use sealant?
Grouting tile joints - a video instruction of the process, by the way, is located at the end of this article, it also involves processing joints using a sealant. It will protect the surface of the tile from excessive absorption of moisture, as well as protect it and the seams from stains. If the surface is finished with unglazed tiles, then it is completely covered with liquid sealant. Such a specific substance has acrylic, varnish or silicone in its composition. Therefore, it is necessary to choose it based on the type of tile and grout.
Between tiles distance
By and large, the width of the grout joint depends solely on personal preferences. Many people prefer narrow seams, which visually seem to suppress the tile. If the surface is made of elements with a size of 10-30 cm, then the most optimal will be a seam of the order of 3 mm. Sometimes a 60 cm tile is also laid according to this scheme. If the tile is irregular in shape, it is advisable to make a wider seam, but it should not be more than 12 mm.
Attention! The wider the seam, the more likely it is to crack. To seal it, it is necessary to apply a grout with the addition of sand, but this may not always ensure a seam from deformation.
On the other hand, you should not make the grout too narrow, as this will greatly complicate the grouting process, and as a result, they may turn out to be leaky, that is, water will seep under the tile. According to professional tilers, the joints should be wide enough so that they can be filled without problems with any of the selected grouts.
Only in this case, they will become waterproof and will act as a kind of shock absorbers in the process of compression or expansion of the tile. If the seam has a negligibly small width, then it will not have such parameters.
Tools and auxiliary materials
- Respirator (working with cement-based grout).
- Protective glasses.
- Rubber gloves.
- Roller, rubber spatula or scraper with a rubber nozzle.
- Bucket.
- Sponge.
- Plywood.
- Jointing, a wooden stick sharpened at one end or a toothbrush.
- A piece of clean cloth.
- A small paint brush or paint roller.
Brief plan
- The grout is mixed.
- The solution is aged to the required level of water absorption.
- The grout is mixed very thoroughly again.
- The solution is distributed.
- Excess is cleared.
Solution preparation
As a rule, dry grout is mixed with either water or latex liquid additives that replace water.
Note! Dry polymer grouts can only be mixed with water.
When using any type of liquid, it is necessary to add only such an amount that will be sufficient to prepare a plastic and easily spread mixture. This aspect is extremely important, since excess moisture can provoke a weakening of the grout. To do everything right, the solution must be mixed strictly according to the proportions indicated on the grout packaging. The container in which the solution will be mixed must be dry and clean.
When mixing the grout, the dry ingredient is added to the liquid. Moreover, initially about ¾ of the norm of the liquid indicated in the recipe is used. After all dry components are introduced into the solution in small portions, the remaining liquid is added, while not forgetting to control the consistency of the mixture.
Important! The grout preparation process can be influenced by such external factors as the temperature regime in the room, relative humidity, and also the component composition, for example, the presence of a dye.
It is recommended to use a trowel or an electric stirrer to mix the solution. If preference is given to the "automation" of this process, then the agitator during operation must be completely immersed in the solution, so air will not enter it. After all, air bubbles can also weaken the grout solution. It is for this reason that the speed of the blade revolutions should not exceed 300 rpm. At the end of the mixing procedure, the solution must be left alone for 8-10 minutes, and then it can already be safely used for its intended purpose.
Grouting ceramic tiles - direct execution
Grouting ceramic tiles begins with laying the mortar on the surface of the tiles. For proper distribution, it is best to use a special trowel. It is held at an angle of 30 0 relative to the surface of the tile and is applied diagonally. It is necessary to go over the treated area with a grater 2-3 times, and not just covering the distance between the tiles, but trying to rub the solution into the seam with an effort to completely fill it. Naturally, the greater the resistance, the greater the filling density of the seam, and, accordingly, the stronger it will be. The main idea of this work is that all the voids and corners around the tile, remaining after its laying, should be filled as much as possible. When applying the grout, the liquid will leave it, and the seam will be filled with particles of cement and sand. Thus, after hardening in the seam, a solid body will be obtained.
It is not necessary to grout the entire surface at the same time. The best option would be to distribute the solution in a small area, about 1-2 m. In the process, it will be found out how quickly the grout sets and whether there is a need for frequent stops associated with cleaning the surface. In some cases, it is possible to wipe 9-10 square meters. m, and then deal with the cleaning of the working area. If the solution sets quickly, then only a small area is overwritten.
What is a grout bag?
If the tiled surface has such a structure that its cleaning process requires considerable effort, for example, imitation of old brickwork, then it is recommended to use a special grout bag. This "tool" visually resembles a pastry bag, with which housewives decorate cakes. A tip is attached to the end of the bag, the diameter of which corresponds to the width of the grout. Then the bag is filled with a solution, which is squeezed out with force directly into the seam.
When using a trowel bag, the tip is placed at the top of the joint and then advanced along as it fills. As a rule, all horizontal seams are filled first, and then vertical ones. In the process of applying the grout, it needs to be squeezed out a little more than it seems at first glance. After some hardening of the solution, it is compacted using jointing or a small piece of a metal smooth tube, the cross-sectional diameter of which is larger than the size of the seam. Then, within 30 minutes, you need to let the grout pressed in the seam seize and then the excess is removed using a stiff brush.
Wet grout removal
When it is visually determined that the grout has hardened sufficiently, the lined surface is wet cleaned. To do this, take an ordinary sponge dipped in ordinary clean water. In a circular motion, excess grout is removed from the tile, while do not forget about the frequent washing of the sponge in water, which must be changed as it gets dirty.
Dry grout removal
The seams need to be aligned and smoothed with a joint, that is, a wooden stick with a sharpened end or the end of a toothbrush handle. Then the edges are trimmed with a sponge. The resulting seam should be even and non-convex, in the vast majority of cases it turns out to be slightly concave. All seams must be the same shape and depth.
We hope that our detailed instructions will help you properly perform self-grouting on a ceramic tiled surface. If some points require clarification, then we suggest that you familiarize yourself with the training video clip.
In this article, we will consider a method for leveling the ceiling with plaster and gypsum mixtures. It is optimal for old apartments with low and uneven ceilings, as it practically does not “remove” heights in comparison with suspension systems.
Foundation preparation
Preparing the base is perhaps the dirtiest and dustiest part of the job when leveling the ceiling with plaster or gypsum mixes. Where to start work, you ask, and we will answer you - first of all, you need to completely empty the premises. If it is impossible to do this, cover all things with plastic wrap and seal them tightly with adhesive tape, because dust and debris cannot be avoided in any way.
To start, we need:
- Sharp spatula;
- Bucket;
- Washcloth;
- Respirator.
So, let's start repairing our ceiling:
Removing old paint
- First, no matter how silly it may sound, it is worth starting with destruction. Namely, to remove traces of the last repairs accumulated over the years (read). Remove all layers of whitewash, water-based and other types of paint from the ceiling with a spatula. To do this, everything just needs to be torn off mechanically.
Tip: Alternatively, you can attach a long handle or stick to the spatula, while you will be able to work with two hands, which will greatly facilitate the task.
- To facilitate the task, you can use the so-called "wet method". First dampen the ceiling with water using a roller, brush or spray bottle. Let it soak well and peel it off without waiting for it to dry.

Tip: When peeling off layers of whitewash and plaster, the spatula should be sharp, so it is recommended to sharpen it from time to time.
There are several methods proven over the years that can greatly facilitate our task.:
- Hot water can be used to soften old whitewash.
- Water-based paint will be much easier to remove using an aqueous solution of iodine. To do this, dissolve one vial per bucket (about 10 liters) and saturate the ceiling with this mixture using a roller or brush.
- Paints such as enamels or water-dispersion paints are not washed off with water. They have to be removed only mechanically (read on). You can also make your work easier by using a “grinder” or a drill with a wire nozzle, however, while the amount of dust increases to impossibility.
There are many products on the market for washing off such paints. They are applied to the surface and after 15-20 minutes are removed with a spatula along with the paint.
Removing plaster
- The next step is to check the plaster for integrity. All places where the plaster layer staggers or falls off must be removed with a spatula to the ground. Particular attention should be paid to the seams between the panels and tap them with a hammer for reliability.. Indeed, over time, all houses shrink, their panel ceiling “walks” a little and shifts, as a result of which the mortar at the joints begins to fall off. Tap the seams between the floor panels and, if necessary, remove the mortar

Sealing of interpanel seams
- Now you can proceed directly to the repair of the ceiling. The first step before leveling the ceiling is to seal the seams between the panels.
It's done like this:
- The seam between the panels is filled with mounting foam and left until completely solidified.
- All seams should be treated with a primer for high-quality adhesion of the solution to the concrete surface of the panels.
- Seal the seam between the panels with a "Rotband".
- A sickle mesh is glued to the "Rotband".
- Level the putty at the level of the panels and smooth it. Method for sealing interpanel seams (rusts)

It should be noted that the use of sickle for large and uneven seams does not exclude the appearance of cracks in the future (see). In this case, it would be better to use a plaster fiberglass mesh, gluing it in layers.
Getting ready to level up
- Now we need to measure the horizontal of the ceiling and set the beacons. But if you're not worried about how horizontal your ceiling is, and you just want to eliminate the differences between the panels, you can skip this step. Without the installation of beacons (when leveling only on a plane), the layer thickness is significantly reduced, which means that less materials will be consumed. True, most people, for some reason of their own, or because of pedantry, cannot come to terms with the idea that their ceiling will be sloping.
In this case, there are several options:
- With a large deviation from the horizontal, only suspended or stretch ceilings can save.
- If the difference is within 5 centimeters, you can use plaster by installing beacons.
Before installing beacons, it is required to determine the lowest point of the ceiling:
- Using a tape measure, measure the distance from floor to ceiling at all corners of the room. The smallest distance will be the lowest point of the ceiling.
- Using a laser level or hydro level, it is necessary to mark the height of this point along the perimeter of the room. It will be easier to do this if you put marks only in the corners and use a chopping cord. To do this, stretch the cord between the marks and, slightly pulling it away from the wall, release it - you get a clear and even line.
- Every 60-80 centimeters, screw self-tapping screws into a line on two opposite walls. Stretch the construction line through the room and, pulling it, tie it to the caps of the self-tapping screws. Such a landmark will greatly simplify the task of installing beacons for us.
- Next, we glue the profile of the lighthouse to the ceiling using the Fugenfüller or Rotband putty using the dot method in increments of 30 centimeters. This refers to the application of dots of putty on the ceiling and gluing the profile by light pressing. All beacons must be aligned along a line stretched perpendicularly.
- The last thing that preparation for applying plaster layers requires is cleaning from the putty protruding beyond the lighthouses and priming the entire ceiling.
Leveling with mixtures
- When the base is ready, you can proceed directly to the application of leveling layers of putty.
They have their own characteristics in the work, which must be mentioned.:
- When mixing putty, do not make a portion more than you can use in 20-25 minutes.
- After the putty is mixed and stood for several minutes, do not add water or dry mix to it. This has a very negative effect on the quality of its structure.
- Do not dry the ceiling in a draft.
- The layer applied at one time should not exceed the allowable value (it is indicated on the bag).
The mixture after kneading is applied to the ceiling with a small spatula and slightly leveled.
Tip: Before applying each layer, it is very important to allow the previous one to dry completely. After all, if the technology is violated, all our work may simply fall off over time, despite the price and quality of the putty.
Each layer should be pulled together using the rule for installed beacons.

- After the leveling layer has dried, it must be checked using the rule for the absence of irregularities. To do this, simply run the pressed rule along the surface of the ceiling - it should fit completely. All protrusions are removed with sandpaper, and the pits should be puttied.
Ceiling finish
- The last step will be the sticker of the grid at the joints of the panels and the finishing putty:
- When the leveling layer is ready, it must be treated with a primer.
- Before finishing putty on the ceiling, it is worth sticking fiberglass at the joints of the panels (rusts) to avoid cracks.
- Fiberglass is glued on top of the leveling layer by pressing it into a fresh layer of putty.
- After the putty has dried, carefully remove all the protrusions with a spatula and sand the surface with sandpaper.
- It remains only to apply two more layers of finished finishing putty "Acryl-Putz" or "Shitrok". You can see the process in more detail in the photo below.
- The final sanding will complete all our dusty work on the ceiling.

Painting
Before painting, clean the room from dust and prime the ceiling. It is not necessary to use special primers for this purpose, just apply the first coat with well-diluted paint. The diluent must be selected only as indicated by the manufacturer on the package.. You should not experiment: if the paint is water-based, then only water can be used when diluting it.
Tip: The painted ceiling must not be dried in a draft, as the top layer becomes crusted, while the bottom remains wet and the plastic properties of the coating are destroyed.
We hope that by reading this article, you have learned how to properly level the ceiling. Now do-it-yourself ceiling repair at home will not be any problem.
We also recommend
 Productive and reproductive thinking
 Reasonable egoism - what is the theory of reasonable egoism?
 Boris Nikolaevich Yeltsin, the first President of Russia
 Underground fights. Underground kings. What is “fighting not for the masses”? Where can you fight for money?
 Yakov Pavlov and Other Heroes of Stalingrad You Need to Know
 Survive an accident at sea in a dream - in reality experience a new love