How to weave a wattle fence if the branches are short. We make wattle with our own hands: photo, video
There are many types of fences from a wide variety of materials. But recently, more and more often you can see a beautiful, eye-catching fence made of intertwined vines - Ukrainian tyn. Such a fence decorates areas near cafes and restaurants, separates zones on a garden plot, or simply encloses flower beds. Tyn can be made with your own hands from a variety of materials.
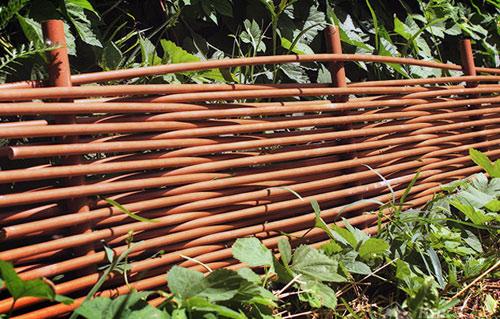
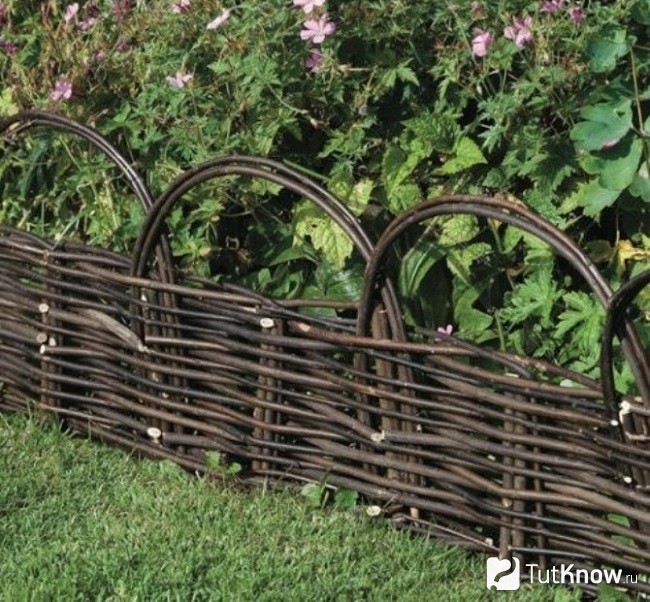
It looks like a classic fence tyn
Colorful and fashionable wicker fence
Vine is called elastic, long rods from any plant material. It is harvested in early spring before the juice begins to move in the stems or in autumn, from early September until frost.
Properly prepared material is the key to a beautiful and high-quality fence
Most often, long annual branches of willow, hazel or willow shrubs are used. The best time to go to harvest material is an early sunny morning. Cut the vine with a sharp knife obliquely, trying to make the cuts smooth and even. When cutting off the branches of a shrub, they tend to leave 3-4 leaves from the ground. So, the bush will recover faster. 
After clearing the branches of leaves, it is desirable to give them a neater appearance by removing the bark. This is done with a simple tool in the form of a split cone, which is better known as a pinch.
It can be made by hand by splitting a hardwood stake from one end. The unsplit end is strengthened by tying it with a strong rope or wire. The rod is inserted between two chips and stretched from edge to edge. The bark from a fresh vine is easily removed, but if it has lain down a little, then it is better to put it in water for a while.

Wicker fence tyn using logs for poles
If the branches were stored for a long time and had time to dry out, it is best to steam them or soak them for a week in a large container of water. It is very important that the material is completely covered.
When the vine is ready for weaving, it is sorted by stem thickness.
Thicker rods are used at the base of the fence and at the very top. The thinner rods are woven closer to the middle. This trick allows you to build a stronger and more durable wicker fence.
Do I need a foundation for a wicker fence
The place where it is planned to put a tyn in the future must be prepared in advance.

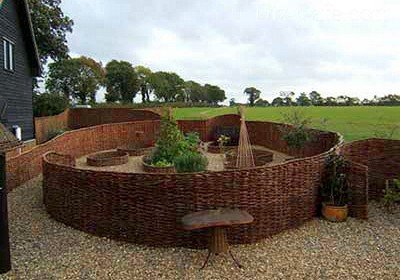
An example of a tyn fence with a foundation
Typically, such a fence does not need, but more expensive options do not exclude stone or brick bases. Such fences are more often installed in public places, for example, in open areas of restaurants or cafes, enclosing their territory and creating a unique comfort. They look quite respectable, but they are much more expensive.
It is best to make a pillow of sand and gravel throughout the entire length for better drainage. This, of course, significantly slows down the construction process and increases the cost, but the wattle fence will not get wet in the water during rains. Hence, it will last longer.
The technology of such construction is very simple:
If you simplify the task of erecting a wicker fence with your own hands, you can simply level the site (in order to avoid stagnation of rain or melt water) and drive the bases into the ground to a depth of 30 cm. You must treat with drying oil, resin or any other means that protects them from decay .
Weaving a fence from a vine
Probably, everyone has seen a finished wicker fence at least once in their life, so they have an idea of its essence.

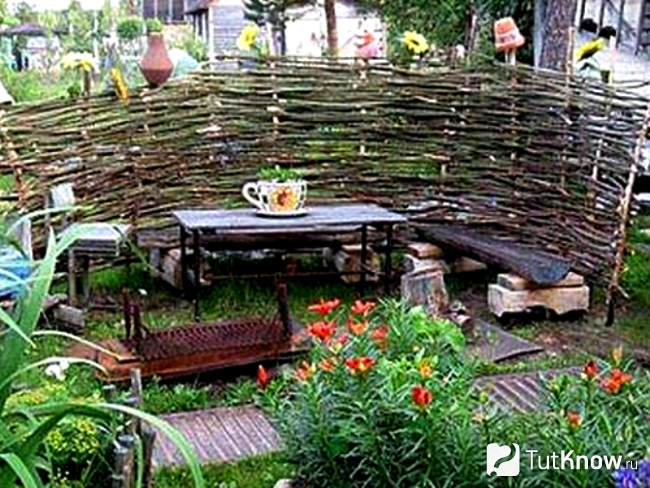
An example of a wicker fence made of vines
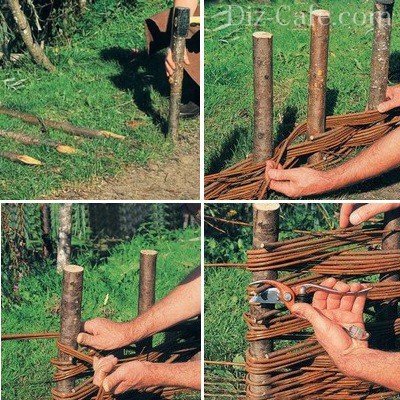
Weaving begins from below, using thicker rods for this. The first rod is firmly fixed in front of the initial base with a hand from the butt side and carefully wound behind the second, and so on, in strict observance of the order.
The rod must end on the back side of the next stake. With the next rod, on the contrary, weaving behind the stake begins and the next stake is wrapped around from the front side. And in the same way - to the end of the fence.  It is not difficult to make such a decorative fence, the main thing is to have patience and know some tricks:
- Each rod must begin to be twisted from the butt, thicker side;
- You can not leave the end of the vine in the middle between the stakes, this will make the fence look untidy;
- It is necessary to regularly compact each row of weaving with a wooden mallet for greater strength and a beautiful look.
When the weave reaches the top edge, the top of the protruding stakes can be cut off or, if desired, left as is. Then you can place various decorations on them in the form of clay pots or a hanging flower pot with a climbing plant.
Interesting options for wicker fences
In order to, you can use other, alternative, material options. Some of them can stand for only a few years, while others are very durable.
Reed weaving
For such a tyne, long bundles of reeds up to five centimeters thick are used. You can make this decorative fence with your own hands using the same technique as. If the reed was dried under the influence of sunlight, the tyn will turn golden in color. Light green reeds can be obtained by drying them in the shade of a canopy.
PVC weaving
Now you can. Such fences are sold in a ready-made set, their price is quite high, but they will stand for a very long time. PVC material is not afraid of sudden changes in temperature, does not fade in the bright summer sun, and it is easy to install it yourself.
It looks like a woven PVC fence
If the tyn is made not so much for a decorative purpose as for performing protective functions, you can build it from veneer or thin boards. Such a fence belongs to opaque types.
In addition to decorative functions, it will also reliably protect the site from the prying eyes of strangers.
The bases for this type of fencing should be stronger, and it is installed at a distance of 1.5 meters or more, but not more than two meters.
The popularity of the rustic style in country landscape design is due to the natural naturalness of its elements: wicker fences, wooden arbors, decorative benches ... Many country house owners who want to escape from everyday life and arrange natural design with rustic motifs on their site. Making a wattle fence is a fairly simple task, which anyone can master. It is not for nothing that wicker fences have often been found in many settlements for a long time. Today, the rustic style is again not the pinnacle of recognition, and therefore such a do-it-yourself design can serve as a worthy decoration of the garden.
Varieties of wicker fences
There are three types of wicker fences, each of which has its own height and functional significance.
- Low fences, the height of which does not exceed 1 meter. They are widely used as decorative elements of landscape design: for fencing flower beds and paths of the site.
- Medium fences meter high. They are good for zoning the site. Fences of this height allow you to emphasize the boundaries of space, but at the same time they will not create the illusion of isolation.
- High two-meter fences can act as a full fencing or fence. They are equipped mainly along the outer boundaries of the site.
The service life of the fence depends on the materials of manufacture. A fence woven from cattail or reeds will last no more than three to four years. A wattle fence made of vine, hazel or willow will regularly last up to ten years. But in order to be able to admire a beautiful wicker fence for a longer period, it is necessary to protect the wood by treating it with antiseptic compounds.
If we take the method of weaving as a basis, then the fence can be made using the technique of horizontal or vertical weaving.
We select the basis for the future fence
A wicker fence, like any building envelope, consists of supporting pillars and sections, which are intertwined thin branches or rods. For arranging the fence, you can use wooden stakes or metal poles.
A significant disadvantage of such stakes is that they are subject to decay, and this significantly reduces the life of the fence. To protect the stakes in place of the future wattle fence, you can equip a trench, the soil in which is replaced with a layer of sand. Water, flowing down to the base of the fence, will simply seep through the sand, and the wood will not rot. It is desirable to treat the stakes themselves with an antiseptic chemical composition in advance. To increase the stability of the fence, the stakes must be deepened by at least half a meter. Metal poles are used in the construction of high two-meter wattle fences.
Vertically driven wooden stakes 3-5 cm thick will serve as a good support for low decorative fences

To give the fence a more natural and attractive look, it is advisable to paint the poles in the color of the braided branches or vines.
Stakes or poles are placed at a distance of half a meter. As practice shows, this step is most convenient for braiding both flexible willow twigs and more rigid branches. The choice of the ball is determined taking into account the thickness and flexibility of the rods, as well as the design idea of the master.
Advice! Along the entire trench, the support posts are placed at an equidistant distance, and closer to the edges of the fence, it is better to install them more often. This placement of supports will create a kind of lock to secure the ends of the rods.
Harvesting the “correct” rods
Traditionally, branches of willow, willow or hazel are used to make wattle. But in the absence of the opportunity to purchase or stock up on a flexible vine, you can always weave a fence from thin annual branches of fruit trees in the garden.

Branches up to three centimeters thick are suitable for high fences, for low decorative fences it is better to use one or two centimeter rods
Smooth long shoots are suitable for cutting. They can be cut, dried and stored tied in small bundles for quite a long time. For the manufacture of wattle, you can even use freshly cut twigs with green leaves.
Branches prepared for weaving must be thoroughly soaked. This will give them flexibility by restoring the circulation of the juice. Flexible rods will be easier to twist, forming simple horizontal or unusual fancy patterns.
Advice! To steam out the branches and make them more flexible for a while, but after drying to return to their former strength, you can arrange a "steam bath". But such a procedure can only be applied to untreated and unvarnished rods.
Braiding rules and decoration techniques
The weaving of rods begins to be performed from the bottom row, gradually rising to the top of the fence.
The rods are carried out in wave-like movements alternately between adjacent support pillars, stretching along the entire length
The branches should wrap the flexible part around the supporting stakes, forming a "figure eight", in which each subsequent rod is a continuation of the previous one. So that during the weaving process the fence does not lead to the side, it is better to attach the tops of the supports to even planks, removing them before weaving the last row.
During weaving, it is important to ensure that the ends of the rods are located on the inside of the hedge. To prevent the fence from crumbling, the ends of the rods can be carefully fixed with a wire, and the protruding “tails” can be cut off with a knife. The ends of the last row are not cut off, but imperceptibly tucked along the stakes.
Here are a couple of video instructions from summer residents:
The finished wattle fence can be varnished or painted to match the surrounding landscape design.

Clay pots, decorative sunflowers and other attributes of a rustic style can act as decor elements for wattle.
Wattle looks most impressive in combination with other wooden decorative products. For example, a wooden bench placed along a wicker fence will bring a feeling of comfort and coziness and will become a favorite resting place for all family members.
Wattle fences allow you to create an atmosphere of warmth and hospitality on the site. Wooden interior items with bright positive energy will always please the eye.
If you want to learn how to make a wattle fence, a stuffed animal to put next to it, then you have come to the right place. Visual master classes, photos will help with this.
Decorative fences from branches - preparation of the necessary
Periodically, foresters cut down excess young growth in the forest. Around summer cottages, this is done by members of garden associations on subbotniks. Then the shoots have to be removed, spending money. But you can turn the trunks of young trees, turn the branches into wattle, making it with your own hands.
To make your job easier, remove branches right in the forest with a pruner and look for suitable stakes. The latter must be strong, so use trees such as:
- pine;
- larch.
- alder;
- Rowan;
- willow;
- hazel.

So, for it you will need:
- branches;
- stakes;
- wire;
- secateurs;
- axe;
- sledgehammer.
The branches should not be old and dry, they do not bend, but break. The best time to collect twigs is spring or the period from July to autumn.
We make a wicker fence with our own hands
It can be quite high, this is located on the border of the plots. But it will be useful and low. Such a decorative fence encloses the front garden, delimits the territory into zones. You can turn this corner into a place of rest, a feast by hanging clay pots on the wattle fence, placing figures of people and animals nearby.
We begin to make a wicker fence with our own hands by preparing the stakes. If you decide to arrange a global fence, their height is 240–250 cm, since 70 cm will be in the ground.
Sharpen the end of each pole with an axe. Lubricate the lower parts with molten bitumen or burn them on fire so that the tree does not rot in the ground for as long as possible. Soak the upper part with an antiseptic, then it will last for a longer time.
The next stage requires male power - you need to drive stakes with a sledgehammer 70 cm into the ground. But if you are making a small decorative fence, use stakes 1 meter high, 30 cm of which need to be driven into the ground. The sledgehammer is heavy for women's hands, so use a hammer. To prevent the top of the pegs from deforming, place a plank on them for the duration of this work.

As can be seen in the diagram, the stakes are placed every 40 cm, but less often. After that, they must be fastened with a horizontal pole, tied with wire or fixed with self-tapping screws. Here's how to make wattle next. If you have freshly picked branches, it is enough to clear them of foliage and unnecessary shoots. If the branches have lain down for some time and do not bend well, put them in a container, pour pre-salted boiling water over it, leave for a day, after which you can use it.

There are several ways to weave a vine:
- Starting from the bottom corner, pass the whip in front of the even stakes, and for the odd ones, it should be behind. Braid the second rod so that its turns are staggered in relation to the first. Further, all odd rows correspond to each other, as well as even ones.
- If you are making decorative fences for flower beds, you can weave the branches vertically. Then you need to fix 3-5 horizontal poles. Starting at the top of the first post, pass the branch between the cross bars, interlacing it. The rest are staggered.
- You can also make an openwork decorative fence using the same technique. With your own hands, you need to bend the first vine in half, attach this middle part in front to a vertical stake, bring the ends of the branch onto it, twist it a little, thread them into the loop formed. Tighten. Now put both ends of the vine on the second stake in front, wrap it around 1 time, also thread them through the second loop.
- If you want to quickly complete the work, take not one thin branch, but several. You can weave them not close to each other, but at a distance.

If your task is to make a wicker fence so that the bars are close to each other, after each decorated row, tap on it with a hammer.

When the branch ends, tie a second branch to it with a wire and continue weaving. It is better to do this near a horizontal pole.
You can weave the branches to the top, leave the tops of the stakes uncovered, or decorate here with such semicircular turns.
Next to such a fence, a figure of a man will look great. You can make these from the most unexpected materials, for example, from a broom.
How to make a scarecrow with your own hands - 3 options
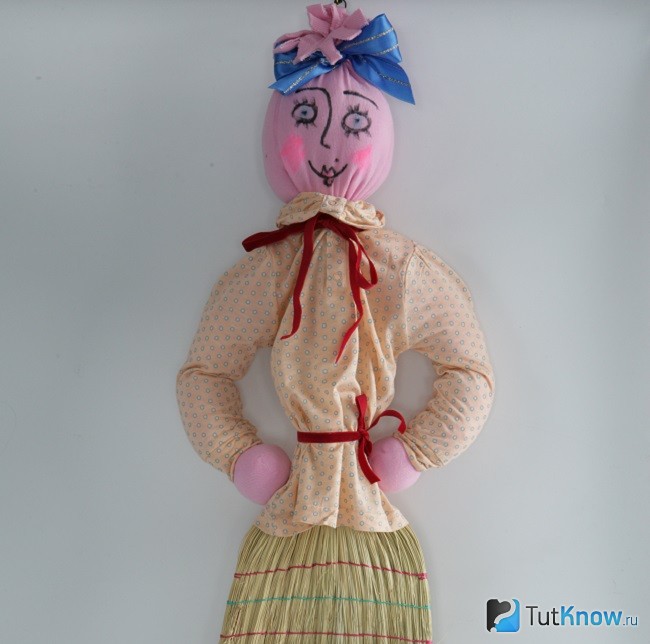
To make this, you need:
- broom;
- cotton wool or synthetic winterizer;
- a small dress or T-shirt and tight tights;
- markers or markers;
- scissors;
- wire;
- multicolored ribbons.

Also fill the upper part of the tights with synthetic winterizer or cotton wool, tie up and down to make a head. Attach the handle of a broom under the chin of the doll, secure it with wire and ribbons.

We do hair. For her, cut the top of the tights into strips, tie them with a beautiful bow. To make our garden scarecrow charming, put a dress or a T-shirt on the figure, which must be tied with a ribbon at the waist. Draw the facial features of the doll and you can put it near the wattle fence.
And here is the second option, which will also tell you how to make a scarecrow with your own hands. This is how he will turn out.

To make a scarecrow you will need:
- straw;
- screws;
- wire;
- 2 bars of different lengths;
- rope;
- white cardboard;
- acrylic paints;
- broom;
- the cloth;
- scarf.
To make the scarecrow further, you need to dress it up in an old sundress, dress, or make a cutout in the center of a square canvas, put it on your neck, before attaching your head. It remains to gird the tunic and admire the result of the work.
And here is another interesting idea. After reviewing it, you will learn how to make a scarecrow to put it where the fence is.
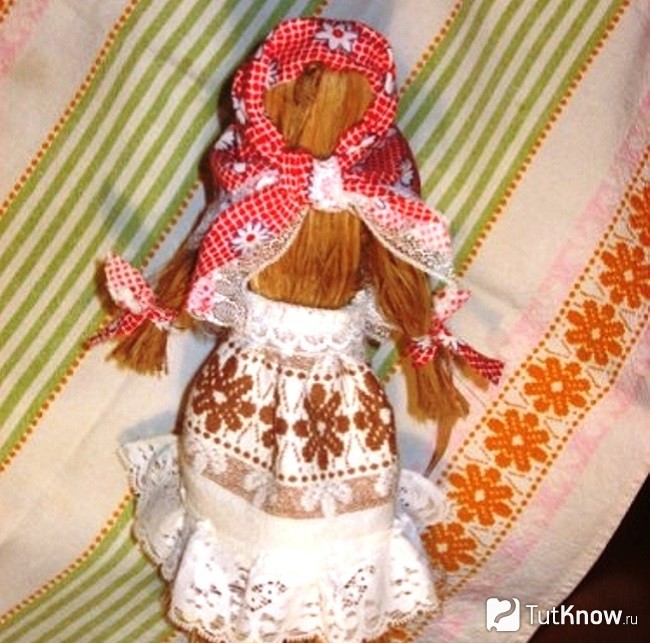
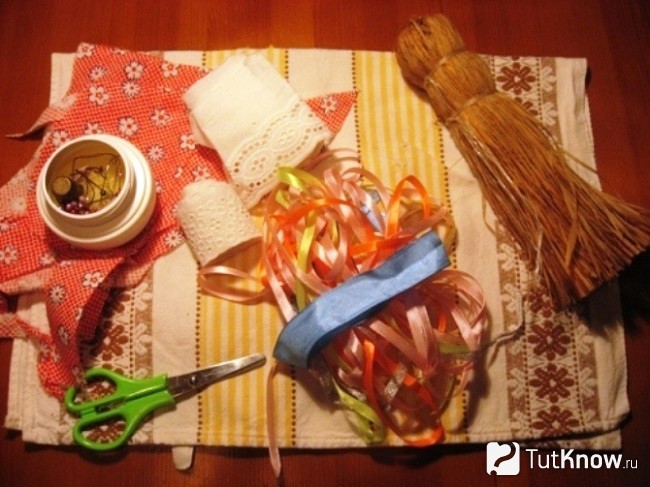
For it you will need the following materials:
- brush or bast of bast;
- satin ribbons;
- patches of fabric;
- lace;
- kitchen towel;
- threads.
- needle;
- sewing machine (if any);
- scissors.
A bast brush can be bought at a hardware store, and a bast can be bought at the market. If unable to purchase, replace these materials with straw.
Fold the washcloth in half, rewind the thread at the top to indicate the head. Separate the right and left strands, tie each in the area of \u200b\u200bthe wrist with strips of fabric. Cut the bast here to get the handles of the desired length.

Cut a triangular flap from the fabric, hem it on one side, and sew lace on the other two. Sew a skirt, sew a belt to it, tie it on the doll like an apron.
If you want something original in the garden so that when you get up in the morning you can smile at an interesting garden figurine, see how to make a scarecrow like this.

It can also be placed where the decorative fence is located - in front or behind it. If harmful neighbors live nearby, you can direct the most prominent part of the scarecrow in their direction.
This idea requires small round pumpkins. If they are not, you can replace the balls.
Here is what you will use:
- 3 pumpkins or balls;
- old jeans, hat and shirt;
- fittings;
- wire;
- scissors;
- white plastic.
Before you make a scarecrow, put jeans on the bottom of the armature. Then stick it into the ground. Now stuff your trousers and shirt with straw. Bandage it to shape the body.
At the neck, connect both upper ends of the reinforcement with wire, put on a pumpkin head, but first you need to prepare it. Make a cutout on the side where the "tail" is. Take out the seeds with a spoon, with this hole you will put the pumpkin head around your neck. Define the mouth. Here you need to make a semicircular cut and insert the teeth. They can be made from plastic white milk bottles by cutting them with scissors.
Insert round plastic circles into the cuts of the eyes, drawing pupils on them with a marker or paint. 2 pumpkins will become the buttocks of a mischievous scarecrow. If you want, at the very beginning of the process, fasten the sneakers, having previously made holes in them in order to thread the reinforcement.
What plants to plant near the wattle fence?
Traditionally, these are sunflowers. See how they fit perfectly with such a fence.

To get a similar effect, unroasted sunflower seeds are soaked in water for two days in early May, then planted in front of the wattle fence, on the south side of it. Then in July - August, the plants form a head with yellow petals, in the center of which delicious seeds gradually ripen.
If you don't want to wait that long, plant decorative sunflowers. They are low, very reminiscent of their fruit-bearing counterparts in miniature, but do not produce edible seeds. Sometimes these plants are sold in pots. You can buy decorative sunflowers in a container, take it out with a clod of earth and plant it after the fence is made.
Behind him, plant Jerusalem artichoke. It harmonizes very well with sunflowers and wattle, blooms at the end of summer, and the stems 2 meters high are visible from afar. Its tubers are edible and very useful. You can dig them up in autumn or spring, make vitamin salads, vinaigrette, boil, stew. Dried Jerusalem artichoke makes delicious coffee. But Jerusalem artichoke grows strongly, keep this in mind when planting at the fence.
Here's how to make a wattle fence, stuffed animal, plant sunflowers, Jerusalem artichoke, to create an unusual corner of relaxation in the country.
Visual aids will allow you to see the process of creativity on a given topic:
Since then, when a person acquired his own territory, he tried to protect it from the invasion of unauthorized persons. He did this by building stone walls, installing wooden palisades. Gradually, housing was ennobled, and with it the fence. In addition to the protective function, it also acquired an aesthetic one.
One of the ways to protect and decorate the territory, which has survived to this day, is wattle. A hedge often decorates dachas, country houses. Consider its features, varieties, as well as technology, how to build a wicker fence with your own hands.
Living fence: advantages and disadvantages
Installing a tyna has undoubted advantages:
- environmental friendliness;
- colorful appearance;
- the possibility of building a structure with your own hands;
- small cost.
But hedges also have disadvantages:
- performs a predominantly decorative function, does not provide reliable protection of the site from the penetration of third parties;
- short service life;
- the complexity of repair and replacement of worn sections.
Despite the presence of shortcomings, a hedge is installed quite often, because this is a great way to give your site a special touch.
Varieties of tynov
To size
The hedge can be of various sizes. Do-it-yourself low fences are mainly used for decorating flower beds, in landscape design. Wattle up to 1 m high is used for zoning the territory inside the site, and high fences up to 2 m are used to protect the house and the surrounding area.

According to the manufacturing method
There is a vertical wicker fence, consisting of horizontal rods of the base, perpendicular to which the wattle fence is fixed. This method of making a tyne is interesting because the rods can be deepened into the ground, so they will begin to grow, forming a beautiful green fence.

But more common are wicker fences with a horizontal arrangement of rods. This arrangement of the vine makes it possible to form various patterns from it.

There is also oblique weaving, in which the rods of the fabric are fixed between the stakes of the base diagonally. In this case, the vine can be directed in one direction, or in different directions, forming rhombuses. These wicker fences look very chic.

According to the materials of manufacture
For the manufacture of wicker fences, flexible material is used - vine, hazel, willow. It allows you to form openwork canvases, all kinds of pigtails with your own hands. For the manufacture of hedges, all types of vines are used, but the most suitable are benotal and krasnotal (willow).

A wicker fence can also be made from cattail, or reeds. The stems of these plants are attached vertically in bunches. Therefore, before forming such a fence, the stems of reeds / cattails are cut and knitted into small sheaves 4-5 cm thick.
note: fences made of reeds and cattails are the most short-lived. Their service life is maximum 3-4 years.

For the manufacture of a fence woven with your own hands, you can also use boards, veneer. They can be mounted vertically or horizontally, forming dense webs with virtually no gaps. Such a tyn is bilateral and is used only for fencing the site.

Since the wooden elements of the base of the wicker fence rot over time, they can be replaced with more durable materials - stone, iron. They are perfectly combined with wood and give the structure reliability and monumentality.

Recently, woven PVC fences have become popular. They are more durable than wooden ones, because they are not afraid of bad weather, pests. The PVC fence consists of separate sections that you can simply assemble with your own hands.

Wicker fence manufacturing technology
To make a tyn with your own hands, you will need a minimum of materials:
- vine;
- stakes;
- wire;
- a hammer;
- shovel;
- sand.
Before building a wicker fence, you must first prepare twigs of vines or willows with your own hands. It is better to do this in late autumn, when the plants stop growing, but the movement of their juices is still ongoing. Vines of the same thickness should be selected - 2-3 cm. The shoots are cut at an oblique angle with a sharp knife.
Attention: the more complex the wattle pattern is, the thinner the rods should be. It is preferable to choose annual branches that bend well.

Plot marking
To prevent rotting of the tree, it is better to make drainage before weaving the fence - dig a trench up to 50 cm deep with your own hands and fill it with sand. Further along the perimeter of the structure, vertical racks - stakes are hammered. They are placed at a distance of 0.5 m from each other, digging in to a depth of 0.3-0.4 m. Previously, the lower ends of the stakes should be treated with an antiseptic to protect them from decay.
Important: the base stakes must support the weight of the wicker fabric, so the thicker the vine, the thicker and stronger the supporting posts should be.

Weaving
15 minutes before the construction of the wicker fence, the rods should be soaked in warm water. So they become more flexible and pliable. They can also be given different shades. To do this, they should be cleaned of bark and treated with hydrogen peroxide (to whiten the rods), stain (gives a shade of wenge oak), potassium permanganate (gives a brown-red tint), a solution of ferrous sulfate (creates a gray-brown tone).
Next, you should decide on the weaving pattern for the fence. It can be performed in a checkerboard pattern, diagonally, vertically. The vine in the canvas can be located freely (tyn with clearance), or tightly (deaf weaving).

Do-it-yourself weaving of tyna starts from the bottom. Alternately, row after row, the rods are laid behind the pegs of the base. Along the edges of the vine, the vine can either be cut evenly, or the last peg can be braided with it, leading into the next row.
Tip: A woven fabric can be further strengthened with wire.

So that the ends of the rods can be carefully cut, they are released at a distance of 15-20 cm and the vine is cut with a sharp knife. Having formed several rows of wattle, they can be slightly compacted by tapping with a hammer. If the vine is not cut off at the edges, but braids the pole, then the last rod should be carefully wrapped around the peg and hidden in the previous rows, fixed with wire. The finished fence can be painted or coated with a special compound that will protect the structure from environmental influences, so your wicker fence will last much longer.

hedge decoration
By building a tyn with your own hands, you will give originality to your site. You can add a special color to it with the help of various decorations. Clay pots and jugs can be used to decorate a wicker fence. They are put on top of the stakes.
Landscape design elements such as a decorative cart or a wheel from it, cut stumps, stones, pumpkins, sunflowers or other tall flowers are very beautifully combined with such a self-built fence. Climbing plants (clematis, petunias), beautifully braiding the tyn, will add romance to the structure. A garden plot fenced with a fence can be decorated with sculptures, create an imitation of a bird's nest, build a gazebo. This will complete the landscape.

A wicker fence can be an excellent fence and decoration for a summer house, a country house. It will ennoble the yard, give it a special flavor. For the construction of the fence will need a minimum of materials. After a few years, the building can be updated, and the decorative tyn will continue to delight you with its beauty.
At the moment, there are a huge number of different types of fences: with decorative elements or simple fences. One of the decorative types of fence is a wattle fence (in Ukrainian it sounds like “tyn”). Making such a fence with your own hands is not difficult, although somewhat time-consuming.
Wicker fences with their own hands. A photo
The main advantage of a wicker fence is not in its size (it can be anything: high or low, as well as any other type of fence), but in its appearance. So There are two main types of weaving:
- vertical. The rods (vine) are intertwined from the bottom up, which allows you to make a really high and unusual fence of the desired size. In addition, there are craftsmen who not only weave standard patterns, but also make unique and original braids, patterns, drawings.
- Horizontal. The vine can also be woven to any height. But most often the horizontal type of weaving is used for low decorative fences. For example, for flower beds.
In these photos you will see what wattle fence (wicker fence) you can make with your own hands on the site of your house.


In addition to the standard vine (grape, willow, rose or reed), they often use wooden flexible slats. A fence made of this type of wood turns out to be solid, dense, with virtually no gaps, which makes it a good external fence for the perimeter of the site. The most important thing is that any wicker fence looks the same from the outside and from the inside.
Among modern materials there are also polyvinyl chloride (PVC) panels designed for weaving hedges. The advantage of artificial material is that it is the most durable, copes well with the aggressive effects of natural anomalies (be it bright sun, or prolonged rain, snow, wind), and is not susceptible to the appearance of pests.
In addition, it is several times easier to mount than a natural wood vine or rail.
How to make a wicker fence with your own hands
 How to weave wattle with your own hands? First of all, you need to decide what type of material will be used. So PVC vines can be mounted at any time of the year, without prior preparation. If the choice fell on natural material: willow, reeds, grapes, rod, then it must be carefully prepared.
What is needed:
- Stakes with a diameter of 5-7 cm. The budget option is pine. But in terms of its properties, this is not the most durable type of wood. Oak is a durable, but financially expensive material. Regardless of the type of stakes, they must be treated with a special compound for wood (from bark beetles, mold, and also refractory).
- rods for weaving with a small diameter (3-4 cm) even and smooth. It is better to harvest them from the fall, when the growth of plants has already stopped, but the tree sap is still preserved in them. Such rods will be flexible and durable, will not break during installation, and will provide easy weaving. They also need to be treated with a special compound.
Regardless of the type of weaving (horizontal or vertical), it is required to drive the stakes correctly. If artificial material is used, then the stakes are simply driven in or dug into the ground in increments of half a meter. If the stakes are made of natural wood, then it is advisable to pre-drain the soil.
Drainage under the stakes of the wicker fence:
- Dig holes 40 cm deep for stakes.
- Pour in some unsifted dry sand.
 This will keep the wood from rotting quickly. Why is it better to use a step of half a meter between the stakes? This is optimal distance, since this way the fence will not sag, they will tilt. In addition, it is easier to weave a vine, creating any ornament and pattern.
After the stakes are dug in, you can start weaving rods. To make them more flexible, their ends can be dipped in salted water for a few minutes. For horizontal weaving, it is enough to simply twist the rods between the stakes. For a vertical one, it is required to weave several rods horizontally at an equal distance, and then proceed to weaving vertically.
It is desirable that the ends of the rods did not touch the ground(Retreat at least 1-3 cm). So they will be less prone to decay.
If a tight fence is required, then the bars should be pressed as close as possible to each other. So they will not let in a lot of excess light, providing a strong fence. The uneven ends sticking out behind the stakes can later be cut evenly with a secateurs or a small hacksaw.
For braiding from rods, it is better to opt for reed vines, since it is the thinnest and most flexible. A willow vine of small diameter is also suitable for this purpose. A braid can be woven with one, two, three or more rods, depending on skill. It is recommended to first weave the braid, and then weave it between the stakes.
In this video you will see how to weave wattle with your own hands.
In the future, the finished fence can be dyed in any desired color. For example, wood varnish or facade paint. But most often the natural look is the most acceptable.
The lacquer will create additional protection against aggressive natural effects, as well as give additional shine to the structure.
We also recommend
 Productive and reproductive thinking
 Reasonable egoism - what is the theory of reasonable egoism?
 Boris Nikolaevich Yeltsin, the first President of Russia
 Underground fights. Underground kings. What is “fighting not for the masses”? Where can you fight for money?
 Yakov Pavlov and Other Heroes of Stalingrad You Need to Know
 Survive an accident at sea in a dream - in reality experience a new love