How to make bathroom shelves your own. Bathroom shelf - the choice of material and a stylish combination with accessories (106 photo ideas)
A full-fledged operation of the bathroom is impossible to imagine without the presence of various plumbing fixtures and accessories that optimize space and make our life easier. The most popular items in the bathroom are all kinds of shelves and cabinets. Sometimes there is not enough money to purchase all these accessories or the products on the market do not fit a particular space in size or design.
There is always a way out! You can make such products with your own hands, taking into account the individual characteristics and specific dimensions of the room.
Of course, we cannot do without a competent drawing, the necessary tools and materials. Therefore, first of all, it is necessary to decide what type the future product will be (straight, angular, built-in, closed or open), and from what material (wood, glass, drywall and others). Depending on this, the following tools may be needed:
- puncher or screwdriver (screwdriver);
- level and tape measure;
- saw for wood (metal);
- a hammer;
- blanks from the selected material;
- mounts and brackets;
- screws, dowels and corners;
- for wooden shelves - primer, paint, varnish;
- various additional details (hooks, moldings, holders) and other decorative components.
This list is not exhaustive; in each case, completely different fixtures, materials and fittings may be needed.
How to make a shelf in the bathroom with your own hands?
Regardless of what the future product will be, there is a general algorithm for the sequence of actions:
- The material from which the product will be made is selected, having previously studied all its operational characteristics.
- A plan for the upcoming work is being drawn up: it is necessary to make a sketch of the future design, in accordance with which all the necessary materials and tools are purchased.
- Work on the processing of the material: the creation of fasteners, the addition of prepared accessories.
- Mounting the shelf in the selected place and checking the stability of the product.
Photo of the original shelves in the bathroom, made by hand
 Shelves-banks
  From a mosaic
  Hanging on twine
  From old boxes
  Embedded
  wicker baskets
  floor version
From wood, fiberboard and MDF
Choosing a tree as a material for the future, you need to remember - it must be of the highest grade. The future product will consist of rails interconnected by small square blocks.
Before starting work, it is necessary to make blanks from wood or MDF of the required length and quantity (the wider the product, the more rails will be needed). Then you need to prepare the appropriate tool for wood (carpentry kit, wood screws, dowels for attaching the shelf to the wall, special glue, paint or varnish).
Let's start installation:
- On each rail, marks are made along the edges with a construction pencil.
- With the help of special glue, blocks are planted on the marks, which must all be the same size.
- Marks are also made in the center of each block, on which holes are drilled (simultaneously with the rails) using a drill.
- The design is assembled into a single whole. To do this, you will need long screws that are pushed into the holes and screwed in with a screwdriver.
- After assembling the structure, it must be fixed to the wall. But before that, the product can be given a noble look by treating it with varnish or special paint. To install the shelf, you will need to prepare a level and tape measure. After accurate measurements and markings on the wall, it is necessary to drill holes and insert dowels into them. In order to carry out the installation of the shelf, you will also need special fasteners installed on the structure itself.
This version of a wooden product is perfect for a room with high humidity, since liquid will not accumulate on it. So, how is a do-it-yourself corner shelf made in the bathroom? Read more about this.

corner type
If the bathroom has a free corner, then you can make a small one. Materials for its self-production can be: wood, chipboard. It is necessary to make an angular structure in two successive stages:
- We prepare the details. The selected material must be at least 6 mm thick. To begin with, the middle is marked on a sheet of paper and a circle is drawn. The radius is selected depending on the size of the shelf. Then you need to attach the circle to the workpiece and cut it out with a jigsaw. The circle is divided into four identical parts using a square, each of which is cut with a hacksaw. The result should be four corner shelves.
- We make grooves in the rail. A wooden rail should be attached to the corner where the future shelf will be located. Then the boundaries of the upper and lower shelves are marked. The middle shelf will be placed in the middle, so you need to measure the same distance. After all the markings have been made, it is necessary to make grooves into which the shelves will be inserted. To do this, attach a shelf and outline with a pencil on both sides. According to the indicated marks, a cut is made, the depth of which should be no more than half of the rail. Cuts are made for each shelf, which should be difficult to enter into the grooves. Similar actions must be done with the rest of the shelves. You can sand the edges if necessary.
- Installing the corner shelf. There are several mounting options. First: using mounting bolts. Second: mounting on mounting glue. To do this, you need a special glue, with which the wooden lath will be connected to the ceramic tile. A layer of glue is applied to the back surface, and so that the rail does not slip, you can use double-sided tape, which is glued in three places - at the bottom, at the top and in the center. After the glue dries, the shelves are installed in the sawn grooves.
Before mounting the shelves, they can be treated with moisture-resistant paint or a special film. This will make the product more durable. You can show your imagination and use various decorative elements or restrictive sides.
The following video will not only tell, but also show all the stages of making a corner shelf in the bathroom with your own hands:
From glass
If the choice fell on glass, then it must be remembered that the material must be at least 5 mm thick. You can purchase ready-made glass of the required dimensions, or you can order sawing and processing in a special workshop. In addition to the usual transparent glass, you can find material with a matte finish, in various colors and with a variety of textures. On their own or in the workshop, the glass is cut into the desired size and shape. It is also necessary to process the edges of the glass to avoid possible cuts.
Given the thickness of the glass and further operation, decorative brackets are selected. You can find small-sized holders or in the form of profiles. There is a wide range of such accessories on the market.
Brackets vary depending on the type of attachment:
- with glass drilling (for wide shelves in which it is necessary to make a hole for the bracket);
- without drilling (suitable for shelves that have a width of no more than 20 cm).
After that, the shelf holder must be fixed to the wall with a drill, and then the prepared glass should be placed and fixed into it. For more reliable fastening, you can use rubber gaskets. And to prevent items from falling off the shelf, you can install a decorative limiter along the edge.
How to make drywall shelves in the bathroom with your own hands, you will learn further.
The following video will tell you more about the process of making glass shelves with your own hands:
From drywall
The production of a shelf from this material is one of the most labor-intensive and inexpensive options. In addition to the drywall itself, you will need special profiles for fastening, which can be purchased at any building materials store (CD and UD). With their help, it is necessary to construct a skeleton, and fasten it with special self-tapping screws.
If drywall is used in the decoration of the walls of the bathroom, then you can immediately make niches for small shelves in which all accessories will be stored. However, the material itself is not resistant to moisture, therefore, after mounting the frame and lining it with drywall, it is necessary to use another finishing material, such as ceramic tiles.
A plasterboard shelf can be supplemented with glass shelves that are mounted on decorative holders. An additional decoration of such a shelf can be LED lighting, for fixing which you will need an aluminum profile.
Finally, we will talk about how you can make built-in shelves from tiles, wood and other materials in the bathroom.
The following video will dedicate you to the intricacies of making shelves with your own hands from drywall. Believe me, your bathroom will look amazing with them:
Built-in product
This type of shelves is made in a wall niche or under the bathroom.
- In the first case, the best option is to make plasterboard shelves, which are then finished with ceramic tiles. How to make a frame and drywall shelves was discussed above.
- For the manufacture of built-in shelves, you can also use glass or wood, and use special holders to install them in a niche.
- Shelves can be built into the space below the bath, which are covered with a special screen. For their device, you can use ready-made ones that are attached to the side walls. Thus, it turns out a full-fledged locker in which you can store household items, household chemicals and other accessories.
- There are other options for arranging shelves on your own, which can be found on sites dedicated to products and accessories for the bathroom. The main thing in this business is not to limit yourself to simple solutions, but to find a fresh idea and bring it to life!

Sometimes, in order to make your interior design exceptional, it is not at all necessary to resort to the services of expensive specialists or buy exclusive and expensive furniture. After all, the interior design of a room is not a routine task, but the most creative process of transforming space. Therefore, sometimes, to give a room a certain individual style, the most ordinary and ingenuous objects are enough, which with their presence will dilute the monotony of the interior, making it more dynamic and functional. Such elements are - racks and wall shelves, when choosing which it is only important to take into account the harmony of their shapes and colors with the surrounding interior, while not forgetting about their main functional purpose.
DIY bathroom shelves. Quick guide.
The moment has come when the repair in the bathroom has already been made, the old plumbing has been replaced with a new one, the furniture and the washing machine have taken their places. But the impression of incompleteness remains, or vice versa, everything seems to be arranged, but suddenly it turns out that there is not enough space for storage. It is not very convenient to use a cabinet or cabinet just to brush your teeth in the morning or get soap. For these purposes, there are shelves for the bathroom.
In this, of course, they have no equal. The most common and most convenient option - the shelf can be placed above the sink, and at the same time with a mirror. There are such options for mirrors along with a shelf. In general, it can be placed in a variety of places, the most suitable for a particular bathroom, in order to ensure a more comfortable pastime in the bathroom. In addition, this is not only an additional place to store all kinds of vials, bottles and vials, but also an additional accessory to your bathroom. And if you also add a backlight to the shelf, everything will look original.
You can beautifully complement the interior with an unusual shelf. You can make it yourself, and it will definitely not be difficult to install it. This will require:
- Roulette.
- Pencil or marker.
- Drill.
Mark the mounting points on the wall, check that the mountings are at the same level. Drill holes, insert dowels and fasten fasteners. Now you can install the shelf directly.
Types of shelves for the bathroom with a photo.
Today's market provides a huge range of bathroom furniture and accessories, and shelves do not lag behind in this variety. Of course, we understand that when choosing a shelf, as well as when choosing furniture, you need to follow the basic rules: the shelves must be made of high-quality materials that will not be susceptible to moisture and large temperature changes. Main options:
- metal;
- wooden;
- plastic;
- glass.
The difference can be not only in materials, but also in the types of shelves, the way they are installed and the way they are used. By their type, the shelves are:
- fixed and removable;
- wall and corner;
- floor and hinged;
- open and closed;
- under the sink and under the bathtub.
How can you not get lost in this diversity and make the right choice. Very easy. Answer yourself a few questions and you will be able to make the right choice. What function will your shelf perform, purely decorative or direct practical use? Which shelf is the most suitable for the design of the room? Where should a shelf, wall or corner be installed? What is the room size? For example, for a very small space, glass shelves are very well suited, they create the effect of soaring and weightlessness. But, and if you try to make a shelf for the bathroom, see the options in the photo, with your own hands, then in any case it will turn out to be exclusive.
This accessory has entered our lives so tightly that it is impossible to imagine any apartment without shelves, and even more so a bathroom without a shelf. It is this room that needs it the most, because due to it we increase the functionality, bring a share of individuality and saturate our favorite bathroom with comfort.
DIY bathroom shelf
Hello to all homemade ones, the bathtub in every home should be with a convenient shelf so that you can easily get the right towel, soap and other accessories. It is in this article that I will tell you how the author made a convenient shelf for accessories in the bath. A lot of materials are not needed to assemble it, all the details can be made from the remains of wooden planks or chipboard sheets that most people have.
In order to make this shelf, we need: * 2 boards measuring 200 x 200 mm, the material can be either chipboard or wood, in this case it will be the sides. * 1 board measuring 200 x 400 mm, which will serve as the back side. * Chrome-plated pipe with a diameter of 19 mm and a length of 410 mm. * Strong glass 5 mm thick, 180 x 400 mm. * Dowels. .* 2 key brackets and 20 mm screws.
You will also need tools, you can’t do without them: * An electric jigsaw for cutting steel, in this case, you just need a saw blade for metal instead of the one for wood. * Electric drill * Quick clamps, or rather clamps, you can also use a vice. * Drafting tools such as tape measure and pencil.
That's all the details with the tools are ready, first we put on a dressing gown for protection, and also protect ourselves with goggles from accidental ingress of chips or other possible particles. Well, now you can definitely start the gradual manufacture of homemade products.
Step one. First you need to cut a sheet of chipboard or wood, we do it with a jigsaw, for greater evenness it is most convenient to use a special stop that rests on the flat side of the board, which ultimately guarantees an even saw cut. You need to saw off the details according to previously measured data, which you need to estimate according to the size of the wall, so that it does not look bulky and not small. On the ends you need to glue the edge, which will close the saw cut and hide from the eyes those same glued chipboard chips.
Step two.
Now let's move on to measuring the details, it will be better to measure in this case with a tape measure, since the length of the next workpiece from a chrome pipe is 410 mm, it is at this mark that we put a dash with a pencil, and then, having installed a metal file in a jigsaw, (this is done in two counts , using a hex wrench at the base of the tool) we saw off the future part, which in turn is firmly clamped on the workbench with large clamps. If there are no clamps, then a vice will do, only before clamping the part, it is necessary to wrap it with some soft material, for example, a rag, in order to leave the workpiece without noticeable dents and similar defects. Working with a jigsaw is very unsafe, so wear safety glasses, as well as protection for your hands, whether it be gloves or special mittens.
Step three.
Armed with a tape measure, we measure 20 mm from the edge on both sides, and then holding the drill in a screwdriver, we drill a hole where we will later install a chrome pipe, but we do not drill through, but leaving a small wall thickness.
Step four.
Making grooves is not an easy job, but an edge groover will help us in this, which makes even grooves with good accuracy, they must be done in the side and rear sections.
In the absence of this tool, you can use a more common method, namely fixing on spikes, they are made easier, and in small quantities they will not take much time. Before the next step, check the coincidence of the sections to each other, if everything is fine, then move on.
Step five.
Now you need to set the depth of cut to the size of the dowels, then apply glue to glue the wood into the cut slots.
Step six.
We insert the finished dowels in one direction, and then assemble the parts together, installing them in the grooves smeared with glue.
Excess glue will most likely come out, but this is not a problem, since in this case it will even be better, due to the fact that there will be a part in this place.
Step seven.
On the other hand, make inserts for the chrome tube before installing the side section, after installing the sides, you can finally clamp the entire structure until completely dry, which is usually 24 hours.
Step eight.
Since the shelf will not stand on any surface, but hang on the wall, it is necessary to think over how it will be held on the wall, you don’t need to think for a long time, this method is called mounting on brackets, which needs to be done in our homemade product . To install the bracket, mark with a pencil the future location of the brackets on the back wall.
And finally, you need to install a glass shelf.
On this do-it-yourself bath shelf is ready, thank you all and good luck with your homemade products.
Store assortment
A towel rack is not only a useful device, it is also an element of decor in the bathroom. It is important to buy not only the option that you liked the most, but also select it for the overall interior of the room. An important factor in the choice is the material from which the shelf is made.
Attention! The material from which the shelves are made must withstand the effects of high humidity and temperature changes.

Manufacturers offer shelves for towels made of:
- Plastic is the lightest and most affordable option, but it is also the most fragile.
- Glasses or mirrors are a little more expensive, but they do not add heaviness to the interior and are more reliable. They are easy to care for, just wipe the surface with a glass cleaner. Glass shelves never get moldy.
- Metal. It is good if stainless steel was used for manufacturing, then the product will serve for a long time. Such interior elements also serve for a long time, but are slightly more expensive than the previous version.
- tree. Not the most practical, but expensive choice. Wooden surfaces should be covered with moisture-proof varnish and this procedure should be repeated regularly. Otherwise, the shelf will quickly become unusable. The mold that has appeared is difficult to remove, and the towels will have an unpleasant smell. In addition, it is dangerous to health.
- natural stone. Such shelves for towels are made only if the bathroom interior has other stone details (countertop, sink).
Installation methods
Bathroom shelves and installation method differ:
- Corner - well suited for installation above the washing machine, toilet or cabinet, saving space on the floor.
- Floor - placed on any free space on the floor. Suitable for large bathrooms.
- Hinged (wall-mounted) - like corner ones, free space on the wall above another piece of furniture is used for installation. Sometimes hanging shelves are also attached to the bathroom door.
Everyone wants to make the design of their apartment, and in particular the bathroom, original. To do this, you do not need to buy expensive designer decor elements or furniture. Warmth and comfort are given by things that are made by hand. And it's also a good way to save money.

Using improvised materials, you can make cute bathroom shelves that can store both towels and personal hygiene items.
Glass or mirror shelf
An excellent option for self-production is a glass shelf. To do this, you need to buy several pieces of glass or a mirror of the right size in a hardware store.

The width of the material will be the width of the towel shelf. You can choose ordinary transparent or colored, smooth or textured glass.
Attention! The thickness of the material cannot be less than 4 mm. Otherwise, the shelf will be too fragile.
In the same store, you also need to choose brackets - the details with which the shelf will be attached to the wall. Pay attention to how the glass will be fixed in the fixture. There are two options.
- When holes are made in the material. Suitable for fixing shelves with a width of more than 20 cm. This method of fixing is more reliable.
- Without holes, when the glass is strongly clamped in a special retainer. Suitable for small shelves.
Now let's assemble the interior element. We fix the glass or mirror in the bracket in the chosen way. Holes are made in the wall for the dowel. First, install the dowel, then fix the core (nail, self-tapping screw). Now we hang the shelf.
Types of shelves
The variety of types of shelves today is very large. If we take as a basis the material from which the shelf is made, then they can all be classified as follows:
- Glass and mirror;
- Wooden (chipboard, MDF, plywood);
- Polymer and plastic;
- From other materials combined with each other.
If we take as a basis the design, appearance, structure and method of attachment, then we can distinguish the types:
wall
Wall shelves supported by other stable furniture or floors. A positive feature of such shelves is that their special design allows them to withstand a sufficiently large load, which makes them indispensable helpers in the house when you need a place to store something large and heavy.
Most often they are used for all kinds of equipment or for storing shoes in the hallway. These shelves take up a minimum of space, which is also a positive feature, especially for small apartments.


Classic (rectangular)
Classic rectangular wall shelves are attached directly to the wall. The advantage of this structure is that both internal and external surfaces can be used. The back wall may be missing, leaving the wall open.
Upstairs you can put various interior items: vases, clocks, photographs, lamps, books, nightlights and figurines. It is these shelves, due to their functionality, that add coziness to the apartment.


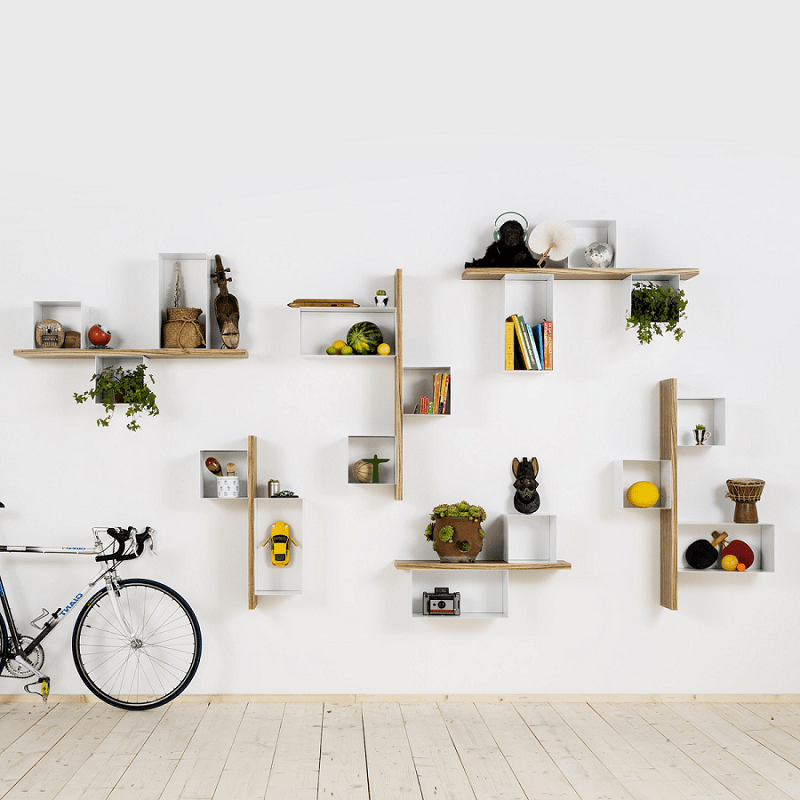
Multi-tiered
Tiered shelves on the wall look very original, and also combine many different functions. This type of shelves can combine a combination of various horizontal, vertical and inclined planes, which is very convenient in everyday life.
However, they often make just the same horizontal planes, which, firstly, have no less beautiful appearance, and secondly, are very functional. In this case, you should give free rein to your imagination to make something both comfortable and beautiful, corresponding both to your preferences and to the surrounding interior.


corner
Corner shelves make it possible to use all the empty corners in the apartment. Most often they are used in bathrooms, but this type of shelves can be used anywhere. They are reliable and stable. They can even be made transparent, which will look very modern.


The use of shelves in the interior
Wall shelves have integrated into our lives so much that it is already difficult to imagine life without them. There is no such place in the house where they would not find their application. People put them on the floor, hang them on the ceiling, screw the shelves to the wall, mount them in cabinets, build them in chests of drawers, install them in mezzanines and other hard-to-reach places. After all, shelves are not only an elegant decoration of the interior, they are also an additional place for storing things, which is always lacking.
In addition, beautiful shelves in the interior will help to correctly place accents in the room, emphasizing its overall flavor. They will look even more attractive if they are equipped with additional lighting in the form of an LED strip that emits soft light.


There are no special rules where it is necessary and possible to place shelves. They can be installed anywhere. However, it is still desirable to take into account the functional purpose of the room:
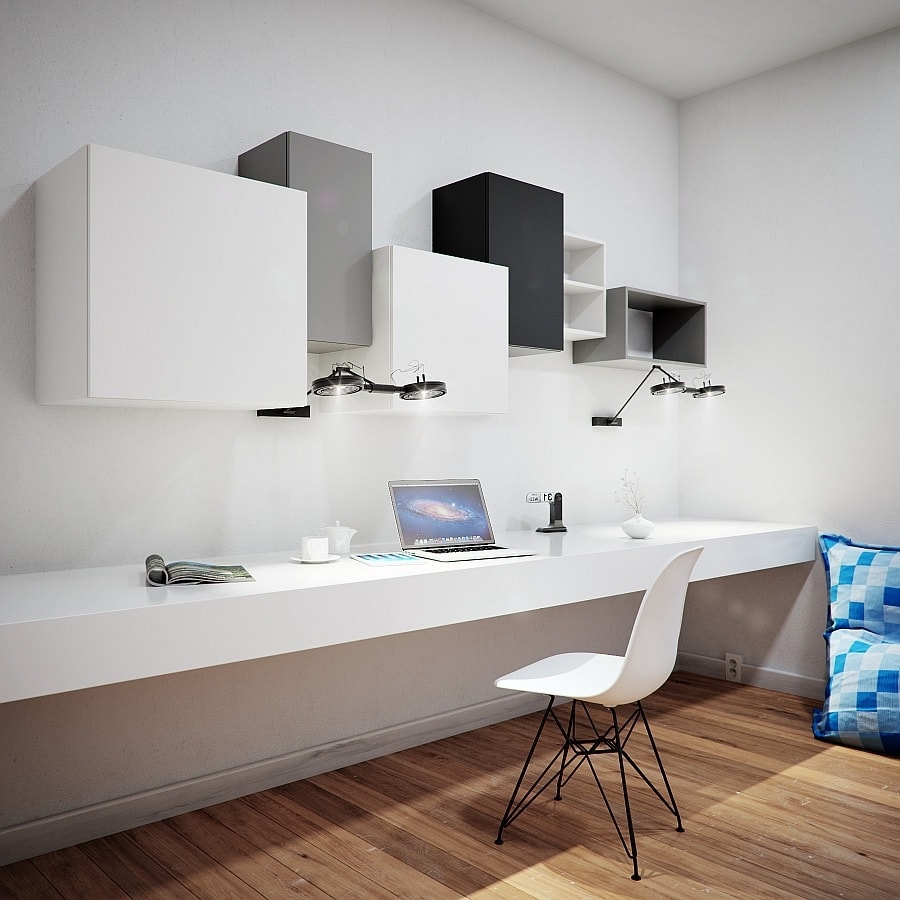
- If this is an office, then it is advisable to install them above the table, within the reach of an outstretched hand, so that if necessary you do not have to constantly get up from your chair.
- The same way of placing shelves is suitable for the kitchen. Only in this case it is better to use open shelves, as every housewife loves to have everything in front of her.
- Designers advise installing wall shelves in a nursery or bedroom near the bed or above it. Thus, you can dilute the empty space of the wall.
As mentioned above, in addition to the functional benefits, it is necessary that the wall shelves also bring aesthetic pleasure. To do this, you can place your favorite books and magazines on them, arrange photos of smiling relatives and people close to you that will give you pleasant memories and warm feelings.


Shelves are a decorative element of household use, the main task of which is to decorate the interior. This item always attracts attention, so it is very important that the things placed on them are correctly and neatly arranged.
- If you want everything to look harmonious and tasteful, things must be arranged in a certain order. For example, large items should not be placed next to small ones, they are best placed separately and preferably higher, while small items will look great on the lower tiers of the shelf.
- We must not forget about the right combination of colors. Each element must strictly correspond to the general style of the room. Bright colors should not spoil the interior, but rather complement it, competently bringing the color palette of the room to perfection.
- Shelf space must be used both in height and in depth. Taller items should be placed behind lower ones, while functional items should be placed in the foreground. However, you should not clutter up the space too much, so as not to create a heavy feeling of an overabundance of decor. Ideally, the ratio of free and occupied space should be 50 to 50%.


Also, do not forget about the option of symmetrical placement of items on the shelf. This method allows you to achieve the desired effect of a certain completeness of the interior. Types of home shelves.
Wooden shelves and racks
Fashionable and modern wooden shelves have long been replaced by huge and uncomfortable racks and cabinets. These fashionable and practical elements fit perfectly into the design of any room. They go well with any style of interior, are easy to use and maintain, and are also a great place to store things.
Wooden shelves will become not only a beautiful addition to your interior, but also an essential attribute of modern life.
Buy or DIY
Today it is not difficult to buy a ready-made hanging shelf both via the Internet and in any furniture store. The advantages of such a purchase are obvious:
- No need to waste time making your own wooden shelf;
- You can buy certified high quality products that will last a long time;
- You can pick up a rack, wardrobe or bed in the same color and design, since in stores hanging shelves are usually a separate element of a furniture set.
- You can immediately choose the required size and height of the shelf, thereby gaining confidence that it will withstand the load you need.
However, not everyone will like the store shelf, many prefer to make it on their own in order to get an original and unique thing.
Making a wooden shelf with your own hands is not difficult, especially since today there are a lot of ideas and master classes on the Internet.


Master class for making a wooden shelf
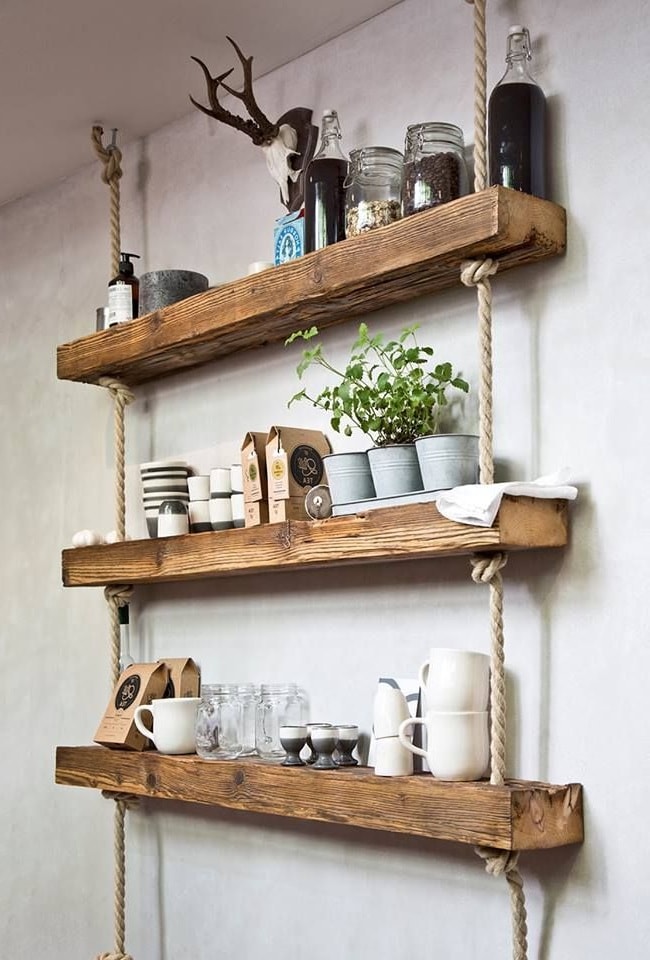
There are models of hanging shelves that you are unlikely to find on the Internet - these are wooden shelves made from scraps of boards or bars, for which a piece of rope serves as a fastener. They look very stylish and unusual in the interior. Here are the two most popular ways to make them: First option:
- We cut the board to the desired size, process it with a grinder, cover it with varnish or paint.
- On the sides on both sides at the same distance with a drill, we make one hole with a diameter equal to the diameter of the rope, on which our shelf will hang.
- We thread the ends of the rope or rope into the holes and tie reliable tight knots so that the board holds on them. We fix the shelf in the chosen place.
Second option (multi-tiered):
- As in the previous case, we prepare the boards, this time there will be at least two of them. We will also need small bars of different sizes and thicknesses, they will become the side walls of the future model.
- To the bars from above and below, using self-tapping screws and special wood glue, we fix the main boards. Then we give our workpiece some time to dry. The first tier of the structure is ready.
- In a similar way, using the same material, we make the remaining cells of the future shelf. We carefully monitor that the inner corners are right.
- After the required number of elements for the shelf are collected, using a rope or a metal chain, we connect them together. The final step is to install the wall mount. A carabiner or an anchor bolt with a hook is best suited for these purposes.
As you can see, there is nothing complicated here. Shelves can be painted to match the color of the furniture, stained or decorated with decorative elements to your liking.

How to choose the right shelf
Agree, hanging shelves in the interior always look spectacular. If, of course, you pick them up correctly and place them in the right places where they will look good. Now, fortunately, the choice of shelves is huge and their variety is simply amazing.
The shelf is not only useful and necessary furniture, but also a great design element that can bring beauty to the house.
In order to make a choice, let's remember what types of shelves exist:
- One of the most popular shelves is wall mounted, which is attached directly to the wall;
- Also popular is the corner shelf, which is placed between two walls. This saves space in the room;
- Floor shelves that are placed on the floor are also very effective. And if they are also on wheels, then they can be moved, removed or rearranged at the right time;
- No less popular are hanging shelves, which, using a variety of chains, cables, belts, are attached to a wall or ceiling.
- Folding shelves are also a great way to save space, as they can be folded if necessary.
- Shelf-table, the name speaks for itself, can take two forms: the table itself and the shelf. This is a great option for a small room.
- If the area of your room allows you to use more space, then shelving is perfect here.
Yes, as you can see, the variety of shelves is great, and there are quite a lot of them today. You just have to decide on the type of construction. Most importantly, do not clutter the entire room with shelves. They should go well with the overall look of the room in which you plan to hang them.


If you need shelving for storing important things: books, documents, photographs, then try to make them stable and strong. Especially if they are intended for children.
Shelves in this case should not be placed too low, as children are very active and mobile. Also, do not opt for glass shelves. And their corners should not be sharp.


As for the choice of shelves in the living room. Here you can give free rein to your imagination. Tetris shelves, shelves of unusual shapes, spiral shelves, frame shelves will look good here. In the bedroom, you can get by with the usual classic shelves. Most spectacularly, they will look over the bed, where you can put family photos.

For the kitchen, it will be better if the material from which the shelf is made matches the material of the countertop. This will give the kitchen space its own specific style and grace.


Video: beautiful shelves in the interior
As you can see, there are plenty of types of shelves and their shapes, so the main thing is not to overdo it, but to focus on quality and durability.
The main thing to remember is that the shelves on the wall should look very good in the room for which they are intended. But no one forbids you to bring something new and unusual to their design. After all, with a good choice of wall shelves and racks, your room can sparkle with new colors.
A do-it-yourself bathroom shelf can be made from different materials, the most popular are glass, wood and plastic. It is also easy to implement both ordinary wall shelves, and corner or built-in niches to save space. In this case, the choice will depend on your desires and the possibilities of the bathroom. But no matter what you choose, there will be general points in the question of how to make a shelf in the bathroom, which we will consider below.
Glass bathroom shelf
DIY glass bathroom shelf is one of the easiest options to create. In addition, it is a beautiful and very suitable interior element for the bathroom.
- To implement them, first of all, you need to decide on the size of the shelves and the place where they will be located.
- Having decided on the size, it remains to order pieces of glass from the glazier, or cut it yourself. You can also buy ready-made glass shelves in the store, thus immediately resolving the issue of safety, since they are made of special shockproof glass.
Tip: If you decide to do everything from start to finish with your own hands, you can get by with ordinary glass. For safety, it is enough to paste over it with a special film.
- It remains only to securely fasten the glass shelves. For this, special glass holders are usually used. Such fastening of shelves in the bathroom can be ordinary or with a decorative finish. They are mounted at the same horizontal level, across the width of the shelf using dowels.
Wooden shelf in the bathroom

A do-it-yourself bathroom shelf made of wood is also a fairly simple task. The main thing is to make sure that the material is well protected from a humid environment. If there is a choice of wood, then it is better to take boards from moisture-resistant wood species. If this is not possible, then the moisture resistance of the material can be organized independently by such methods as:
- Using ordinary paint, applying it in several layers;
- Moisture-repellent varnish;
- Use of self-adhesive film.
This board finish can also be an excellent decor, but the most important thing in this process, for any of the options, is to sand it well and degrease it.
Having prepared the materials for the shelves, you can begin to mount them.
- To do this, you can use special metal holders for shelves in the bathroom, which are shaped like the letter "G". It is enough to choose their size correctly - and home-made shelves in the bathroom will be securely fixed, and they will look harmonious.
- There is another option for mounting a shelf in the bathroom. It is more mobile, although it will take more wood material. You can execute it by fastening two horizontal boards on the sides with two vertical ones so that you get something like a cabinet, only without the back and front walls. At any time, this design can be moved to another location. It is also used when it is not possible to make holes in the wall, for example, if tiles are laid on it.
Fixing a wooden shelf

How to fix the shelf in the bathroom yourself?
- Before attaching the shelf in the bathroom, it is necessary to take measurements, noting the places of future fastenings. It is necessary to ensure that the finished shelf is located strictly horizontally. A verified eye or building level will help with this.
- The next step, before installing the shelf in the bathroom, is to mark the place of attachment on the wall. To do this, you need to attach the part with fasteners to the place where it will be located, and mark the places for the holes. Make holes in the marked places with a puncher.
- For tiled walls, at first this is done without shock mode, in order not to damage the tiles.
- Having inserted the dowels into the holes, we fasten the structure - and the shelf is ready.
Corner wooden shelf

A feature of this type of bathroom shelf is the need to resolve the issue of how to fix the shelf in the bathroom. In this, it has something in common with the above described model of attaching a wooden shelf, but in this case, the installation features are different. By design, the shelf will be angular, and will consist of four horizontal surfaces attached to a wooden vertical axis.
Before you make a shelf on the bathroom, you need to prepare horizontal surfaces. How to make shelves for this design:
- First, select a material. It can be chipboard, it is better to choose a thickness of at least 6 mm.
- We make a hole in a chipboard sheet with a carnation, using a thread and a pencil, we draw a circle, the center of which will be this nail. The radius of the circle will be equal to the desired length of the future shelf. Next, you need to cut this circle with a jigsaw or hacksaw and cut it in diameter into four even parts so that the angle of each part is 90 degrees.
- Before assembling the bathroom shelf, you will need to prepare the base for attaching the shelves. To do this, you need to take a wooden rail, attaching it to the corner where the shelf will be placed, mark the location of the topmost shelf. Further, dividing the rest of the space into equal parts, mark the places of the remaining shelves.
- Grooves for attaching chipboard sheets are best done with a saw with fine teeth so as not to destroy the rail. Along the lines marked on the rail, it is necessary to make two cuts up to half the width, then cut a groove with a knife or chisel. This method makes grooves for all four shelves.
- Before hanging a corner shelf in the bathroom, we try on the boards to the grooves; for a better connection, you can additionally grind the grooves of the shelves and rails.
- To mount the structure, you first need to attach the rail to the desired angle. The installation of the shelf in the bathroom is carried out using mounting glue. Glue is applied to the back side of the rail and attached to the wall, for greater reliability, for the drying time, you can glue the rail with adhesive tape or mounting tape.
- When the design is dry and secure, you can remove the tape and insert the shelves into the grooves, if they fit correctly, there will be no need to glue them additionally. This type of shelf is similar in design to a plastic shelf in the bathroom on spacers.
Conclusion
In order for all the necessary items and things to be in your bathroom at hand and, at the same time, not to create a mess in a small room, you should think about installing shelves in it. You can do it yourself easily and with pleasure.
In the bathroom, everything should be at hand: soap, toothpaste, shampoos, numerous jars of cosmetics and other little things necessary for hygiene, beauty and comfort. Where to place this whole set so as not to break the design and not clutter up a small room? A do-it-yourself bathroom shelf can be made from affordable and practical materials. It will become not only a convenient place to store bath accessories, but also a stylish element of room decor. Of the proposed options, everyone will find what he likes and can afford.
Do-it-yourself plasterboard shelves in the bathroom: step-by-step instructions with photos
If the idea to equip the bathroom with spacious “storages” came during a major overhaul, then you can include drywall shelves or niches in the plans. Using this easy-to-work material, it will not be difficult to get original and functional shelves in empty places - above the bathroom, in the corners, above the washing machine and toilet. The main thing is not to forget that only moisture-resistant drywall is allowed to be used in the bathroom.
Moisture resistant plasterboard for the bathroom
Drywall comes in various sizes: from 2 to 4-5 m long, and from 1.2 to 1.3 m wide. The thickness of this material varies from 6 to 24 mm. Consider the load that will be placed on the shelf and buy the appropriate material. To work on the installation of drywall shelves, you will need materials and tools:
- galvanized profile, preferably 50x25 mm;
 Types of galvanized profile
- guide rails;
- drywall;
- reinforced mesh for fixing putty;
- self-tapping screws;
- screwdriver;
- putty knife;
- level;
- primer.
This is an incomplete but basic list of materials you may need. After constructing a sketch, calculations and measurements, we proceed to installation.
 Dimensional drawing of a plasterboard ceiling shelf.
- The first step in building a shelf will be fixing the profile in accordance with the drawing.
 Fastening profile for drywall
- After fixing the profile, we create the frame of the structure, that is, we fix the guides.

Guides are longitudinal and transverse rails. Here again, you need to remember about the load on the shelves. If the load is not small, then the rails must be fastened carefully, and a jumper is inserted between the profile and the guides.
- The next step is to start fixing the drywall. First the top cover.
 We start sheathing shelves with drywall from above
- Fasten all other sides from top to bottom.
 Plasterboard sheathing
- We start finishing the finished structure with putty. The first step is to apply a reinforcing mesh to all joints and corners.
 Application of reinforcing mesh at the joints of drywall sheets
- Prime the surface evenly. Putty-primer will not only give the surface a uniform look, but also additionally protect against moisture.
 Priming the surface of drywall
- After the drywall dries, it must be sanded with fine sandpaper and finish finishing. For example, stick tiles or just paint.
 Capital open cabinet made of drywall tiled
When choosing the shape of shelves, it is recommended to pay attention to niches - they look much more impressive than standard solutions and do not visually reduce the space. If desired, niches can be supplemented with lighting, resulting in an original design and a cozy bathroom.
 Spacious niche in the wall of the bathroom
Quick and clean: glass bathroom shelves
The main advantage of glass shelves is that they literally dissolve in space and do not visually reduce the area of the room. It is also important that the glass is not afraid of high humidity, it is easy to clean and does not stain after contact with detergents. To equip a bathroom with glass shelves, you do not need to wait for a major overhaul - their installation is not associated with dirty processes. Glass furniture looks stylish and does not require special skills and professionalism in order to make it yourself.
 Glass shelves look stylish and fit into any interior design
First of all, you should buy glass with a thickness of at least 4 mm and cut it in a glass workshop into pieces of the desired size. Instead of traditional transparent glass, you can take colored, textured or frosted, mirror or plexiglass - it all depends on individual preferences and interior style.
 Brackets and glass are selected to taste and taking into account the style of the interior
According to the thickness of the glass and taking into account the general direction, decorative brackets are selected. By design, glass brackets can be in the form of small elements and in the form of profiles. The choice of this fittings cannot but rejoice: chrome-plated holders, bronze and gold items, painted in black or in a trendy bright color, are on sale. According to the type of fastening, holders are distinguished with and without glass drilling. The former, as a rule, are suitable for shelves no more than 20 cm wide. For wide shelves, brackets are more suitable, to which the glass is screwed through a hole drilled in it.
 Weightless glass is ideal for small spaces
Do-it-yourself glass shelf fastening is available to any home craftsman who has a drill and skills in working with this tool. The bracket is attached to the wall, and then the glass is inserted into it and fixed. If desired, you can install a decorative limiter that will prevent the tubes and jars from falling.
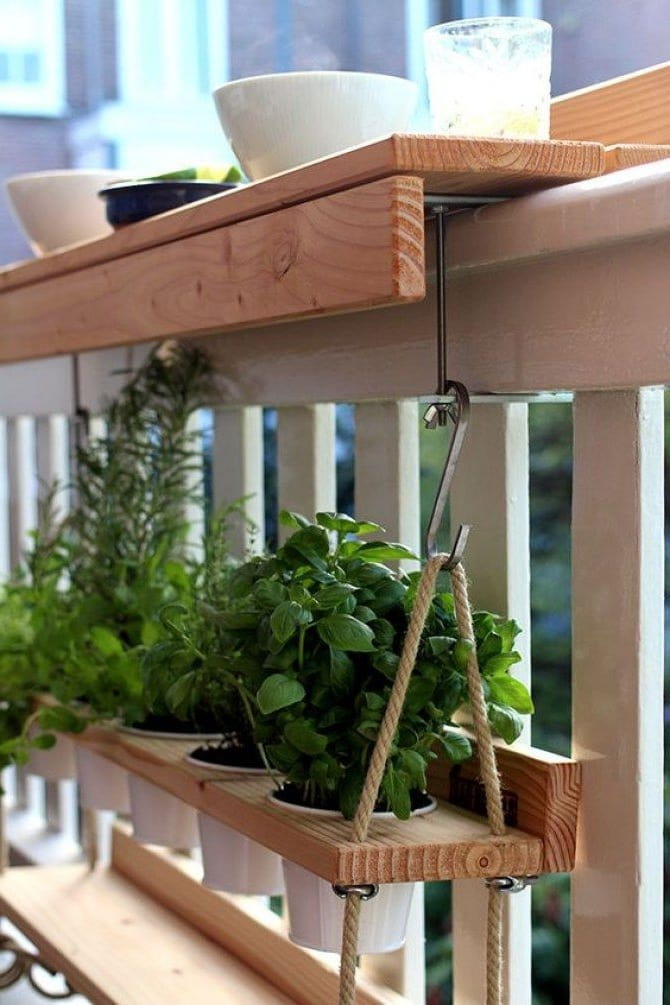
Original and uncomplicated: rope shelves made of wood or laminate
For the design of a bathroom in a country style or with a nautical slant, a simple but practical hanging rope shelf is perfect, the shelves of which can be made of wood or laminated chipboard. For work, you will need planks that you can buy at the store or search among unnecessary furniture. Excellent shelves can be obtained from the doors of an old cabinet or chest of drawers, if you give them a second life with a decorative moisture-resistant film.
It is even easier to use a laminate or parquet board as a base. If these materials are left over from the repair - fine, if there is nothing in the house, then you need to go to the store and buy one board of a moisture-resistant laminate of a suitable color.
 Rope shelves can be made even by a woman
Looking at the photo of the finished shelves on the ropes, it is easy to understand the principle of their manufacture: through holes are drilled in the boards, through which a strong rope is passed from top to bottom. Under each hole, be sure to fix the position of the rope with a knot or wooden spacer. A loop is left at the top so that the structure can be hung on a hook, and the lower ends are fixed with knots and decorated.
 This is how a shelf on ropes is assembled without a nail and a screw
If you like the idea, then instead of shelves made of chipboard, you can use wicker baskets - in this case, you get a small hanging cabinet in which it will be convenient to store towels, shower products and other necessary things. So that rope structures do not look lonely, in order to continue the rope theme, you can wrap several accessories with a rope, weave a rope holder for towels, hang a mirror on it, or make a rope frame.
Do-it-yourself plastic bottle shelf in the bathroom: video
Waste to income: bathroom shelves from unnecessary things
The wide ceiling cornice remaining after the repair can be used as small shelves for small items. It is most practical to choose polyurethane moldings for this purpose and attach them to the walls with liquid nails. Of course, it is better not to put heavy objects on these holders, they are more suitable for decor, souvenirs and small items.
 Wide ceiling cornice will hold small tubes and decor items
Plastic pipes are another valuable material that can be turned into an original structure for storing towels and other important things in the bathroom. Pipes can be of the same or different diameters, they can be placed close to each other or at a distance, at right angles to the wall or at a slight slope. If desired, the plastic is pasted over with a colored laminating film.
In the event that the elements will be placed on the wall separately from each other, each circle will have to be fixed. Another option is to fasten all the parts together, and then hang the finished structure in the chosen place.
 This design can be made from pipes, cans or hat boxes.
If there is no use for an unnecessary basket in the house, then it makes sense to look at it from the other side and turn it into a stylish miniature towel cabinet. The basket can be attached directly to the wall or attached to the holder. A wonderful hanging whatnot will turn out from 2-3 baskets, which can be the same size or vary around the perimeter.
 Round baskets as towel holders
Working with drywall requires experience - it is important not only to clean the entire structure with maximum accuracy and assemble it, but also to properly process the material, given the high humidity of the room. For those who do not have skills in repair work, it is better not to take risks, but immediately entrust the complex process to professionals.
Video: do-it-yourself corner bathroom shelf
Quality furniture in the bathroom, allows you to create a strong and practical interior. There is a certain place for every little thing. Thanks to this, the room seems spacious and comfortable. Modern technologies bring to our attention a huge variety of furniture paraphernalia. It has unusual shapes and sizes that fit perfectly into any relaxation area.
Surely, many consumers prefer the presence of home-made designs that will reflect the delicate taste of their owners. These items are filled with meaning and warmth.

Beautiful do-it-yourself bathroom shelves allow you to distribute household trifles. Thanks to them, in the interior space, all the details are in their place.

What are the benefits of homemade shelves?
Homemade models of shelves have a number of advantages rather than disadvantages. These include:
- interior decoration. There are hundreds of bathroom shelf ideas on the internet that allow you to choose the right one for any space. Home-made structures are neatly fixed on the wall surface;
- here you can select any material and coating for the manufacture of the structure;
- up to 6 elements can be present in the structure of hanging shelves.

In the manufacturing process, it is important to take into account the weight and objects that will be located here. Before proceeding with the construction of the structure, it is necessary to deal with the variety of shelves for the bathroom.


Types of products and their scope
There are several types of shelves. They differ in their structure and scope in the interior space. These include:
- Removable items. They have minimal weight and have good mobility. They can be placed in different parts of the bathroom. This option is ideal for various kinds of redevelopment.
- Suspended models. They are most often used in small spaces where every cm plays an important role.
- Corner shelves. This type is also used in small bathrooms. They are neatly fixed in the corners of the room.
- Floor structures. The model is suitable for spacious rooms. It has ample storage space.
- Stationary shelves. This option cannot be removed. They are carried out at the initial stages of finishing work. The structure includes drywall and ceramic tiles. They help to make a strong foundation that will last for quite a long period of time.


Materials for the manufacture of shelves
What can you make a shelf in the bathroom? Most often used for this:
- plastic;
- tempered glass;
- stainless steel;
- wood;
- chipboard and MDF panel.

It is necessary to choose suitable components for shelves, taking into account constant humidity. The best option is plastic and chipboard panel with a protective coating. These materials are able to withstand daily moisture tests.

Workshop on creating a bathroom shelf
We bring to your attention detailed instructions on how to make a floor shelf with your own hands. The design will consist of 3 departments. Before proceeding with the manufacturing process of the structure, it is necessary to prepare the following materials and tools.

For this we need:
- building level;
- roulette;
- a hammer;
- hacksaw;
- screwdriver and screwdriver;
- wooden boards;
- detailed drawing of the future product;
- mounts and brackets;
- putty solution;
- acrylic paint;
- brush;
- self-tapping screws.

The manufacture of the shelf is divided into several stages:
We make markings on the surface of wooden boards. Here we note the height of the future structure and its width. Next, using a hacksaw, we cut out each element. The result should be two support bases and three shelf elements.

After that, we proceed to the installation of the shelves in the bathroom. Here we need corner fasteners and self-tapping screws.

On the side of each part we strengthen one clamp. After that, we connect all the parts together with screws. We cover the holes in the attachment points with putty and leave to dry completely.

The final step will be painting the entire structure. To do this, apply a thin layer of acrylic mortar with a brush. When it dries, move on to subsequent layers of decorative base.

DIY bathroom shelves photo


