How to make a summer toilet in the country. Do-it-yourself toilet for a summer residence: step-by-step instructions with a photo
Everyone knows the popular expression that says that acquaintance with the theater begins with a hanger. We will not be mistaken if we say about the dacha that it begins with a toilet. By its appearance and device, one can judge the owner. The “handy” owner has this building beautiful and neat. It has no drafts and no bad smell.
It will be useful for beginners of country life to learn how to build an inexpensive and comfortable outdoor toilet with their own hands.
In this article we will talk about the most common types of closet structures, their arrangement and consider the possibility of combining with other summer cottages.
According to the method of disposal of sewage, these facilities are divided into three types:
- Powder closets;
- Toilets with a cesspool (septic tank);
- Water closets.
The first type of outdoor toilet is easy to arrange and operate. Its main part is a seat (stool), under which a removable container is installed. After each visit, a peat mixture is poured into it with a scoop, which absorbs liquid and unpleasant odors.

A toilet seat with a sealed lid and a bucket of peat - that's all you need to equip an outdoor latrine
A significant drawback of this design is the small capacity of the bucket. For those who rarely visit the dacha, powder closet is optimal. If you plan to spend weekends on your site or your family has more than three people, you will often have to empty the container.
An improved version of powder closet is a peat dry closet, offered on the market today. It consists of a plastic case, inside which one or two containers are placed. A tank with a peat mixture and a dispenser is installed on top.

1, 2 – containers for the solid fraction; 3 - funnel for liquid; 4 – funnel for solid fraction; 5 - a tank with a dispenser for peat; 6 - ventilation pipe; 7 - drainage tube
To eliminate unpleasant odors, the structure is equipped with an exhaust pipe leading to the roof of the cabin. Empty containers in such a toilet should be no more than once a week. This is achieved by separating the liquid and solid waste fractions.
When using a dry closet, the liquid enters a funnel located in the front of the body and is discharged through a tube into the ground or a plastic container located on the street. Dense fractions of sewage accumulate in the inner container.
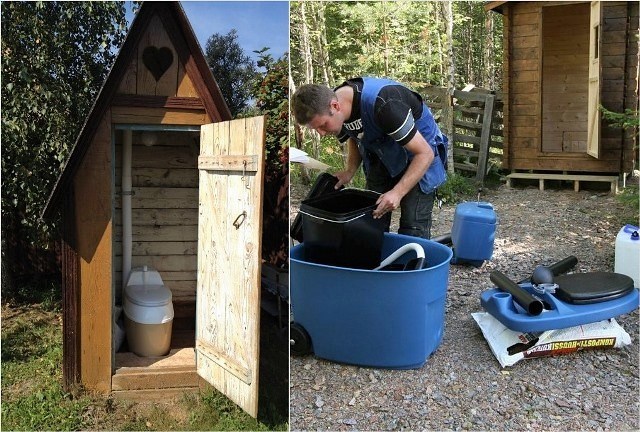
Dry closet in the "combat position" and in the process of installation. In the first case, the closeness of the booth catches your eye, so we do not advise you to save on its area at the expense of comfort.
Despite the advantages of a peat toilet over a classic powder closet (conversion of waste into fertilizer, good ventilation and extended use), many summer residents choose the option with a cesspool (septic tank). Its device is cheaper than buying an "advanced" dry closet, and the frequency of cleaning is 1-2 times a year.
At the same time, one should remember two serious problems that the cesspool can present to its owners if it is built incorrectly:
- Infection of the soil with pathogenic bacteria;
- Bad smell.
It is not enough to simply dig a large hole in the ground and put a closet over it. The sewage tank must be securely isolated from the ground. A concrete tank treated with a waterproofing impregnation is best suited for this purpose.
The second condition is the introduction of special bacteria into the cesspool. They quickly decompose sewage, disinfect them and eliminate odor. Dry concentrates of bacteria for septic tanks and cesspools can now be bought at any household supermarket.
The design of the backlash closet (air toilet) cannot be called too complicated. Its main part is a concrete pit with a hole. A booth is installed on it. To eliminate unpleasant odors, an exhaust pipe is placed on its back wall. Its lower end is in the pit, and the upper one rises above the roof. Due to the difference in height, thrust is formed. The air from the cabin is sucked into the pit and expelled into the atmosphere through a pipe.

Scheme of the design of the backlash closet
Another popular option for a summer cottage toilet is a water closet. Its main part is the well-known toilet bowl with a flush tank. There is a water lock in it, which excludes the possibility of the smell coming out of the pit into the booth. Unfortunately, it is impossible to use such a system without heating, because in winter the water in the toilet and cistern freezes. Therefore, this design is designed for the warm season.

Drawing of a street water closet
With the onset of warm days, the container on the roof of the booth is filled with water. The outlet channel is connected to through a tee equipped with a vertical ventilation pipe.
Toilet cubicle options
You can build a toilet cubicle from different materials. Most often, the basis of the structure is a wooden frame sheathed with OSB, grooved board, plywood or siding.

The toilet, sheathed with a planed board, looks neat and cozy
Moving away from the use of the frame and sheathing, the house can be folded from, thereby creating a picturesque imitation of a log house.

Lovers of natural wood can also be advised to use a blockhouse for sheathing. It is cheaper than a massive log and is easily mounted on a frame. No less attractive are the walls of the toilet, lined with wooden clapboard "herringbone".

Many dacha owners are not satisfied with the rustic look of the "birdhouse" toilet. Striving for originality, they erect luxurious log mansions on the plots for "solitary reflections."

Brick and blocks as materials for the construction of latrines are still very popular. Whatever one may say, but the capital structure will stand for more than a dozen years. Neither dampness, nor wind, nor the sun will harm him.

If there was no facing brick at hand, then the walls can be built from the remnants of red and silicate. High-quality plaster will hide the irregularities of the masonry.

A booth built from mixed bricks is waiting for a plaster finish
Translucent polycarbonate can be used for lining a metal profile booth. This material looks very aesthetically pleasing and is not afraid of moisture.

Sheet corrugated board is a practical and durable material for a toilet cubicle. You can put it on both wooden and steel frames. The only condition is the internal lining of the walls with insulation. Without this addition, there will be a hot “oven” in the summer, and a freezer in the winter.

Interior decoration of the booth with plastic clapboard - concise and hygienic
Straw blocks can be attributed to the category of unusual materials used for the construction of latrines. The cabin built from them is warm and cozy. Anyone who wants to impress the imagination of neighbors and guests does not go to the construction base for materials. Having collected a certain number of empty bottles, he builds a toilet out of them "to everyone's surprise."

In addition to rectangular and rounded structures, "huts" of various sizes are very popular.
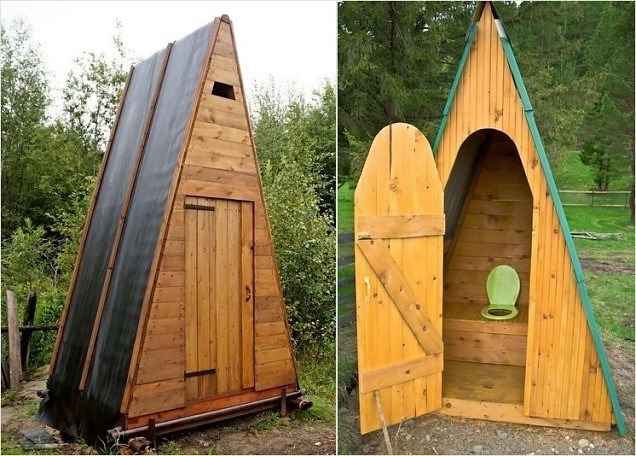
There are two rational grains in this solution:
- The slopes of the steep roof replace the walls;
- The unusual appearance of the building adorns the landscape.
Very often, the toilet becomes part of the hozblok. This solution allows you to place several rooms in one building. As a result, savings are achieved during construction (common walls) and the comfort of use is increased (a warm toilet is always at hand).

A solid combination of a latrine with a shower, lined with siding and covered with a hipped bituminous roof

A variant of a brick toilet interlocked with a shower cabin

Aesthetically not very successful combination in one outbuilding (toilet-shower) of a log house and a roof made of plastic slate

Some owners combine two toilets in the building: "for gentlemen and ladies."
How to build a simple toilet for a summer residence on your own?
Having decided on the waste disposal system (powder closet, cesspool, septic tank), you can begin construction.
Minimum cabin dimensions- width 1 meter, depth 1.4 meters and height 2.0 meters.
The basis of the structure, the step-by-step construction of which we will consider, is a wooden frame made of antiseptic bursa. It can be placed on a block foundation or on a shallow concrete "tape". A thick sheet of plywood or OSB board with a rectangular hole cut into it is attached to the frame from above.

Having assembled the base, the vertical racks of the frame and strapping bars are set according to the level.

Having made the frame, it is sheathed with plywood using a jigsaw and a screwdriver.

The next step is the installation of the roof rafters. They are made from a dry beam with a section of 5x10 cm, cutting it into the upper belt of the wall binding. In the upper part, the bars are connected to a horizontal ridge board.

Having completed this stage, the rafters are sheathed with plywood. This is the best base for shingles that will lay on the roof.

Having finished with the roof, proceed to the assembly of the "podium" frame. It will have a powder-closet storage tank and a hole for a seat with a lid.

The toilet door is assembled from a tongue-and-groove board fastened with transverse strips for greater rigidity.

After tying the doorway with a beam, a door leaf is attached to it with the help of hinges. Finishing operation - painting the closet booth from the outside and from the inside.

In conclusion, let's say that we considered the option of building a summer outdoor toilet. For the winter season, the walls from the inside must be insulated with foam plastic (minplate) and sheathed with any sheet material (plywood, OSB, board, plastic).
If you decide to bring light into the booth, then along the way you can increase the comfort of use at minimal cost. Install an electric fan heater. In just a few minutes, it will warm the air to a positive temperature.
We all love comfort in everyday life, but we rarely get it just like that, without any effort. Someone pays “specialists” for repairs in their home, often getting a carelessly done job, while someone prefers to do everything with their own hands, which, without a proper approach, can also lead to problems.
At the same time, any path involves significant financial costs, and therefore the initially correctly chosen approach not only saves your nerves in the future, but also saves the family budget.
And if at the moment, most apartments are already equipped with all the necessary amenities, then things are often somewhat worse at summer cottages, often people who come from the city to their dacha experience a number of inconveniences, and one of the most noticeable is the lack of a toilet.
In this article, I would like to tell you how, using relatively cheap materials, you can make a toilet in the country with your own hands. He will delve into the intricacies of this process, explain all the nuances and difficulties, because a do-it-yourself toilet in the country, the photo of which you will see in the article, is not at all a luxury, but a necessity.
So, how to build a toilet in the country with your own hands?
First of all, you need to know about this process that the construction of such a structure in our time is more expensive than before, unfortunately, it is not even connected with the trend of fashion, but with new sanitary requirements, which strongly indicate the need to preserve an environmentally friendly environment.
At the same time, the issue of disposal of accumulated waste products is acute, because the need to regularly clean them from a simple toilet in the country can turn the life of any person into a nightmare. This problem will be solved by modern technologies, which have now become much cheaper and more accessible, which allows most people to use them on their plots.
Finally, here again the desire to create the most comfortable conditions for existence intervenes, few people will now be satisfied with a small rickety booth with a hole in the floor, which is quite understandable, because such structures do not improve summer vacation at all, and besides, they spoil the view of the site as a whole.
In this regard, it becomes clear that the ideal toilet for a summer residence should be safe for the environment, convenient in terms of waste disposal, comfortable to use and fit beautifully in a summer cottage.

After defining the main task, it is necessary to solve a number of other important issues:
1. Based on local conditions, determine how wastewater will be discharged, where it will be discharged, how it will be disposed of.
2. Find a suitable place in your summer cottage to install a toilet.
3. Make a choice of the preferred design solution - it can be a booth or a cabin.
4. Find a decorative design that would optimally match the complexity of construction and appearance.
5. Determine the necessary for all expenses.
All these issues are largely interconnected, so they need to be addressed in a comprehensive manner, thinking about how to make a toilet in the country with your own hands. At the same time, when building a booth, you can afford more freedom, since only the appearance and convenience depend on it, and the base is the most complex and expensive element here.

What to build a toilet in the country?
In most cases, it is best to build a wooden toilet for a summer residence, this is due to the cheapness of this material, in addition, wood is very easy to process, it has good heat-resistant characteristics and, with a competent approach, does not cause any harm to a person. With proper processing, it can be weather-resistant and unsuitable for any bacteria or insects to grow on it.
In addition, a lightweight wooden structure allows you to save on the foundation, which in some cases may not be useful at all, because the size of the toilet in the country with your own hands can be small, in which case its cabin can simply be placed on reinforced concrete monoliths or bricks.

To build a simple toilet in the country with your own hands, you need to decide on the types of materials.
For the construction of the frame, an ordinary beam is often used, it is convenient to cover the floor and the toilet seat with a tongue-and-groove board, trimmed or tongue-and-groove boards are suitable for external cladding, and cut and uncut boards are well suited for roof lathing.
In the construction of sheathing, boards made of waterproof plywood or OSB can be effective, which can also be used in creating laths for purlins. A good material can be a grooved board, which, at a slightly higher price, surpasses most other materials in its properties.
For curved sections, it is optimal to use a marine boat board, which, in addition to everything else, will last much longer in an area where precipitation is frequent, however, compared to a sheet pile board, it holds back gusts of wind worse.
Without exception, all wooden elements must be treated first against rot, then from dampness. It is this sequence that is the most correct, in which the boards will serve the longest time.
Those parts of the toilet that will be turned inward (toward the cesspool and the ground) must also be treated with bituminous mastic or hot bitumen.

What kind of toilet to build in the country?
Even if you decide to build a simple toilet in the country with your own hands, you should not forget about the importance of its appearance. There are a number of types of cabins, in the form of a house, a hut, a hut, a birdhouse. In the end, you can always experiment with shapes, do something completely unusual, however, in my article I will focus on the basic options without going into the field of complex design.
So, what is the difference between the listed types of cabins:
1. During the construction of a hut, one must understand that it is strong, constructive, has good resistance to precipitation and wind, does not require large expenditures of materials, however, it requires a lot of space and suffers from a number of inconveniences, primarily from crowding. If you try to make it larger, then the benefit of saving materials disappears. The design itself is primitive, and may not be suitable for some summer cottages.
2. In terms of the complexity of construction, a birdhouse is even simpler than a hut, it does not require large expenditures of materials and takes up minimal space. However, it has a weak design, does not hold temperatures well, and is prone to drafts. Despite the shortcomings, such a design may be optimal if an outdoor toilet is intended for summer cottages.
3. In the construction of a house, you can achieve greater heat resistance and strength than a birdhouse. It also requires a little land and materials, but it is more difficult to install a water tank to it. This design allows you to use a variety of finishes and design elements.
4. The complexity of the construction of the hut is superior to other types of cabins, in addition, it requires more material consumption. At the same time, its faceted shape allows you to create very durable structures that are well protected from adverse climatic conditions. In terms of functionality and ergonomics, this is one of the best options. And the design possibilities are almost endless.
When the view is finally chosen, it is necessary to determine the size of the toilet in the country.
For a birdhouse with a house, the ideal dimensions of the floor and the toilet seat are at least 1.2 meters in width and 1.5 meters in depth. In the case of a hut and a hut, the depth can be left at the level of 1.5 meters, and the width can be taken in the region of 0.9 meters.
It is important that there is at least 40 centimeters of distance from the head of the person who entered to the walls. At the same time, several meters can be called the optimal ceiling height. In general, when the question arises of how to build a toilet in the country, it is important to remember that many of its parameters will depend on your preferences. In this regard, the size of the toilet can be adjusted depending on your own height, etc.
Almost all of the types of cabins listed above suffer from a common disadvantage, namely, exposure to gusts of wind if the toilet door is not closed. To combat this, you just need to install the door on the barn hinges. For more durable structures such as a hut, you can use hidden loops.

Where to put the toilet in the country?
You can’t think about how to make a simple toilet in the country without taking into account such important aspects as its location, especially if it involves the presence of a cesspool, the construction of which is prohibited if the groundwater is located above 2.5 meters.
The choice of a construction site should be based on a number of factors, such as the type of soil, the proposed foundation, the distance from the house, etc. All these elements are closely interconnected and require a serious approach, because not only convenience, but also safety for you and the environment depends on this.
There are strict sanitary standards that prohibit the location of structures of this kind at a distance closer than 12 meters from the nearest housing, and the distance from a water source must be at least 20 meters. In addition, it is important to remember about the neighbors, who are unlikely to approve the construction of a toilet right under their fence.
In order to build a toilet for the dacha yourself, you must first decide how far you are willing to walk, in some cases, the distance of the toilet from the house only has a positive effect on the atmosphere of the summer cottage, and the proximity of the house to the cesspool can be quite unpleasant, for example, due to possible odours. At the same time, the location of the toilet should be accessible for the entrance of the sewage truck, because the maximum length of its hose is about 7 meters.
It is good if it is possible to install a toilet in an inconspicuous and secluded place, for example, in a garden, where trees cover it from the general view. It is also important to remember that locating the toilet in a low-lying area can cause the pit latrine to fill up more quickly, since most of the rainfall will fall directly into it. And the location of such a structure at a height can make it prone to strong gusts of wind.
Once the site was definitely needed to decide what type of cesspool is suitable for it.

Varieties of cesspools for a toilet in the country
In order to gradually build a toilet in the country, it is important to choose the right type of cesspool. They differ mainly in the degree of penetration of waste products into the ground, and are divided into sealed pits, as well as pits with a filter bottom.
Sealed pits require more money, due to the more frequent need to clean them. Pits with a filter bottom are cheaper, but they are fraught with environmental pollution, in addition, their use is not allowed in terms of sanitary standards.
There are different types of walls for cesspools, they can be monolithic, brick, plastic, and also consist of concrete rings. Each option has its own advantages and disadvantages.
Brick pit latrines aren't cheap, but they're strong enough, they can be built quite deep to reduce the need for frequent cleaning, and they seal reasonably well. It is possible to create both a hermetic version and a design with a filtering bottom.
Plastic containers are quite inexpensive, but due to their size they will require more frequent cleaning, when creating a sealed structure, only the upper part is cut off from the container, when creating a filter, the lower part is also cut off, while the bottom is covered with a filter layer.
Structures made of concrete rings cannot be airtight, because they move easily in the ground, their use is permissible only in those places where groundwater is located at a considerable depth. After filling the pit with rings, its bottom is either covered with a concrete screed or a filter layer.
Monolithic concrete pit latrines are well sealed, but due to the nature of the construction, they can be difficult and expensive to make too deep, and therefore, they will often have to be cleaned.
Speaking about cesspools, one would think that the construction of such structures is extremely difficult, below you will see how you can build a toilet in the country, photos, instructions, a description of the process.

Do-it-yourself toilet in the country in stages with a photo
Approaching the question of how to thoroughly make a toilet in the country house yourself, let's take a relatively simple and comfortable design, accompanying its construction with photographs, because in order to build a toilet in the country house with your own hands, drawings are not necessary, it is quite easy to do without them.
The foundation will be concrete pillars, for them we make holes of 130 millimeters by 0.8 meters. We insert pipes inside to the maximum possible depth (for example, old water pipes). After that, we fill everything with a solution using roofing material and sleeves.

The strapping will be a 100 by 100 beam, which we will fasten to the corners.

We cover the floor and the toilet seat with grooved boards. The design for the toilet seat itself is standard, nothing special, you can make it removable.

Racks are made of timber 50 to 50.

We make the roof from planed boards 25 by 120, add flat galvanized sheets to them, bending them along the edges at the back and front, from the sides we close the boards with a galvanized profile.

For walls and a toilet seat, we take 9 millimeters of OSB, varnish them on the inside to reduce the risk of splinters, and the toilet seat is also varnished.

The outer crate is made of a bar 25 by 50, almost any will do, we put siding on top of it.


In the lower part along the perimeter of the structure, you can put some trimmings from corrugated board, this will help create the desired visual effect.

The threshold can be finished with galvanization.

Polycarbonate can be used for the window at the entrance; small gaps can be allowed to create ventilation.

The door is made from an OSB sheet, boards 25 by 120 are applied from below and above, a board is also placed on the outside, space is left for siding, you can fasten the boards with the OSB sheet with simple self-tapping screws. Also, siding is attached to the structure with small screws.
I hope that the description of how to make a toilet for the dacha with your own hands, a step-by-step photo of this process, will inspire someone to new feats in improving life comfort, because it is on such little things that the full enjoyment of a summer vacation depends.
Now you know how to make a toilet in the country, what difficulties it can have and what you need to consider.
Toilet in the country with their own hands. Video of the construction process.
Wherever a person lives, he tries to equip his habitat as comfortably as possible. Therefore, the first structure to be built in a summer cottage is a toilet. Without this building outside the city it is difficult to live even one day. To build it, you can hire specialists or do the work yourself. But even if you decide to make a toilet in the country with your own hands, you cannot do without theoretical knowledge. So we find out what needs to be done to build a much-needed structure.
Where to place the structure?
Before building a toilet, a place for its construction is determined. The remoteness of the toilet from other buildings depends on its design. Or rather, whether it will be a building with or without a cesspool.
Which type of toilet to choose is decided not only taking into account preference, but also taking into account the location of groundwater. If they are located above the mark of 2.5 meters, the construction of a cesspool is prohibited. In such cases, a powder closet is built.
When choosing a place to build, do not forget that this is a place of solitude. Therefore, it is desirable to take him a corner away from the buildings.
When constructing a toilet with a cesspool, follow the sanitary standards for such structures. The toilet should be located no closer than 12 meters to residential buildings. The distance from it to the water source is at least 20 meters. In order to avoid misunderstandings with neighbors, we are building a toilet in the country, a meter and a half away from the fence.
When planning the construction of a country toilet with a cesspool, consider how the sewer truck will subsequently drive up to it. The length of the hose for pumping sewage is only 7 meters. And 3 of them will be located in the pit.
Also consider the landscape of the site. a toilet built in a lowland will quickly fill up during the rainy season and spring snowmelt. A building on a hill is blown from all sides by the wind.
Varieties of cesspools
Depending on the penetration of sewage into the soil, cesspools are: with a filtering bottom and sealed. The construction and operation of a sealed structure will cost more. This is due not only to consumables, but also to more frequent cleaning and calling a sewage truck. Spending on a pit with a filter bottom is less noticeable, but there is a possibility of contamination of the surrounding area. In addition, such structures are prohibited by sanitary standards.
The walls of the cesspool can be built from different materials. Depending on this, they are:
- brick;
- plastic;
- from concrete rings;
- monolithic.
Let's take a look at each of them in more detail.
We lay out a hole of brick
Option #1 - Sealed Design
Having decided on the construction site of the toilet, they clear the marked area. Dig a rectangular pit according to the required dimensions. The larger it is, the less often it will be necessary to clean the toilet from sewage. Then tamp the soil at the bottom. Pour a layer of sand (10-15 cm) and make a concrete base. Do not interfere with the use of reinforcement and filler, you can crushed stone. After the concrete hardens, lay out the walls of the structure and plaster. For better sealing, they are treated with bituminous mastic. The walls of the cesspool make ten centimeters above the surface of the earth.
After laying the brick for the cesspool, the walls of the structure must be plastered and covered with bituminous mastic.
Option #2 - filter bottom design
For such a cesspool, the bottom is not made airtight. To do this, a layer of pebbles or large gravel is poured over the sand. Liquid waste through such a filter seeps into the ground. This reduces the total mass of sewage, which increases the time until the pit is cleaned.
It is advisable to make cesspools with a filtering bottom only in those places where soil waters lie very deep.
Use of plastic containers
Plastic barrels or eurocubes can be used as a waste collector for cesspools. They are buried in a hole under the toilet. For a sealed design, only the upper part of the container is cut off, where the waste will flow. For a non-sealed pit, the lower part is also cut out. At the same time, a filter layer is poured onto the bottom of the cesspool.

So that the soil does not displace plastic containers, they must be fixed with anchor weights.
Variant of construction from concrete rings
Now let's figure out how to install a toilet in the country using concrete rings. Due to the fact that reinforced concrete products can move during use, it is difficult to make such a structure airtight. Therefore, it is desirable to use it only in places with deep groundwater. The construction of a cesspool from reinforced concrete products is a laborious process. To facilitate it, a special technique is used.

Due to the heavy weight of concrete rings, special equipment is required for their installation.
After choosing and clearing a place for construction, they dig a hole according to the size of the ring. They lower the first ring and begin to dig the ground from under its base. Thus, there is a gradual lowering of the rings under its own weight. When there is enough space, install the second ring on the first. Thus, they continue to dig and install the required number of rings. At the bottom of the pit, either a concrete screed or a filter layer is made.
The top of the last installed concrete ring should protrude ten centimeters above the ground.
You will find step-by-step instructions for installing a cesspool made of concrete rings in our following material:.
Monolithic concrete structure for the toilet
For a cesspool made of monolithic concrete, after digging a pit, the bottom is covered with a layer of sand. Reinforcing it is made with a call to the walls. This will give the structure strength. The bottom of the pit is poured with concrete and left to solidify completely. Then the formwork for the walls is installed and they are poured with concrete. After it hardens, formwork and pouring of the floor are made.

Defects in concrete after formwork removal must be repaired with cement-sand mortar
Construction of a toilet house over a cesspool
After the cesspool has been prepared, they begin to build a house over it. We invite you to figure out with us how to build a country toilet out of wood.
The length of the building is 20 centimeters more than the width. For example, the width is 1 meter, and the length is 1.2. Let the height be 2.1 meters. Next to the cesspool, a foundation is made according to the appropriate dimensions.

Roofing material is laid between the foundation and the wooden frame for insulation
A roofing material waterproofing is laid on top of it. A frame is assembled from a wooden block and screwed to the foundation.

Floor boards are laid on top of the frame and fixed with self-tapping screws. The floor must be quite strong, so the thickness of the board is taken at least 3 cm.

The timber frame must be treated with an antiseptic
The front and rear frames of the toilet house are made from a bar.

The front frame should be 10 cm higher than the rear
Then they are fixed on the base, exposing with the help of a level. Strengthen the structure with transverse bars.

The transverse bars under the roof should protrude 0.3 m in front and 0.16 m in the back
Then a frame for the pedestal is installed. Its height is 0.45 meters.

The height of the pedestal is made taking into account convenience
At the next stage, the frame of the house is sheathed. For this, an imitation of a bar is perfect. It has a convenient thorn-groove fastening. Sheathing the structure begins from the bottom, the boards are fixed with screws or ordinary nails. A window is cut out above the door.
When fixing the imitation of the beam, make sure that the groove is on top, and the spike is on the bottom. This method prevents moisture from entering the groove.
After that, sheathe the frame for the pedestal. Cut a hole in the middle. Its size depends on the capacity that will be installed inside. The bottom of the container is cut out before fixing.

The size of the hole cut into the pedestal depends on the container that will be used.
Then they make the roof of the house. First, the boards are fixed parallel to the front of the building at a short distance from each other.

Cross boards for the roof are fixed starting from the front of the building
Then the visor above the door is sewn from below. Fasten the boards around the perimeter of the base of the roof.

Boards fixed around the perimeter of the roof base should form right angles
Now it remains only to cover it with slate. At the next stage, the door is assembled and hung on the hinges. Platbands are stuffed on top.

Platbands close the gaps and prevent the door from opening into the room
Then the entire structure is covered with a special impregnation that protects against moisture and pests, and then with paint or varnish. Handles and a hook or latch are attached outside and inside the building.
From our next article, you will learn how to build a country toilet with a shower:.
Toilet for giving by the type of powder closet
Where groundwater is located near the surface, the construction of a toilet in a country house with a cesspool is prohibited. In this case, a powder closet is built. Unlike the previous version, this design does not have an underground waste receiver in the form of a pit.
Therefore, the container inserted into the hole of the pedestal must be with a bottom. It is even better if these are two containers: one is slightly smaller than the other. Moreover, the smaller one should have small holes for leakage of liquid. And in the larger side, a drainage hose is inserted to drain excess fluid.

For powder closet, you do not need to dig a cesspool. Waste is sprinkled with peat, and then taken out to the compost heap
The foundation of the building must be concreted. Before using the container, a filler is poured onto its bottom. It can be peat or sawdust. After each visit to the toilet, a new portion of the filler is poured on top. As the container fills up, its contents are taken out to the compost heap.
These toilets are only suitable for temporary use. For permanent residences, it is better to equip a septic tank or build a local treatment system.
The first thing a person needs in a summer cottage is a toilet. And do it better even before starting any construction work right. Natural need can strike at any moment, even a couple of hours after arriving at the dacha. Despite the simplicity of the design, it is necessary to make a wooden toilet on the street, taking into account all the features and rules.
Types of wooden toilets
wooden toilet
Conventionally, all existing types of wooden outdoor toilets can be divided into two types: without a cesspool and with a cesspool. The first option is suitable as a temporary latrine. For example, for the period of construction on the site. Although there are those who prefer such a country toilet for permanent use.
Powder closet
Powder closet

This type refers to a wooden toilet for a summer residence without a separate cesspool. Usually, a container is placed directly under the latrine itself, which must be emptied in a timely manner. At the same time, crushed peat, ash, sawdust or hay is used as a means for the fastest humus of feces. They “powder” stools to get rid of an unpleasant odor.
The main advantages of powder closets:
- fast erection;
- simple use;
- no unpleasant odor when used correctly.
Thermo toilet

A significant disadvantage of this type of country toilet is the need for frequent emptying of the container. In cases where powder closet is planned for permanent use, it is recommended to use a large volume tank (500-700 liters) as a sewer pit. Feces from such a toilet quickly rot, so they can be used as fertilizer and compost to feed plants on the site.
dry closet
dry closet

One of the varieties of closets without a cesspool. The device is similar to the previous version, however, special biobacteria are used for quick humus. With their help, feces are processed into compost or fertilizer, which are safe to use for plants in their summer cottage.
The main disadvantage is the need for special bacteria. If they are not at hand, then there will be nothing to process the bowel movements. One of the main advantages is the absence of an unpleasant odor. Bacteria process faeces as quickly as possible, so no aroma has time to form.
chemical toilet
chemical toilet

Such a country toilet is suitable for those who are not going to use bowel movements for compost or fertilizer. The principle of the device is the same as that of a dry closet. However, not bacteria, but chemicals are used to process feces.
This type of closet for giving is unreasonably expensive in terms of finances. Special tools are more expensive than building a garden toilet with a cesspool with your own hands. The undeniable advantage of a chemical closet is the absence of smell and the ability to install it anywhere on the site, as well as inside the house itself.
play closet
play closet

Do-it-yourself garden toilets of this type are easy to make. The play closet is a latrine with a sealed cesspool, which is emptied independently using a fecal pump or a sewage machine. In this case, the depth of the outhouse recess cannot be less than 1 meter. This type of country toilet is suitable for those who do not have the opportunity to make a regular wooden garden closet.
A distinctive feature is the presence of an exhaust pipe through which unpleasant odors are formed. At the same time, I make a cesspool at a slope to the ventilation hole.
As a sealed cesspool, you can use a large container - a barrel or a container made of thick plastic with three holes: for draining feces, for ventilation and for pumping out. In this case, for the arrangement, you only need to dig a moat under the container, strengthen it in the ground, and make a drain from unpleasant odors.
The main advantages are:
- ease of use;
- absence of unpleasant odors with proper erection;
- possibility of installation directly in the house.
A significant drawback is the need for regular emptying of the cesspool with the help of a sewage machine. The use of a fecal pump is justified in winter, when the pumped sewage goes deep under the snow, practically without emitting an unpleasant odor. In the warm season, this type of release of the cesspool is not appropriate.
Classic toilet with a cesspool
The main elements of the toilet

This type of toilet is familiar to summer residents more than others. It is usually a wooden small room, under which there is a pit for feces. Nothing sealed, not to be emptied. Usually the toilet after filling is simply transferred to a new location. The cesspool is buried or sprinkled with earth, peat, grass. Within 3-5 years, the contents completely rot into black soil, on which garden plants grow well.
Main advantages:
- low cost of manufacture;
- no need to empty the pit;
- ease of construction.
Among the shortcomings, unpleasant odors, drafts, unpresentable design are noted. However, it is precisely such a “rural” toilet that is easiest to install, and, if necessary, to liquidate with benefit. The faeces left in the cesspit are hastily used for fertilizer and compost.
Sanitary standards
According to the established norms SanPiN 42-128-4690-88, a garden toilet on a private plot can be located at a remote distance from the residential building at the discretion of the owner. In this case, the minimum distance is 8 meters. If there is no centralized water supply on the site, then the restroom should be located at least 50 meters from wells, lakes, ponds, springs. From fruit trees it is necessary to retreat 8-10 meters, shrubs - 1 meter.
Sanitary standards suggest that an outdoor toilet should have two parts: ground and cesspool. At the same time, a cesspool is not necessarily a cesspool. SanPin does not clearly define this concept. In a powder closet, the role of a cesspool is played by a container that must be emptied in a timely manner. The rules suggest that the place for feces should be impenetrable, but the classic rural toilet does not fit into this framework.
Do-it-yourself construction of a country toilet
Do-it-yourself construction of a country toilet

Regardless of the type of restroom, construction involves three main stages: preparing a place for feces, the foundation for the ground part, and the frame of the cabin itself. The construction of a garden toilet with your own hands begins with the foundation.
How to make a foundation for a country powder closet
The foundation for a country powder-closet

- 4 asbestos pillars (2 meters long each);
- cement;
- sand;
- broken brick or large gravel;
- water;
- wooden pickets or boards.
Preliminary marking is carried out for the future country toilet. In the corners they drill or dig holes with a shovel under the pillars. The optimal depth is 1-1.2 meters. Asbestos poles are leveled into the wells so that the ground part is 80-100 cm, reinforced with broken bricks or rubble. The cement mortar is mixed with liquid - 2 parts of cement account for 3 parts of sand and 4 parts of water. The consistency of the concrete should be like low-fat sour cream.
The pillars are poured with cement mortar, if necessary, the level is measured again, broken bricks or crushed stone are reported for strengthening. The concrete will completely harden only after 7-10 days, but work on creating a booth can be carried out after 12 hours. Wooden pickets or boards are inserted into the pillars for strength.
Sometimes, to enhance the strength of asbestos columns, they are additionally treated with bituminous mastic. However, this is not necessary, the foundation will turn out to be solid and strong even without it.
How to make a foundation for a pit latrine
Sewerage with a cesspool

A country toilet of this type is more solid. And the foundation for it is used of a tape type - not vertical, as in the case of a powder closet, but horizontal, as for a barn, garage or other outbuilding.
From the materials you will need:
- sand;
- crushed stone small and large;
- broken brick;
- fittings;
- cement;
- water;
- wooden boards for formwork;
- ruberoid.
The strip foundation is made when the cesspool is already ready, or at least its dimensions are outlined and the location is determined. At the same time, 30-40 cm recede from the place for feces. In this case, the foundation will not wash out in a couple of years from the inside.
The optimal trench size is 50 cm deep, 30-40 cm wide. The strip foundation for the country toilet in this case will withstand both a wooden cabin and a brick one. In a dug trench, the bottom is rammed as tightly as possible.
Laying support boards for pouring the foundation

If it is possible to lay out the bottom with clay, then this must be done. "Clay castle" will not allow the foundation to sag or crumble over time. Performed as simply as possible. The rammed bottom is covered with clay, which is also rammed, periodically wetting with water.
Formwork boards are installed in the pit along the side walls. The bottom is additionally sprinkled with crushed stone: small and large mixed. For a tape-type foundation, the cement mortar is kneaded steeper than for a columnar one. For 1 part of cement, there are 3 parts of sand and 3 parts of water.
Concrete is poured into half of the trench, broken bricks or large gravel are added, and reinforcement is laid. After that, the rest of the solution is poured in. It is covered with roofing felt to protect it from moisture.
The foundation will completely harden in 14-21 days, but the formwork can be removed as early as 3-4 days, when the concrete "grabs". If the construction of the toilet with your own hands began in wet weather, then it will take more time. In this case, the formwork is removed after 7-10 days.
While the foundation is solidifying, it is advisable to deal with the arrangement of the cesspool.
The simplest foundation
simple toilet foundation

The simplest option, which does not require digging deep holes and trenches, using mortar and gravel, is laying concrete blocks under the toilet. The blocks are a little buried in the ground around the perimeter of the future closet. A finished booth is subsequently placed on them. Such a foundation is assembled quickly, does not require hardening time, although it is somewhat more expensive than a strip or columnar foundation.
In addition, it must be done when the cesspool is already ready and prepared, otherwise there is a risk of not matching the size of the booth and the perimeter of the pit for sewage. The deeper the slabs are buried, the lower the toilet will turn out.
However, even for a high closet there is a solution - a convenient step along which you can climb to the latrine.
Cesspool
Cesspool device

If a cesspool is not required for a powder closet and its varieties, then for an ordinary classic rural toilet it is simply necessary. The principle of its arrangement for the backlash closet and the usual country toilet are somewhat different. But the preparatory stage is the same.
A pit for feces is dug with a slope in the opposite direction from the booth. In this case, when filling, sewage will not accumulate at the level of the pedestal or toilet bowl, depending on what is installed in the toilet.
In addition, it is easier to organize ventilation this way - an excess of unpleasant odor in the deepening of the cesspool will be drawn out faster through a pipe or a special hole.
When a ditch for feces is dug, its bottom is rammed, and the walls are leveled as much as possible. According to the norms of SanPin, it is forbidden to dig a cesspool to the sandy bottom, so sewage will enter the groundwater especially quickly.
This violates sanitary rules and negatively affects the environment. The exception is the backlash closet. The optimal depth of the cesspool is 2.5-3 meters.
Classic sealed cesspool
Classic cesspool

After the preparatory work, the bottom must be concreted. The cement mortar is kneaded not too steep. Such that it was possible to fill the bottom completely. When the concrete hardens, a construction grid for puttying or a clay layer is applied to the walls of the pit. Both options are suitable for sealing. The walls are plastered with a steep concrete mortar or a special moisture-resistant putty.
You can use additional waterproofing material. Building glue can be added to the cement mortar, which will make the consistency denser, and the mortar itself stronger and more durable.
If it is possible to purchase waterproofing material for the cesspool, then it is better to use it. Over time, the putty will crumble, which will lead to depressurization. And as a result, feces get into the soil and wastewater.
When the pit is prepared inside, you can begin to equip its upper, ground, part. The cesspool cover is knocked together from boards that are installed directly on the finished place for feces. To the flooring, formwork is made of boards. The lid is poured with a steep concrete solution with the laying of reinforcement.
The flooring under the pit should contain three openings: under the toilet or pedestal (round or square), for pumping (usually square) and for ventilation. If you do not install a tap for unpleasant odors, then it will be uncomfortable to be in the toilet. For ventilation, you can use a plastic pipe, on which a protective "fungus" is installed - a visor that will prevent precipitation from entering the sewer pit.
Cesspool with sealed container

In this option, plastering the walls and pouring concrete on the bottom is not required. A sealed tank or barrel is dug into the pit, which is fixed by filling it with soil. As ventilation, you can install a mesh on the hole, and above it, mount a protective visor directly on the ground.
For pumping sewage, there should be a lid that is convenient to open and close in any weather.
There are special sewer country tanks with all the necessary holes. They are buried in the ground to the depth of the container itself, only slightly sprinkling the upper part with soil.
Drainage cesspool
Drainage cesspool

The use of such a cesspool is preferable if there is no close groundwater. In addition, feces will have to be pumped out several times less often than from a sealed one. After tamping the bottom, several holes are drilled in it, into which small crushed stone or gravel is poured. Asbestos or plastic short poles (50-100 cm) can be installed in these pits. And rubble is already falling into these pillars. All this is necessary for the rapid drainage of liquid sewage.
The walls of the cesspool for the country toilet are laid out with bricks. At the same time, the masonry should not be continuous, but with gaps to drain sewage in a natural way. Additionally, plastic short tubes with a diameter of 10-15 cm can be inserted into the gaps.
With their help, feces will quickly release the pit, going into the ground. A lid with three holes is installed over the cesspool: for pumping out, for ventilation and for draining. Drainage pits may use a vent to empty the contents. In this case, a hatch with a mesh is made in the lid, which can be freely opened and closed.
DIY toilet cubicle
DIY toilet cubicle drawings

When the most difficult stage is behind, you can proceed to the ground construction of the cabin of the country closet itself. The preferred material is wooden boards. A rural toilet is not necessarily a simple cubicle. It can be decorated in the form of a fabulous house or interesting to decorate. Such a closet will be a decoration of the site, and not just a latrine.
Choice of lumber
Choice of lumber

A country toilet is made from any type of wood, but there are features that need to be considered when choosing. So, spruce or pine is less susceptible to decay and pathogenic bacteria. Therefore, such lumber for a country toilet is preferable. In this case, the processing is reduced only to spraying with a moisture-resistant composition or varnish. In the future, the booth can be painted with water-based facade paint or ordinary acrylic. For construction, thin boards, plywood, bars for the frame (minimum 50x50) will be required.
Instruments
DIY toilet building tools

In order to make a country toilet with your own hands, you will need a minimum set of tools:
- circular saw or hacksaw;
- roulette;
- level;
- pencil;
- level;
- self-tapping screws;
- screwdriver
It is not practical to hammer a booth with nails. In the future, it may be necessary to disassemble or move the toilet, all the boards will be damaged and not suitable for further use.
cabin frame
Timber toilet cubicle frame

The frame of a country toilet is assembled from the bars. It is easiest to use metal corners or staples for screeds than to cut grooves. However, the grooved design is more stable. You can choose any fastening option, after the inner lining the corners will be invisible.
The frame is assembled according to the frame principle: all the bars are leveled, then connected to each other right on the ground in two places. The height of the toilet cubicle cannot be less than 2 meters if its width is 1.2 m. Otherwise, the structure will turn out to be unstable. On the finished frame, you can stuff plywood or boards for walls.
It is better to upholster the walls after installing the frame on the foundation. Boards or plywood are stuffed on the outside so that the booth can be painted later. Aesthetically, it will look more pleasant this way.
Roof, ceiling, floor
toilet roof

On the finished frame, two timber triangles are installed for the roof opposite each other. This will be the toilet seat. You can cover the roof of the closet with slate, tiles, iron, or for the first time with roofing material. In the “triangle”, a window cutout is allowed for additional ventilation, but it is difficult to close such a window. The ceilings are hemmed with plywood or boards at the discretion of the summer resident.
Floor in the toilet

The floors are stuffed from boards of "fives" (5 cm thick). In the place where the cesspool hole is located, a rectangle or circle is cut out. The latter is preferable, since a pipe can be fixed into it, through which feces will fall into the pit. Such a toilet will remain as clean and fresh as possible, even if a large family uses it throughout the summer season.
Wall insulation
Insulation of toilet walls

The dacha is visited not only in warm weather, so it should be comfortable to go to the toilet even in frost. A cold closet will bring little pleasure. Therefore, when boards or plywood are stuffed, it is necessary to conduct insulation inside. Styrofoam (3-5 cm thick), mineral wool or roll-type fiberglass is suitable as an insulating material. In this case, it is preferable to use foam sheets - they do not slip over time, like mineral wool or fiberglass.
Insulation is placed between the bars. Styrofoam, if necessary, can be cut to the desired size with a construction knife. The rolled insulation is attached with a construction stapler, but over time it still slips, violating the insulation and tightness.
To make the walls look more aesthetically pleasing, another layer of plywood is stuffed or moisture-resistant drywall is attached. Sometimes clapboard or wood panels are used to upholster the toilet. On the walls, you can fix shelves for toilet paper and various cleaning products, a box of peat for powder closets, or a waste basket.
Installation of a cabin on a columnar foundation
The principle of assembling the frame for powder closet is somewhat different. The frame is stuffed directly onto the foundation. The lower bars are stacked on poles, pulled together by floorboards. And only after that, corner bars are installed to support the walls and roof. Otherwise, the powder closet can collapse like a house of cards when in use. The sewage container is installed under the hole in the floor under the pedestal.
It is better if the tank or barrel has a handle on the side for easy extraction from under the foundation. Or there will be a hook or ring on the container, to which you can attach a carabiner with a cable. Since the country toilet on a columnar foundation turns out to be high, it is necessary to additionally install a step or several for easy ascent.
Pedestal or toilet
The main problem is what exactly to install in the country toilet. So, an ordinary hole in the floor no longer meets all the requirements of summer residents, and it does not look aesthetically pleasing. Not to mention that the use causes discomfort to people, with rare exceptions.
In a country toilet of an ordinary rural type, a wooden pedestal with a seat is usually installed. The use of a toilet bowl is not advisable, since there is no water supply for draining. The pedestal is mounted to the closet floorboards for stability.
Wooden pedestal with seat

If the cesspool does not have a hole for pumping sewage, then the pedestal can not be fixed to the floor, simply placed on the boards. In this case, it can be removed to empty the toilet using a fecal pump or a sewage truck (if the entrance is organized for it).
An old toilet bowl can be used in a country toilet for convenience even without a water supply as a seat. It is not necessary to mount it to the floor, it is enough to install it steadily. However, in winter it will be cool to sit in such a closet, even if the walls of the cabin are insulated.
How to avoid bad odors
Country toilet cleaner

In addition to the fact that there should be ventilation in the country toilet from the cesspool, it is also desirable to make a window in the booth. Moreover, if the frame is already ready and does not provide for its presence, then it can be done in the door. In this case, after each visit to the closet, airing can be carried out, leaving the door itself closed. In addition to always smelling neutral or pleasant in the toilet, it is allowed to fall asleep beneficial bacteria in the pit at least once every two weeks.
Even if the cesspool is sealed, such an action will not be superfluous. Firstly, it will not smell like sewage. Secondly, the pit will have to be pumped out less often. It is timely pumping out that is the main guarantee of the freshness of the country toilet. The lower the level of sewage in the pit, the less unpleasant odor. On average, it is recommended to empty the closet at least once every six months.
The nuances of using country toilets
A wooden country toilet with a cesspool can be further converted into a dry closet. To do this, you need to purchase special bacteria that will be added to the cesspool after each visit.
To pump out processed feces, you can use a fecal pump, the hose of which is sent to the compost pit. It is additionally dug up next to the toilet, filled as necessary with peat, humus, treated sewage. In the future, compost can be used to fertilize the site, garden plants and trees.
sewerage pump

Whatever the country toilet, its construction should begin in the first place. Even a temporary hole in the ground with a booth in a hurry, staying in the country will be many times more comfortable than without any closet.
And not even from the garden house. The first thing any owner puts a closet. Because without it, further development of the territory is impossible. A hand is stuffed on this simple object and the first practice of construction work appears. How to build a toilet for a summer residence with your own hands? Step-by-step instructions, photos and diagrams will help to cope with this task.
The design of a sanitary house must be approached with all responsibility
The norms and rules for the location of a latrine on the territory of the site are not a whim of the inspection authorities. Their main goal is to prevent waste from entering the groundwater and to ensure the owner of the site is sanitary and safe. That is why it is important to know and comply with a few simple requirements:
- The distance from the sanitary block to the reservoir, if it is located next to the site, is not less than thirty meters. If the water body is located in a lowland relative to the site, the toilet should be moved as far as possible.
- You can not have a toilet closer than fifteen meters from the basement or cellar.
- From the house you need to retreat at least eight meters, from the chicken coop or other buildings for living creatures - five meters.
- From the trees, the garden and the fence you need to retreat at least a meter.
- It is recommended to study the direction of constant winds so that the unpleasant smell does not bother the neighbors.
- It is important to know the depth of groundwater. If their level is less than two and a half meters, you will have to install another sealed version of the closet.
Important information! When planning the construction of a country latrine, you need to study the location of neighboring pits, wells and wells. Good relations with neighbors is one of the vital conditions for a successful country holiday.
Do-it-yourself toilet in the country: how to make a closet with a cesspool
Many dachas are equipped with closets with a cesspool. This type of construction is not suitable for areas where the groundwater level rises above 2.5 meters. The depth of the pit must be made at least 1.5-2 meters. If in the process of preparing the site it turns out that the pit is filled with moisture, all the work will be in vain.

A closet with a cesspool has the following advantages:
- simplicity of design;
- fast erection;
- duration of use.
There are also some disadvantages:
- it is important to study the depth of groundwater;
- you will have to significantly retreat from water sources (wells, wells, reservoirs);
- costs for waterproofing and ventilation of the facility;
- the need for regular cleaning.

This sanitary facility consists of two parts: the booth itself and the pit. The capacity for sewage is strengthened bricks or boards treated with resin or other impregnation that prevents them from rotting. The bottom is poured with a layer of concrete thirty centimeters. The toilet for the dacha, the drawing with the dimensions of which is presented above, provides for the possibility of the entrance of a sewage truck for removing waste from the pit. The hatch into the pit, through which cleaning will be carried out in the future, must be tightly closed. Experts recommend building a clay castle around the entire height, that is, between brick or wooden walls and the ground, you need to fill in a layer of clay up to a quarter of a meter thick.
Helpful information! The size of the pit directly determines how often you have to hire a car to clean it. Calculations show that 1 cubic meter of volume per year should be provided for one permanently residing person.


Sanitary facilities without cesspool
The increased occurrence of groundwater does not allow a cesspool to be arranged on the site? There are several alternative solutions:
- Toilet type "Powder closet". For its arrangement, you will need a container, which is installed directly under the toilet seat. To prevent an unpleasant odor after use, sand or ash is poured into the container. Pros: the toilet can be placed anywhere on the site, the device is quite hygienic and does not require special maintenance costs. Cons: you have to change or clean the tank often.

- Dry closet. The principle of operation of dry closets is the use of special reagents (liquids or mixtures) that decompose waste. Advantages: ease of maintenance and lack of odors, the possibility of placing a sanitary point anywhere, even in the house. Disadvantages - the need for frequent cleaning and the high cost of reagents.

Models and prices for finished devices
Dry closets for summer cottages are divided into three main categories:
- Liquid - using liquid fillers, do not require ventilation or drainage.

| Model | Mister Little Mini | Campa Potti MG | Portable 10 (Enviro) | ZENET OS07 | Visa Marin 319 |
|---|---|---|---|---|---|
| Price, rub | 5900 | 3444 | 3000 | 2950 | 4900 |
| Dimensions, mm | 420x370x340 | 383x427x330 | 350x430x320 | 350x410x310 | 410x420x370 |
| Weight, kg | 5 | 3,6 | 4,5 | 3,5 | 5 |
| Drain type | piston pump | hand pump | hand pump | hand pump | piston pump |
| Tank volume, l | 18 | 12 | 10 | 10 | 18 | 250 | 250 | 250 | 250 | 250 |
- Peat - natural peat is used for filling. This closet requires the organization of ventilation and drainage, so it is better not to put it in the house.

| Model | Piteco 505 | Compact Elite | Biolan Kit | BioComfort | ROSTOK Standard |
|---|---|---|---|---|---|
| Price, rub | 5490 | 4400 | 22500 | 8900 | 6900 |
| Dimensions, mm | 710x390x590 | 650x380x600 | 850x600x780 | 670x420x650 | 790x615x820 |
| Weight, kg | 8,5 | 6 | 15 | 8,8 | 11 |
| Peat supply | manual | manual | manual | manual | manual |
| Tank volume, l | 44 | 40 | 140 | 40 | 100 |
Related article:
- Compost - do without fillers, run on electricity. Waste can be used for compost.

Any of these products can be installed quickly and practically anywhere. A comparative analysis of popular brands of dry closets is presented above.
Do-it-yourself toilet for a summer residence: step-by-step instructions for building a birdhouse
The step-by-step instructions for a do-it-yourself toilet for giving in the form of a "birdhouse" are appreciated for its simplicity. Indeed, what could be simpler than an ordinary booth with a door and a symbolic window for ventilation?

A do-it-yourself toilet in the country, the drawings of which suggest using standard sizes and dimensions, is not difficult to build on your own. The height of the booth is usually 2-2.5 meters, the internal dimensions are from 1 square meter.

Drawing of a toilet cubicle - birdhouse
Support poles made of brick or concrete 20-30 centimeters high are placed around the equipped pit. Such a height is sufficient so that during seasonal movements of the soil the structure does not overturn. Oiled plank flooring is installed on the pillars.

Vertical racks made of timber are fixed with metal corners. Make a strapping of the top of the frame. A bar makes out a doorway. If the site is exposed to open winds, it is better to install additional oblique slats.

The frame is sheathed with wood, or OSB boards. A sheet of corrugated board or ondulin is fixed to the roof sheathing. Hang the door leaf.

Related article:
Toilet-hut: basic design principles
The triangular design of the "Shalash" closet is easier to manufacture and can be built literally in a matter of hours. Its peculiarity is that the walls are at the same time roof slopes.

Sheathe such a toilet only from the front and back. Roofing material is used from the sides.
Helpful advice! It is best to lay a soft roof on such structures. It is laid on plywood or OSB sheet.

The construction of a structure of the "hut" type
Do-it-yourself toilet in the country: photos, ideas and construction tips
The design of the closet can be the most diverse and include an additional shower and utility unit. If you combine these buildings, you can simultaneously save on the manufacture of a shower pit and a storage base for garden tools. Below is a do-it-yourself toilet in the country: photos and various interesting solutions.

With the growing popularity of wooden construction, many options for ready-made outhouses made of logs and timber have appeared on sale.

Another option for the booth is a plastic construction. It is not very beautiful, but it looks neat and easy to wash and clean.

A garden toilet made of brick or stone is a solid and durable structure. It is usually erected from "junk" bricks and lined with stone, tile or simply plastered.

Craftsmen offer original designs from improvised materials. Closet can be arranged from car tires, glass bottles or firewood.

We also recommend
 Productive and reproductive thinking
 Reasonable egoism - what is the theory of reasonable egoism?
 Boris Nikolaevich Yeltsin, the first President of Russia
 Underground fights. Underground kings. What is “fighting not for the masses”? Where can you fight for money?
 Yakov Pavlov and Other Heroes of Stalingrad You Need to Know
 Survive an accident at sea in a dream - in reality experience a new love