How to decorate a closet. Cabinet design: decor of old objects, corner, book, built-in structures
How to update an old closet? Surely many people had a similar question, because over time, every interior becomes boring and nondescript. In this case, it is not necessary to spend money on new furniture. Even an old wardrobe is easy to transform with your own hands, “rewarding” it with a more attractive appearance. To do this, you can use both professional materials and improvised means.
If you are no longer attracted to your own wardrobe, kitchen or bookcase, then you should definitely take the time to read this article. In it you will find a lot of useful and interesting information related to the reconstruction of furniture at home.
We update the old wardrobe with our own hands
As mentioned earlier, almost any materials will fit to update an old cabinet with your own hands. Various stickers and photographs are even suitable for this purpose. For a better transformation of furniture, you can use the following accessories:
- photo wallpaper;
- paint;
- stained glass film (self-adhesive);
- textured decorative plaster;
- vinyl stickers;
- photo printing;
- any fabric;
- broken tiles, etc.
We describe the use of these materials in the table below.
Affiliation | Step-by-step instruction |
photo wallpaper | Compared to photo printing, photo wallpapers are more affordable and economical decorative elements. Usually they are decorated with mirrored wardrobe doors. Before sticking such wallpaper, the surface must be washed and wiped dry, and so that in the future the pattern can be replaced with another at any time, glue the material with glue, which includes starch. |
vinyl stickers | With the help of these self-adhesive items, absolutely any wardrobe can be updated: wooden, lacquered, polished, etc. To use the vinyl stickers, you just need to peel off the base and stick it in the right place, for example, on a mirror or on a wardrobe door. Such decorative elements are also removed very easily. If necessary, they can always be replaced with another decoration. |
ordinary wallpaper | If you still have a roll of unused wallpaper after repair, do not throw it away. With the help of such paper, you can beautifully update an old wardrobe. To do this, the surface of the wardrobe must first be degreased. This can be done with ordinary alcohol, as well as acetone and gasoline. After gluing a sheet of wallpaper, it is necessary to level it with a dry rag, so that later there are no tubercles with air on the surface. |
decorative plaster | With the help of a similar mixture and a stencil, it is easy to transform even the oldest cabinet. This method is recommended for updating wooden surfaces. If the furniture is covered with paint, then it must be cleaned off. Before applying decorative plaster, the chiffonier should be wiped and cleaned of fatty deposits, if any. If there are cracks, cover them with putty. After that, proceed to the design of furniture. To do this, attach a stencil to the surface (you can use adhesive tape). Next, fill all the holes in it with prepared plaster. Without waiting for the mixture to solidify, remove the stencil fixture, and correct the resulting patterns, if necessary. When the plaster dries well, sand it, and then cover the entire wardrobe with acrylic paint. The final layer will be varnish. It turns out very beautiful and stylish. |
broken tiles | You can beautifully update the closet with broken tiles. To do this, it only needs to be glued to the surface of the wardrobe in the form of a mosaic. This option is especially suitable for kitchen and wardrobe furniture. |
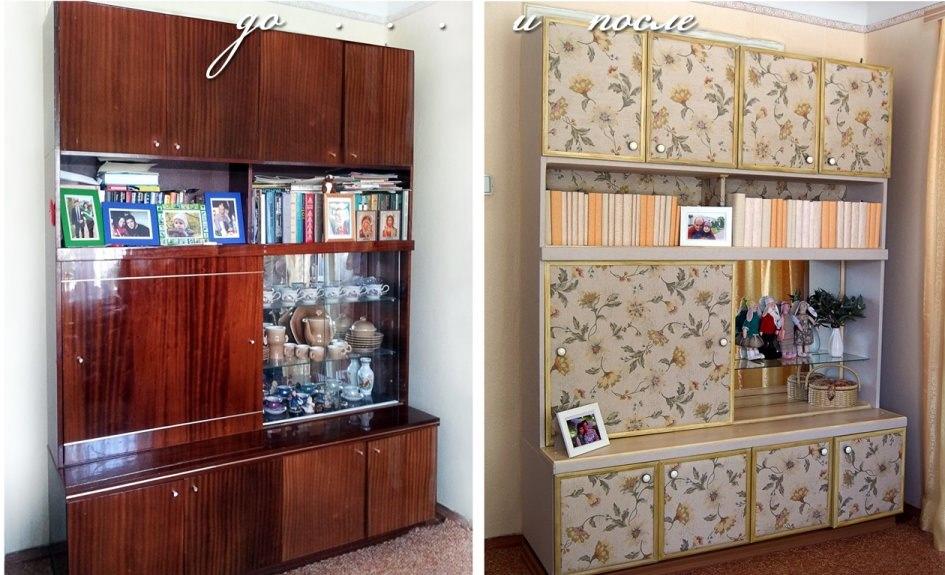
Often, ordinary beautiful fabric is used to decorate the hostess' wardrobe. As a rule, only the doors of the object are covered with it, having pre-upholstered them with foam rubber or synthetic winterizer. To fix the material, it is allowed to use both liquid nails and a special stapler for furniture. This method is convenient in that the fabric can be removed at any time and, if necessary, replaced with another if the interior of the room has changed. |
In addition, there are many more ways to update the cabinet with your own hands. For example, you can make a popular slate board out of its doors (see photo). To do this, it is enough to purchase only a special coating with the effect of a blackboard (paint, film, etc.). This option is ideal for a children's bedroom. In other rooms, furniture can be decorated with various rivets and other similar elements. Thus, it is possible to transform both an ordinary wardrobe, and a corner and built-in one.

What do you need to know?
What else do you need to know if you decide to update your wardrobe? Almost all old furniture, in addition to changing the appearance, requires careful restoration, which can be done with a single surface treatment or a complete replacement of wood. Follow this principle.
- If the structure of the cabinet has begun to deteriorate in places, then it is recommended to go through the cabinet with a hard washcloth before decorating. This will help remove the damaged top layer. After treatment, the areas must be washed from dust and dried in the fresh air.
- If there are various defects on the furniture (holes, scratches), a thin layer of putty should be applied to the surface, and then allowed to dry completely.
- If any metal parts in the cabinet have begun to rust, then you can stop this process and remove contamination using special anti-rust products.
- When painting furniture, it is best to use acrylic paint. However, if you prefer enamel, then it is desirable that it be alkyd, since such paint is primarily of high quality.
- If you want the cabinet to acquire a varnish coating, then it is recommended to use spray varnishes to update it. In this form, they carefully process the surface.
Now you have the necessary knowledge on the correct technique for updating an old cabinet. We hope you take them into account and use them as soon as necessary. Give your old furniture a new life!

". When it was ordered, there were only two budget filling options: chipboard and a mirror. I chose a mirror for reasons of visual expansion of the space (the room is elongated, and the closet is located on the long side). However, it didn't turn out too well. Therefore, I came to the need to decorate the wardrobe - compartment with my own hands. I present a detailed master class on decorating a wardrobe.
I thought long and hard about how. I wanted it to be cute, and not too long and expensive, and durable. As a result, I settled on a simple imitation of a stained-glass window using special stained-glass contours and paints. The colors are bright, do not fade over time (sometimes I paint bottles as a hobby, so I had some practical experience), they are quite durable.
Drawing layout
I didn’t want to be completely without a mirror in my wardrobe. Therefore, it was decided to leave three mirror ovals: one for each door. A large one is in the center, and two smaller ones are on the side doors, more for composition than for practical reasons. And decorate the remaining space with a pattern.
As a motive for a stained-glass window, such a blank was found on the Internet (there are many of them on the websites of companies involved in the manufacture of wardrobes).  And I began to think about how best to transfer it to the mirror. What was clear. A permanent marker draws great on a mirror and glass surface.
But how exactly to transfer the decor of the cabinet - a compartment with your own hands, I had to think. Compositionally, the drawing more or less suited (empty fragments approximately where I wanted to leave the mirror). However, if I simply superimpose my ovals on the picture, a significant part of the picture will be covered, which, of course, I did not want. Therefore, I decided not to be smart with the transfer “in squares”, stencils and other things, but simply redraw “by eye”, so that the flowers are located around the mirrors.
But first, the actual ovals had to be applied. They were supposed to be located in the center. Therefore, with the help of a marker, I applied the middle axes on each door (I washed the door first). However, it turned out that, since the wardrobe is installed next to the bed, visually the ovals located in the middle look “fallen” down. Therefore, the horizontal axis was shifted upward visually by about 15 cm.
Next, I cut out oval templates from old newspapers, attached them to the doors, fixed them in fragments with masking tape and circled them. Then she drew a picture. By the way, the bad lines of a permanent marker can be erased with alcohol or something containing alcohol.  And there were too many bad lines, but, in the end, I managed to create a nice, in my opinion, drawing.
The decor of the cabinet is a do-it-yourself compartment. Drawing contours
All markings were carried out on the doors installed in the cabinet (By the way, how to make a cabinet - compartment yourself, read, and the processes of self-assembly and installation of cabinet doors - compartment are described in detail). Then clean the door again (they gather dust terribly fast) with glass cleaner. It, apparently, also contains alcohol, so you need to act as quickly as possible: just apply it, and immediately remove it with a rag. And even so, the drawing is partially erased, small gaps appear in the lines.
I remove (using the “husband” tool) the door and lay it on the floor. So it will be more convenient to work with it further, and the stained-glass paints that will be used to decorate the cabinet - a compartment with your own hands, will be distributed evenly in the contour. (In the photo, the door that was completed last, so the finished door installed in the closet is visible in the reflection). 
I outline the marker lines with a black outline. True, "circle" - to say it is wrong. It is better to keep the contour hanging a little above the surface of the mirror. So the "sausage" squeezed out of the tube is more controlled, it is easy to put it where it is needed. If everyone missed it, you can gently move the unfrozen contour with a toothpick. 
The surface of the mirror is large, so when the stroke is finished, the edge where the work began is already dry. So, I wash off the remnants of the marker, taken out from under the contour, with alcohol and proceed to decorating with a golden contour.
I divide the background space into separate “glasses” with it. I apply without marking, "as it fell on my soul." I try to keep the lines light and even, without trembling. I create a drawing randomly. True, I wanted to make some kind of imitation of bright colors against the background of a forest or jungle, so in some places you can see the contours of branches, vines, leaves.
When finished, leave to dry completely.
The decor of the cabinet is a do-it-yourself compartment. I paint stained glass
Once again my door. This time I wipe with alcohol inside the contours to remove dust (where it comes from!) and degrease the surface for paint. First I wipe the main drawing, fill it in, then the background. I mentally divide the background of each door into four parts: I paint over one part, then mine the next.I start filling the contours with paint from the main drawing. To make it look more contrasting to the background, I chose cold shades for flowers and leaves, and warm golden-ocher ones for the background.
I start with flowers. As planned, the flowers should be opaque in order to make them stand out from the background as much as possible. For this, white stained glass paint is used. When added to any other, it looks like an opaque colored enamel. In order not to miss a single fragment, I first apply a thin layer of white paint inside the contour. Then I add crimson and white in different proportions. I level with a brush and mix so as to create a semblance of volume and imitate veins on the petals. 
I want to focus on one point: for this stained glass window, I used water-based and organic-based paint. This is probably not the way to do it, but I had no choice: the store simply did not have the right amount of paint with the same base.
In stained glass paints, different colors can be mixed. But!!! In no case should paints be combined with different bases. They react chemically with precipitation. In practice, a sort of muddy "snot" is formed at the confluence. Therefore, water - with water, organic - with organic. Within the contours, even in the neighborhood, paints with different bases behave decently.
In general, stained glass paints on a water and organic basis are distinguished by a number of properties, which, probably, can only be known by working with them. Organic paints dry a little more transparent, adhere well to glass, but if necessary, they can be easily removed by picking up the edge. Filmed in one piece. When thickening, they are diluted with a special thinner. Their main drawback is a specific unpleasant smell, which disappears for an extremely long time, especially if the product is large. Water ones - when thickened, they are diluted with water, they practically have no smell. But removing them, even with a strong desire, is not at all easy: if you manage to pry a hard surface, then a small piece breaks off. In general, much more time and effort is needed.
Use different brushes for water and organics. But for each color separately - it's not worth it. Paints are mixed almost everywhere, and even where you paint in one color, it is not noticeable.
Even during application and, especially, mixing, a lot of air bubbles form in the paint. It doesn’t look too good, so if possible we expel them with a brush to the edges of the cells. Most of it breaks, but some percentage remains. On small items like bottles, I usually pierce them with a needle. But in the volume of the closet ... In general, I decided not to bother, let it be, as it will.
Then I fill in the leaves. They are small and, as planned, should be bright, saturated. Therefore, I apply the paint directly from the tube, without a brush. Here again two colors: olive and emerald. Olive - very dark, so I bring out the streaks with it. I fill the remaining space with emerald. 
 I paint the branches brown and orange.
I'm moving on to the background. Here a surprise awaited me. As planned, the background is different shades of yellow. In fact, it turned out that the paint called “light yellow” is really yellow, but just “yellow” is actually light orange. But, the paint is bought, there is nothing to do ... Well, the color scheme in general - it came up)
In addition to yellow and orange, I also bought white and colorless paints. With the help of the latter, a variety of shades will be created so that the background does not look monotonous yellow. I apply with a brush, I choose the color arbitrarily. 
Another "surprise" came when I finished the first door. The fragments, where white and colored organic-based paint was mixed, began to become cloudy when dried, gradually turning into ugly “chalky” stains.
It was evening, upset, I went to bed with thoughts about how tomorrow I would clean the muddy paint, repaint, buy more material ...

Divorces are visible here.

The door is dry and there are no streaks
But by morning everything was dry, the paint became translucent, uniform, as intended). 
I painted the other two doors in the same way.
True, with the third door, everything was a little different. I didn’t have enough contour with a wide nose for it. In the store, he also ran out, I had to buy a contour with a nose long and thin and simply cut it off to get a line of the desired thickness. Unfortunately, the composition of the contours is also different. For thin lines, the contour is more liquid and plastic. Therefore, it keeps its shape worse. I don’t know how visible it is, but the contour turned out to be less embossed.
After drying, the doors were installed in the closet. Here's what it looks like now. 
The decor of the cabinet is a do-it-yourself compartment. Labor and cost
So, I consider the time costs:
- Preparatory stage (search for a sketch, purchase of materials) - 0.5 days
- Marking and decorating with a marker - approximately 1.5 days
- Outlining and painting of stained-glass windows - about 6 days
A total of 8 days in total. The pace surprised me, I assumed that it would take much more time for such a colossus (6 m2).
Now for the consumption of material and cost:

- Contours:
- Black — 7 pcs
- Golden - 6 pcs
- Organic based paint
- Yellow - 12 pcs
- Orange - 1 pc.
- White — 4 pcs
- Antique white — 5 pcs
- Thinner - 1 pc.
- Water based paint
- yellow - 7 pcs
- White - 1 pc.
- Colorless - 4 pcs
- Brown - 2 pcs
- Scarlet - 1 pc.
- Emerald - 1 pc
- Olive - 1pc
Total: (7+6)*90 + (12+1+4+5+1)*65 + (7+1+4+2+1+1+1)*55 = 3600 rubles.
In comparison, even with a simple sandblasted pattern, the difference is about an order of magnitude.
The decor of the cabinet is a do-it-yourself compartment. Conclusion
Despite the noticeable man-made and "homespun" stained-glass window, in my opinion, this is exactly the element that my bedroom lacked to make it homely. The mirror at the base reflects the light, illuminating the image from the inside, which makes it similar in saturation and brightness to a real stained glass window. A beautiful carved yellow-orange reflection where the cabinet is adjacent to the wall, enlivened the surface, gave it a certain unusualness. In general, the do-it-yourself decor of the closet-coupe evokes only positive emotions in me, which I wish you too.)


Currently, in stores you can find an endless number of all kinds of cabinets, chests of drawers, shelving, hanging shelves, multifunctional boxes for clothes and personal items. But if you decide not to plunge into a long search, but to follow the thread of your imagination, then with the help of the following master classes you will learn how to update an old wardrobe with your own hands beyond recognition.
After reading the article, you should not have any questions about how to paint lacquered, chipboard or wooden cabinet, what paint to paint and make it suit your own style, and you will also learn some of the intricacies of this work.

- Painting— This is the most reliable and capital method.
- Wallpaper, self-adhesive film and decoupage- choosing this method, remember that it is not durable!
- Covering with fabric and decor with carnations - also
The best method for updating any chipboard or wooden cabinet is, of course, painting - it is not as expensive as it seems at first glance and is quite simple to perform.


Painting a wooden cabinet from chipboard
Paint selection
- For processing wood and chipboard, you can use alkyd or acrylic,
- spray or regular wood paint,
- for deeper staining - varnishes, but most often preference is given acrylic paint m.
They are non-toxic, dry at room temperature, which in our case is very convenient when painting home furniture, they are presented in stores in the widest range, they can colorful b, i.e. dilute with white paint, achieving the desired color. In addition, there is a choice of acrylic paints with a mother-of-pearl effect or, for example, metallic.
Aerosol acrylic paint adheres better than conventional paint to the surface, creating a smooth and evenly painted texture. It is easy to work with for both professionals and beginners.


- Lacquers are mainly used to give antique furniture, but well-groomed appearance, noble and rich. In this case, the surface is painted over several times after each layer has completely dried.
- Varnishes are also needed to fix the color and protect the surface from scratches and minor damage.
- Lacquer will be needed even if you decide to paint the chest of drawers antique or in Provence style.

The choice of brushes and roller
After choosing a paint, special attention should be paid to brushes and rollers. Why not save on painting supplies if you decide to update the chest of drawers with your own hands?
- With the right technology for processing the old surface and good painting, the cabinet will maintain its appearance for several years.
- When using bad brushes, you will not save freshly painted furniture from sticking hairs or lint, which is almost impossible to fix imperceptibly.

If your task is to paint a large smooth surface, then for work suitable for both roller and aerosols.

ATTENTION: Do not leave the brushes dry during work, it is better to put them in a jar of water, otherwise they will quickly become unusable
Technologies and methods of painting
Do not forget about other important painting tools and materials, such as sandpaper or grinder, primer, putty, thinner and varnish. All this is necessary to comply with the technology of proper staining.

Equipment:
- Sandpaper different grit is needed for preliminary rubbing of the old layer of paint and surface polishing.
- Primer needed for sealing small cracks on the surface of wood or chipboard.
- Putty (you can take a car putty) and a spatula will come in handy if there are deep scratches, chips.
- A solvent or white spirit is needed to degrease the surface before painting for better impregnation.
- The varnish performs a protective function and gives the furniture a shine.

In general, preparing a cabinet for painting consists of 5 short but very important steps.
- To start carefully remove the old paint and with medium-grain sanding paper(or machines) level the work surface.
- All dust must be brushed off, but without using wet rags, sponges etc. Otherwise, the old paint will only absorb better, and the new one will fall poorly.
- After processing with the finest grain degrease with white spirit(acetone) and apply a primer coat for better adhesion to the paint.
- If there are large chips, then pre-fill them with putty and rub them to a smooth state. After that, we apply one or two coats of primer.

When you know all the preparation steps, it's time to move on to the main step and figure out how to paint a wooden chest of drawers and chipboard.
Master class number 1. Painting under the stencil
Everything is mixed up in this closet - romanticism, Chinese motifs, and even something from Gzhel. Everyone sees something different in him. Let's learn painting techniques.

Materials and tools
- Prepared cabinet;
- white paint;
- solvent;
- spray paint blue;
- gold paint;
- stencil;
- brushes.
Walkthrough
Step 1.
- We remove all fittings, locks, handles, etc. from the cabinet. Using familiar technology, we will prepare a wooden cabinet for painting.
- On the working surface (on the floor) we spread newspapers or a large piece of polyethylene so as not to spoil other furniture.

Step 2
- We take white enamel and solvent. In a small plastic jar, dilute the paint and solvent according to the instructions on the paint jar.
- The paint consumption is also written on the bank, it is better to use this information and dilute the required amount immediately. If you mix a little paint, then the second time you can get a different color.
- Making the background of the picture applying the first coat of paint. Leave until completely dry.


Step 3
- If the color is saturated and you like it, then take a stencil and put it on the cabinet. Gently glue on the front side and side walls so that there are no bubbles.
- Shake the spray paint well and spray it on the stencil. For an even color, one layer of blue paint will be enough, so we do everything the first time.

Step 4
While the blue paint dries paint accessories taken from the closet, in gold leaf. After the parts are dry, screw them into place.
We remove the stencil from the closet and place it in the most prominent place in the room - because now it deserves special attention!


You can decorate the cabinet under the stencil, for example, with flowers.


Master class number 2. Updating the cabinet from chipboard
This closet looked very cheap as it was designed from chipboard. But we updated it with a beautiful ornament for the children's room, now it can even fit into the interior of high-tech or modern.

Materials and tools
- Prepared cabinet;
- white paint;
- pencil;
- building level;
- sponge-brush;
- masking tape;
- additionally: protective paint (enamel).
decor process
Step 1.
- Prepare furniture by cleaning surfaces from roughness, chips, cracks with putty and primer.
- After using special means, you need to give dry surfaces completely.
- Take painter's tape and stick it on the front side of the dresser according to your individual idea.
- We make combinations of triangles along the upper and lower edges, rhombuses in the middle, rectangles in the upper and lower parts. We cut off the strips and make shapes out of them, as shown in the photo.

- We make a rhombus by cutting strips of the same length and placing them perpendicular to each other.
- To make rectangles, first stick the tape evenly, parallel to the cut of the chest of drawers, and with the help of a building level and a pencil, mark equal intervals. Cut through one.
TIP: Pay attention to the placement of the fittings (handles, locks) and the gaps between the drawers - let it be symmetrical rather than even.


Step 2

Step 5
The final stage is the application of protective enamel. It will extend the life of the chipboard cabinet and protect against small mechanical influences such as moisture and dust.
And now the stylish wardrobe is ready for active use!

Color options can also be as in the photo below.


Master class number 3. Painting a polished cabinet
Someone can’t believe that you can make such a vintage-style candy out of an old polished cabinet, and without losing functionality. And then it is told how to do it.

Materials and tools.
- Old polished cabinet;
- vintage paint (plain acrylic matte);
- white spirit or acetone;
- brushes;
- sandpaper or grinder;
- golden drawer handles.

Coloring process
Step 1.
Despite the fact that we create a vintage effect, the real shabby chest of drawers is useless. Therefore, we carefully prepare it for painting.
- To do this, we remove all the old fittings and use a grinder to process the entire surface of the chest of drawers. First we use coarse sandpaper, then fine-grained sandpaper.
- Puttying and priming is not necessary, except for serious chips on the surface. Degrease the surface with white spirit or acetone, let it dry.
TIP: Since the paint will be applied in several layers, it is very important that it is well absorbed into the wood.

Step 2
- We cover with the first coat of paint. Very thin, you can not try too hard and leave unpainted places.
- We rub the first layer with fine-grained sandpaper. We clean from dust, but do not use wet rags, sponges, etc. in the process. Wash only with a dry cotton lint-free cloth.
- Next, apply a second coat of paint, also rubbing it. Let it dry and rub again a little.
- So repeat until the color becomes even, but a little rough. For this we used matte paint with a vintage effect. After a few days, it will completely absorb and dry out and begin to turn yellow (pay attention to the instructions on the can so that you do not have to repaint everything again later). To avoid this, you can try this staining method on a small and inconspicuous area. Proceed to full coloring when you are satisfied with the result.

If you bought new handles, check if they match your color and screw them into place. Golden brass carved handles with patterns fit the white antique chest of drawers.
Check the chest of drawers for compliance with your requirements - it is still comfortable, beautiful, and here's the paradox - modern. Vintage is in fashion now!


Wallpaper or film
When applying film or any other paper covering to update the cabinet, it should be remembered that we use the cabinet every day. And usually such a coating does not last long, but it is very simple in execution.


Cloth covered
This is the most painstaking way to update the cabinet, when the fabric is stretched over the entire plane. The method is quite outdated. But maybe someone will like it.


Dot painting for a polished cafe
Dot painting is perfect for a polished cabinet. In this case, it is not necessary to remove the varnish and grind the surface. The technique is simple:
- Draw with a marker
- The marker is painted with paint using dots. Details - here.


Ideas for updating the closet


Decorative design of furniture can be called real creativity, in which there is no place for fuss. Perhaps you have also been thinking about updating your old furniture for a long time, but all the time you were afraid to spoil it outwardly with a closet that has become familiar or out of fashion? Then consider several options, techniques and ideas that allow you to radically change the design of the cabinet with your own hands. Maybe you will like something. In fact, even from an old simple wardrobe, you can make an original, stylish and unique piece.
Popular furniture decoration options
DIY wardrobe decoration can be done using the techniques and ideas below. Among them there are, for example, color film or photo printing, which do not require any skills at all. The same options as using stencils or matting are not for everyone - some skills will still be required here.
First, find out with what you can decorate cabinets:
- Photo wallpaper or photo printing.
- Matting mirror or glass.
- Vinyl stickers or stained glass film.
- Decorative plaster (stencils).
- Ordinary or vinyl wallpaper.
- Painting or restoration.
Now let's take a closer look at all the decor methods.
Application of photo wallpaper or photo printing
This technique is mainly used to decorate cabinet doors. By the way, large-format printing has long been used in interior design. The drawing is applied to paper using a special printer. The difficulty lies only in the fact that this service is not cheap - you need to look for a workshop that specializes in providing this service.
It is much cheaper to paste over the cabinet with wallpaper, more precisely with photo wallpaper. They sell them on the Internet and hardware stores. Their themes can be the most diverse - landscapes, animals, flower arrangements, fairy-tale characters, cartoon characters.
Important! They are glued with starch-based glue, so in the future it will be quite easy to remove the pattern and replace it with any other.
Decoration with vinyl stickers and stained glass film
If you are looking for an option on how to decorate a closet with your own hands so that it is as simple as possible in terms of execution, then stop at vinyl stickers and stained glass film, because it is easy to apply them yourself. Your closet will become more presentable thanks to the decor. By the way, stained glass windows are at the peak of popularity today.
Important! In addition to decoration, the film protects the surface of the cabinet from various damages.
You can also remove such a sticker with your own hands. Believe me, no one will be able to distinguish your hand-made imitation from a real stained glass window. The cost of the material depends on the size.
Important! Since the stained glass film has a self-adhesive base, you can periodically change the surroundings.
Matting mirrors or glass
This is a great idea how to decorate a mirror on a closet. It is more suitable for wardrobes.
Important! Matting in industrial conditions involves the removal of the top layer of glass or mirror, resulting in a three-dimensional multi-level image.
You can make matting with your own hands using a special paste. You will also need a spatula for rubber and a stencil for work:
- It is placed on the surface, the paste is applied on top with a spatula.
- In this form, everything remains for a while.
- In the case of using a paste with abrasive particles, it will take about an hour to rub on the glass.
- The rest is washed off with plain water.
Decoration with vinyl or plain wallpaper
Perhaps after the repair you have a large amount of materials left, then an idea will come in handy on how to paste over the cabinet with wallpaper in order to update it.
Features of the use of materials:
- You can decorate the closet with simple paper wallpaper, which is enough to coat with glue, then glue. And they are inexpensive, much less than vinyl counterparts. But they have two disadvantages: an uninteresting pattern, a low level of strength.
- Vinyl wallpaper can have a non-woven or paper backing. They are heavier and require mandatory degreasing before sticking.
The use of decorative plaster
If you master how to decorate a cabinet with decorative plaster, then you will get a rather voluminous decoration through the use of relief elements. If desired, they can be painted in any shade.
For decoration you will need:
- Plaster.
- Plastic, cardboard or vinyl stencil.
- Old closet.
- Masking tape.
- Flat spatula.
- Acrylic paint.
- Sandpaper.

How to proceed:
- If the cabinet is already covered with paint, then its surface should be treated with sandpaper until the wooden base begins to be seen.
- If it is not painted, then it is necessary to remove the top layer with sandpaper, then remove the fat.
- Fill existing cracks.
- Then take the finished stencil, attach it to the door, secure with tape.
- Using a flat trowel, apply decorative plaster to the stencil, filling in each depression.
- Remove the stencil without waiting for the plaster to harden, correct all irregularities with a knife.
- Let the plaster dry, then paint the cabinet with several coats of acrylic paint.
- At the very end, varnish the surface.
Decor with paint and wallpaper
In this section, we will learn how to decorate an old cabinet with paint. Prepare for work:
- Old closet.
- Acrylic lacquer.
- Acrylic paint based on enamel.
- PVA glue.
- Paper wallpaper.
- Paint roller or brush.
- Fine and coarse sandpaper.
- Gold paint.
- New fittings.
Below we will consider how to decorate an old wardrobe in stages:
- First, disassemble the cabinet, pull out all the drawers.
- Take sandpaper, process the surfaces of all parts.
- Apply paint with a brush first in the corners, then with a roller go over the entire surface.
Important! It is necessary to paint until the dark color disappears.
- Decorate the drawers: paint their front sides with white acrylic. Wait for it to dry.
- Glue tape to decorate each element with “golden” paint. Cover all the details with it.
- Paint all the drawers with white paint. Remove the tape.
- Take the wallpaper, cut strips from them, coat them with glue, carefully glue them.
- Glue wallpaper to the inside of the cabinet.
- Carefully paint over everything that remains dark, at the same time inserting brand new fittings.
Coloring and restoration
Before you decorate an old wardrobe with your own hands at home, carefully inspect it - it may need restoration. It often happens that old furniture needs to be slightly corrected, repaired.
To decorate any piece of furniture, special skills are not needed. Master classes, tips, a lot of photos from the Internet can inspire even an amateur to seriously transform furniture. So, an old wardrobe, which is kept only because it is a pity to throw it away, can be updated and remade for the interior. The most common way is decoupage, but there are other possibilities for transformation.
This piece of furniture will be processed in the same way as other surfaces for decoupage. But there are still some subtleties. The basic set of necessary materials includes: acrylic varnish and acrylic paints, decoupage glue (in the absence of such, you can use PVA glue), napkins and brushes.

The decoupage technique with which you have to update the closet is as follows:
- If the cabinet is polished, acrylic paint will not adhere as well to this surface, but the situation can be corrected by repeated subsequent application of varnish.
- If the cabinet is not wooden, then the surface to be decorated must be treated with fat-dissolving agents (ordinary dishwashing detergent will do).
- Several layers of acrylic paint are applied to the surface to be modified.
- Next, you have to stick the picture: for this, two light layers are put on from the napkin, only the top one remains.
- The surface is carefully smeared with glue, a pattern is glued onto it, and carefully straightened with a sponge.
- The pattern can be additionally fixed along the edges with a brush with glue. When the napkin dries completely, the surface is covered with acrylic varnish.
- The second layer of varnish is applied only after the first has dried well.
- To give the effect of aging, which decoupage is so famous for, you can apply a special craquelure varnish. It creates small cracks on the surface.
With your own hands, you can choose any pattern that adorns the surface of the cabinet. It can be special decoupage paper, wallpaper and fabric.
For kitchen cabinets - decoupage is just a godsend. An old headset can be updated with your own hands, and it will be cheap. Simple plant motifs, acrylic paints in pastel colors or delicate herbal ones will be a good background. Acrylic paint is an excellent primer. Such a kitchen set will be original, fresh, and it will convey the atmosphere of home comfort in the best possible way. And you can start your decoupage experiments by updating a simple stool, so that after getting the hang of it, you can move on to transforming cabinets with your own hands.
Do-it-yourself decoupage of old furniture (video)
Restoring a closet with fabric
Furniture decoupage includes many details, but sometimes individual components of decoupage turn into a special technique. You can decorate the closet with fabric. For lovers of tenderness, natural elegance, country motifs in the interior, this method will be good.
Do-it-yourself fabric upholstery of the cabinet is as follows:
- Separate parts of furniture, drawers, doors or other ledges can be upholstered with fabric, under which it is necessary to put thin foam rubber.
- The fabric is fixed on the back of the door or drawer - this is done using a furniture stapler. Liquid nails are acceptable.
- The fabric is chosen to match the wallpaper, then the combination will be really harmonious and elegant. You should choose dense fabrics that do not deform from stretching.
Often it is such a restoration that transforms the chest of drawers.


Restoration of the cabinet with wallpaper
With your own hands, you can also give a new life to the closet, while using the remnants of wallpaper.
An old-fashioned wardrobe is painted with more than one layer of acrylic paint. The paint should have a color whose response is in the wallpaper pattern. Many masters restore cabinets with two doors in this way, very old, perhaps not even homemade. Often master classes show how to transform a locker, for example, decommissioned from a doctor's office. They are low, their doors have a relief structure.
Either the front of the cabinets, or the doors, or the inner wall are pasted over with wallpaper. Restoration can not only put a thing back into operation, but also make it the most fashionable piece of furniture.

Antique closet restoration
Decoupage includes elements of aging furniture, but there are also separate techniques that allow you to decorate this or that antique item. Such vintage furniture can decorate a classic interior, or a retro interior.
With your own hands, you can gracefully age the closet, and the following tricks will help with this:
- First of all, the object must be freed from paint, for this it is better not to find a grinder. After that, the furniture is degreased with a solvent.
- The next step is to apply a layer of primer. You do not need to try to damage the cabinet with your own hands so that cracks appear on it. Craquelure varnish, which is applied as the next layer after the primer has dried, will do just fine.


- Coniferous cabinets can be updated as follows: treat the surface with a metal brush to create characteristic furrows. Then the wood is covered with dark paint, and until the paint has dried, a cloth is passed over the furniture. This process is called patting.
The restoration is completed by applying varnish.
Decorating furniture with your own hands. Master class (video)
All of the above methods, which are easy to do with your own hands, can be used fragmentarily. A decoupage detail or wallpaper upholstery of a small ledge on a cabinet - all this serves as a decoration for furniture that needs to be updated.
Good luck with your transformation!
Creative ideas for decorating old furniture (photo)


We also recommend
 Productive and reproductive thinking
 Reasonable egoism - what is the theory of reasonable egoism?
 Boris Nikolaevich Yeltsin, the first President of Russia
 Underground fights. Underground kings. What is “fighting not for the masses”? Where can you fight for money?
 Yakov Pavlov and Other Heroes of Stalingrad You Need to Know
 Survive an accident at sea in a dream - in reality experience a new love