How easy it is to assemble and install an electrical panel in an apartment. Housing shield
Good afternoon, dear readers.
This article is a continuation of the first part. If you haven't read Part 1 yet, please read it first. This article will consider the design and assembly of the shield "on its own", based on the information from the first part of the article and on a specific example from the forum.
Detailed design of a switchboard using an example from the Mastercity forum
I propose to consider the distribution of lines using the example of a topic that appeared on the forum at the time of writing this article - user Alisa Selezneva asked on the Mastercity forum how to assemble a shield in an apartment. An example is very revealing in terms of shield design:So, initial data:
- One-room apartment, in a new building, wiring from the developer for a complete rework.
- A C40 automatic machine is installed in the floor switchboard, the floor switchboard is made according to the "Soviet scheme", that is, in addition to the introductory one, two automatic switches are installed in it - one for light, one for sockets. Therefore, there is a need to lay an input cable ... Alice planned an input cable of 3x6, but according to the recommendations on the forum, it was changed to 3x10.
- The budget allows you to install three high-quality RCDs and circuit breakers from well-known European manufacturers. But, at the same time, the shield is planned without any frills.
- Voltage relay provided. Also, despite the presence of a machine in the entrance, Alice decided to add an introductory machine to the apartment shield. Quite a few people do this, although with simple shield schemes I find it somewhat redundant.
Below is a plan of the apartment "from the developer" to redevelopment. The redevelopment involves a division into a bedroom and a hall (unfortunately, there is no redevelopment drawing).

I give the list of lines presented by Alice already in the processed version, in the form of a table, which I wrote about in the first part of the article:

- On the lighting line - a cable with a cross section of 1.5 squares and an automatic machine no more than 10 amperes.
- On the line of sockets - a cable with a cross section of 2.5 squares and an automatic machine no more than 16 amperes.
- On the hob and instantaneous water heater - a cable with a cross section of 6 squares and an automatic machine no more than 32 amperes.
- Lines of different types should not be mixed with each other. Lighting can be combined with sockets, but then the machine is taken "at a minimum", that is, 10 amperes.
Alice chose characteristic C for herself, since in Ryazan, where she lives, vending machines with characteristic B are rare in warehouses, they should be ordered and waited for (unfortunately, this is true for many cities in Russia). It is for the same reason that many choose C, because there is no other in the shops of their city. Another reason is that C usually costs a little less than B.
But at the same time, there is an important nuance - in the old housing stock, rural areas, garage cooperatives, that is, where the old wiring has high resistance, in the event of a short circuit due to the high resistance of the wiring, the circuit current may not be sufficient to trigger the machine with characteristic C , which will certainly lead to a fire in the wiring during the operation of the second protective mechanism of the machine - a thermal release.
I am sure that the high level of work of this Master, plus ready-made shields for the price of components, will probably please you.
Conclusion
I sincerely hope that this article helped a little for those who decided to assemble the shield themselves or for those who want to figure this issue out on their own.It should be understood that there are a great many architectures of shields and only one of them is presented in the article. Different masters do it differently, I described my vision of a certain “typical” solution.
I hope the article was useful for you. Thank you for attention.
Sincerely, Alex.
Hello dear reader! I hope you find it interesting.
Electrical panel in the apartment
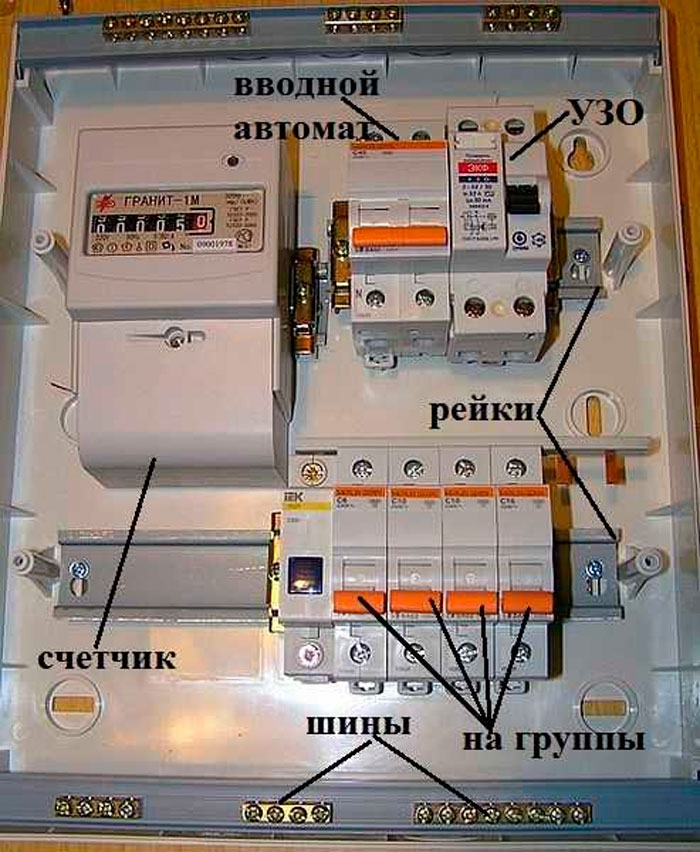
class="eliadunit">Symbols on the electrical circuit of the shield
In the diagram, I tried to define in detail all the symbols for the elements of the shield circuit. It remains to explain them.

Introductory circuit breaker . A device designed to protect the entire electrical network from short circuit currents, as well as for general forced shutdown of the premises from the power supply.
Electric meter. A device for controlling the consumption of electricity. The flow value is displayed in Kilowatt per hour (kWh). According to the indications of the electric meter, payment for electricity is made. Electric meters can be electromechanical and electronic. The latter are programmed.
Differential circuit breaker. This is an electromechanical device that combines a short-circuit circuit breaker and an RCD (residual current device) to protect a person from leakage currents.
Busbars for connecting wires. Each electrical panel is equipped with at least two tires. One for neutral wires, the second for ground wires. In the example of the electrical circuit of the shield of such tires 4 (N; N1; N3; N4)
The switchboard has two separate functional groups (on the right in the diagram). One group for two branches, the second for three. For example, this option is suitable for separate functional groups of the bathroom and kitchen. Or any additions to the house.
Other articles in the section: Wiring
- Introductory machine. Calculation, selection of an introductory machine for an apartment
- Complete set of switchboard, circuit breakers, connection terminals
Normative references:
- PUE (Rules for the Construction of Electrical Installations) ed.7
- GOST R 51628-2000, Switchboards
- GOST 2.702-75, Rules for the implementation of electrical circuits
- (Regulations)
The presence of an electrical panel in a residential area or in a country house allows you to solve two problems at once: distribute the load throughout the room and protect appliances in case of accidents. It is desirable that competent organizations deal with this issue, but if there are some skills in handling electricity, then installing an electrical panel and connecting it will not be difficult. As a rule, the main machine and the meter are connected by the power supply organization, but after the meter you can do the wiring yourself, only before starting you will have to invite representatives of this organization to check everything and measure everything. Naturally, this will cost some money, but still, it will cost much less than if the wiring and installation of the electrical panel were carried out by people from the corresponding company.
The only condition is knowledge of the norms and rules for carrying out such work. After all, the shield, and sockets and switches are installed at a certain height.

Depending on whether it is an apartment or a private house, electrical panels can be installed in different ways, depending on where the meter and introductory machine are installed. Nowadays, the counter and the introductory machine, if you take a private house, are installed outside, in a place convenient for control. The shield is installed inside the house, where it is convenient to control the electric lighting and operating electrical appliances. A few decades ago, both the meter and the protective "plugs" were installed in the house, which was extremely inconvenient for controlling organizations. They had to enter private houses, which the owners did not like very much. Now, when the meter is located on the street, it is convenient to control and reduce readings.
Unfortunately, this option is not always and everywhere possible. In this case, the meter is placed in the apartment in the panel, where the shutdown machines are also located. Therefore, when installing the shield, it is necessary to take into account the dimensions of the meter and the number of switches.

In apartment buildings, as a rule, meters and introductory machines are located on landings, in special electrical panels, where several meters serving several apartments are placed at once. At the same time, no shields are provided in the apartment, especially if the apartment is not of a modern layout. In the case of repairs in the apartment, the electrical panel is simply necessary, as this will allow you to share the power supply of almost all rooms, which makes them independent. This is especially true in the event of an accident, when it is possible to provide this line with a separate machine and carry out repair work. At the same time, in the remaining rooms, all electrical appliances will function as before.
With electricity, jokes always end in failure, therefore, the issue of safety should come first. There is such a device as an RCD - a residual current device (photo above No. 3), which must be installed in front of the machines that distribute the load in the apartment. This device protects the line even if such leakage is minimal, minimizing electric shock. The RCD is switched on as follows: the phase is connected to the inputs of the automata, and the neutral wire is connected to the neutral common wire. The machines also have built-in protection against overload and short circuits.
Another interesting device, without which sometimes you can’t do at all, is a stabilizer. It's no secret that the quality of our power supply is disgusting: the voltage constantly "jumps" from 160 V to 280 V, which negatively affects the operation of some electrical appliances, the operation of which is controlled by microprocessors. In this regard, such equipment as computers, washing machines, refrigerators, audio and video systems require a stable voltage. If something happens, then their repair can be expensive, therefore, it is better to play it safe and purchase a stabilizer not for the whole apartment, but only for critical household appliances. Naturally, this should be thought about in advance and the responsible power outlets should be combined into one group.

The stabilizer can be installed both on one and on several groups, if you turn it on in front of the machines. At the same time, you need to carefully calculate the required power and take care of a power reserve of at least 20% so that the stabilizer does not overheat. At the same time, one should take into account the fact that the dimensions of the stabilizer will not allow it to be placed in the shield, which means that the stabilizer will have to be installed separately and this must be taken care of in advance.
There are 2 tires in the electrical panel: a ground bus and a neutral bus. All wires connected to the ground of devices and devices are connected to the ground bus. A wire from the RCD (zero) is connected to the grounding bus. The zero line is always indicated by the letter "N" and when wiring, all white or green-yellow wires are connected to it, and the phase wire is always red or brown. That is why, for wiring, it is desirable to use multi-colored wires, so that later you do not have to call each wire. This is especially true for those who do it for the first time: you can wind up such that then specialists will have to figure it out for several days.
All automata in the shield are connected in parallel, or rather, the upper terminals, where the phase is supplied. The lower terminals are each connected to a separate line that feeds individual rooms.
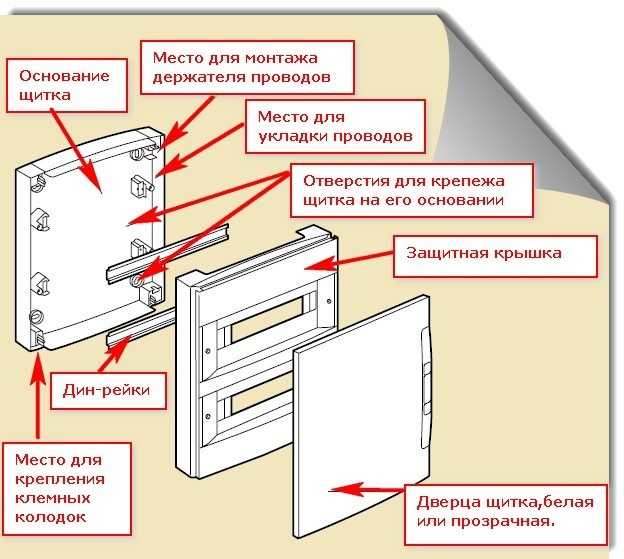
 DIN rail option in shield housing
 RCDs and machines are mounted on a special DIN rail using latches, so there should be no problems with installing such devices.
 Connecting comb for machines in the electrical panel
Schemes for several consumers
Power supply schemes depend on the categories of electrical consumers and on their importance. Groups of electrical consumers are distributed by floors, according to the purpose of the building, according to the number of rooms, etc. Usually they separate living rooms and outbuildings, basements and garages, as well as street lighting. If there are many consumers, then not on each individual line, in addition to the main RCD, separate RCDs of lower power should be installed. The kitchen and bathroom must be protected by protective devices according to a separate scheme.

If it is planned to install consumers with a power of up to 2.5 kW, then it is desirable to install a separate protection. Household appliances such as a microwave oven, an electric kettle and a hair dryer have similar power.
At the stage of developing a power supply circuit for electrical consumers, first of all, one should think not about savings, but about safety. All electrical appliances are purchased only from well-known companies, and they cost a lot of money.
The manufacturer produces various types of shields, both for indoor and outdoor installation. Shields for outdoor installation are fastened with dowels directly to the wall of the building. If the surface is made of wood (fire hazardous), then a non-combustible material, such as asbestos, is placed between the surface and the shield. Such shields are installed in places where they do not interfere with the normal functioning of a person. However, the location must be accessible and convenient to operate. The outer shield rises 12-18 cm above the wall surface and this factor must be taken into account when determining the installation location.

The shield for indoor installation is designed for installation in a specially prepared niche. This type of shields is always on the same level with the surface, therefore, does not pose any danger to normal life.
The body of the shield is made of either metal or plastic. The size can be found under any specific conditions.
As a rule, choose a shield of the appropriate size. It should freely fit all circuit breakers, all RCDs and at the same time there should be enough space for wires. Other than that, nothing should interfere with the connection.
It is very important to determine in advance the number of machines and select the electrical panel of the appropriate dimensions. At the same time, one should not forget that it is possible to expand the electrical network. In this case, there should be room in the shield for at least two machine guns.
Installation and connection of electrical devices
All modern machines and RCDs have a special unified mounting location that is absolutely compatible with the mounting DIN rail located inside the shield, no matter what design it may be. On the reverse side of the machine or RCD, a special latch is mounted, which is folded back with a screwdriver. Everything is very simple: a screwdriver is taken and inserted into the hole, after which you need to pull the latch with force. The device is installed on the bar, and the latch is released. As a result, the machine or RCD is securely held on the DIN rail. At the same time, you can hear a characteristic click.
After installing all the electrical appliances in their place, proceed directly to the connection. First, connect all the wires that provide power to the corresponding groups of objects. Each wire should be marked. For example, when wiring, write on the wires: kitchen, bath, toilet, hallway, bedroom, hall, balcony, etc. If the inscriptions are done in a timely manner, immediately after the wiring, then there should be no problems with the connection. After the wires are connected to each machine to the lower terminals, they begin to connect protective devices and apply voltage to all machines. In this case, all machines must be in the off position (“off”).

The phase wire is connected to the upper terminals of all machines through a protective device, and the neutral wire is connected to a separate zero terminal. Modern requirements predetermine the installation of a two-pole introductory machine.
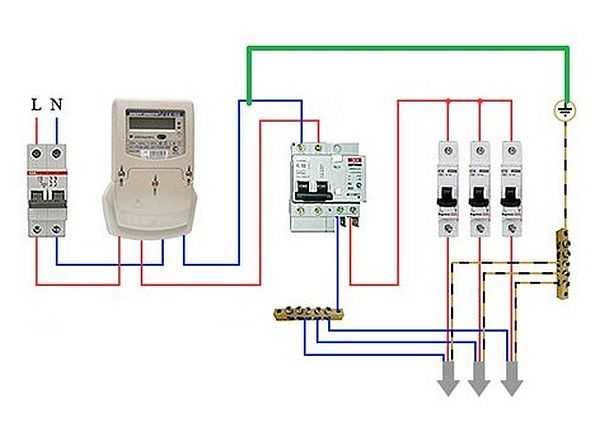
The RCD connection diagram is as follows, as shown in the photo.
How to install an RCD on a DIN rail is shown in the video.
After everything is connected, you need to check everything and only then, one by one, the machines begin to turn on. If you have certain skills, then it is better to check all the wiring for short circuits using the device. After turning on the machine, it is advisable to check the presence of voltage in the room that it protects, if there is no short circuit. If the RCD trips after switching on, then somewhere there is a leak or an implicit short circuit. With an explicit closure, the automaton that was turned on should work. As a rule, group machines are designed for a lower operating current, which means a lower short-circuit current. This approach ensures selectivity of protection.
How to connect an RCD: video.
In the process of self-connecting all the elements in the shield, you should know that the meter and the introductory machine are subject to sealing. In modern electrical panels, everything is provided. Unfortunately, not every model is equipped with a separate box where an introductory machine is installed. If this is not provided for, then the organization will either refuse to seal and write an order, or seal the entire shield, without the right to access it in the future.
In the next video, you can get acquainted with what machines are and how they differ from one another, except for the manufacturer.
Electrical appliances installed inside the shield are interconnected by jumpers from a conventional insulating wire or using a factory-made comb. What is the connection of circuit breakers with wires, you can see in the photo.

Jumpers are made:
- Of conductors of the appropriate length, in which the insulation is removed at both ends, and the ends of the conductors are bent by an arc. Two conductors are inserted into each terminal and only one into the last machine, after which they are securely tightened with screws.
- From one long conductor, from which the insulation is removed after a certain distance. After that, with the help of round-nose pliers and pliers, the conductor is bent in arcs. The bare ends of the arcs are inserted into the terminals and tightened with screws.
Almost all electricians do this, and if you show care and diligence, then the contacts will turn out to be good. At the same time, there is an alternative option when special tires (comb) are used instead of conductors. How to connect all machines using a bus can be seen in the video.
The phase wire is connected to one of the machines, to the upper terminal, where they are connected using a wire or comb. If a wire was used to connect, then power is supplied either to the extreme right or the extreme left automaton, where only one conductor is pressed. If you connect power to other automata, then the connection will not turn out to be so reliable, since there are already two conductors on the terminals of these automata and the third conductor is simply superfluous here.
The right choice of machines
Three types of electrical devices can be installed in the electrical panel:
- Automatic switches (automatic devices). Switching on and off is carried out manually, and in the presence of a short circuit, the machine operates automatically.
- RCD (residual current device). These devices react to increased leakage currents and disconnect the line under such conditions.
- Dif-machine (differential machine). This device, which is able to protect the line, both from short circuits and from increased leakage currents.
The so-called differential automata can replace the RCD and the circuit breaker. This is especially true when there is not enough space.

Due to the fact that differential automata are much more expensive than a simple automaton and an RCD combined, exactly two devices are installed - a circuit breaker and an RCD. In addition, in emergency modes, it is possible to determine what exactly is causing the problems. If this is a short circuit, then the machine is triggered, and if there is a leak somewhere, then the RCD is triggered. If the differential machine works, then it is unlikely that it will be possible to establish the true cause. In this case, you will have to look for the cause, armed with devices.
How do vending machines protect
Automatic switches (automatic devices) are selected according to the operating current, which is determined by the total current consumption of the devices of the corresponding group. To determine the current, you need to add up all the power of household appliances connected to this line and divide by 220V. The circuit breaker is selected with some margin so that it does not trip due to overload. For example, with a total power of 6.6 kW (6600W), if divided by 220V, you get 30A.

Automatic machines are produced with the following current ratings: 6A, 10A, 16A, 20A, 25A, 32A, 40A, 50A and 63A. Based on the calculations, an automatic machine with a working current of 32A is more suitable, and it needs to be installed.
Types and types of RCD
The industry produces RCDs of 2 types: electronic-mechanical and electronic. They differ in some parameters, in addition to this, electronic-mechanical ones are somewhat more expensive. For a house or apartment, those that are more expensive are suitable. The fact is that they are still more reliable and work regardless of the presence of power.
If you turn off the introductory machine and do something, then damaging the insulation, the electronic-mechanical RCD will work and the reason will immediately be clear. In order for the electronic RCD to work, voltage is required, and it will work only after the introductory machine is turned on. As a result, the cause of the emergency shutdown will have to be sought.
To determine which device it is, it is enough to have a battery with wires that connects to any pair of contacts. If this is an electronic RCD, then it will not work, but an electronic-mechanical one will work. You can learn more about this by watching the video.
At the same time, RCDs are distinguished by the nature of the current on which they act:
- AC type - variable, sinusoidal;
- Type A - variable plus pulsating constant;
- Type B - AC plus pulsating, plus pulsating DC, plus DC;
Based on the characteristics, type B is the most versatile device, but they are much more expensive. Type A is enough for a house, although type AC RCDs are also sold as the cheapest. Although many argue that the AC type is not good. In fact, AC-type RCDs are enough for a house, given that few people install them at all. The fact is that although they fully protect, the percentage of false positives that are not related to emergency modes is quite high, and not everyone will like it. This is due to pickups that appear in the power grid from the operation of various household appliances. Fighting them is very difficult, quite expensive, and sometimes pointless.
RCDs are selected according to the rated current and leakage current. Rated or operating current is the current that passes through the contacts without overheating or destroying them. The operating current of the RCD is always chosen to be greater than the operating current of the machine operating in tandem with the RCD. If the machine is designed for an operating current of 25 A, then the operating current of the RCD can be 32 A or even 40 A. As for the leakage current, everything is not at all difficult here. For apartments and houses, RCDs with leakage currents of 10 mA and 30 mA will go. A 10 mA RCD is installed on a line designed for one device, such as a gas boiler, washing machine, electric oven, etc.
In addition, they are installed in rooms where a high degree of protection is required. It can be a bathroom, a children's room, a kitchen, etc. A 30 mA RCD is installed on a line that feeds several electrical consumers. These can be groups of outlets placed in separate rooms. As a rule, RCDs are not installed on the lines that control the operation of lighting. The only place where it may be needed is the garage, as a very responsible building.

In addition, RCDs are distinguished by the delay in the response time. In accordance with this, RCDs are:
- S - selective, which operate after a certain time interval after the appearance of a leakage current. As a rule, they are installed at the entrance, which excludes the possibility of turning off all the machines. In this case, the machine connected to the damaged line will be switched off first.
- J - although they also work after a certain period, but this period is much shorter than that of previous types of RCDs. Such RCDs are installed on entire groups of consumers.
Differential machines are selected in the same way as RCDs. The only thing is that they are selected according to the estimated rated current. To do this, it is enough to calculate the total power of consumers and divide by 220V. A differential circuit breaker is the same circuit breaker, but with a built-in leakage current protection function.
How to install a built-in shield, as well as the procedure for connecting it, can be found in the video, where a generalist will tell and show everything intelligibly.
As a rule, RCDs and differential circuit breakers are regularly checked for operability. To do this, on the body of these devices there is a button "Test", after pressing which, the device should turn off. It is enough to carry out such a check once a month. It is very important.
Electricity is not an area where you can easily save money. Savings can have serious consequences in the future, since electric current poses a certain danger to others if safety measures are ignored. Therefore, you should always install electrical appliances that have protective functions.
The same can be said about the wiring, as well as its connection. Without certain skills, it is difficult to do something well the first time. The task is further complicated by the fact that you have to choose wires both by type and by cross section, especially since different consumers have different capacities.
The electrical panel is a serious device that distributes electricity throughout the house. It performs many functions for safety, protection of wiring from overloads, and distribution of energy to all consumers.
Installation and assembly of the electrical panel
The structure of the electrical panel includes complex modular equipment. If necessary, you can carry out the installation yourself, but first you need to learn how to properly assemble the shield.

To separate work from electrical components and installation of the case, you should purchase a panel on which the frame is removed and there are DIN rails.

There are several types of electrical installations:
- wall mount;
- wall installation.


Consider the second option, since the first is installed simply on the holders. Before you gouge an opening in the wall, you need to make sure that it is not "bearing" in the house. According to the rules, it is impossible to do installation work in it.


The power supply must be visible. Doors should not interfere with his access. For safety reasons, the shield must not be placed near gas pipes and other combustible substances. To place it on the wall, it is necessary to take into account the height from the floor to its lower edge of at least 1.4 m, and the distance of the upper edge from the floor is not more than 1.8 m.

The building level will help to mark the future area. To comply with all dimensions, you can attach the case to the wall and circle it with chalk. A cut is made along the marked lines with a grinder.

A chisel and a puncher will help to hollow out the inside. It is necessary to check the depth of the resulting niche by inserting the body of the electrical panel into it.

First, the mount included in the kit is mounted there. Then the electrical panel. Holes are made for fasteners and dowels are inserted. The remaining cavities are sealed with mounting foam.
DIN rails are unscrewed from the electrical panel in order to install modular equipment on them. If there are no special fasteners in the kit, then you need to drill holes in the back wall of the shield for future fasteners. This is done carefully, from excessive force the case may burst.
How to insert cables correctly
The electrical panel with a removable cover will help to correctly and conveniently insert the wires inside. Conventional enclosures have openings for cables that are slightly cut or extruded. They are located at the top or bottom of the case. They may also be in the back wall.


Poor quality switchboards may not even have a hint of any holes. Then you will have to mark and drill them yourself, not everyone has the patience for this. Therefore, it is better to buy a more expensive case and it will take less time to install it.

In modern cases for the plant of cores there are plugs. They are removed after the shield is installed in the wall. Cables are inserted into the holes obtained. Instead of plugs, there can be stuffing plates.
The first step is to get the input core. It should be located near the input machine. There are comb-type fasteners on the shield, an introductory core should be attached to it. A plastic clamp is used as a tie. Its excess ends are cut off.

The cable is marked with a marking, which is indicated on the diagram. So do with all the veins. After their installation, a removable cover is applied and marks are applied to it. Cutouts are made along them, and the lid falls into place.


How to cut cables inside the shield
It is necessary to remove the insulation from the inserted cores. This process is done carefully, the conductive wires cannot be damaged. Immediately it is re-labeled. This is important because after cutting all the wires, a lot of confusion can occur.

Paper tape is good for tags. Do not forget the main rule: labels must be applied, as indicated on the diagram.
To ensure that the cable is enough for the entire length of the wiring, you need to enter it into the electrical panel and run it to its entire height. Then measure the same distance in height again. The result is a length twice the height of the shield. This supply of cable will allow you to confidently lead it to the desired point according to all the wiring rules, and you can always cut off excess pieces.


Modern modular protection devices
The quality of electricity in modern networks is not always happy. To protect the line from overloads, modular-type protective devices began to be used. The electrical panel with automatic machines will be protected from short circuit. It will immediately react to the appearance of overcurrents. When connecting the machine, you must adhere to the general rule for power supply - it is connected only from above.

The insulation is removed from the wires. The machines have clamping terminals, insert the core into them and tighten with a screw. Be careful not to get insulating materials into the contact of the terminal. If this happens, then electricity may suddenly disappear in the apartment, or the protection device will fail. Perhaps this will lead to a fire.

There is another important rule: do not connect wires of different sections to one AB terminal. A wire with a large cross section will get a good contact when tightened, and a wire with a smaller cross section will get a bad one. The insulation on it will melt and cause a fire.


If the connected core is monolithic, then for good contact, its end should be bent in the shape of a U. The connection area increases, and the contact is reliable.

Stranded wires in the terminals of the machine cannot be tightened without special lugs. Contact will be poor and unreliable. For their switching use:
- tip NShVI (2);
- tip NShV.

Assembly of modular shield elements
For those who have never come across such a task, you can give instructions for assembling an electrical panel. We prepare the workplace, nothing should interfere with the assembly of modules. We make good lighting.

You will need the following modules:
- automatic switch (load switch);
- voltage relay;
- residual current device (RCD);
- differential automata;
- automatic switches;
- cross module.


You can assemble a single-phase shield with your own hands, provided that you have some knowledge of an electrician.


All modules are mounted on a previously removed DIN rail. They are arranged in the same order strictly according to the list. Modules are fastened with special clamps. After checking the correct distribution, proceed to the terminals. They need to loosen the screws.

You will need different types of combs. Introductory clamps (terminals) will help to more conveniently connect the combs to the power wires. They must be placed between the terminal of the module and the comb.

The introductory load switch has a phase output (lower contact) from which a phase is distributed to the RCD, automatic machines and other switches. There are zero clamps on the RCD, they receive a working zero, which is taken from the lower output clamp of the introductory machine.

For further assembly of the electrical panel, one end of the neutral wire must be free. It is connected to the main bus of the working zero. Zero tires and zero outputs of all RCDs are switched with a blue wire.

All unused connections are twisted with a screwdriver. After that, the entire installation is checked. After applying voltage to the introductory machine, press the test button.

The terminals of the circuit breakers are checked for voltage. When they are turned on, the same measurements are taken at the output. To prevent household appliances from burning out from voltage surges, a voltage control relay is installed. The method of assembling a three-phase shield is the same as for a single-phase one. They differ only in the number of conductive wires.

Final assembly
When all modular devices are adjusted and tested, it remains to transfer them to the electrical panel housing. For safety, turn off the power. A niche in the wall is being prepared. The assembled devices on a DIN frame are mounted inside the case.

The main and protective zero tires are mounted. When distributing wires into bundles, it is not recommended to allow their intersections. Protective zero wires are attached to the PE bus. The connection sequence is observed as in the electrical panel diagram. Protective zero before switching with the bus terminal - marked.

When all devices are connected, a check for compliance with the connection diagram begins. On the Internet you can see a photo of the electrical panel in the assembled state.

To check the assembled electrical panel, it is necessary to install all switches and sockets in the apartment. Connect the load to sockets on all lines of powerful consumers. After applying voltage, phases and zeros are checked for compliance.


When the adjustment is over, do not rush to close the electrical panel. He should work for a couple of hours, and then it will become clear whether the assembly was carried out with high quality. Installing and connecting the shield is a laborious process that requires certain knowledge and experience. It should be started after studying the theoretical part, and follow the step-by-step assembly instructions.


The electrical network of a house or apartment is not only wires, sockets, light bulbs and switches. The more complex and most important part of the electrical circuit is considered electrical panel, which contains circuit breakers, RCDs, difavtomatov and additional equipment. Exactly at electroshield the control unit for all electrical facilities is located in a separate area. Until recently, there were no electrical panels in the apartments. It was considered sufficient switchboard which is located on the landing. An electric meter and a couple of automatic machines relied on a separate apartment.
However, sometimes the meter was located in the apartment and with it - two fuse plugs. However, progress does not stand still, energy consumption has increased several times, and safety requirements have changed. Suffice it to say that 30 years ago, consumption per apartment was limited to 800 watts. Compare this figure with today's energy consumption. One electric kettle consumes 1.5–2 kW, not to mention washing machines, microwave ovens, air conditioners, etc. It is clear that, along with increased energy consumption, the requirements for electrical equipment have also changed.
Before embarking on electrical work, it is necessary to draw up a diagram of the apartment electrical panel, indicate what will be in it and how to connect it. When implementing such a scheme, the following factors must be taken into account:
1. Wiring type in the apartment: "star", "loop", in junction boxes or a mixed version. The choice of wiring depends on how many wires will fit the shield. Their number can vary from one to several dozen.

2. total power all electrical appliances in the apartment and separately the power consumption in a dedicated area. These values must be calculated in order to determine the nominal values of the machines.
3. Consider all load options, for example, guests arrived and literally everything that is possible is included in the apartment: a stove, air conditioning, a computer and even a washing machine. If such calculations have already been made (you have determined the cross section of the conductors), then it will be easier - automatic machines and other devices are selected for the cable. When it is designed for a current of 25 A, which corresponds to a cross section of 2.5 mm² of a copper core, then the machine or RCD should be 16 A.

4. What type of electrical appliances installed in the apartment. Remember that RCDs must be installed on individual devices (for example, washing machines).

To better imagine sequence of actions for installation of apartment electro flap, we will give an example of setting a specific scheme. In front of you is a two-room apartment.
It is known which devices will be in it and the number of separate zones, a diagram of the electrical panel has been drawn up. Installation begins with the choice of the location of the shield, its size and type. The shield, as a rule, is located in the hallway near the front door. This is the most rational - you do not have to pull the incoming cable far. Although this condition is not strict, you can put an electrical panel in the back room.

Diagram example - apartment wiring, three-phase
It is located at a height of 1.5 m or at eye level, so that it is convenient to reach it with your hand. If there are children in the house, it makes sense to install the electrical panel higher and choose an option that is locked with a key, such as a metal SHRV.

Diagram example - residential wiring, single-phase
View electro shield: outdoor or indoor installation, plastic or metal, with a transparent door or not - depends on the ease of installation and your preferences. For example, it is most convenient to install a built-in shield in plasterboard partitions, and outdoor installation on reinforced concrete walls. You do not have to gouge a recess under it in the wall, which is very laborious.

Switchboard size depends on the number of devices that will be located in it. There are approximately 30 poles, or modules, in the above diagram. One single-pole circuit breaker occupies one module. All electrical devices that are located in the shield have dimensions that are multiples of the width of this module. For example, a counter can occupy a place equivalent to the place of 8 machines; to install it, you will need a box for 8 modules. By counting the number of machines and the dimensions of other electrical devices, you can find out what size shield is needed. You don’t need to go to the store with a ruler at all. Shields are called like this: for 12 modules, 36 modules, etc.

There are many types of them. In our case, you need a box for 36 modules. There are those inside which there may be places for a counter and separately for machines and other devices attached to a DIN rail, or only for mounting on a DIN rail. Lots of options. To select the right shield, you need to make a list of all the equipment that will be installed inside, and consult with the seller in the store.

If a electroindoor installation shield, then to bring a large number of wires to it, wide strobes are hollowed out that can accommodate a bundle of cables. For outdoor - boxes of appropriate size or a sufficient number of plastic pipes. For the introduction of wires inside the plastic switchboard, there are holes on the side panels around the perimeter, covered with break-out hatches. There are ready-made holes in the metal shield: at the top - for incoming cables, at the bottom - for outgoing ones. The wires at the entry and exit points of the shields in such boxes are protected by glands or couplings. If a metal box with a sealed lid, then the installation of couplings is required.

Outer electro shield fastened to the wall with dowel-nails or screws. The inner one can also be attached to the back cover and additionally grabbed along the edges with plaster glue or alabaster. After the shield is installed in place and the wires are inserted into it, the turn of the electrical installation equipment comes. Inside any box there are special pins for attaching a DIN rail. Meters can be mounted on this rail or a special place inside the shield on the usual fasteners: screws or screws.

Very easy to install: it is enough to insert them on the DIN rail until they click - and the device will be securely fixed on the bar. To remove or move the machine, it is enough to push its eye with a screwdriver - the device will be removed from the mount. The electrical panel, which is suitable for installing the devices shown in our diagram, has 3 DIN rails of 12 modules each. An input two-pole machine for 40 A is placed on the first bar from the top on the left. Phase and zero are connected to its two poles, respectively. The machine will show symbols indicating which conductor to connect to what. A counter is installed next to the machine to the right of it.

Note. Devices in the shield can be placed in any order - it does not matter, as long as they are connected to each other correctly. However, it is much more convenient when they are arranged one after another in the same sequence as in the diagram.
If you do not have permission to install, then you should not connect the shield - a specialist will do this. In the case when you nevertheless connected it yourself, you need to show the shield to the electrician on duty, who will check everything and put seals on the meter.

Note. It is not possible to consume more energy than indicated on the meter. What kind of counter will stand on the apartment, the organization (Housing Office) chooses. For example, if it is written on the device that it is designed for 5–40 A, then it will be impossible to consume more than 8.8 kW. The counter will just turn you off.
Immediately behind it is a 40 A bipolar machine, similar to the one installed in front of the meter. In truth, this automaton is an obvious search, it simply duplicates the work of the first VA. However, if you want to play it safe, you can put it. The place on the first DIN rail is over, now you need to move on to the middle one. The voltage relay is installed first on the left on the middle shelf. This is such a tricky device that monitors the extreme values \u200b\u200bof the voltage and keeps a record of its throws. In fact, it duplicates the work of VA, breaking the circuit if the current suddenly starts to rise or fall above or below the set values. In addition, the relay shows exactly when and how much the voltage has changed. This additional control device is optional, but very useful if expensive electronic equipment is installed in the apartment.

Next in line is RCD. After the voltage relay, the common line is divided into 3 zones, each of which is controlled by one RCD. Since the machine in the circuit in front of this device is designed for a rated current of 40 A, then the RCD is set with the same indicator. The response threshold for all such 3 devices is 30 mA, which, in principle, is normal. However, the RCD, which is responsible for the bathroom, is best set with a threshold of 10 mA. You should not install one such device to connect the oven and washing machine with a water heater in the kitchen. It is better to break these devices into different RCDs. The middle DIN rail is busy, now you need to go to the bottom one. The entire lower bar is occupied by single-pole VA. There are only 9 of them, so there is enough space in abundance. Each of these automata is responsible for a certain part of the circuit.

For example, the first and second from the left stand on 2 groups of outlets in the kitchen. This is correct, since the kitchen is the most powerful consumer, it houses a lot of electrical appliances. 2 more machines control the power load in the bathroom, as it houses serious power equipment: a water heater and a washing machine. These devices are connected not through sockets, which should be less in the bathroom, but through junction boxes and terminals. The last 2 machines in a row of 10 A each are set to lighting, which is divided into 2 zones: living rooms and other premises - a bathroom, a kitchen, a corridor and a toilet.

The diagram shows that there is a two-pole machine at the input. Then the apartment network is divided into 2 main zones: lighting and power. The RCD and the automatic device in front of it protect the power zone, it is additionally divided into 3 parts and the RCD does not control the lighting zone. After the machines and other devices fall into place, it is necessary to connect them to each other and to the network. Such a connection occurs only when the incoming cable is disconnected. You should start with the fact that 2 tires are installed inside the shield on special stands, which must be used without fail. In a plastic or metal box, such tires are installed in a free space on insulating stands. These tires serve to connect together zero and ground conductors, since all equipment after the RCD is connected together only by phase conductors.

The busbars should be loose so that there is room for suitable wires. It is necessary to select a bus according to the number of wires suitable for it. In this case, it is better to choose a tire with 14 holes in order to have 2 in reserve. It is best to connect the devices to each other using single-wire cores, since they are well fixed in place and do not require special lugs to be installed on the bare part. To connect the poles of the machines to each other, you can use a special single-pole bus-comb; if not, then just twist the wires.
It is not difficult to connect electrical devices if you carefully read the diagram and take your time with the connection. It should be noted that the 2 wires on the far right in the diagram, responsible for lighting, do not have ground wires. If there are no fluorescent fixtures with a ground contact, this is normal. When available, you will have to put a three-wire wire on the lighting and connect the ground conductor to a common ground bus.

After the equipment is interconnected, the incoming cable and the wires going to the power zones are connected. The last step: sign each machine - what exactly it refers to. There are special boxes for this. If there are none, then the inscriptions are made on the plastic cover of the shield, which covers the inside of the box. The final touch is the inclusion of an apartment electrical panel. After that, you need to check the power on all wires using the indicator.

- You should always purchase a slightly larger shield for several groups. If there is a need to install additional equipment, then you do not have to change it.
- You should not combine several different-purpose electrical appliances under one RCD, otherwise it will turn out that a hair dryer will break through in the bathroom, and the computer will turn off in the living room. It is better to divide the zones geographically: a bathroom with a toilet, separate living rooms, a kitchen.
- It is better to install an RCD after the machine according to the scheme, and it should be one step higher in terms of the rated current. For example, a pair of VA / RCD should be like this - 16 A / 25 A. After all, the RCD does not respond to a short circuit. This should be done by the machine, so it is better to choose a higher value for the RCD so that it does not burn out. You can put equal values, there will be no big error.
- If the RCD protects several machines in a row and stands in front of the machines according to the scheme, this is a violation. At the same time, in front of the RCD there is usually an introductory circuit breaker (or maybe more than one). This is prohibited, more precisely, not according to the rules of energy supervision. According to this organization, a VA machine should be on the incoming cable, then a meter, and only then an RCD. You can put a difavtomat in front of the counter.
- The best solution would be to put an RCD on each zone after the machine. However, looking at the prices, you have to combine several machines under one RCD.
- Do not put RCDs and difavtomatov on sockets to which the computer will be connected. This tricky device can cause false triggering of devices, especially if the trigger threshold is not calculated.
- It is better to purchase a mechanical RCD, rather than an electronic one - it is more reliable and does not depend on the operation of the network.

apartment electro shield is not the only problem a home electrician may face. After all, there is also storey electrical panel, in which, in theory, it is impossible for a home master to host, but sometimes it is necessary. It is unlikely that you will have to install such a switchboard, but if you seriously take up the modernization of electricity in the apartment, then you cannot leave it unattended. There will be no big use in ultra-modern equipment inside the apartment if the power cable in the switchboard is made of aluminum of retirement age, and the only 25 A package switch controls the power supply, obviously not the latest model.

Let's figure out what happens in the switchgear, which, as a rule, is locked, and the electrician on duty has the key. This is a wiring harness from one supply electrical panel for several apartments. The principle is the same as that of the water supply - one riser per entrance, from which there are branches to each user. True, electricity then returns in the form of zero, and the water supply ends with a sewer. You should immediately warn: if there is no access to the shield, then you should not climb into it, unless the machine cuts off the electricity and you will need to turn it on again. All work must be done by an electrician from the Housing Office.

The only thing that can be achieved is to buy materials and achieve modernization from the Housing Office. The electrician will do and you will watch. ShchE must correspond to the apartment shield, if not in terms of equipment, then at least in terms of power and reliability. Inside the shield there is a picture that will make anyone horrified. These are tangled bundles of wires of an incomprehensible section, connected together in a variety of ways, half-decayed insulation, dilapidated automatic machines in cases covered with cracks. All this is neatly covered with dust, causing nostalgia (or allergies) for Soviet times.
As a rule, it is impossible to figure out which cable belongs to what - there are no tags and inscriptions on them. The cable leading to the apartment is detected by long experiments to turn off the input machine and by poking a probe at all contacts or approximately guessing in direction. You can do this: draw up a diagram of what exactly needs to be done, buy materials and agree with an electrician on the work to be done. It is best to cooperate with neighbors to remake the entire shield.

Necessary actions:
- 1. Replace the cable leaving the riser with a copper cable of the appropriate section. In this case, it is necessary to connect the aluminum cable of the riser to the copper outgoing cable using a special terminal or clamp.
- 2. Replace the old AE or package switches with modern automatic switches suitable for amperage, which must be put on a DIN rail.
- 3. If neutral and ground wires are attached to the ground bus and common zero using old connectors, then it is better to replace them with newer and more modern ones.
There is another way how to radically replace all the equipment in storey electrical panel. If the counter is moved to apartment electrical panel, then in the floor you can put a knife switch with fusible links or even without them. The main thing is that the Housing Office should agree with this.


