From what you can make a rectangular door arch. How to make an arch with your own hands in a doorway: step by step instructions
The arch of the doorway is an original architectural solution that allows you to separate adjacent rooms and give individuality to a typical apartment. Every year, this interior design is becoming increasingly popular, due to its versatility and attractive appearance. Making an arch in a doorway is not difficult, so every homeowner can handle this job.
Varieties of arches in the apartment
Choosing an arched opening should not only take into account taste preferences, but also depending on the width of the opening and the height of the ceiling. It is necessary to properly plan the structure, which should look organically in a particular interior. It will also be necessary to take into account the features of specific premises. For example, an arch installed instead of a door to the kitchen or living room will be a great solution, but to a nursery or bedroom can complicate use.
For the device of door arches can be used:
- wood;
- drywall.

It is drywall that has received the greatest distribution, since it is an inexpensive and easy-to-use material that with equal success allows you to make rectangular and oval arches. Every homeowner with minimal experience in construction work will cope with such a finish.
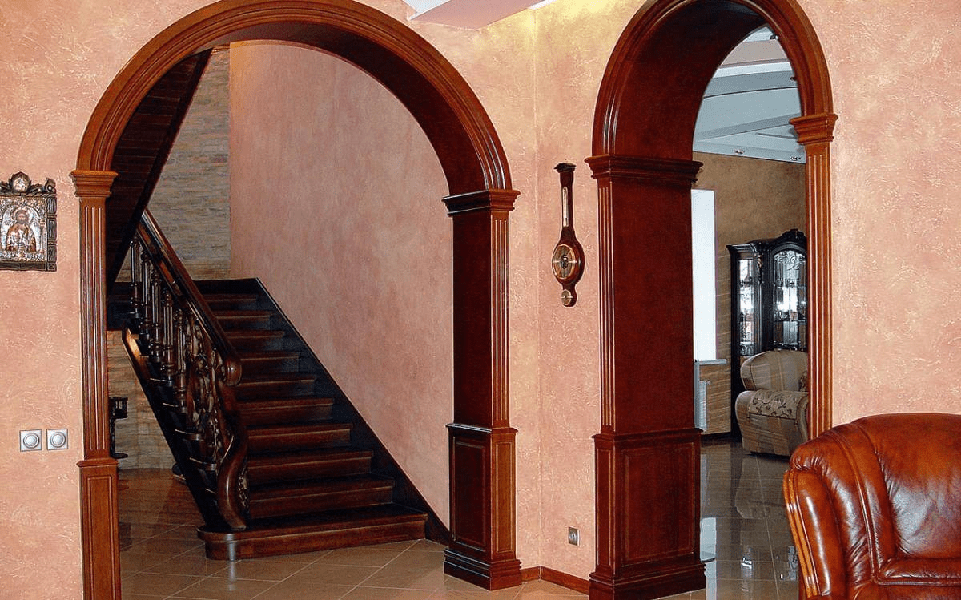
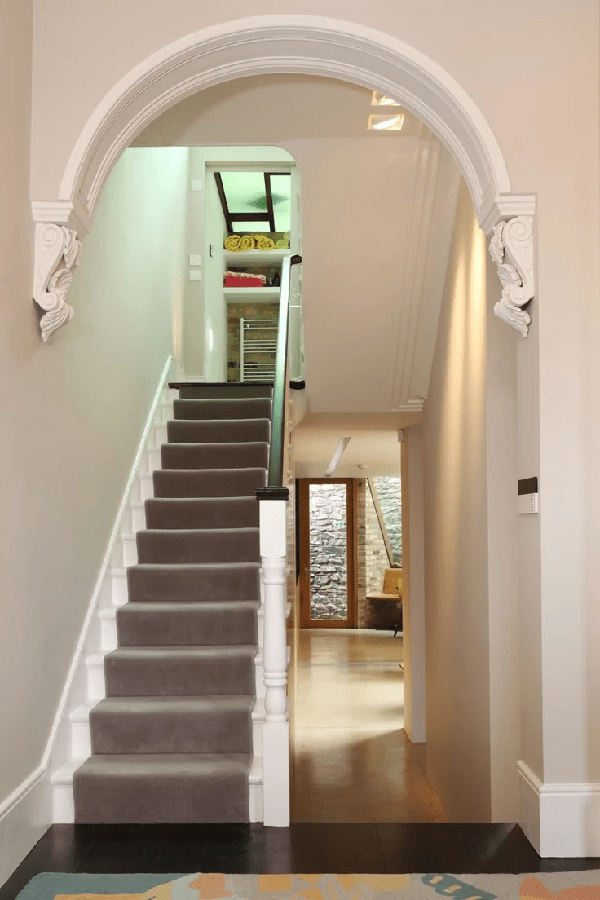
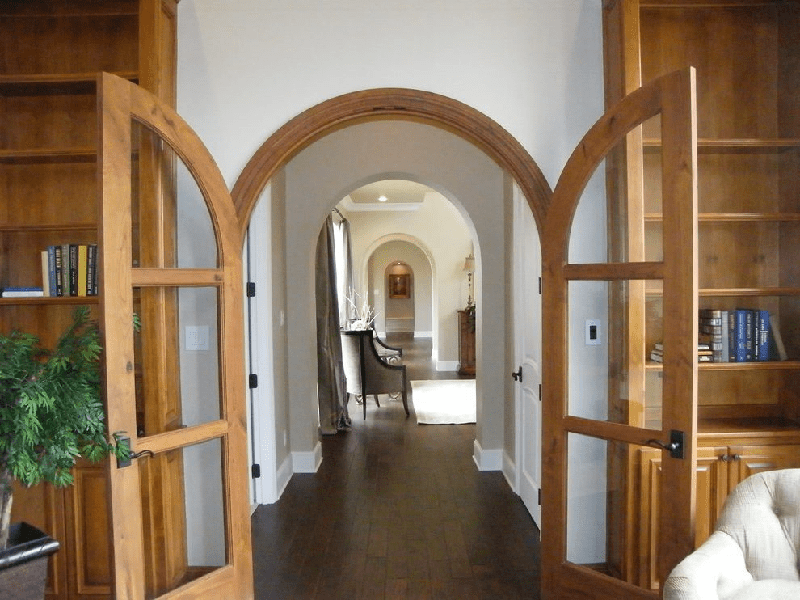
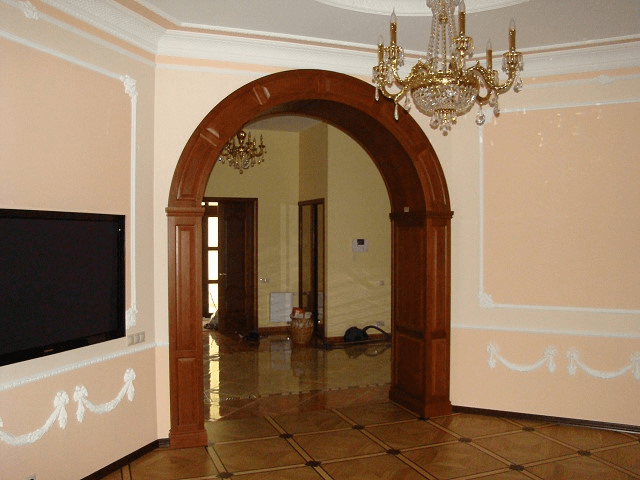
In rooms designed in a classic style, it is recommended to choose arches with a semicircular shape, which look great in rooms with a ceiling height of more than 3 meters. Such a design can be made according to patterns, and the subsequent finishing is carried out from wood, stone or decorative materials.
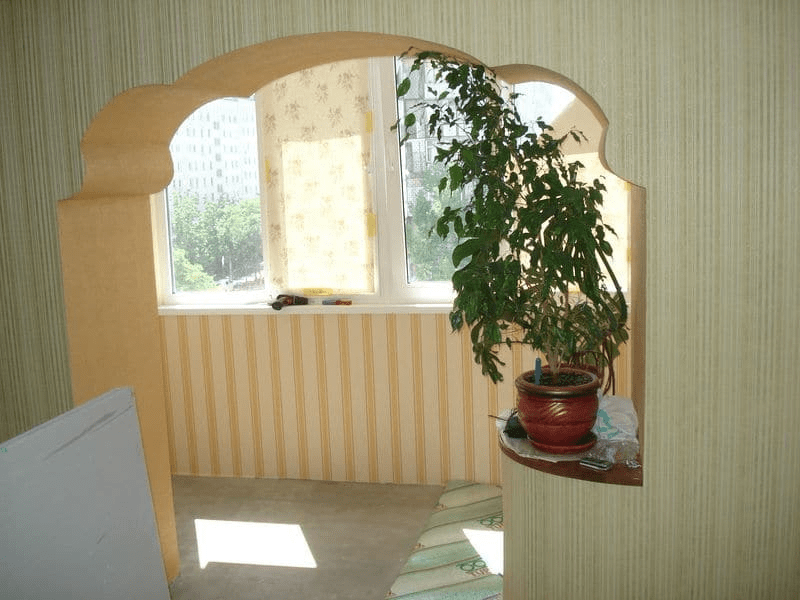
In rooms with a small area and low ceilings, semi-arches in the style of romance, which look like an arc with rounded corners, are suitable. In a modern interior, simple U-shaped portals made of drywall or similar materials look great. The advantage of such straight arches is their versatility, which allows them to be used in rooms with different interior styles.
Step by step manufacturing instructions

When planning repairs in the house, you can turn to professional finishers who will equip the arches from drywall and other similar materials. If you wish, you can do all the work yourself with the simplest tools.
You just need to choose the type of arch, which should correspond to the characteristics of a particular room, make an approximate sketch of the future design, decide on the height, width of the opening, choose the right materials, dismantle the door yourself and make an original and stylish arch.
Taking measurements

Like any other construction work, the manufacture of a door arch begins with measurements. For this, a level and a simple tape measure are used. They take measurements from the opening and passage, determine the optimal height and width, you will need to take into account the dimensions of the span between the walls.
All measurements obtained are recorded in the drawing, which greatly simplifies the work and allows you to calculate the required amount of building materials. All work is carried out, referring to the sketch, maintaining the calculated dimensions.
Dismantling the old door
If necessary, the old door is dismantled, which is removed along with the box. It is recommended to perform the work as carefully as possible, keeping all the platbands and the canvas itself. You will need a chisel, mallet, chisel and similar tools.
Dismantling the old door takes literally half an hour. If necessary, it will be necessary to further level the opening, for which they carefully operate with a chisel, chisel and hammer: large protrusions are removed and the concrete is cleaned of foam and sealant.
Arrangement of the supporting frame
The supporting frame is the basis of the whole structure, which is attached to the doorway and ensures the reliability, rigidity and durability of the arch. The use of metal guides for drywall simplifies the work, while the elements can be fastened either directly to the walls or pre-assembled, and then fixed with anchors and dowels.
The frame is mounted as follows:


- Along the lines of the opening, with the help of anchors and dowels, a contour made of a metal profile is fixed.
- Vertical guides are installed with a slight ledge from the interior wall.
- Parallel to each other, 2 profiles from a metal contour are installed on each side.
- Having mounted the profile, you can begin to fix the drywall. With a GKL thickness of 12.5 mm, self-tapping screws measuring 3.5 by 35 are used.
- Drywall sheathed 2 sides of the frame. It is not recommended to save on self-tapping screws and fasteners, since the quality of fixation and the durability of the completed structure will depend on this.
- The easiest way is to build an arch-arc from a metal profile, for which the metal is cut in increments of 6-7 cm with special scissors. For the manufacture of an arched structure, you will need 2 such blanks.
- The arcuate profile is installed and fixed on the frame. They need to be fixed with self-tapping screws or special suspensions, the number of which will depend on the width and length of the opening.
- With a step of 50 mm along the perimeter of the frame, stiffening ribs are installed, which are fixed by guides from two contours.
The supporting frame will be durable, the homeowner will only have to sheathe it with drywall, plywood and carry out a decorative finish. On sale you can find a ready-made curved profile, the use of which will greatly simplify the repair work and the manufacture of the arch.
Bending drywall sheet
Having mounted the supporting frame, you can begin to bend the drywall sheets, which is necessary to give decorativeness and original appearance to the completed arch. GKL is a versatile, durable and pliable material that easily takes the desired shape and guarantees the highest possible durability and reliability of repairs.
There are two ways to bend drywall sheets:
- dry;
- wet.

With the dry method, small cuts are applied to the wrong side of the sheet, located parallel to each other. The material is easily bent and fixed on the installed frame with self-tapping screws or other fasteners.
The wet method takes more time, but it is possible to give the material an original shape. The sheet is moistened, small punctures are made in it, after which, under pressure, it is gently bent according to the pattern. After drying, the surface retains its shape, all that remains to be done is to fix the cut and bent parts in the mounted supporting structure.
Rough lining and puttying

Drywall sheathing of the mounted arch frame is simple. It is recommended to pre-fix the material with adhesive tape, on top of which screws are screwed. The minimum fastening pitch is 5 cm. With a larger distance between the screws, it is simply impossible to ensure high-quality and reliable fixation, and the arch will have to be redone.
After fixing the material with self-tapping screws, it is recommended to clean the edges of the drywall sheet, which will prevent damage to the edge, on which a perforated plastic corner is additionally installed. Having completed the fastening of the GKL, you can proceed to its rough finish and leveling with putty.
A primer is applied to the sheet of drywall, on top of which puttying is performed. To improve the quality of work, it is necessary to putty in several layers, using a special reinforcing mesh and reinforcing the corners of the arch with fiberglass. It usually takes 10-12 hours for the putty to dry completely. For complete drying of the composition will have to wait a day.
decorative trim
Do-it-yourself door arch can be finished with various materials. Factory wooden linings are very popular, allowing to give the structure an original look. You can also sheathe the opening with plastic elements, wallpaper, paint, decorate with Venetian plaster.

The decoration of doorways with natural or artificial stone is popular, which allows you to create an unusual and original interior. Homeowners who prefer environmentally friendly materials, we can recommend a cork, which is additionally coated with wax or natural-based varnish. In private houses, arched cladding is made with clinker tiles; such a finish does not require maintenance and will last for decades.
In each case, the choice of a particular finish is made based on the preferences of the homeowner, the style of the apartment or private house, and the overall budget. The easiest way is to make an arch in the apartment yourself and sheathe the opening with ready-made wooden and plastic panels. Venetian plaster is an original decorative material, work with which will require appropriate experience and special tools, therefore, when choosing a finish, it is best to turn to professionals, which will guarantee the quality and durability of the repair.
Read more
How to make an arch in a doorway - this question becomes relevant if you need to arrange an entrance without using a door. To implement this idea with your own hands, there is far from one approach. Each has its pros and cons. Which method to choose depends on the available resources and the personal capabilities of the master.
There are many ways to make an arch in a doorway.
Advantages and disadvantages of arched structures
If you decide to make a door arch and are going to do all the work yourself, the first thing to consider is the advantages and disadvantages of such a design.
Advantages of arched structures:
- Visual increase in space. The effect of combining two rooms into one is created, the boundaries between the rooms are erased, which in itself increases the total area.
- Fresh air. The absence of a door leaves the opening open and allows air to circulate in the room.
- The possibility of zoning a huge area. With the help of an arch, you can separate the dining room from the kitchen, zone the living room, while maintaining a holistic perception of the room.
- Review extension. You can observe what is happening in the next room, for example, watch the stove or a small child.
- Aesthetics and style. The arch looks much more interesting than just a door, with its help you can create a unique interior.

Aesthetic and decorative appearance is an integral advantage of arched structures
Arches Disadvantages:
- Lack of soundproofing. Everything that happens in the room will inevitably be heard in the next room.
- Distribution of odors throughout the house. This is especially true when the living room and kitchen are connected by an arch.
- The impossibility of privacy. If there is an arch instead of a door, a curtain or a screen will not hide you from your eyes and will not allow you to be alone with yourself.
In order to decide whether it would be expedient to build a similar structure in a house, it is necessary to evaluate the overall style of the interior, the functional purposes of adjacent rooms and roughly plan both options: both with and without a door.
Design
The ideal arch should fully comply with the style of the interior and at the same time emphasize the doorway itself. Therefore, the first step is to decide on the project and choose the most suitable option for making an arch in the doorway, which you will be able to do with your own hands.
There are the following types of arched structures:
- Round. Significantly, this view is best used for zoning a living room-studio or at the entrance from the hallway.
- classic ellipse. This is the most common type of arch, which displays the very meaning of this word, its upper part is rounded with a smooth transition.
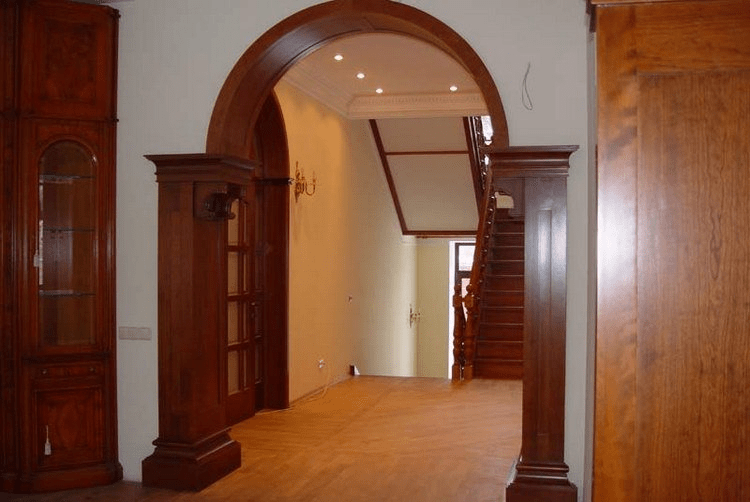
- Rectangular. It looks like an empty doorway without a door, as it retains a rectangular shape.
- Curved portal. The same rectangle, but with smooth rounded corners at the top.
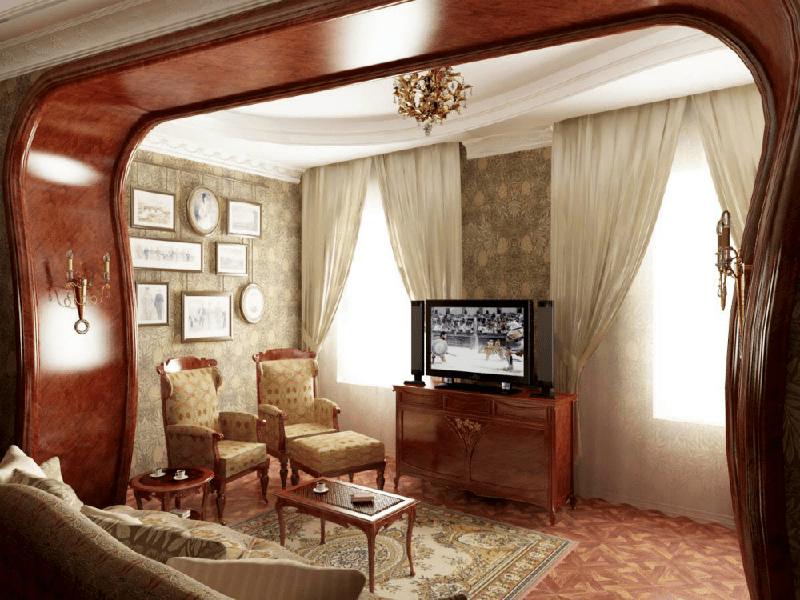
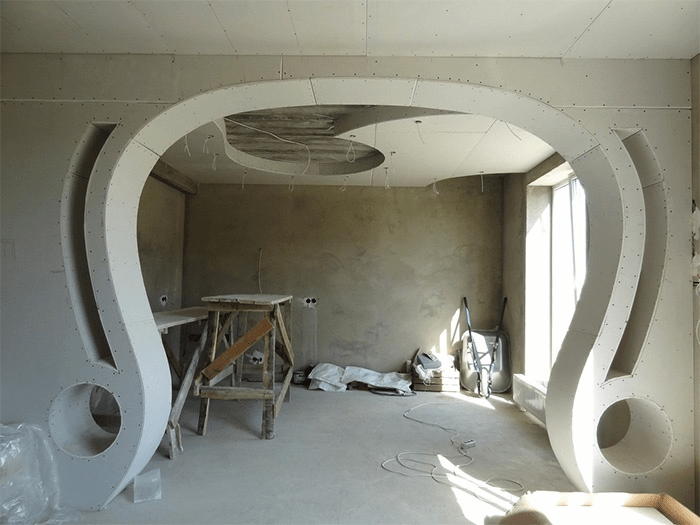
- Asymmetrical. The most interesting and complex form, requires construction. It can be of any shape and configuration.

Varieties of arched structures
Area preparation
Once you have decided on the type of arch, you can begin to prepare the opening. First of all, you need to get rid of the structure, instead of which it is planned to build an arch. It's easy to do it yourself.
Remove the door from the hinges and dismantle the door frame, it is most convenient to use a grinder and scrap for this. If, according to the project, the dimensions of the opening do not satisfy the requests, take care to correct this situation. Two options are possible here: cutting out part of the wall to increase the area, or, conversely, building a smaller structure, if it is possible to reduce the distance in the opening.
It is also necessary to clean the surface of pieces of concrete, dust and chips. To protect against mold and fungus, it is recommended to treat the wall with antiseptic impregnation.
Frame installation
After you have prepared the work area, you can proceed directly to the design of the arch in the doorway. Consider the most popular options that are easy to do with your own hands:
- plaster;
- drywall;
- patch panel.
The first option is suitable for those cases where the shape of the opening is generally preserved and the damage to the wall after dismantling the box is insignificant, in this case, you can only do with leveling the top and sides. To do this, use putty. Prime the wall and after drying, apply a layer of the starting mixture. After adjusting the level, you can fix the result with finishing putty.
To prevent the plaster from crumbling, use a special mesh.
Alternatively, you can use a patch panel, then there is no particular need to plaster the opening. However, keep in mind that the linings are foaming and the joints must be masked with platbands.

A variant of the arched structure of a metal profile and drywall
If instead of a door you plan to install a complex arched structure, you cannot do without drywall. First, fix the metal frame according to the shape of the project, then screw the cut drywall fragments with self-tapping screws. All joints and seams are puttied.
Surface leveling
After you have marked the boundaries and shape of the arch, you can begin to level the surface. Doing it yourself, of course, is best with putty. Initially, the wall and arch are primed, after which you can start applying putty. Regardless of the method of forming the opening, this stage is mandatory for all options, puttying allows you to smooth out minor flaws and eliminate differences between the arch and the wall.

Leveling the surface of the plasterboard arch with putty
For drywall, instead of the starting mixture, you can immediately use the finishing putty. Self-tapping screws are specially slightly recessed so that they can be easily disguised at this stage of work. To achieve an ideal result, you need to wipe the putty after drying.
decorative trim
The most interesting stage is the decorative decoration of the arch. For this purpose, you can use a variety of materials. The most popular ways to make decor with your own hands are:
- wallpapering;
- painting;
- textured or colored plaster;
- MDF panels;
- cladding with tiles or mosaics.

Variants of decorative finishing of arched structures
The easiest option is painting. In the house, it is best to use water-based mixtures, instead of paint, you can also use wallpaper, for the hallway and balconies, plaster is ideal. You can use a colored smooth or textured mixture, it all depends on your wishes. In addition to this finish, you can use artificial stone. The opening completely lined with mosaics also looks good: the material creates colored highlights and overflows.
White is considered classic for the inside of the arch, but you can choose a contrasting shade or tone to match the walls.
The MDF finish looks expensive and neat. In fact, these are the same overlays, but they are already installed on the final arch, so no additional finishing and masking of the joints is required.
What exactly to do with your own hands is up to you, but do not forget to follow the general tips and recommendations.
Often the interior passage in the apartment is not closed with a door, but left open. This allows you to elegantly combine the space and make the interior design of the rooms more elegant. To do this, you can purchase a finished structure from typesetting elements or cut out individual parts with your own hands and then assemble everything in the doorway. But how to make an arch yourself so that it looks even and beautiful? After all, there are a lot of materials and technologies for installation, you need to choose wisely.
designer arch
What arches can be installed in the apartment
Installation of an arched structure in place of an interior door can be performed without the involvement of professional builders. You just need to choose the type of arch and materials for its manufacture. Following the step-by-step instructions below will help you avoid mistakes and make an arch with your own hands.

Arch curves can be the most bizarre
Design features and significant differences
In construction, arched structures are supports for the upstream elements of walls and structures. But in apartments, doorways to the corridor and between rooms are not load-bearing. In the first case, structural materials are selected based on serious external loads, and in the second case, they must withstand only their own weight, coupled with the finish.

Arch with bar
The apartment door arch, installed instead of the door, is an element of interior design. Its frame can be made from a light profile for plasterboard or bars with a cross section of 20-30 mm. Such a design can easily withstand the weight of finishing materials. It is only necessary to firmly fix it on the walls so that the decor does not warp or fall off after a couple of weeks.
Reference! In private houses and city apartments, an open door arch between rooms performs an exclusively decorative function. Bearing loads in this case are assigned to the concrete walls on the side or a lintel above the opening.

Finished plastic arch
Forms of arched openings and their possibilities
There are many options for arranging interior arches in shape:
- "Classic".
- "Romance".
- "Modern".
- "Ellipse".
- "Trapeze".
- "Portal".

The most popular types of interior arches
The first option at the top has the shape of a regular semicircle, and the last one is performed with strict rectangular outlines over the entire height. The rest are intermediate versions between them. But other variations are possible with one side "support" or two curved racks.
The shape of the door arch and its design are chosen according to the design style of the room. This takes into account the height of the ceiling, the dimensions of the opening and the features of the premises on both sides. In some houses, classic shapes with the correct bend in the form of a semicircle will look perfect, while in others - a rectangular portal. This is more a matter of the taste of the owners of the house and the general style of the interior decor. Some even prefer cone-shaped contours.

- The classic version is recommended to be chosen only with high ceilings in the region of 3 meters and above.
- In typical panel high-rise buildings, it is better to decorate the entrance to the kitchen with the MODERN arch.
- For a wide doorway from the hall to the corridor, "ROMANCE" with large wide racks is more suitable.
- Rectangular "PORTAL" looks best in the interior, where the decoration is dominated by clear horizontal and vertical lines. A similar design option for a doorway is ideal for houses made of timber or logs. In such a dwelling, its rectangular corners will look elegant and as much as possible in the theme.

Classics in the interior
What to build a design opening with your own hands
To quickly make an arch in the doorway of an apartment, it is enough to purchase a set of typesetting elements made of plastic or laminated chipboard lumber. They must be cut to the desired height, and then fixed in place according to the instructions. But such options are standard and quite expensive. Plus - not every opening will be able to pick up a finished model with the right dimensions.

Components of the interior arch system
For the manufacture of panels of arched racks and arcs, you will need one of the following materials:
- drywall;
- plywood;
Advice! For sheathing the frame, it is better to choose drywall sheets. GKL in the future can be finished with a large number of different materials. However, thin plywood is much easier to bend.

Finished veneered arch
The frame for the interior arch can be made:
- from a metal profile;
- from wooden bars 20x20 and 30x30 mm.

Brick decoration is ideal for joining a balcony
You can also make an arch instead of a door from concrete, brick or aerated concrete blocks, and only then ennoble them with one or another finishing material. But these options are more likely for lovers of capitality and solidity. Plus, they weigh a lot, in the apartments of old apartment buildings it is impossible to build anything from them.
The use of metal is limited not only by its weight, but also by its high cost. The manufacture of metal structures of complex shape at home is a project that is very difficult to implement in practice. It is easiest to work with drywall and a profile for it on your own with your own hands.
Step-by-step instructions for self-assembly
The following photos and recommendations will allow even a novice master to cope with the improvement of the doorway. To do this, you first need to create a frame, and then sheathe it and decorate it. Everything can be done with your own hands, you just need to do everything consistently and without errors.

Plasterboard arch scheme
Preparing the doorway
- First, the canvas and the frame of the existing door are dismantled (if it exists and stands still).
- Then the opening is expanded to the planned dimensions.
- Plastering cut walls under the frame is not worth it, they will still be covered with sheathing. It is enough to trim them and remove everything that can fall off (plaster, pieces of concrete, falling out bricks). The main thing is that the carrier profile can be fixed securely and in a strictly vertical position without tilting.
- If a backlit design is planned, then it is necessary to pre-wire.
- Measurements are always taken at several points of the opening, so as not to miscalculate with the dimensions.
- If the walls are uneven, then the thickness of the racks (arch depth) is selected according to the thickest place.
- To simplify the marking and cutting of sheet material for sheathing the arched frame, it is necessary to make a full-size template from cardboard. This will allow you to avoid mistakes and see in advance how the contours of the structure being formed will look like.
Important point! The upper part of the arch takes about 10-15 cm from the height of the doorway. At least 20 cm should remain from it to the ceiling. When calculating and marking, these figures must be taken into account.

Mounting rails
Creating a Structural Frame
- To make a frame for the arch, you first need to create a main contour around the perimeter of the opening from the profile, fixing it to the walls.
- Then the upper curved part of the frame system will be fixed on it. Sometimes only a curved element is made from above, but this is possible only with perfectly even slopes.
- The vertical guides in the doorway are mounted with an indent from the plane of the interior wall by the thickness of the drywall sheet plus 2 mm to the subsequent plaster on top of it.
- After plastering, a single, even surface should be obtained.
- On each side and at the top of the created arch, you will need to fix two such profiles parallel to each other.
Advice! If the walls are made of wood, then self-tapping screws are enough to fix the guides, but in the case of concrete or brick, dowel screws are required. The step between fasteners should not exceed 30 cm.


If the arch columns are made of small thickness, then two arcs can be safely replaced with a wide profile. All manipulations for cutting and bending in this case are carried out in a similar way. However, transverse installation will no longer be needed. When used instead of a profile of wooden bars, the frame for the arch is made using a similar technology. Only the original material of the supporting frame structure changes.

Two ways to bend drywall sheet
Rough frame trim
After completing the assembly of the arch frame, all that remains is to mount a plasterboard or wood board on it. To give plywood or fiberboard the desired shape, they will have to be pre-moistened, fixed on the template and steamed with a hot iron.
Ideally, you need to use a special arched drywall, reinforced on both sides with non-woven fiberglass. It is enough to knead it in the longitudinal direction and give the desired shape.
There are two ways to bend a regular drywall sheet: wet and dry.
- Wet technology involves soaking the back side of the GKL with water and gradually bending it on a template of the required shape with fixation on it. This process is lengthy, haste can lead to rupture of the cardboard layer of the sheet. And it is possible to install and fasten the resulting part with self-tapping screws on the arch frame only after the gypsum has completely dried.
Advice! It is possible to speed up the process of moisturizing GKL to give it elasticity with the help of a spiked roller.
- The dry method involves the application of parallel cuts on one side of the sheet, which affect the plaster and the upper outer layer of cardboard. But the front cardboard layer remains intact. The bend turns out to be even and regular in shape.

Installation of the main element of the arch
Cutting sheet material is best done with a jigsaw. When using a hacksaw, the cutting edges will certainly turn out to be less even. The sheathing is fastened with self-tapping screws in increments of 5-6 cm. After fixing it, the edges of the plasterboard and plywood sheets are sanded. And then a special plastic corner with perforation is attached to the curved edge to protect it from chips.

Fastening GKL
Putty for perfect surface leveling
The next stage of finishing the drywall arch is a primer and putty. After applying the first, you must wait until it dries. And for the reinforcement of the second layer, a fiberglass mesh is used. The corners are also reinforced and leveled with a grid.

Edges must be even

Surface putty

Putty joint with the wall

mesh reinforcement

Edge reinforcement with mesh
Next, a third finishing layer is applied. Hardened after 10-2 hours, the putty is sanded with sandpaper to remove excess, to make the surface as smooth as possible. There should not be any protruding caps of self-tapping screws or dents on it.

This should be the arch
Decorating the structure and design techniques
You can finally decorate the arch in the apartment with your own hands and make it beautiful:
- painting in color with walls;
- sheathing with wood or plastic panels;
- wallpapering or veneer;
- finishing with a decorative stone on a plaster basis;
- decoration with mosaics and mirrors;
- decorating with stucco or finished columns.

Simple backlit finish
Materials in the finishing of the interior arch are used both natural and artificial. The choice here depends on the overall design idea for the design of the apartment interior. To refine the doorway, you can use polyurethane moldings and even textiles. All options are acceptable, as long as they are in harmony with the surrounding decor.

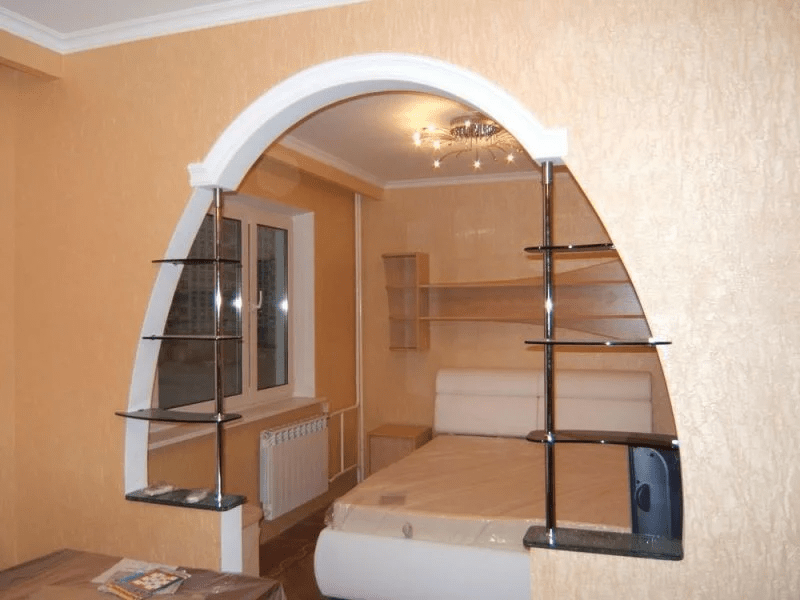
Shelves in the design of the arched passage to the corridor
The framing of columns made of clinker or decorative stone looks original and stylish. Handmade installation will take time and diligence, but the result will surely please the master. The uniqueness of the apartment with this method of decoration is guaranteed.

Decor with artificial stone
Finishing the arch with natural wood will bring solidity and elegance to the house, and the mosaic pattern invented by the owners will make the decor unique. The main thing is not to overdo it with the design, making the design a tasteless heap of elements of different styles. All interior details should harmonize and complement each other.

Stucco columns in an arched opening with wide walls
Often, the usual painting in white or brown is enough to complete the design, making the arch beautiful and elegant with your own hands. However, some require built-in lighting and additional decorative elements in accordance with the style chosen for the apartment. It will take more time to finish the arched opening, but it's worth it.

Decor corner and wallpaper
It is not difficult to install and arrange an interior arch instead of a door on your own. For work, it is enough to have metal scissors, a screwdriver and a hacksaw in the house. But if there is no experience with these tools, it is better to trust professional installers.
Most interior designers consider interior arches to be a well-established classic of the genre, the arched vaults of doorways have long and seriously pressed the slightly angular rectangle of a classic door. Passages and openings between the rooms remain a kind of bridges that unite islands of living quarters, different in meaning and content, with no less important kitchen, bathroom and toilet. If possible, why not make interior openings no less beautiful and comfortable.
How practical are interior arches
Often, everyone who wants to build interior arches has a doubt about how practical and convenient such designs are in everyday use. The idea of building arcuate arched openings has existed for several hundred years, back in the 50s of the last century, many interior and corridor openings with arches of various configurations were built, until the fashion for savings and a utilitarian approach to interior design finally buried a wonderful idea.
The manufacture of interior arches will require certain financial and time costs in connection with the alteration of part of the doorway. But most often, the owners decide to remake, since the end result fully justifies the costs:
The appearance is significantly improved, even the simplest interior arch looks much more attractive and interesting than the official version of a rectangular door hatch;
The space of an apartment or house visually becomes more spacious, even in small apartments with miniature kitchens and tiny corridors, the room becomes brighter;
An order of magnitude improves heat transfer and air movement between rooms. Fresh air does not seep through the ventilation ducts, it moves without interference and restrictions along the shortest path.
In most cases, the owners decide to change the shape and size of the interior opening, equipping the arch above the doorway in order to improve the appearance of the interior space of living rooms. Only a few years later, it is discovered that the installation of an arch and the modification of an interior opening can improve the conditions for distributing heat throughout the house in winter and coolness in summer heat. And most importantly - without laying an additional complex pipe system.
Types of arches
One of the most valuable qualities of the interior arch is the good adaptability of the updated doorway to any interior of rooms and corridors. Door arches are made in the form of frames from a steel profile and wooden slats, bricks and gypsum blocks. For external finishing of the surface of the walls and ceiling adjacent to the arch and the box of the interior opening, plasterboard sheets, panels, mounting foam, plywood and fiberboard sheets are used.
For doorways and interior aisles of standard width, up to 90 cm inclusive, an arch with a support frame can be bought at a specialized salon. Such standard arched vaults are most often cast from polypropylene or hand-assembled from wooden blanks.
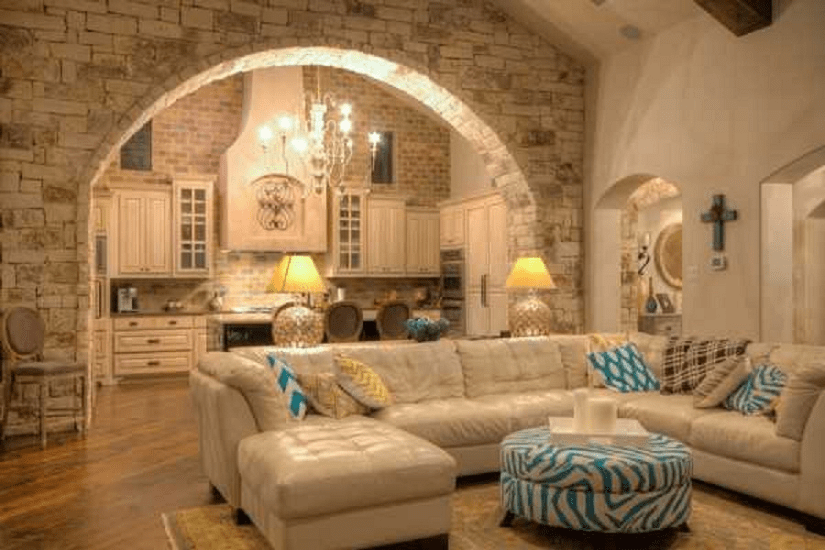
round arches
Most often, the arched vault above the interior doorway is associated with the classic round arch, the most common in the architecture of stone buildings and structures. It is the round arch that is most often chosen for the doorway.
Artists-designers and interior designers of residential premises use about a dozen basic configurations of round interior arches with supports on the frame of the doorway.
To get the perfect arc of the interior arch, the galvanized profile is divided into sectors, the side shelf is cut and the metal bar is bent according to a pre-planned pattern.
Note! The round arch is very popular, primarily because of the simple installation technology.

In the classic version, a round interior arch is made in the form of a sector in ¾ of a circle or ½ of a circle, often the shape and curvature of its arc can be supplemented with side elements of arbitrary shape and configuration, but always symmetrical.
If it is necessary to add oriental motifs to the design of the interior arch, then the profile of the arched ceiling of the span is made in the form of two intersecting arcs. In this design, the interior arch acquires an almond-shaped profile.

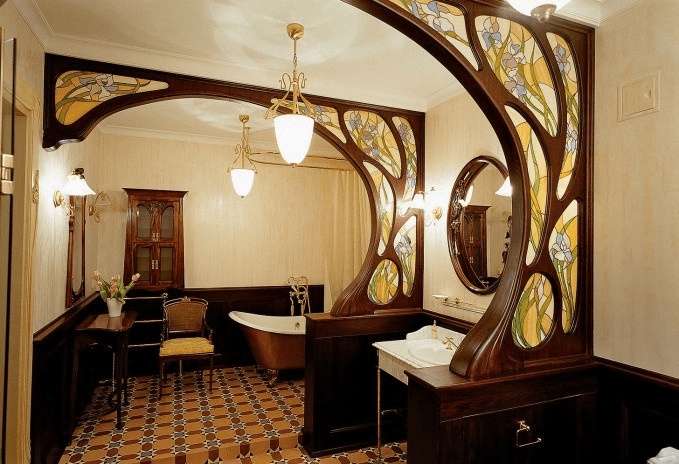
The interior arch can be combined with supporting columns, most often with stucco elements or imitation of the Victorian era style.
If necessary, for example, if the size of the doorway is relatively small, the arch can be decorated without any columns and unnecessary decor. It is enough to emphasize the line of the arched arc and close the transition plane to the walls with decorative overlays.
In the event that the dimensions of the corridor allow, the design of the interior doorway can be arranged in the form of one round arch. Instead of a standard rectangular door frame, only a small rounded outline remains, marking the border between the kitchen, living rooms and corridor.
Round arches are used in cases where the apartment or living space of a private house is built in the form of several small rooms. Full-sized rounded arches very successfully visually combine the rooms into one studio apartment. In order to keep a private character behind the bedroom, kitchen or personal office, the interior opening with an arch is closed with double doors or a light sliding canvas.
A rather interesting solution is shown in the photo below.

In one design of the interior opening, a round or annular arch and a rectangular box are used. A stylish doorway makes it possible to add some very necessary details to the interior of the room and open an adjacent room or corridor for light and air.
If the ceiling height is more than 2.5 m, and the dimensions of the interior passage are more than two meters, you can use the widespread technique of dividing the space into several sectors.

In this case, the design of the interior opening in the form of two small-sized arches of a classical shape with an intermediate column provides the best quality of ventilation and light filling.
For low ceilings, a round arch is broken into several elements or replaced with a rectangular doorway.
Rectangular arches
Arched structures of a rectangular or square shape in their characteristics and functions are no different from the classic round arch. A rectangular shape is resorted to if the interior of the apartment contains a significant number of objects and details with straight lines.
In the vast majority of cases, a rectangular shape for an interior arch is chosen in a situation where precious woods, plastic and a monotonous rectilinear design are actively used in interior decoration.
For example, an interior doorway between the corridor and the living room can be designed in the form of wooden panels assembled into one arched structure. On the one hand, there is enough air and light, on the other hand, the boundary between two rooms that are completely different in meaning and functions is clearly marked.

Rectangular arches are simpler and more technologically advanced to manufacture; installation does not require the use of special marking devices, as in the case of semicircular and round arched structures.
Ellipse arches
It is not always possible to build a doorway with an arch in the form of an ideal semicircle or circle segment. There are certain restrictions on the distance from the ceiling to the top point of the arched arc; for the premises of the apartment, this distance should be at least 40 cm.
In such cases, the arch arch is made in the form of a horizontal semi-ellipse. The excess of the arched arc turns out to be less, and the entire design of the fashionable interior opening fits freely in the dimensions of the rooms and the height of the ceilings of a standard-plan apartment.
According to the scheme with a horizontal ellipse, it is possible to build a fairly wide passage between adjacent rooms according to the scheme shown in the photo.
The ellipse is ideal as a profile for building an interior passage. For example, you can form an opening in the form of a vertical ellipse with truncated edges.

The passage itself turns out to be wide enough to use it, but due to the narrowing of the sidewalls to the top and bottom, the section is smaller than that of a standard rectangular profile or arch of a classical shape. Therefore, in order to increase the amount of air and light through the interior opening, the passage contour is supplemented with side windows.
Trapezoidal arches
The device of the arch in the form of a trapezoid can be considered a natural continuation of the rectangular scheme. Traditionally, door and interior openings with a trapezoidal top are used in attic rooms, especially if the ceiling of the room is made with side bevels.

The shape of the trapezoid provides increased stability of the upper transverse beam of the opening, so such structures are widely used in houses made of timber and logs.

The decorative qualities of a trapezoid are lower than those of interior openings with an arch in the form of an ellipse or rectangle. Nevertheless, there is a demand for a passage in the form of a trapezoid arch, especially in the projects of panel houses and country houses. In any case, an interior doorway with a trapezoid-shaped arch looks much more interesting than a boring rectangular design.
curly arches
Making an arched vault of complex shape is a good way to show the talents of an interior designer, imagination and fiction. The easiest way to build an original arch of a non-standard shape is to attach several curved lines and surfaces to a classic arch arch.
For example, if you add a couple of side arches to a simple symmetrical arch, you can get a fairly expressive line of the arched vault for an interior wall.
A small addition to the standard arc or semi-ellipse of several asymmetric elements turns the arch into a stylish interior opening.
Figured arches, as a rule, are made according to complex curvilinear patterns, for example:


The process of designing and manufacturing a figured interior arch is quite complicated for an amateur level, so even the simplest multi-level openings, as a rule, require the knowledge and skills of a professional artist-designer.

Drywall interior arches
In the process of planning a curly arch, you always have to look for a suitable assembly method and material from which it is easiest to assemble a rather complex arched structure.
Most of the home arched interior openings are built of wood and drywall. Sheets of pressed gypsum are perfectly processed, cut, drilled, painted and puttied.
The basis of the plasterboard arch is assembled in the form of a galvanized profile frame. A strong corner and a U-shaped profile made of thin sheet metal can be used as a supporting element of a strong frame or bent into an arc of any curvature.
The manufacturing process of the interior arch is as follows:
- The frame is assembled with rivets and attached to the walls and ceiling of the interior opening;
- The base is sewn up with sheets of drywall;
- Seams and cracks are rubbed with gypsum putty;
- Curved surfaces are sanded, painted and finished.
The arched interior opening turns out to be light, durable and of arbitrarily complex construction and design.

Interior arches made of wood
Arched interior openings made of wood and its imitations firmly occupy the second place in popularity of the design. It is very difficult to technologically bend a beam and a lath made of valuable species of wood with the desired radius, therefore almost all interior arched openings made of wood are built in a rectangular shape.
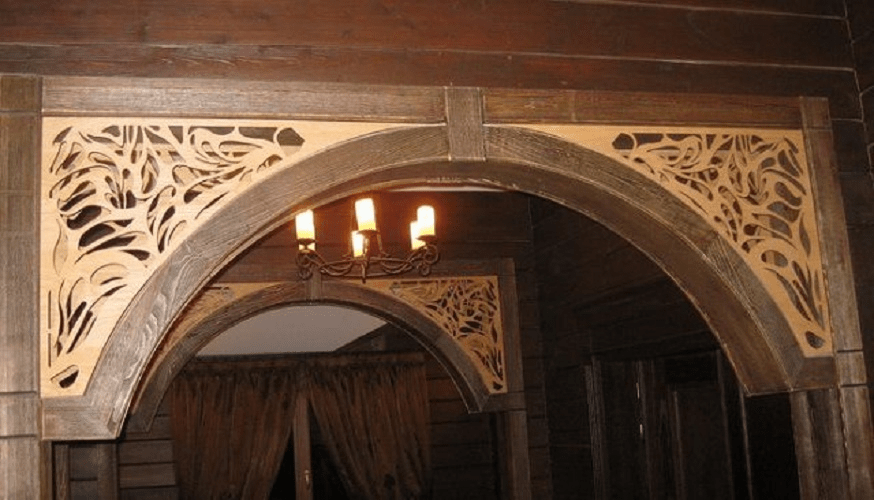
The exception is handmade wooden arches, very beautiful, with carvings and elements of furniture decor. Often, the arc is cut from a solid array of wood and veneered with fine wood veneer.

Note! A handmade arch is easy to distinguish by surface microdefects and a characteristic veneer texture, while cheap interior arches made of polypropylene look perfectly smooth and one-color.

Arches
Depending on the materials used to build the frame of the interior opening, choose the most appropriate type of finish. Drywall constructions must be primed and puttied, after which the surface of the arch can be pasted over with PVC film with a texture like wood, red brick or natural stone.

A simpler way of finishing involved the use of decorative plaster or wall graphics. Corner joints of interior arches can be pasted over with polyurethane tiles under an artificial stone.
Wooden arches are finished using furniture technology:
- The surface of the wood is primed, tinted and varnished;
- The final coating is applied to match the colors of the walls and ceiling of the rooms adjacent to the interior opening;
- Veneered surfaces of doorways with arches are always varnished with subsequent polishing of the decorative layer of wood.
If the finishing operations are performed in accordance with polishing standards, the decorative layer of wood can last at least 20 years, while the plasterboard finish will last a maximum of 10-15 years.
Illuminated arch
Installing lanterns and lighting remains one of the most popular ways to enhance the decorative effect of the arch.

Lanterns can be installed along the contour of the arch, or placed at the top of the arched arc and covered with translucent polycarbonate.
Instead of spotlights, you can use LED strips, monochrome or color.
Interior of interior arches
The most difficult stage in planning an interior arch is the development of a common style, because the doorway must correspond to at least two rooms at the same time. For example, the passage from the living room to the kitchen is best done in light colors. White, cream and beige shades are considered universal, able to be combined with almost any style of the interior of the hall and kitchen.
Arch in the living room
All other interior arches leading from the living room to other rooms are designed in the style of the interior of the main space of the apartment.
Before planning the shape and dimensions of the arched structure, you will need to take into account the color and texture of the furniture in the living room, the pattern of the flooring.
The concept of designing an arch in the living room is extremely simple - interior openings should visually expand the size of the room, even if this requires removing half of the internal adjacent wall.
Arch in the hallway and corridor
A similar technique is used when planning arched openings in the hallway. The corridor room experiences the greatest load from dust and dirt brought into the apartment from the street or entrance.

Therefore, the entrance part of the apartment is planned in more muted colors, respectively, arched structures are made with minimal space absorption.

An exception may be interiors with extensive use of wood paneling, parquet and fine wood finishes. In this case, a massive interior arch, decorated in mahogany, can serve as a kind of bridge from a more utilitarian and stuffed hallway to the central part of an apartment or house.
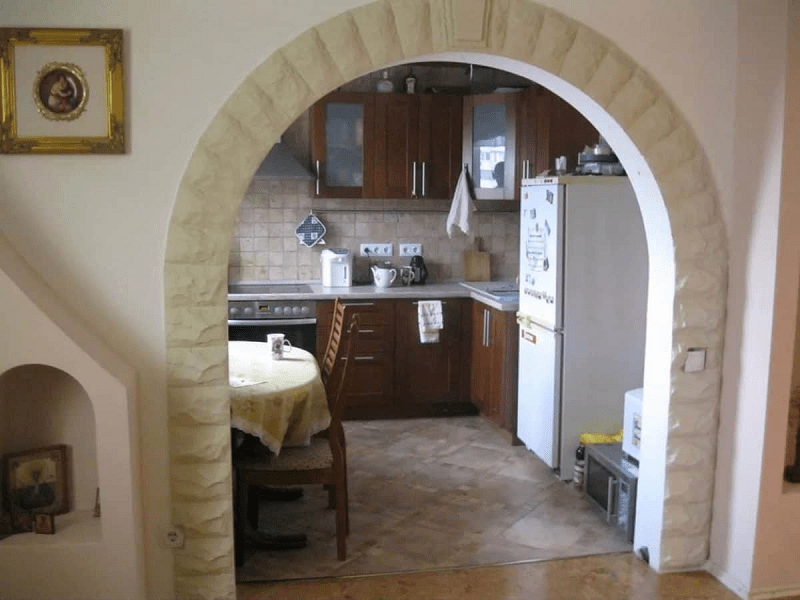
Arch to the kitchen instead of a door
To date, interior openings between the kitchen and the living room firmly occupy the first place in the list of the most popular solutions for redevelopment of old apartments. It so happened that in the vast majority of apartments of the old building, the hall is connected to the kitchen by a long and narrow corridor.
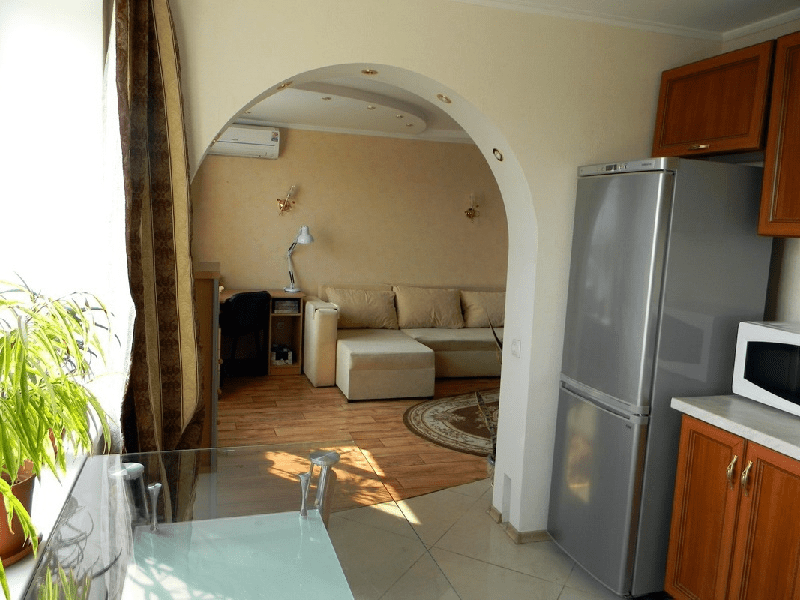
It is very inconvenient, so the hall is connected to the kitchen by a wide and spacious opening with a round arch. In the budget version, the interior arch can be made of plasterboard sheets with decorative plaster trim.
A more complex and at the same time non-standard option for arranging an interior opening is shown in the photo below.
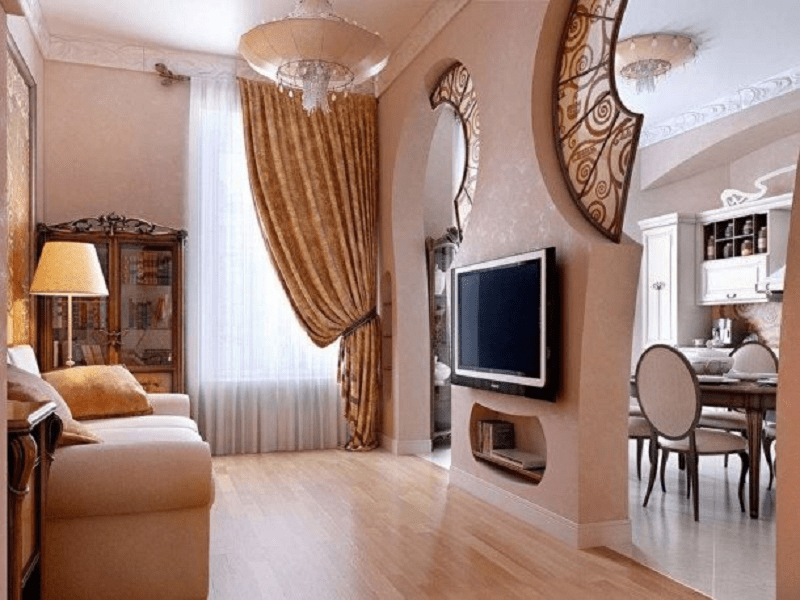
Instead of one passage in the adjacent wall, two symmetrical figured passages with round arches and an asymmetric shape of the opening were built. High ceilings allow you to make the arched part with a certain degree of broadening. As a result, the central part of the wall remains used for the installation of a TV and furniture, while the side sectors are “donated” for arranging the arch.
Arch in the children's room
In apartments with a small living area, with the help of an interior arch, the problem of dividing and delimiting space into the territory of adults and children is solved.

If the room is allocated for several children, then with the help of the arch it is possible to resolve most of the disputes related to the division of the territory. For arranging a doorway, arched structures are used quite rarely.
Arch in the bedroom
For the rest room and bedroom, the color of the walls, the shape and style of the arch are chosen in strict adherence to the interior decoration and interior of the room.

As a rule, double doors with an arched vault or small-sized interior arches with a monotonous decoration of the walls and the ceiling space are used for the bedroom.
Conclusion
Arched structures have long won the hearts of apartment and house owners seeking to improve and improve the layout and interior of their home. The interior arch remains one of the most accessible, simple and at the same time very effective ways to make the interior of rooms brighter and fresher. Moreover, the manufacturing process is not so complicated and intricate, and most of the work can be done at minimal cost. Only a small skill of an artist-designer is required, the rest must be entrusted to design professionals.
Arched openings make standard apartment interiors stylish and elegant. The arched shape of the doorway visually expands the space, changes the interior beyond recognition. In city apartments, arched openings are not always left open, since it is necessary to ensure the possibility of a full separation of individual rooms. But the curved upper lintel creates difficulties in choosing and installing the door in an arched opening. There are several options for how to close such an opening with a door, they differ both in the complexity of execution and in the principles of approach to solving such a problem.
Options for closing the arched opening
There are two types of situations when the owner installs a door in an arched opening. The first - when the question of installing the door is decided after the manufacture of the arch. In this case, the matter is complicated by the fact that the opening is already ready, and you have to start from ready-made conditions.
The second is when the owner thought in advance about the options for installing the door in the arch, and when making the opening, he prepared the elements necessary for this (niches for a cassette sliding door). From the options below, you can choose the best one, depending on the specific situation.
When creating arches, the opening did not increase, but roundings were made
An important factor in choosing the type of door and the method of installation in the arch is the method of making the opening with the arch. If the radius is inside a rectangular opening, then its actual height will remain the same, but visually it will appear lower.
Closing the opening on one side with a full-height sliding door
Sliding doors are installed from the outside, while the leaves slide along the wall. The size of the canvas is made according to the height of the opening at the top of the arch. Thus, the sash will overlap the arch on one side of the opening. On the other side, the passage will remain open.

Important! In such a combination of a rectangular canvas and an arched passage, the sash should have a symmetrical pattern, either in the form of radius panels, or be made using arched glazing. At the same time, all segments in the web design should have a vertical orientation, preferably without horizontal jumpers. So it will be possible to visually raise the opening.
Cassette door installation
This is the best option, which is planned at the stage of creating the arch. An arch with a cassette-type sliding compartment door is also a budget option compared to the cost of manufacturing a door leaf with arched shapes. A rectangular canvas with the same type of pattern is used. This approach will allow you to close a non-standard opening with any shape.

Making a wooden door
If the door is installed in an already finished opening, and sliding structures for some reason do not suit the owner, it remains to go to the carpentry workshop and order an arched door.

In wide openings, you can install a double door, each leaf of which is a folding door book.
The opening increased in height
Making an arched portal by cutting out the upper part above the opening in the partition is the right option in terms of aesthetics. Such an arch will look proportionate in the room. A high arch will give more room for imagination, and there are much more opportunities for installing a door into it. The main principle of closing a high arched passage with doors is the use of structures with transoms. With this approach, standard doors of any type can be installed in the opening.

An expensive and at the same time luxurious option is to order a solid wooden canvas with a solid wood box in the workshop. This method is used to close narrow arches designed for a single-leaf door. A cheap option would be a regular door with a transom.
The most affordable way to close the arch with a door is to make a rectangular box without a threshold and install an accordion-type folding door into it. These systems are sold in kits, have a variety of designs, and are easy to install. After installing a folding door, you can evaluate how it looks in the interior, and in accordance with the impressions received, make an upper arched transom and complete the design of the opening.
In addition, folding systems are not designed for intensive use. It is this mode that is usually assumed when installed in an arch, because only in the open state does it look spectacular.
What are folding doors made of?
The bulk of folding systems in stores are made of MDF or plastic. Plastic is light and practical, but it lacks soundproofing properties, and the design itself is noisy and gives the impression of laxity.
Important! Plastic panels have stiffening ribs, therefore, with external fragility, they are rigid and durable.

The plastic assembly assembly is lightweight, so the installer does not need outside help for installation. The plastic itself is easy to cut, and modern movable interlocks of the panels allow you to cope with the assembly and installation of the structure in a few hours yourself. In addition, guide profiles in plastic structures are fastened through clips, which simplify the installation process.
Systems with MDF lamellas look solid, but they are more difficult to install. They organically look in the arched opening. Due to the mass of the structure, the guides are attached to the opening with self-tapping screws.
The standard folding kit includes the following items:
- Narrow panels. In addition to several identical panels from which the canvas is assembled, there are two half-panels that are installed along the edges, the starting and locking strips.
- Guides. All kits have a top and two side rails. In systems for wide openings or with flexible slats, there is also a lower guide.
- Rollers, stoppers. In some designs, ordinary hinges can be used to connect sections.
Dobory and platbands for the box, locking mechanisms are not included in the package and they are purchased separately.
How to install a folding structure
First, a box is made and installed. It is assembled from extensions in which there is no usual quarter for the door leaf. The box is made according to the height of the straight part of the sides of the arched opening.
After installing the box, it is necessary to measure the height and width of the resulting opening, and only after that go for the purchase of a folding system. So you can accurately calculate the number of sections and pick them up in width.
Important! Having bought a folding door, it is necessary to carefully read the installation manual. Each manufacturer supplies products with detailed instructions.
- In budget PVC models, the lamellas are interconnected through special grooves or with the help of gaskets. The connection process looks like this: the panels are shifted, one lamella is inserted into the groove of the other lamella and pulled to the end.
- MDF sections have special lugs that fit together and a long pin (axle) is threaded through them.

- It is better to install the lock and handle in the lock panel before assembling the leaf.
- The slats are cut to the required height. In a suspended state, they should be raised above the floor by 1.5-2 cm.
- After connecting the lamellas and semi-lamellas, a locking panel is attached on one side, and a deaf (fixing) panel on the other.
- The rollers are attached to the upper end of the sections through one, starting from the lock lamella. Before installation, it is desirable to treat them with technical petroleum jelly.
- The upper profile is cut exactly to the width of the opening, and the side profiles are substituted against it from below.
- The procedure for installing the profile depends on the intended method of fastening to the opening. If the profile is attached to the clips, you need to mark up and fasten the clips around the perimeter of the box. To do this, a line is drawn in the center of the upper jumper, and with the help of a level it is continued already on the racks. Clips for the locking vertical profile are smaller than the others. On the upper jumper, the clips are attached in increments of 5-7 cm, and on the sides it is enough to install 4 pcs. After trimming the guides, all that remains is to insert them into the fixed clips. If they go tight, you can use a rubber mallet.
- If the profile is attached to self-tapping screws, then they are first engaged in installing the upper guide. It is screwed on with one screw in the middle. After that, the guide is unfolded so that the sash rollers can be inserted into it. Having inserted the sash, it is assembled in the center, the profile is turned back, finally aligned and the rest of the self-tapping screws are tightened. Only after that, the side parts are screwed in level.
- At the end, the blind panel is snapped into the side profile, the mechanism is checked for smooth running. In the lock profile, a striker for a lock or latch is installed.
Finishing the opening with platbands is carried out after the installation of the arched transom.
Installation video of the accordion type folding system:
In small apartments, doors to an opening with an arch must be planned before work begins on its creation. And to close an existing opening without prejudice to the surrounding space, you can use a folding structure.
In contact with
Comments
Unfortunately, there are no comments or reviews yet, but you can leave your own ...
New Articles
New comments
S.A.Grade
SvetlanaGrade
SergeyGrade
SergeyGrade
Alexei


