Slides of flowers in the country with their own hands. Alpine slide: design instructions
The flower garden, created in the form of a full-fledged alpine hill, with properly selected green spaces, will not leave indifferent even people who are far from floriculture. As a rule, the design and construction of an attractive combination of plants characteristic of the highlands and uniquely selected stones is carried out by professional landscape designers who have the necessary knowledge, experience and technical means to carry out the work. Do not despair, a simple alpine slide with your own hands, even beginner flower growers can do it, the main thing is your desire and patience, and the presented article will become a kind of instruction. The reward for the time and effort spent will be a small, but at the same time quite spectacular mountain landscape that adorns a personal or summer cottage.
The publication provides an exhaustive answer to the question of how to make an alpine slide with your own hands step by step on your site, without asking for help from specialists. The distinctive features, features of the flower garden are considered and practical recommendations are developed for the choice, location of stones and rock garden green spaces.
The first mixed compositions of wild exotic plants and stones appeared in Europe in the second half of the 18th century. The desire to recreate the natural originality of the wild nature determined the choice of green spaces - the preference was given to representatives of the flora that were not cultivated by breeders. The plants of the mountainous alpine regions were the best suited for this purpose. Meadows, located at an altitude of 2 to 3 thousand meters, abounded in a variety of low-growing vegetation, including ground cover species that form "grass cushions". A little lower, at an altitude of 1.5 to 2 thousand meters, centuries-old coniferous forests grew in the subalpine zone. The brought plants were distinguished by their particular unpretentiousness and frost resistance, since mountainous regions are characterized by rather harsh climatic conditions - the possibility of frosts is not ruled out throughout the year.
 rockery
  Alpine slide
So, thanks to the natural habitat of plants - the alpine mountain range, artificially created compositions of green spaces and stone blocks got their name. The design of the alpine slide is fundamentally different from other areas for growing flowering plants, and the peculiarity is not only in the presence of stones. For example, rockery (rocky hill) also suggests that a significant part of the soil surface is occupied by relatively large stones located in a chaotic manner. The fundamental difference between these two types of flower beds is that the landscape composition of the rock garden imitates a mountain landscape, with a center of a group of stones surrounded by small areas (terraces) with plants characteristic of a mountainous area.
It is the correct, harmonious selection of plants - flowering, shrubs, conifers and their successful composition on stone terraces that distinguish the alpine hill from other flower beds.
Do-it-yourself technology for creating an alpine slide
Depending on the area occupied, the rock garden can be very different - from miniature fragments, occupying no more than 1 sq. m, ending with the largest, located on tens of square meters. The size of the flower garden should be proportional to the size of the site and depends on the overall landscape. Its height depends directly on the area of the alpine hill - in a small space it makes no sense to imitate mountain slopes. As a rule, in mini-rock gardens with an area of \u200b\u200bup to 3 square meters, a hill is not erected, with an area of \u200b\u200b6-10 square meters - simple alpine slides, height is allowed up to 1 m. process into logical stages, will help to better comprehend and plan an independent rock garden device.
Video "Alpine hill do it yourself"
Site selection and planning
Thinking about how to make an alpine slide with your own hands, it is important to understand that the only requirement that it must meet is an imitation of a mountain landscape and its specific vegetation. And how to achieve this, what means will be needed, what plants to choose - it depends only on your plan and on a particular personal plot. You can build an alpine slide with your own hands in almost any part of the garden, but most often it is placed near the front side of the estate. If you want to grow light-loving species, the chosen place should be well lit. Regardless of the location, the stone composition should organically harmonize with the general style of the plot, the main buildings and be clearly visible.

The variety of the created composition largely depends on the features of the terrain. The ideal option is the presence of natural bumps or a steep slope on the plot, which will allow you to build tiered terraces that are in harmony with the overall design. If the terrain is flat, an embankment with stones will have to be created artificially. After the final choice of location, it is necessary to determine the size and total area, which is planned for the rock garden. To imagine the future structure directly on the ground, wooden pegs driven around the perimeter and twine stretched between them will help.
Remember
In order for the flower garden not to overwhelm with its size, professional designers recommend proceeding from the following ratio - the total area of \u200b\u200bthe site (0.6 hectares), the area of \u200b\u200bthe alpine hill (6-10 square meters), height (60-100 cm).
Selection of stones and earthworks
More often than others, when creating a rock garden with their own hands, they use granite, sandstone or limestone, but it is advisable to choose one type of stone, a maximum of two. Basic Required qualities: strength, moisture resistance, durability and naturalness. It is important to remember that our goal is to recreate a miniature copy of the natural mountain landscape, so it is better to refuse artificial materials.

simple alpine slide
Granite is better for decorating stone ledges, and if it is necessary to build terraces or paths, pay attention to layered sandstone slabs.
It is not necessary to complement the mountain composition with perfectly smooth boulders, if the construction of a landscape waterfall is not foreseen.
“Old” stones look very impressive with traces of destruction, cracks and chips, and to emphasize naturalness, they select different sizes and colors.
Creating an attractive rocky flower garden with your own hands requires a long and painstaking preparatory work, including:

A simple alpine slide with your own hands
- ground preparation,
- creation of a drainage layer,
- selection and placement of large stones,
- preparation of soil mixture,
- planting vegetation,
- laying out small stones.
It is advisable to proceed directly to the construction of the alpine slide at the end of spring or in the first half of summer, in which case, by the time the plants are planted in the autumn, all work will be guaranteed to be completed. When planning the time, do not forget that it will take 3-4 weeks for the natural shrinkage of the soil. Before starting earthworks, it is recommended to draw the most detailed plan of the mountain composition with an exact indication of the location of large stones, terraces, paths and green spaces and their sizes.
The first step of practical work is the excavation of soil from the inside of the rock garden marked on the ground. It is enough to dig a pit 20 cm deep, while weed roots are carefully removed from the removed fertile soil layer.
The second step is the device of the drainage layer. As drainage, you can use crushed stone of a fraction of 20x30 mm, expanded clay or broken brick, the thickness of the created layer is 15-20 cm. A planting mixture prepared from excavated soil, peat and small broken stone, mixed in equal parts, is poured over the drainage cushion.
The next step is the most important - the installation of large stones and, if necessary, layered slabs along the perimeter to create terraces. Depending on the height of the terrace being created, the slabs can be fastened with cement mortar or sprinkled with earth with the addition of clay.
As a rule, when creating a simple alpine slide with your own hands, 2-3 height differences are arranged - horizontal or inclined terraces of different levels. On them, in addition to planted plants, small stones are laid out in a chaotic manner, preferably of the same type as the underlying large ones. The free space between the stones is left exactly as much as is necessary for planting groups of plants. Remember, it is important not to overdo the latter when creating a mountain composition. Try to avoid any symmetry and equal distances - a small man-made landscape should match the natural one as much as possible. After filling the sites with soil mixture and the completion of the construction of stone hills, the finished structure is given time to shrink.

Types of laying stones for an alpine slide
Selection and planting of plants
To create an original and spectacular mixed composition of stones and green spaces, you have a fairly wide choice - perennials, annual flowers, shrubs and conifers. When choosing plants for an alpine slide, remember that you are creating a mountain landscape, with vegetation characteristic of difficult climatic conditions. In this case, you are required to make a reasonable compromise between the desire to give the flower garden a colorful brightness and the need to preserve naturalness and originality.

- the main selection criteria: compliance of plants with a mountain landscape, undemanding care, decorative qualities or a long flowering period;
- number of species. Given the small size of the composition, it is desirable to select 3-4 species of flowering plants, 1-2 shrubs and 1 species of coniferous or woody representatives;
- plant size. The alpine and subalpine belts are characterized by short, compact plants and creeping groundcovers. It is preferable to decorate the top and upper tiers with drought-resistant undersized perennials;
- frost resistance. By picking up stones for the alpine slide and leaving space between them for planting, it was assumed that the planted plants were able to endure harsh winters without additional shelter or digging;
- slow growth. The choice of coniferous or tree species is desirable to be carried out from representatives that grow no more than 10-20 cm per year and grow no higher than 1.5-2 meters.
It is advisable to plant selected plants starting from the top, gradually descending to the lower tiers and ending at the foot. After planting, it is advisable to mulch the soil around the plants with fine gravel. This will not only protect against weeds, but also keep the soil moist.
Having the necessary knowledge to build a simple alpine slide with your own hands and following the recommendations set out in the publication, you can always create a small, but original and attractive mountain landscape on your backyard plot.
Today we will talk about one of the richest traditions in gardening and landscape design. Alpine slide or rock garden is a beautiful composition of plants and stones in the garden. As you might guess from the name, this composition is created to imitate the picturesque slopes of the Alps - the rock occupies the central position, but it is almost completely hidden by various high and low plants (unlike rockeries, where the stones come to the fore).
In this article, you will learn how an alpine slide can be made by hand and which plants are best suited for it. To your attention - step by step instructions and 35 photos!
Beautiful alpine slide in the country or in the garden
The creation of alpine slides today is expressed in many styles and forms, including slides with artificial ponds and waterfalls. But the main secret of their attractiveness is the combination of different plants that contrast with each other in height, color and texture of the leaves. Quite often, for a more expressive effect, dwarf trees and shrubs, especially conifers, are placed in the center of the hill. In general, flowers and plants are selected unpretentious, often found in the mountains. They love rocky soil and sunny places, need good drainage, but are not afraid of drought.

A small do-it-yourself alpine slide is created in several stages:
- The choice of plants and stones (actually thinking over the design of the slide);
- Selection of ideal drainage and soil;
- Directly creating an alpine slide in a country house or a plot of a private house.
The best time to start this business is just the middle of autumn. It is worth installing stones, filling up drainage and soil right now, so that during the winter they have time to “settle” and be ready for planting in the spring.
Alpine slide plants: photos and names
As we said above, plants for an alpine slide should contrast and emphasize the beauty of each other. But so that your garden composition does not turn out to be clumsy and inharmonious, you should limit yourself to 3-5 types of plants and flowers.
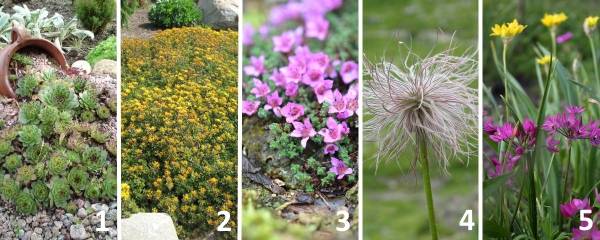
Here is an example of a popular combination of 5 alpine plants that are widely used in horticulture around the world:
- Young - perennial mountain plant with a pinkish-purple hue;
- Stonecrop "Weihenstephaner Gold" - a plant with spectacular reddish stems, which is covered with golden flowers in late summer;
- Saxifrage - fluffy low bushes with purple flowers (in spring);
- Pasque alpine - has attractively textured leaves and white flowers in spring followed by feathery stems;
- Mountain onion - relatively tall flowers for an alpine hill with white, yellow or pink-purple petals.
If you want the alpine slide to change throughout the season from spring to winter, you can plant flowers on it that bloom at different times of the year.
Common spring-flowering plants for alpine slides:
- Anemone tender;
- Saffron Sieber;
- Corydalis dense;
- Iris;
- Cyclamen Caucasian;
- grouse;
- daffodils;
- Tulips;
- Mountain bow;
- Colchicum and others.

Flowers for the alpine slide that bloom in summer and autumn:
- Colchicum Agrippa;
- Autumn crocuses;
- Sternbergia yellow;
- Cloves and thyme;
- Saxifrage;
- Lumbago,
- Stonecrop.
All of them are quite unpretentious in their care and easily take root in almost any soil. But, as elsewhere, there are some nuances in the choice of soil and drainage for these plants, which we will dwell on in more detail.
How to make an alpine slide (step by step instructions)
You are already familiar with the main features of slides and plants for them, now it's time to find out how you can make an alpine slide with your own hands.
Important point: most alpine plants hate excess moisture. They endure summer heat much better than May thunderstorms. Therefore, you need to choose in advance a suitable place and drainage for the alpine slide. Ideally, such a place could be the southern slope of an earthen embankment near your house or cottage.
High drainage will allow water to run down the slope more quickly, as well as give the plant roots good aeration and sufficient nutrients. The best drainage for your alpine slide can be gravel, pumice, coarse sand or perlite. Note that drainage and decorative stones should be at least 50% of your rock garden, or even 90%.
As for the soil where you will plant the plants, everything is without wisdom here. Use the same soil that is available in your dacha or yard, mixed with peat moss, rotted leaves, bark, compost, or other organic additive, if possible.
What you need to make an alpine slide with your own hands:
- container under the hill (if necessary);
- Large shovel for backfilling;
- Spatula or small spatula for planting;
- Crowbar for maneuvering heavy stones (if necessary);
- Drainage;
- Stones of all sizes;
- Priming;
- Compost;
- Plants for the Alpine slide.
Following the further step-by-step instructions, you can make a beautiful alpine slide in the country or near a private house with your own hands.
Step 1: choosing a place for rock garden
The rock garden can be built on level ground or on a slope. In the first case, you will either have to artificially create a small hill, or dig a slope down, as in the photo below.

Alternatively, you can set up a miniature alpine slide in a stone trough, pot, garden vase, or other container that has drainage holes. So that they do not become clogged over time, they are laid with shards from old broken pots.
Step 2: cleaning the soil from weeds
The item must be completed if you use the land from your own site, and do not buy separately.
Step 3: foundation and stone laying
Dig a hole at least 30 cm deep and lay a foundation of rubble or large stones in it. For reliability, the perimeter of the pit can be laid with bricks (if you do not use large stones).

It should be filled, going from the largest "ingredients" to the smallest. A layer of gravel is laid on the rubble, then soil with compost. Small pebbles or mulch can also decorate the top layer of an alpine slide.
Using a few large rocks as the base for the slide will allow you to use less gravel and other ingredients later on.

Step 4: backfill
When filling the alpine slide with soil, use some of the small stones to create "pockets" for the plants. They should resemble a horseshoe that will hold the mixture of soil and compost. If possible, immediately mark these places with flags, since the top layer of the alpine slide - small pebbles or mulch - can hide them from your eyes.


Step 5: planting
Water the plant while it is still in its pot. Then remove it and carefully release some of the roots - especially if they are wrapped around a clod of earth. Place the plant in a planting pocket and cover the roots with soil. As a finishing touch, sprinkle small pebbles or sand on top, which will protect your do-it-yourself alpine slide from falling leaves and weeds.

Alpine slides (photo) - do-it-yourself landscape design
Finally, we suggest you take a look at some beautiful alpine slides in the photo. Who doesn't need a dose of inspiration to take on DIY landscaping? Thank you for reading Dekorin!


Also read: 


Also read: 


The main purpose of the dacha - growing food and a place for hard physical labor on the ground - is gradually fading into the background, and most summer residents use suburban areas to relax in nature with their soul and body. And the aesthetic appearance of the territory plays a significant role in this, the variety of colors in the flower beds is especially pleasing to the eye.
Flower decoration of the slide
But the standard flat stationary flower beds are already a little tired, and I want to decorate my yard with something bright, beautiful and original. An excellent solution can be a flower hill - a hill covered with a multi-colored carpet of annual and perennial crops.
Flower slides or rock gardens have already become favorite guests in summer cottages and suburban areas. They are compositions of stones with plants planted between them, repeating a unique mountain landscape. In addition to beauty, they also have a number of undeniable advantages:
- such a flower garden will allow not to deal with the natural irregularities of the site, but to emphasize and beat them favorably, creating an original garden design;
- with the help of an alpine slide, you can hide unpresentable buildings - a barn wall, a restroom, an outdoor shower;
- a rock garden can be made with your own hands from improvised means - broken bricks, rubble and stones left after the construction of buildings;

- thanks to a special flower planting system, such a hill almost does not need to be weeded - the stones restrain the growth of weeds and the uncontrolled growth of plants.
Creating a flower slide with your own hands
Consider how to create beautiful flower arrangements yourself:
- Initially, you need to determine the desired placement of the rock garden: if the site has a natural eastern or western slope, then it will be an ideal base. Otherwise, a hill of stones can be laid out in any corner of the yard, for this it is better to choose a sunny place, well viewed from the window of the house, gazebos or benches in the yard and even the street - after all, efforts will be rewarded with pride for your creation. Such beauty should be admired by the owners, guests, and even ordinary passers-by!
- Before construction work, you need to decide on the design, shape and size of the future flower garden, photos on the network will help with this. The height of such slides is often 1-1.5 meters, and the slope of the slope does not exceed 45 degrees, with a greater steepness, the composition loses its attractiveness.
- After that, you should start choosing stones. It is recommended to use natural stone of natural forms, tuff, shell rock, granite, sandstone will do.

- Flower slides need high-quality drainage to maintain their shape and normal plant growth. To do this, the contours of the future flower hill are outlined with ropes and pegs, the fertile soil is removed to a depth of about 10-15 centimeters, a layer of geotextile is laid on top, and solid construction debris is poured onto it - fragments of brick, ceramic tiles, crushed stone, unnecessary stones, pieces of concrete, it is they who form the hill for the flower garden. This step can be easily done by hand.
- Next, the surface is covered with their own hands with a layer of sand and earth with a total thickness of 40 cm, on which stones are laid out. First, large boulders are installed, while it is recommended to use 2-3 pieces at once to create bright accents. As practice shows, several large blocks look much more spectacular than many small ones. When laying, the stones should be firmly fixed in the soil, if necessary, the earth is filled up and tamped. Boulders need to be immersed in the substrate by a third or even 2/3 to create the effect of the old age of the placer, and all stones must also hold firmly and not loosen - this is the basis for the safety of working with a slide.

- From the stones, you should immediately make an attractive composition that looks organic even without plants, because in the cool season the flowers will not cover the slope, and the yard in the country house will be decorated with an unusual stone composition.
- Next, you can start planting plants. Depending on the wishes and imagination of the gardener, the hill can be planted with various flowers - perennial and annual, high and low, shrub and ground cover. It is recommended to first plant perennial crops, and fill in the remaining areas after planting with annual crops. The remaining fertile soil is poured under the roots in the course of work, sometimes you have to use a purchased substrate.
- After planting all the seedlings, the remaining empty space is filled with small stones, this will emphasize the contrast between greenery and bright flowers and a calm, cold stone, as in the photo. In addition, the stone coating will protect the flower garden from the appearance of weeds and the uncontrolled growth of some aggressive plants.
As you can see, everyone can make a flower slide with their own hands, there would be a desire and a little free time.
When selecting stones, you can go in two ways:
- fully think over the desired composition in your thoughts and look for material for it;
- find suitable stones and from them, in the course of work, think over the appearance of the slide.
The latter option is more acceptable, since finding a stone of a predetermined size, color and texture can be very difficult.

You can do the preparation of stones with your own hands, since outside the city you can almost always find stones of various sizes in the public domain. But if there is no time to search, you will have to contact construction companies that sell building materials, but in this case there may be a problem with the selection of boulders of different sizes, since stone fragments are sorted by size and sold in batches.
When choosing a material, it is necessary to observe the unity of texture, color and shape. After all, on a natural mountain slope you can find only one rock with small veins and interspersed with another, so large and medium stones should be from the same material, but small elements can be anything.
If clastic boulders are used, then all stones should be with sharp, wild edges, in which case pebbles will be out of place. Conversely, when using several rounded stones, all others should also be smoothed. The stones may differ in size, but their appearance must be similar so that the finished composition looks like a single whole, a natural ledge of rock. It is also recommended to use smoothed stones for flat rock gardens, but a steep hill is created from clastic stones
Most often, slides in the country are made from stones of such breeds:
- granite is hard, strong, durable, with a wide range of colors from light gray, green, brown to black, the only drawback is the increase in the acidity of the soil around the stone, which is why heather and conifers should be planted in such a rock garden;

- sandstone - a porous, smooth, spectacular stone that harmonizes well with vegetation and other rocks;
- limestones are porous, light rocks that accumulate moisture during rains and then give it to plants, reduce the acidity of the substrate, and after a few years are effectively covered with moss;
- shale - layered rocks with different colors, ideally repeat the natural beauty of layered mountain slopes, slides made of such material look original and spectacular.
As a rule, for a flower slide with stones, you will need several large boulders, a couple of medium ones and small fragments to fill the remaining space.
For the design of alpine slides, mountain plants are used, which in nature grow on the slopes. Although with the development of selection, the once unpretentious and unsightly cultures turned into luxurious flowers with a variety of shapes, colors and species, they still convey the unique charm of the harsh mountain nature.
The selection of flowers and plants for a flower slide is an important stage in the design of a flower garden. Indeed, despite the apparent diversity of such crops, they all have specific requirements for lighting, moisture, soil type and watering. And creating areas with acidic and alkaline soil on the same hill is too difficult and troublesome, and care will become much more complicated. From this, it is difficult for an inexperienced gardener to independently select a complex of plants that will not only create a beautiful picture and bloom all year round, but also get along well with each other. Experts recommend that beginners take as a basis ready-made schemes for planting rock gardens in the network and specialized magazines and adjust them to their composition.

In most slides, the landing tier is observed:
- The upper tier is planted with light-loving and drought-resistant crops, because the top of the flower garden will most of all be exposed to sunlight, and moisture will drain to the foot. Most often here I use various variants of ground cover flower plants - carnation, iberis, edelweiss.
- The middle tier is decorated with light-loving and shade-loving plants, there is a wider choice of crops, since light and humidity are in balance. Phloxes, wormwood, obrieta, aster, primroses, anafalis, various bulbs are suitable.
- The lower tier is given to moisture-loving and shade-tolerant plants, often flowers here are adjacent to dwarf shrubs.
Also, when choosing crops to decorate a hill, you need to take into account the time of their flowering, it is recommended to select and plant evenly plants with different periods of bud formation, so that spring flowers give way to summer ones, and then to late autumn ones, so the flower garden in the country all year round will please the eye with beautiful colors. It is equally important to choose the right neighbors, since some flowers tend to grow and clog neighboring plantings, such crops include obrieta, lamb, rezuha and soapwort, they are recommended to be planted separately, surrounded by large stones and small scattering to control growth.
Also, when planting plants, you should not overdo it with the number of sprouts, and although at first the flower garden may seem empty, you will have to be patient a little, because soon the seedlings will grow and the free space will be filled. If you initially plant too many crops, then after a couple of months they will interfere with each other and create a feeling of overcrowding, redundancy of the flower bed.

If desired, you can create a flower garden of perennials, as in the photo. This option will allow you to create a composition with your own hands, which for many years will decorate the yard in a country house or a suburban area with little or no care. In addition, most perennial crops are distinguished by the splendor of the bushes and abundant flowering. This option is ideal for busy people who love constancy.
If you want to create the ever-changing beauty of a flower bed, then it is better to use annual crops, which can also be planted as their predecessors fade. So, you can create a constantly changing and bright flower garden with your own hands, pleasing with a riot of colors throughout the summer. But, of course, there will be more trouble with such a slide.
Flower hill without the use of stones
To decorate flat areas in the country, you can use small earthen hills covered with flowers. Especially original is the use of various decorative elements - an old vase, carts, barrels that are laid on the ground, near them a hill is created with their own hands from soil or compacted sand, on which undersized flowers are planted. The result is an unusual flower arrangement, which is a flower that has spilled out of the dishes. Such a flower bed looks not only original, but also very colorful, which is confirmed by the photo.
Would you like to improve your landscape design skills? Try to make an alpine slide with your own hands. We warn you: it’s better not to get down to business without confident skill, otherwise you risk growing a mess in the flowerbed, making the neighbors laugh and being disappointed in the design. The editors of the publication understand what is the use of a rock garden and how to make it yourself.
Alpine slide: photos, ideas, combinations
This exterior element is based on a combination of mountain plants with stone. Alpine Hill is a serious and confident competitor to traditional flower beds and plaster sculptures. It is already difficult to surprise someone with the latter, not to mention creating a unique atmosphere in the exterior.
Photo 1 - Composition by Debora Carl Landscape designAlpine slides are used for decoration:
- private houses;
- country estates;
- squares;
- gardens;
- lawns of office buildings;
- areas near cafes and malls.
The design of the Alpine slide is multi-level. There are many schemes for beginners that help not to get confused in the arrangement of design elements.
Alpine slide plants: photos and names
Mostly coniferous plants and flowers are used. In terms of cost and practicality, the leaders are:
- juniper;
- spruce (dwarf);
- dryad;
- young;
- short cloves.
Photo 5 - Composition by Petriv Landscape Design: coniferous plants and wildflowersIMPORTANT! The main rule for selecting plants is a competent combination of all elements of a mini-ecosystem.
How to make an alpine slide? Preparatory work
Photo 6 - Exterior by a group of designers Marianna Notkina & Khomjakov StanislavA few tips before starting the arrangement of the rock garden:
- take care of its basis - the ground;
- keep in mind that the design should include imitation of natural areas characteristic of rocky terrain;
- the compositional basis is stones, as well as plants of small height and creeping nature.
"Wonderful Garden" "Wonderful Garden"IMPORTANT! It is this kind of vegetation that is typical of the Alpine mountains, the atmosphere of which has become the basic idea of the described landscape element.
The creation of a rock garden provides for the presence in it of such elements as:
- sole;
- slopes leading to the summit;
- vertex.
Therefore, if you want to build an alpine slide, take care of these elements.
Photo of alpine slides in the garden: choose the view
Photo 11 - Author of the project: Mary-Liz Campbell Landscape DesignBefore you create an alpine slide on a garden plot, you should familiarize yourself with their types. This will make it possible to arrange everything as competently and thoughtfully as possible.
Photo 12 - Exterior by Huettl Landscape Architecture Photo 13 - Project by Banyon Tree Design StudioTypes of alpine slides:
- rock cliff - a hill, which provides for a maximum of rock boulders and a minimum amount of vegetation;
- the mountainside is a composition in which stones of various sizes are combined with numerous vegetation. She is quite tall, which is her basic feature;
- mountain valley - a hill consisting of massive stones peeking out of the ground. The stones are surrounded by vegetation;
- gorge - rock garden, equipped in a hollow of a natural nature. The slopes are paved with stones, plants are planted that belong to the rocky species of flora.
The arrangement of an alpine slide of this type is more complex than in previous versions. But there is an opinion that such a rock garden is visually the most spectacular.
Photo 15 - Rock garden from Case Design / Remodeling, Inc.There is another type of landscape elements that stand along with alpine slides in popularity, but differ from them. This is a rockery - a garden consisting of stones that act as a backdrop for ornamental vegetation.
Photo 16 - Exterior project from The Philbin Group Landscape Architecture designersAlthough it is not an alpine slide, it has a rather important positive feature. It can be set up on completely flat terrain.
Alpine slides: photos of landscape design and step-by-step instructions for creating a rock garden
Photo 17 - Project by Calvin DesignWe decided not to complicate and for convenience we broke down the process of creating an alpine slide with our own hands into steps.
Do-it-yourself Alpine slide: step by step photos
Photo 18 - Exterior by Imagine design & Construction pty LTD- Step 1. We develop a sketch
Draw a sketch of what your alpine slide should be. It is not necessary to make full-fledged drawings. The main thing is to calculate the number of tiers and think over the vegetation. This approach will make it possible to avoid the mistakes of improper planning.
Photo 19 - Multi-level flowerbed by Remick Associates Architects + Master Builders- Step 2. Determine the place
At this stage, it is important to remember the decorative function of the rock garden and the fact that it will be looked at from different angles. It is necessary to plan the location of the alpine slide so that it looks interesting from different angles.
Photo 20 - Statue in composition. Idea: Westover Landscape Design, Inc.IMPORTANT! Do not forget about planning a place to relax near the rock garden. Nearby you can place a small flat area where you can put a deck chair, a table, chairs and even install a gazebo.
- Step 3. Create conditions for vegetation
In order for plants to feel good in the ecosystem, slopes should be located to the east and south. So the vegetation will receive enough sunlight and heat.
Photo 21 - Exterior idea from Neumann Mendro Andrulaitis Architects LLP- Step 4. Consider the natural unevenness of the terrain
If there are a lot of natural irregularities on the site, there is no better place for a rock garden. Located on natural slopes, the alpine slide will look organic. And stones and plants will be a wonderful decor.
Photo 22 - Landscape designer Kimberley Bryan- Step 5. Draw lines
The lines from the sketch in the appropriate scale are transferred to the site, thanks to which it is possible to indicate which element and where should be located.
Photo 23 - Landscaping idea from Princeton Scapes Inc.- Step 6. Install the first boulders
The first large boulders should be installed around the perimeter. To make everything look organic, they can be somewhat deepened into the ground. Such a solution will visually ensure that the stones are perceived as a natural and integral part of the existing landscape.
Photo 24 - Exterior design by All Oregon Landscaping design team- Step 7: Create Space for Plants
When the boulders around the perimeter are laid and there is a clear outline of the hill, care should be taken to prepare a place for plants. To equip it, pour suitable soil into the interior of the rock garden and plant vegetation.
IMPORTANT! The soil of each previous tier becomes not only a habitat for vegetation, but also the basis for the previous one.
This should be done in tiers and gradually, separating each tier of the hill with stones. Otherwise, you will get something like a "sloping flower bed".
Photo 25 - Landscape design project by Porebski Architects Chippendale- Step 8 Decorating the Vertex
When the tiers are ready, it's time to form the top. As this element, one large stone or a pair of small ones, folded in the shape of a pyramid, can be installed. In addition to the fact that the top is of decisive importance in the formation of a visually complete image of the composition, it also protects against soil erosion.
Do-it-yourself alpine slides in the country: photos and best ideas for the exterior
Photo 26 - Recreation area from the designers of the studio Cording Landscape DesignWhen flower beds and flower beds cease to amaze with originality, rock gardens become a great option. If you have figured out a simple algorithm for creating a composition, you can try to make an alpine slide with a waterfall with your own hands. It can be not only with a waterfall, but also with a fountain.
Photo 27 - Design project from Huettl Landscape Architecture studioA rock garden with a waterfall is more difficult to equip, but it is worth all the effort invested, because it looks spectacular.
Photo 28 - Succulents in the design of the rock gardenThe sequence of its creation is as follows:
- we tear out the foundation pit after marking the rock garden;
- fill the future pond with water;
- fill the space around with sand, pour water over the edges, make several layers, which we then tamp down;
- for the cascade we take stones with a flat surface - their installation is easier;
- we tilt the structure back so that it is not noticeable;
- we make fastening with mounting foam or cement mortar;
- remove excess building materials;
- we mount the pump on the bottom (we select the power according to the height of the cascade);
- we bring the hose to the top of the rock garden and mask it between the stones.
When all these steps are completed, the fountain is ready.
Photo 29 - Rock garden in the exterior from Envision Landscape StudioAlpine hill: photo and editor's choice
Photo 30 - Exterior Stones by Paradise Restored Landscaping & Exterior DesignIf you do not have ideas for self-development of sketches of an alpine slide, the design of beautiful rock gardens, photos of which can be viewed below in the gallery, will come up with interesting ideas.
Each modern well-groomed cottage is unthinkable without a garden and flower beds. To implement bold landscape design ideas, it is not necessary to have a vast estate. Beautifully and tastefully you can decorate even the most compact area. An excellent solution for small areas is a small alpine slide made by hand from available materials. A miniature rocky landscape looks more interesting than an ordinary flower garden, it does not take up much space and does not require complex care.
Where is the mini-rock garden appropriate?
A composition of flowers and stones will decorate any empty corner of the cottage. Near the wall of the house or the fence, a one-sided slide looks beautiful. In the middle of the lawn, it is better to make a circular flower bed, open to the eye from all sides. For the porch and terrace, the best option would be a mini-rock garden in a floor pot.

Harmonious combination of stones and plants
Before you make a small alpine slide, you must make sure to follow a few simple rules:
- Plants must receive enough light. In the shade, most flowers fade and stretch. For this reason, choose a well-lit, sunny place.
- You can not have a rock garden under trees or near drainpipes. Leaves fall from the trees and spoil the appearance of the structure. And during the rains, water from the branches or from the roof will wash away the ground.
- All residents of the flower bed should be combined with each other. Obviously, you can not mix plants that require completely different growing conditions.

Alpine slide in country style
The most successful ideas and examples of their implementation
The design style and appearance of a small alpine slide depends only on the preferences of its owners. However, in order to finally decide in which direction to move, it is worth examining the photos of the most beautiful mini-rock gardens.
The traditional version of a small do-it-yourself alpine slide is a stepped structure located directly on the ground. Such a slide can be successfully entered into a common flower garden.
The rock garden looks beautiful in combination with water. Even a small bowl at the base of the stones, imitating a pond, will enliven the composition and give it charm. And if you install a fountain or make a mini-waterfall, then such a slide will undoubtedly become the main decoration of the cottage.

Mini rock garden with a fountain
If there is not a single piece of free land on your site, do not despair. Look at the photo of small alpine slides in flowerpots and other unusual containers, maybe you decide to do something similar.
DIY beauty from nothing
A mini-flower garden does not require serious efforts to create, because you do not need to carry out any large-scale landscape work. All you need is a positive attitude and some free time.
What to make an alpine slide
In any household there are materials from which you can make a small alpine slide in the country with your own hands. A few small stones, gravel, shards - that's all that is needed for work. Even if you only have a rusty basin or an old washbasin at your disposal, you can turn them into a real work of art.
It is better to choose stones of a non-standard shape or color, then the rock garden will look interesting even with a minimum of plants. Ordinary gray cobblestones should be beaten with gravel of a different shade or bright flowering bushes.

Small alpine slide in a wooden box
Mini plants for mini areas
The smaller the rock garden area, the smaller the plants should fill it. There are many species suitable for planting in a rocky garden. First of all, these are dwarf conifers and slow-growing rock specimens:
- boxwood;
- juniper;
- erica herbaceous;
- saxifrage;
- Phlox subulate.

Succulents for a small alpine slide
So that the mini rock garden does not look boring, greens are diluted with flowers. For these purposes, undersized plants with small flowers are suitable:
- creeping thyme;
- aubrieta;
- lobularia.
If the rocky garden is not supposed to be left to winter, then you can make a composition of cacti and succulents. A slide decorated in a flowerpot in the fall is enough to bring it into the room. Succulents for mini rock garden:
- fat woman;
- agave;
- small varieties of catus.
Step-by-step instructions for creating a mini-rock garden from an old basin
Step-by-step photos and detailed instructions will help you create a small alpine slide from an old basin with your own hands.
For work you will need the following materials:
- a metal basin that has served its purpose;
- gravel or expanded clay for drainage;
- soil for plants;
- stones;
- cement, small gravel and sand for container decoration.

An example of decorating a flowerpot
Work begins with the decor of the container for the slide. Knead the cement mortar of the consistency of thin sour cream, add small gravel to it, which will serve as a decor. The basin is turned upside down and covered with a uniform layer of cement mortar 1.5–2 cm thick. If the bottom is rusted and there are holes in it, they are not cemented, but, on the contrary, left to drain water. If there are no holes, make a couple of holes with a thick nail.
Leave the basin to dry for about a day. While the solution is still wet, you can do additional decor. For example, gently scratch patterns on the surface or lay out a mosaic of shards, broken glass, shells or tile remnants. If decoration is supposed, crushed stone is not added to the cement.
The dried container is set in place. 5–7 cm of expanded clay or gravel are poured to the bottom for drainage. A layer of soil is laid on top, the largest stones are installed, forming a rocky landscape. The entire workpiece is watered so that the earth settles and the earth is poured again.

Finished slide
Plant the largest bushes of plants. If it is supposed to plant a dwarf tree with rather powerful roots, then they do it at the stage of laying the first stones. Medium and small plants are planted last.
The almost finished rocky garden is again watered and proceed to the final finishing. Small pebbles, sand, garden decor are used - everything that fantasy tells. For inspiration, it would be useful to once again review the photos of small alpine slides created by creative natures with their own hands. You can make a garden stylized as a desert, a forested mountain slope or alpine rocky terraces.
That's all. Work completed. It remains only to admire the magnificent result. Such a slide will become a real highlight of the summer terrace of a country house or apartment balcony.


