A wrench made from a pipe. DIY socket wrench
To unscrew or tighten a nut, bolt, coupling, faucet head, etc. wrench is used. Any master who does male housework or deals with technology has come across this tool at least once in his life.
Wrench sizes
Each device has its own parameters and characteristics. There are generally accepted standards dimensions wrenches. To determine the size of the key, attention is drawn to the clearance that the fixed jaws form. This is pharynx tool. The handle of any wrench contains digital designation. This is the number of millimeters that determines the distance between the jaws. The sizes of wrenches range from the smallest (2.5x3.2) to the largest (75x80 mm). These are GOST indicators that cannot be violated under any circumstances. Registered and others wrench requirements. Any manufactured tool must have a specified hardness and strength. A special calculation of the maximum deviations of the nominal throat size was carried out; the protective and decorative coating of the key is taken into account; trademark marking is applied, etc.

Wrench sizes
Varieties of wrenches
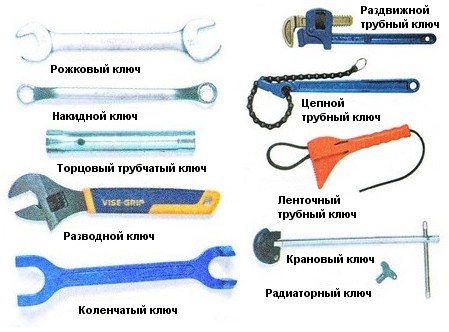
Now let's deal with what are wrenches. More applicable keys, which include two gaps. Its second name is two-arm key. If you need to unscrew parts with a distance of 19 or 22 mm between the polar faces, then you need to use wrenches with a handle, where there are designations 19 and 22. It happens that in a force majeure situation, a tool of the right size is not always at hand. In this case, a larger wrench will do. If using the wrong size tool, use a screwdriver or knife and insert it into the empty space.
So, what are the wrenches. First of all, movable. These are open-end wrenches, the size of which may vary. Secondly, composite. They consist of a hollow seat, an end structure nozzle and a handle, long or short. There is specific profile keys. These are unusual wrenches. There are hex, bristol and torx wrenches designed to work with computer and bicycle equipment, twisting parts in hard-to-reach places that border on almost jewelry work.
Choosing a wrench
how choose wrench to meet all requirements? The variety of wrenches demonstrates that there are different types of wrenches for every need. It is necessary to proceed from the purpose of its acquisition and the complexity of the task that you set for it. The material for the manufacture of modern keys is a special tool steel, which is composed of chromium and vanadium. Therefore, when referring to the material, they usually say that there are wrenches on sale. chromed.

There is a unique thing that can solve all problems in one fell swoop and save you from having to puzzle over which key to choose. There is universal a wrench that contains all the keys combined. He can use nuts of any size with different head shapes. It does not slip on a smooth surface due to its powerful teeth, which is its clear advantage.

There is also electric wrench, the name of which speaks for itself. This tool is powered by batteries and rechargeable battery. So each master decides for himself which wrenches are best for him.

electric wrench
The price policy of keys is very diverse. As a rule, wrenches price ranges from 21 rubles to 415, depending on the manufacturer and the versatility of technical characteristics. The cheapest will cost single sided key the open throat of which is from 3.2 to 85 mm. When buying, it is also worth remembering the long handle, which limits the range of motion of the key in turns. If one of the jaws is shortened, then, accordingly, the radius of the key will increase. In this case, it is possible to put the wrench on the side of the nut. If the handle is artificially increased, then the applied force will increase, and the jaws of the pharynx will divorce or even break. A sledgehammer can put them in place if they are separated, but the material will no longer be as strong as before. If you have a key made with 40X or 40XFA steel, then there is the option of hardening the sponge.
There is another way how to repair worn or protruding pharynx. Through the welding of the metal layer, the throat volume is adjusted using an abrasive tool. If the open mouth is more than 24 mm, then this key recovery option will be more effective. Life time wrenches ranges from one to three years. When talking about durability of use, they always mention ring key. It cannot be distributed, but it will wear out. There are restrictions on the operation of this type of key. It can be used when put on nuts, but it cannot be used to unscrew, for example, the union nuts of flexible hoses. For plumbing work, ring wrenches are used to loosen or tighten gate valves, cast iron siphons, etc. The advantage of this wrench is a hexagonal or dodecahedral opening, which allows you to work more intensively.

ring wrench
We make a wrench with our own hands
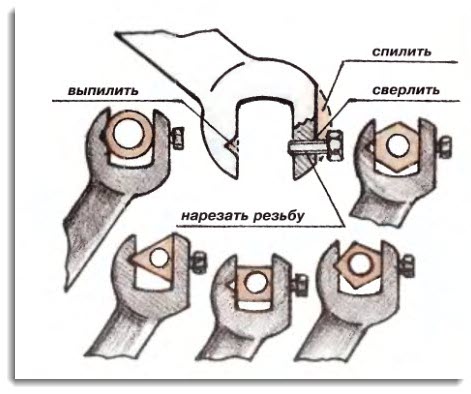
A legitimate question arises, how make a wrench without the help of a specialist. For those who decide to personally make this tool for themselves, there are small tips. It is worth starting to make a wrench with your own hands by making a single-sided or double-sided wrench. Use a sample of a ready-made similar product. Do drawing wrench, based on which you will make your tool.
To start we do blank from a sheet of steel with an overall dimension larger by 2-3 mm than the outer dimension of the sides of the key. There are difficulties with thick blanks. Do not cut with a hacksaw. And the use of a gas burner is contraindicated. It is best to use blacksmithing. This is done by flattening the steel rod.
After the workpiece is, we begin to apply markup. If the workpiece has uneven sides, it is better to file them, remove scales. Then you need apply paint on the finished top. You can apply quick-drying paint or varnish. The overlay of the sample occurs after the paint has dried. It is best to use some kind of press so that the sample does not move during delineations. Sharpened steel wire will act as a scriber. After separating the sample and the workpiece, it is necessary to bring the final risks through 1-2 mm from those already applied, then mark them. First, set the core with an inclination at risk, and straighten it when striking with a hammer. The distance between the pits in the throat should be 3-4 mm.
Well, in the end it is necessary harden manufacturing. At home, this can be done with gas. If you use a blacksmith's forge or a special stove, it will be ideal. To remove the key, pliers are used by lowering one side of the key into the water. After that, you need to take it out and lower it until the sponges completely darken. Then we cool them in water. The opposite side of the key must be processed in the same way. This is the technology for making a wrench.
Making a wrench
Dear site visitors Labuda blog» From the presented material, you will learn how to make a universal key yourself from a bicycle chain, a bolt and three nuts with your own hands. Presented step-by-step photos of the assembly of the key and so let's go ..
Many of you have probably encountered such a problem .. when the edges on the unscrewed nut or bolt are slightly knocked down and the usual wrench simply scrolls without performing its function. This can be solved with the help of a home-made chain wrench working in compression, that is, the stronger the handle of the key, the stronger the chain will be clamped and thereby unscrew any even the most eaten nut or bolt.
To make a universal wrench, you will need a piece of bicycle chain, two nuts and a bolt. We screw the nuts onto the bolt and weld a piece of chain to them in such a way that a grip is obtained and welded to the other side of the nuts. Next, we put the chain on the nut or bolt that needs to be unscrewed and tighten the bolt, thereby tensioning the chain, everything can be unscrewed)
materials
- bicycle chain
- nut 2 pcs
Instruments
- welding inverter
- UShM (Bulgarian)
Step-by-step instructions for assembling a universal key with your own hands.
And so, the necessary details for assembling the key.

Two nuts are screwed onto the bolt.

We measure the chain, namely how much is needed from nut to nut.

We make a mark in the place where the chain should be riveted.

We clamp the chain in a vise and cut off the rivets with a grinder.


We knock out the rivets.


Then it is stretched and welded on the other side of the nut.


Scale and excess metal is removed using an angle grinder (grinder)

Then we unscrew the bolt and loosen the chain to the required diameter.

We insert the nut and tighten the bolt along the thread, thereby tightening the chain and clamping the resulting connection.


We test the key in action.


We consolidate the material covered by watching the video. Happy viewing)
Overview of a universal ring wrench designed to work with nut sizes from 4 to 19 mm. Details - further.
Chinese tool manufacturers never cease to amaze with their desire to improve and universalize everything that many of us have long considered simple things and seemingly not requiring any modifications.
So this time, the inquisitive Chinese mind took care of the problem of creating a universal tool that would eliminate the need to carry a whole set of different-sized ring wrenches.
Why exactly cap, because in nature there are already many adjustable, gas and other universal wrenches of this kind that allow you to adjust to the desired size of the nut.
The fact is that such keys are most often of the "open-end" type.
The most common and frequently used open end wrench is indispensable when the end of the nut or bolt is not accessible and the edges can only be accessed from the side by pushing the wrench, but the disadvantage is the relatively small transmitted moment, as well as the tendency to slip and “lick” the edges.
If it is necessary to apply a sufficiently large force to the bolt or nut, then the most suitable for this is a ring wrench (ring wrench), which allows you to transfer much more force to the bolt because it simply cannot come off, the jaws of the wrench (like an open-end wrench) cannot unbend and thereby increase the size of the pharynx - the system is closed.
Even if the edges of the fastener are already damaged, the key will most likely have enough remaining corners for full-fledged work. Ring wrenches are not inclined to jump off and turn, if you release the key during operation, in most cases it will not even fall. When working with fasteners, it is recommended to start unscrewing the tight nut and finally tighten it tightly with just such a wrench.
The monitored wrench belongs to the type of cap and is designed to work with nuts ranging in size from 4 to 19 mm, i.e. in fact, it can replace a whole set of 16 single-sided or 8 double-sided box wrenches.
The key is delivered in a simple blue cardboard box.
Outwardly, the key looks like a regular, double-sided ring, only noticeably thicker.
Also, as in a conventional double-sided wrench, each of the two sides is designed for nuts of a certain size, only if in the usual this size is always fixed, in this case it can be changed within certain limits.
One side is designed for nuts from 4 to 11 mm.
The other is for sizes from 12 to 19 mm.
The key has a rubber ring to prevent slipping of the hand, the ring itself, apparently, is glued for reliability.
Adjustment to the required nut size is carried out by rotating the wheel located in the center of the key.
In this case, depending on the direction of rotation, a metal rod extends from one or the other end of the key, which during operation acts as one of the faces and tightens the nut.
In the photo of the store, the key looks small and, besides, because of its shiny chrome surface, it resembles a toy, although in reality it is not. Its length is about 20 cm, with a weight of 300 grams.
Before receiving, there were fears that it would be some kind of silumin richly covered with shiny paint, but taking the key in hand, you immediately get the feeling of a heavy, strong instrument.
The characteristics on the store page indicate that the material of manufacture is “CrV”
For reference
Chrome Vanadium, abbreviated as CrV, is the most common type of steel used today in various types of tools, and has the strength, toughness and wear resistance acquired through a deep annealing process.
At the same time, during annealing, this type of steel is less prone to deformation and loss of its original shape than other types of tool steel, in addition, the material is relatively inexpensive.
At first I could not understand why the inscription "UP" was applied on each side of the key. It turned out that if you keep the key in a horizontal position while moving the adjusting rod, then the mechanism starts to wedge and you have to make an effort for this. On the contrary, if you hold the key vertically during adjustment, then the wheel turns easily, so most likely the “UP” mark serves as a reminder to hold the tool in a vertical position for adjustment.
Perhaps this is done on purpose and in a horizontal position, a kind of lock is activated to prevent the rod from moving during operation.
So, how does it work on the example of a bolt and nut.
We put the key on the bolt head.
Then tighten the rod with the adjusting wheel.
For smaller bolts and nuts, use the second side of the wrench.
When using a wrench to work with sufficiently large nuts, there are no problems. The key allows you to apply a fairly large force and there is no difference, as if using a regular cap.
At the same time, the convenience of an adjustable rod lies in the fact that if, for example, the bolt has already seen the views and its size is slightly different from the original one, then the rod will simply tighten it “in fact”.
When working with small sizes of nuts and bolts, the fact that the core is located in the center of the key begins to affect and, accordingly, there is some distance from the edge. Because of this, with a small (thin) bolt head, the rod presses it closer to the edge and therefore can slide off with great effort.
In general, the tool turned out to be quite useful, it can be put in a bag or tool case and actually replace a whole small set of wrenches with it, although of course, if you plan to work on a large scale, then it is better to use classic tools.
Thank you for your attention.
The product was provided for writing a review by the store. The review is published in accordance with clause 18 of the Site Rules.
I plan to buy +36 Add to favorites Liked the review +56 +111
Every time I did my own oil change on my van, I had trouble changing the oil filter.
The reason is that to replace it, you need to unscrew the cover, on top of which there is a hexagonal protrusion that looks like a nut. Unfortunately, I do not have a suitable socket wrench, and for this purpose I used an adjustable or box wrench, or a combination of both. The whole difficulty lies in the fact that in a limited space it is quite difficult to apply enough force to unscrew the cover.
Therefore, I decided to make a key designed specifically for this task.
What you need
Instruments:- - welding machine for electric arc welding.
- - angle grinder.
- - other tools (file, wire brush, hammer...).
- - a small metal plate 8 mm thick (probably thinner, but not less than 5 mm).
- - metal pipes (diameter 20 and 25 mm, each about 40 cm long).
Cutting a metal strip


The first thing to do is to measure the length of the face of the hexagon for which you need to make a key.
We multiply this size by six (the number of faces), and we get the length of the metal strip that needs to be cut.
The plate should be wider than the height of the bolt under which you are making the key (a couple of millimeters is enough).
When everything is measured, cut off the strip.
Then you need to make cuts along the lines, deepening by 2/3 of the thickness of the plate.
The result should be a strip of metal that looks like a chocolate bar.
Shaping a hexagon


At this stage, it will be more convenient to work if the metal is heated. (I did not maintain a constant temperature and I did not manage to bend the whole part in one piece).
Clamp the strip in a vise at the level of the recess made earlier.
Use a hammer to bend the section protruding from the top of the vise.
Check if the angle fits by trying it on the corresponding nut.
We repeat for each segment.
As my strip cooled, the metal became more difficult to work with. This led to a break above the third segment. In my case, this did me good, because when I started to bend the fourth segment, it turned out that its length was not enough and I needed to grind off some metal so that the nut would fit properly. (I think that adding a millimeter to each segment will help to avoid the shortage of the length of the inner edge of the key).
So I got a part consisting of two parts, each with three faces. (Perhaps this is easier to work with than with a solid part, curved into a ring, as I originally planned to do).
Check that the workpiece fits properly on the nut. But not too tight. (If necessary, you can grind off part of the inner surface of the edges)
Hex shape welding


Now it remains to weld the part into one. (In my case, I used a 2.5 mm welding electrode)
After that, you need to try on the nut again, and if everything fits, then you can fill the cuts with welding. (3.2 mm electrode).
Again we try to put on the nut, because the high temperature during welding can deform the metal.
(This time I additionally tried on the workpiece to the hexagonal ledge on the filter...)
After that, you can clean up all the excess, making the shape of the part smoother.
We weld the lid


After sanding, place the part on the sheet of metal from which the strip was made, and trace its outline on it.
I preferred to draw the line along the inside, adding a couple of millimeters along the edges. But you probably want to circle the part on the outside, on the contrary, removing an extra couple of millimeters.
Then we weld the resulting upper part onto the previously manufactured part. (We use 2.5 mm and 3.2 mm electrodes)
Check again if everything fits.
Pipe welding


After sanding and rubbing with a brush, I applied black spray paint to the key.
Now everything is ready.
Application
This socket wrench has a fairly clear purpose.It is a pleasure to change the oil filter with it.
But I think that the way I made the tool can be applied to any other bolts and nuts that are in hard to reach places.
The manufacturing method is quite simple. The work does not take much time (I did it in 3 hours), and the key is quite cheap, even if you buy all the materials in the store. I think that after this project, in the future I will make more such instruments.
I hope you liked it. Thank you for your attention!
An open-end wrench will never lose its relevance, if only for the simple reason that a cheaper, faster and more convenient way to tighten or unscrew a nut has not yet been invented. And why invent a new one, if you can improve the old one!
Open-end wrench - what GOST prescribed
In fact, in a simple wrench, there are many complex and highly specialized modifications. Manufacturers, as in the case of screwdrivers, invent and patent their own types of nuts, for which special wrenches are also produced. This is done to protect the equipment itself - so that users cannot disassemble the mechanism and unknowingly harm it, but instead carry the equipment to service centers. Wrenches can be collected like stamps, and still new ones will appear every year.
An open-end wrench is the simplest variation, but there are also cap, end, adjustable, combined products.
According to the design of the key, the nut is fixed between the horns, however, if you look for the name of this invention in GOST, then look for an open-end wrench - this is how it is officially called. If you look closely at the longitudinal axis of the head, you will find that it is at an angle to the longitudinal axis of the handle. This angle is usually 15°, but there are tools with other angles, such as 75°. The angle is needed to facilitate work in a narrowed or limited space. Quite often carob products have two heads with different sizes on opposite ends of the handle. It is not difficult to guess that the presence of such a simple modification significantly reduces the set of open-end wrenches. In any case, having such a set is much more reliable than buying - you will still need the keys.
Versatility and simplicity - these main advantages allow horn instruments to remain popular even today. And this is despite a significant drawback - the presence of only two contact zones, which are located close to the corners of the nut. When pressure is applied to these areas, the destruction of the corners is possible, especially if the wrench size is slightly larger than the nut itself. And with too much effort, the same thing can happen.
Manufacturers offer a solution to this problem with the help of various modifications. For example, they change the profile of the horns - shorten them, make bulges, change the notch itself. Such modifications are found both individually and grouped in one instrument. In this case, the use of wrenches becomes really an order of magnitude more convenient, for example, the product can be moved without removing the nut from the throat - just pull it back.
In addition, the likelihood of corner lubrication is reduced - the contact zones of the horns with the nuts are deeper. If you need to turn a nut with already crumpled corners, try to find a product with small bulges on the inside of the horns. According to the manufacturers themselves, they help to capture even a crumpled nut. It is impossible not to mention another modification of the open-end wrench - power. Such a key is made much thicker than conventional analogues and with a special thickening at the second end, which can be safely hit with a hammer or sledgehammer. With a power tool, you can unscrew rusted or painted nuts without fear of damaging the wrench itself.
Wrenches - ring and slotted
A more perfect wrench is a box or ring version. The second name better conveys the design feature of the tools - their working area is made in the form of a ring, whose internal shape is adapted to grip a nut or bolt. Due to this, such wrenches are deprived of the main drawback of the open-end type - instead of two contact zones, the cap affects all six points, in addition, these points are located a little further from the corners. In sum, this allows without destroying the corners.
The head of the ring tool is smaller in comparison with the same open-ended version, which again makes it easier to work with such a tool. The internal profile of the head can have both 12 faces and 6. It is the 12-sided tool that is more common, since it is more convenient to work with such a tool - it needs at least 30 ° to move, while the hexagon needs an angle twice as large, which is not always convenient in a narrow space. However, the hexagon has its advantages - due to the larger area of \u200b\u200bthe faces, the contact also increases, so with this key you can carry out power work without fear for the state of the corners of the nut.
For different purposes, there are various options for ring tools, which differ in the location of the head in relation to the handle. The best option is a product with a head bent by 15 °, although for some purposes flat keys or keys with a bend in the handle itself will be convenient. As in the case of open-end wrenches, ring wrenches are produced with two rings of different sizes at opposite ends, and the power modification differs only in a different head. Do not confuse slotted products with carob products - this is just a modification of the annular ones, the slot in the ring allows you to grab a nut closed at the end with a rod.
Particularly popular among motorists and mechanics are combined versions of tools that have a classic carob head at one end and an annular one at the other. If we choose just such a key, then it is better to look for a modification with heads turned 90 ° relative to each other- in this case, no matter what end the master works with, his palm will rest against the wide plane of the opposite head.
Adjustable and socket wrench - to get the right nut
An adjustable wrench is capable of changing the distance between the jaws, however, this feature was appreciated only in everyday life, in a professional environment they prefer not to deal with them. The fact is that one single advantage entails a lot of disadvantages - this is a large uncomfortable head, and the backlash arising from the mobility of the horns, which in turn helps to smooth the corners of the nut, and the wear of the mechanism of the movable sponge ...
It is much easier to use a socket wrench with interchangeable heads, for that matter - and the nuts will be safe and sound, and the nerves are in order. This variety is most often used in car maintenance - it is much easier to get the right nut with end tools with appropriate recesses at the ends than with conventional tools. Quite often, such products are made in an L-shaped form, with two hexagons at the ends. In this case, the dimensions of the hexagons can be the same, since the ability to get a deeply hidden nut with a long end plays a role here, sacrificing torque, and in the case of a convenient location of the nut, use the other end with a large turn.
End products are also produced with a dodecahedral recess, with the same disadvantages and advantages as for a cap tool. Sometimes manufacturers combine hex and dodecahedral heads in one product. Face tools are also available in T-shaped or cross form for ease of use, in addition, there are products with interchangeable heads, which significantly reduces the size of the set.
We also recommend
 Productive and reproductive thinking
 Reasonable egoism - what is the theory of reasonable egoism?
 Boris Nikolaevich Yeltsin, the first President of Russia
 Underground fights. Underground kings. What is “fighting not for the masses”? Where can you fight for money?
 Yakov Pavlov and Other Heroes of Stalingrad You Need to Know
 Survive an accident at sea in a dream - in reality experience a new love