House with a roof made of natural tiles. Do-it-yourself tile installation
Ceramic or natural tiles are one of the oldest roofing materials known since antiquity. It is made from fired clay, which makes it one of the most environmentally friendly materials. Today, natural tiles have been significantly replaced by more modern and cheaper metal tiles. However, ceramics should not be considered obsolete and obsolete material. Installation of natural tiles is still in demand, especially in the elite segment of the market.
ADVANTAGES AND FEATURES OF CERAMIC TILES
The main advantages of ceramics over metal tiles are:
- Durability - once you install a natural tile, you can be sure that it will last 50-100 years, which is several times longer than in the case of a metal tile.
- High resistance to atmospheric factors - high humidity, ultraviolet radiation, frost, heat.
- The highest rates of sound insulation - even on the attic floor, the drumming of rain is almost inaudible.
- A more presentable appearance, and in general, ceramics are considered more respectable than metal.
At the same time, the qualities common to natural and metal tiles do not go anywhere - ease of installation on roofs with a complex configuration and high maintainability.
MOUNTING
Laying natural tiles is a very time-consuming and laborious undertaking that requires high qualifications. This task should only be entrusted to an experienced roofer.
The whole process of arranging a roof made of natural tiles consists of the following steps:
- Roof design. The main thing here is to correctly calculate the weight of the roofing material and plan a suitable rafter system for it.
- Construction of rafters, supports and other elements of the "skeleton" of the roof.
- Arrangement of the "roofing cake" - laying in the correct sequence of a vapor barrier film, heat-insulating material, waterproofing membrane, arrangement of the battens and counter-battens.
- The laying of the tiles.
- Final work - installation of ridge elements, cornice and end strips, snow retainers, drainage system, etc.

PRICE FOR INSTALLATION OF NATURAL TILES
|
№ |
Name of works |
Unit measurements |
gable roof |
hip roof |
complex roof |
|---|---|---|---|---|---|
| seam roof | |||||
| 1 | Installation of seam panels | sq.m. | 448 | 537 | 627 |
| 2 | running meters | 420 | 500 | 550 | |
| .3 | Installation of a dropper on the junction | running meters | 140 | 160 | 190 |
| 4 | Installation of skates, hips | running meters | 420 | 500 | 550 |
| 5 | Valley device | running meters | 420 | 500 | 550 |
| 6 | Installation of end strips | running meters | 280 | 330 | 390 |
| 7 | Installation of cornice strips | running meters | 280 | 330 | 390 |
| Metal tile / piece tile | |||||
| 1 | Installation of metal tiles - profile "Monnterray" | sq.m. | 190 | 230 | 270 |
| 2 | Installation of ceramic tiles | sq.m. | 500 | 600 | 700 |
| 3 | Installation of connections to the wall / pipe | running meters | 280 | 330 | 390 |
| 4 | Installation of skates, hips | running meters | 220 | 260 | 300 |
| 5 | Valley device | running meters | 280 | 330 | 390 |
| 6 | Installation of end strips | running meters | 220 | 260 | 290 |
| 7 | Installation of cornice strips | running meters | 220 | 260 | 290 |
| Soft tiles | |||||
| 1 | Installation of flexible tiles | sq.m. | 220 | 260 | 300 |
| 2 | Underlayment installation | sq.m. | 40 | 50 | 55 |
| 3 | Installation of connections to the wall / pipe | running meters | 250 | 300 | 350 |
| 4 | Installation of skates, hips | running meters | 280 | 330 | 390 |
| 5 | Valley device | running meters | 280 | 330 | 390 |
| 6 | Installation of end strips | running meters | 220 | 260 | 290 |
| 7 | Installation of cornice strips | running meters | 220 | 260 | 290 |
| The cost of installation of load-bearing structures and insulation in rubles | |||||
| 1 | Mauerlat installation | running meters | 420 | 500 | 550 |
| 2 | Installation of the truss system | sq.m. | 500 | 600 | 700 |
| 3 | Draft ceiling installation | sq.m. | 70 | 90 | 100 |
| 4 | Vapor barrier installation | sq.m. | 60 | 70 | 70 |
| 5 | Insulation laying | sq.m. | 70 | 80 | 90 |
| 6 | Laying waterproofing | sq.m. | 60 | 60 | 60 |
| 7 | Installation of the counter-lattice | sq.m. | 40 | 45 | 50 |
| 8 | Installation of a sparse crate | sq.m. | 70 | 80 | 90 |
| 9 | Installation of step crate | sq.m. | 80 | 90 | 100 |
| 10 | Solid plywood base | sq.m. | 75 | 90 | 100 |
| 11 | Seam processing (for shingles) | sq.m. | 20 | 20 | 20 |
| 12 | Lumber septation | cubic meters | 1 100 | 1 100 | 1 100 |
The price for the installation of natural tiles is formed on the basis of several factors:
- brand of tiles (there are both budget and elite varieties),
- the need to strengthen the existing or build a new truss system,
- roof configuration and the need to install additional elements (antennas, air ducts, chimneys, etc.)
Considering how difficult and responsible the type of work is the installation of natural tiles, the price for high-quality installation looks like a completely reasonable waste, while self-laying, on the contrary, can result in unjustified expenses for reworking the marriage. A reasonable decision would be to turn to professionals from the very beginning - to order this service from us. Our specialists have the necessary training and experience, which allows them to carry out installation quickly and efficiently. In addition, we guarantee all roofing work!
You can see the standard prices for laying natural tiles on our website. Our specialist will be able to calculate the total cost of installation in relation to your object after leaving the site.
Natural tile has been known to people since ancient times and to this day is a popular roofing material, which now shows the excellent taste and status of the owner of the house. In addition to the classic ceramic tiles, this concept also includes cement-sand tiles. We will talk about these types, their features and installation in this article.
Varieties of tiles
At the moment, as already mentioned, there are ceramic and cement-sand tiles to cover the roof surface. These species differ in composition and manufacturing process. And their quality characteristics are similar.
Natural tiles are made from clay, while Portland cement, quartz sand and special pigments based on iron oxide are added to sand-cement tiles.
Natural ceramic tiles are the benchmark for roofing. No wonder most of the currently existing coatings imitate it. The service life of such roofing material is about 100 years. This is due to resistance to temperature extremes, exposure to precipitation and direct sunlight. Due to the fact that the material is piece, the roof made of natural tiles has natural ventilation, which protects the roofing cake from moisture and premature destruction.

It absorbs little moisture from the environment, which allows the roofing to be as durable as possible. But such an indicator is true only for high-quality material that has minimal porosity. The most famous is the natural tile brand Braas.
Ceramic tiles, in addition to these advantages, are an ideal sound insulator, are fire resistant and have low thermal conductivity.

Material production
The technologies for the production of natural and cement-sand tiles for roofing are slightly different from each other, so it is worth considering each process separately.

Features of the manufacture of natural tiles
Ceramic is a material made of clay that has been fired in a kiln. Its color is red-brown. This shade is obtained due to iron oxides, which are present to some extent in clay. After some time, the tiled elements become darker, and a patina forms on them. If it is necessary to give the material a different shade, then other processing methods are used.
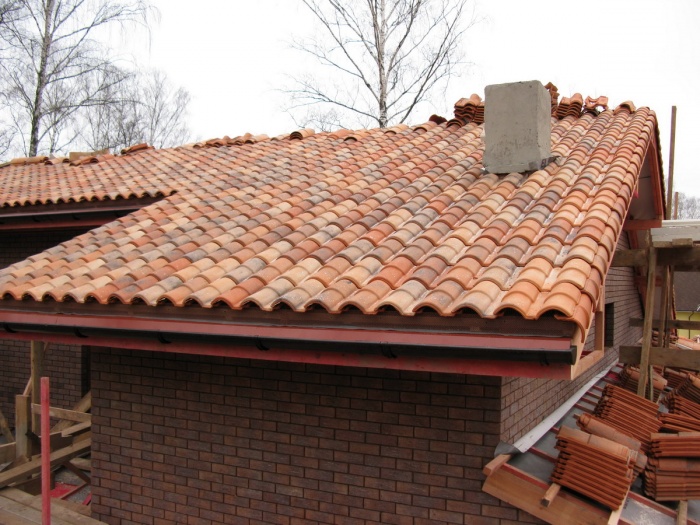
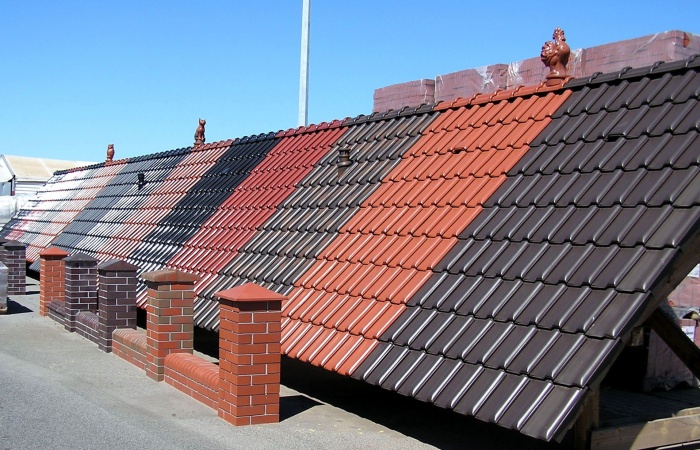
For example, the engobing option, which is most suitable for the Russian climate. In this case, engobe is applied to the upper surface of the tiled elements. This is a solution of clay and mineral additives in powder, which give the intended shade to the tiles during firing. So, it is applied to the material and it is fired in a kiln at a temperature of 1000 degrees. It turns out the finished coating for the roof, as in the photo.

Color change can also be carried out by glazing. The glaze is able to give the clay details not only the right shade, but also an incredible sheen to the entire roof. Glaze is needed not only as a decorative coating, but also for practical purposes. So, it protects the outer surface of the tile, completely closing all the pores on it.
In addition to the external coating, roof tiles are divided into types according to the design of the elements. They are shown in the photo below. She may be:

Production of cement-sand tiles
Due to the absence of firing in the production of cement-sand type of tiles, which increases the cost of elements, its price is significantly reduced. The mechanical strength of the material and its frost resistance is achieved by cement hydration.
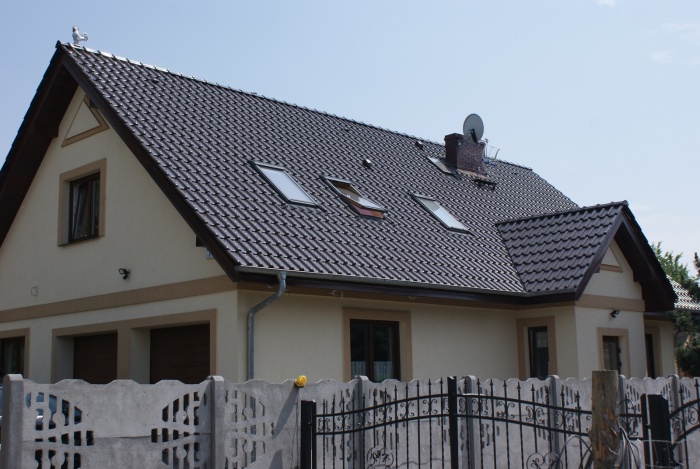
There are many color options for this tile. It all depends on what pigment was used. Some options are shown in the photo. The process of coloring elements takes place in several stages. At the first stage, pigments are added to the cement mass, and at the second stage, the finished products are covered with a layer of the appropriate paint. Usually this type of tile is painted in brick red, gray, green or black. The most famous manufacturer of this material is the Braas company.


Installation of ceramic tiles
A finished tile roof that has been installed correctly does not require additional care and maintenance. At the same time, this does not affect the service life in any way, so natural tiles will be an excellent choice for a country house.
But high-quality laying is possible only if the recommendations and rules that are prescribed in SNiP are observed. First of all, there are some requirements for the rafter system. Also, during the installation of such a complex roof, it is necessary to use a large number of additional elements, including a snow retainer for a roof made of natural tiles. And the most important requirement is that the roofing is carried out only by professional masters with relevant experience and qualifications.

Ceramic tiles are best laid on those roofs that have a slope of 22 to 50 degrees. Although its modern variants involve laying on those roofs, the slope of which is in the range from 10 to 90 degrees. So, let's look at the main steps in the installation process.
Material calculation
In order to find out how many tiles are needed for a particular roof, it is necessary to calculate the useful length of one element. It is obtained by subtracting from the actual length of the ceramic part the segment required to form the overlap. In the technical documents for the material, you can find an indicator of the useful width of the part. If you multiply these data, you can get the required number of pieces that will cover 1 square meter of the roof. And then this amount is multiplied by the area of \u200b\u200bthe roof, thereby obtaining the required value.
Another way to calculate the number of tiles is to count the horizontal and vertical rows, which are divided into useful length and width parameters.
Important! The data received should be increased upwards so that there is a margin. It is best to add the number of parts that fits in 1 row.
The process of laying tiles
If it is planned to provide a roofing cake under ceramic tiles with waterproofing and insulation, then several ventilation gaps are necessarily created on the roof surface. The first of them is located between the named layers, and the second is between the waterproofing and the tiling. Thanks to this approach, moisture will not accumulate inside the structure, which will increase the service life of the entire roof structure.
You can create ventilation gaps in this way:

The first step in creating a roofing cake is the laying of a waterproofing layer, which is carried out from below in the direction of the ridge. Laying is done with an overlap and fastening with a stapler. Be sure to fix the flooring around the entire perimeter of the roof.
Advice! To prevent the accumulation of moisture, the flooring between the grate must necessarily sag slightly.
After that, the crate is performed. When the installation of natural tiles is completed, it is necessary to measure the correct installation of the crate in the plane. If any deviations are found, then the lining of wooden elements is performed.
In order to avoid an overload on the roof and the rafters do not collapse, it is necessary to immediately lift all the tiles onto the roof. It is laid out evenly in stacks of 5-6 pieces over the entire roof area.


Important! For safe movement on the roof, it is necessary to think in advance about a safety harness and an additional crate.
Conclusion
Natural tile is an excellent roofing material that can protect the house from external influences for many years. But its positive qualities are manifested only in the case of high-quality installation, which is necessarily carried out only by professionals, since the tile does not tolerate mistakes when laying.
A roof is to a house what a hat is to a lady. Being an indispensable part of the wardrobe and protection from rain, wind and heat, a fashionable hat at the same time adorns its owner, serves as a source of pride and admiration. And it is she who attracts the initial look. I would like to continue this analogy purely on the topic of the article: when we enter the territory of a gardening partnership, the first thing we see is this. Their silhouettes, as decorative elements of cottages, create a characteristic architectural appearance of the building, play an important role in the ensemble of the holiday village.
The shape of the roof, the angles of the slopes, graphics and, type and color - all this creates a unique individuality of the dwelling. The house, together with the roof, reflects the tastes, habits, if you like, the perception of life, serves as a visiting card of its owner.

The choice of roofing scheme and the type of material for it is influenced by the climate, the surrounding landscape, the architectural and building traditions of the area, and finally, the family budget.

We have already managed to get acquainted with various aspects and problems of the construction and operation of the roof and the types of roofing materials: In this publication, we will take a closer look at natural tiles.
What is natural tiles
Among the many types of roof coverings, natural ceramic tiles are the undisputed leader. This was the reason for the creation of numerous analogues imitating it (for the most part only in name).
In recent years, both metal-plastic stamped sheets and small-sized roofing tiles made of glass bitumen have been called tiles. Roofing is usually chosen first of all, at the stage. Although we sometimes receive letters from developers who, having already “raised” the walls, have not yet decided what kind of roof they are going to use. This causes sincere regret, and sometimes annoyance. After all, the choice of roofing material affects a lot in the future: the configuration of the roof, the angles of slopes, - in a word, the appearance of the house as a whole.
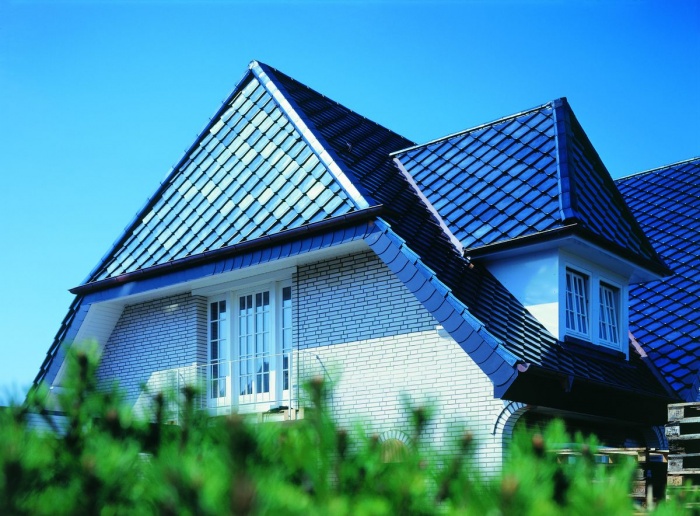
A house with an elegant tiled roof looks solid, creates a feeling of confidence in the future, reliability, and inviolability of the foundations.

An amazing harmony between the color of the tiles and the facing stone. All materials are natural.
The term "natural tile" means two technological products:
- , molded from clay;
- (C/P) - from and .

Cement-sand tile "Braas"
Ceramic products made from clay by firing at a temperature of 1000 ° C enjoy unlimited trust in humans. For thousands of years they serve as a roof for dwellings and hearths, material for manufacturing and decorations. Ceramics is deservedly considered a harmless material. As they say, environmentally friendly. And from the concrete produced on the basis of the same natural raw materials, familiar houses are made. Why do we doubt the environmental friendliness, that is, "naturalness", of cement-sand tiles made of fine concrete?

Cement-sand tile Braas
If for Western Europe natural tile is the most common option for a roof, then in Russia in the entire history of construction it has not become a roofing material for mass use. It was used everywhere only in the treeless south and very rarely - in the central provinces.
Clay tiles two centuries ago in the conditions of our frosty winters are short-lived: "... it tears with our frost" - it is written about it in Dahl's Explanatory Dictionary. In addition, for the main population of “bast-bast” Russia, tile, compared with straw, shingles, even board, has always been an extremely expensive material. Since then, a lot of water has flowed, the production technology has changed, and modern ceramic tiles seem to have found a second birth. Now it is characterized by high frost resistance, and its durability exceeds the age-old bar.
In the Russian construction markets, you can find quite worthy products of the following brands: BRAAS DSK-1, Baltic-Tile, Creaton, Koramic.
Application of tiles
Roofs of both simple and most complex shapes are covered with tiles: from single to multi-pitched, hip, gable, etc. Possible slope of the roof for using tiles: from 10 ° to 90 ° - for cement-sand and at least 22 ° - for ceramic . These figures are quite suitable for snowless geographic areas. However, if falling out is a common thing for you, then the roof will have to be “lifted up” by at least 37 °. Here it is, a sensitive connection between the project and the materials used.
So it is necessary to think about the choice of tiles even at the stage of project preparation. This was already mentioned at the beginning of the article, but this truth is worth repeating.
Properties of natural tiles
This material attracts primarily with its prestige. This word hides:- enviable durability (for ceramics - up to 150 years, for C / P - 60 years);
- the beauty;
- environmental friendliness;
- indifference to temperature changes;
- resistance to UV radiation, rain, winds, snowfalls, etc.;
- high degree of noise absorption in the rain;
- no need for operating costs;
- ceramics are bypassed by bacteria, mosses, etc.;
- it can be painted, engobed, covered with various glazes;
- in addition to the classic color, modern tiles can have dozens of different colors;
- burned and hardened clay becomes fireproof until the end of time.

However, pluses always rely on minuses. The consumer must know them and evaluate the material according to the totality of characteristics. There are few disadvantages to shingles., but they are. This is:
- a large mass that makes the roof structure heavier;
- fragility, requiring careful treatment of the material;
- the need to arrange roofs with a large slope;
- the difficulty of constructing roofs of complex shape;
- pretty hefty price.
Types of natural tiles
Years of development of the "tiled" trend led to the creation of three types of it:- flat;
- grooved (tray);
- grooving (folded.)

Tile "beaver tail"
Grooved shingles made in two versions. The first is a cone-shaped chute slightly smaller than a semicircle (1500). And the second is a "Dutch" S-shaped model, curved along the width of the shape with spikes.

In this case, the facade apron tiles are more decorative than functional.
Flat and grooved tiles are used on slopes with a slope of at least 40 ° and are laid with a large overlap in height and width of the coating so that the roof does not “cry”.
In the now most widespread seam tiles grooves and protrusions are provided on the side or all four sides for tight connection of tiles with each other (fold). Thanks to these constructive tweaks, slotted tiles have the highest covering power coefficient. These are Marseille, Frankfurt, Dutch types of tiles and their modifications.

Construction of a tiled roof
The roof consists of a supporting truss structure and a complex system of enclosing roofing. Under the roof is warm or unheated. The following are used as rafters for tiled roofs:- insulate . What is the best way to do this? In houses with unheated attics, where in winter they only dry (or rather, freeze) washed clothes and keep them for a bath, the insulation is not placed on the roof under the roof, but between the ceiling of the upper warm floor and the floor of the cold attic. This is more economical, since the floor area is smaller than the pitched roof area, and more convenient.
If you are going to equip a warm attic, there is much more work to be done, and it is more difficult. In this case, the heat-insulating material is placed between the rafters, and its thickness is limited by the width of the rafter, i.e. very small. Therefore, it is necessary to use the most effective heat-insulating materials here.

The process of building a tiled roof consists of 5 main stages:
- Checking the evenness of the roof slope;
- Marking rows of crates. For this, a template or a dyeing cord is often used.
- Raising shingles from ground level to the roof. It would seem, well, why focus on this? But this roofing material is very heavy (several tons even for a small roof), and if you put all the stacks in one place, you can easily damage the crates. Therefore, stacks of material must be evenly spaced throughout the slope.
- Direct laying of tiled dice. It is led from bottom to top, from right to left. For fixing on the crate, most types of dies have a special spike, thanks to which they cling to the crate. Groove dies additionally cling to each other, forming a continuous carpet.
- At “problem” points (under the ridge, on the overhang of the eaves, next to the gables), the plates are additionally fixed with screws and clamps (even the all-knowing Wikipedia did not find an explanation for deciphering the last technical term, so I’ll try to formulate it myself: a spring-loaded steel strip used for fixing building elements).

Now tiles are back in fashion with new variations on a classic theme. The beauty, flawlessness and natural elegance of the lines make it one of the most common roofing materials in the world. If the new wave of classic style captivates you, natural tiles will show off your simple mansion or cozy romantic chalet in a winning light. Good luck!
Despite the huge number of modern roofing materials that are able to imitate the natural look of a tile coating very well, many homeowners prefer ceramics. The rather high cost of ceramic tiles does not allow the massive use of this material in the roofing device. In addition, professional work on the installation of ceramic roofing is expensive.
Features of the truss system
The truss system for a roof made of ceramic tiles has specific features due to the weight of the roofing material. Natural tiles are ten times heavier, and the load per square meter of roofing is about fifty kilograms.
For the rafter frame, you should choose dry wood with a moisture index of not more than 15%. Rafters are made of timber with a section of 50x150 mm or 60x180 mm. The step range should be 80 - 130 cm and depends on the roof slope. The greater the roof slope, the greater the rafter pitch.

On a roof with a slope of 15 degrees, the distance between the rafters is 80 cm, and with a slope of 75 degrees, the rafter step is 130 centimeters. In addition, it is necessary to take into account the length of the rafter legs. The longer the rafters, the smaller the distance between them.
Material calculation
Any must withstand a load of 200 kg / sq.m, regardless of the weight of the roofing material itself. To get the correct calculations, it is necessary to add the weight of the ceramic tile to this indicator. Thus, the roof frame is created taking into account the roof load of 250 kg/sq.m.
The installation of natural tiles is carried out by overlapping, the size of which is influenced by the roofing slope. If there are slopes of less than 25 degrees, installation is carried out with an overlap of 10 cm, with a slope of 25-35 degrees - 7.5 cm, and with a slope of more than 45 degrees - 4.5 centimeters.
To obtain the useful length of the material, it is necessary to subtract from the total length of the ceramic element the segment necessary to form the overlap. Data on the useful width are indicated by the manufacturer in the attached instructions. Based on these two values, the roofing material is calculated per square meter of coverage. The result is rounded up.
In addition, you can determine the number of tile elements along the length of the slope, based on the useful length of the tile. The resulting indicator is the number of tiled rows. Then you need to calculate the number of elements in one row, and multiply the result by the number of rows.
With a roof slope of 22 degrees, the installation of a waterproofing layer of rolled material is required. The overlap of the canvases should be ten centimeters. To calculate the waterproofing material, it is necessary to multiply the area of \u200b\u200bthe slopes by 1.4.
The most accurate calculation of the materials required for roofing work can be done using special computer programs or using online calculators.
Installation instructions
Marking and installation of the crate
The crate for natural tiles is made of beams with a section of 50x50mm or 40x60mm. Along the cornice sections, it is necessary to lay lumber with a width of two centimeters more than this figure for ordinary elements. The horizontal bars of the crate are laid in an amount that corresponds to the number of tile rows with the addition of an additional cornice row. 
The marking of the place of laying the sheathing beams is carried out by means of a coated cord and templates that match in size with the useful height of one tile. Docking of horizontal rails is performed on rafters.
To calculate the step of the crate, it is necessary to subtract the length of the lower step from the total pitched length, as well as the distance from the bottom of the last crate beam. The result obtained is divided by the approximate step of the crate.
The simplest method for calculating the frame is to take into account the standard length of 40 cm with an overlap of 5.5-9 centimeters. Based on standard data, the step of the crate is the length of the tiles, from which the overlap is subtracted. As a rule, the optimal step size is not less than 31 and not more than 34 centimeters.
Laying and fixing natural tiles
Tiling begins with a uniform distribution of stacks of roofing elements over the roof surface. This principle does not load the truss system with excess weight.
First, the top row of natural tiles is laid out. It is located along the ridge. Then

the bottom row of roofing material is mounted, which should be laid along the overhang. It is necessary to fasten the tiles to the frame of the crate after checking the correctness of the installation.
After fixing the cornice row, further installation of the tile covering is carried out in the directions from bottom to top and from right to left. For fastening the material, hardware is used, regulated by the instructions from the manufacturer of roofing tiles. Then the elements of the ridge and gable sections are laid.
The ridge part is supplied with an edged board, which touches the ridge elements only at the attachment points. The intersections of the pediment and the roof ridge are equipped by fitting and trimming the tile elements. For cutting, it is recommended to use a grinder.
Pitched roofing requires tight fitting of the roof covering to the chimney and steps for safe access to the pipes. For steps, it is necessary to install two reinforcing rails to the rafter legs. Tiles with steps must be devoid of a lock, which allows for the correct fit of the steps.
An important role is played by the competent and dense device of chimney junctions by means of self-adhesive material based on lead or aluminum. All joints of the roll adjoining are fixed by means of a clamping bar. The seam at the top of the plank is treated with a colorless sealant. When arranging the ridge, the parameters of the edge tiles are taken into account, which are aligned by cutting the material along the edge bevel.

On roofs with a complex configuration, it is required to equip valleys. Before laying the waterproofing layer, it is necessary to fix a continuous crate. The bottom of the valley is equipped with edged boards, on top of which an appropriate layer will be laid.
Improving waterproofing is facilitated by sticking a double-sided self-adhesive tape to the valley. For fastening, special steel clamps are used, which are mounted in drilled holes. The edge is painted with special pigments.
Arrangement of ventilation
Normal operation of a roof made of natural tiles is impossible without providing quality. performed in accordance with the rules and arrangement of air gaps. One gap is located between the thermal insulation layer and the waterproofing. The second gap is mounted from the waterproofing membrane to the roofing.
For the valley, the length of which exceeds six meters, a ventilation tile row is laid. For this purpose, tiles of the appropriate category are used.
You can learn more about installation by watching the video.
The cost of installation work
Laying tiled roofs using natural ceramic tiles on average costs the consumer in the amount of 700 rubles per square meter. meter. This price includes the price of the installation of absolutely all standard roofing units. All non-standard roofing options are evaluated according to complexity and volume.
Summing up
A distinctive feature of ceramic tiles is the complexity of installation work, and it is for this reason that it is recommended to use the services of experienced roofers.
For fixing natural tiles, galvanized hardware or special clamps are used. The points of obligatory fixation of the tiles are:
- places subject to significant wind loads;
- a row located along the eaves;
- sections of gables and along the ridge element.
Fastening ceramics on slopes with a roof slope of more than 50 degrees is carried out strictly through the element.
All photos from the article
This article focuses on methods for decorating roof overhangs. We will figure out how the installation of the frontal board is carried out, and what dimensions it should have. In addition, we will find out what material can be used for filing overhangs and how to fix it correctly.

Overhangs design elements
First, let's get acquainted with the terminology. So, frontal board: what is it and what role does it play in the roofing system?
This is just a longitudinal shield that covers the ends of the rafters or the protruding part of the crate above the gables of the attic. In addition to it, the part of the roof that interests us includes:
| Element | Short description |
| Rafter | A board parallel to the slope of the roof (or a wooden I-beam), mounted in a vertical position and providing rigidity to the roofing pie |
| crate | Perpendicular to rafters or beams that serve as the basis for laying roofing material |
| Waterproofing | A layer of water-impervious film that prevents condensation from getting to the rafters and the insulation laid between them |
| dropper | Metal or polymer profile, which prevents condensate flowing down the waterproofing layer from getting onto the frontal board |
| eaves plank | A profile that directs rain or melt water flowing down the roof into the gutter |
Note: a dripper is needed only when attaching the gutters to a long hook to the crate.
Fastening the drain to the frontal board makes it unnecessary.

When using flexible roofing material (bituminous shingles, ondulin), instead of lathing, a solid shield is assembled along the rafters - plank, plywood or made of OSB.
Frontal board: close acquaintance
Dimensions
At the ends of the overhangs, the rafters are usually cut vertically. As a result, the length of the end is slightly larger than the transverse dimension of the rafter. Typically, the dimensions of the frontal roof board are made such that they completely or with a slight shortfall overlap these ends. The typical transverse width of the board is 180 - 250 mm.
What should be its thickness?
Let's briefly think about the mode of operation of the roof element:
- It does not perform load-bearing functions. The maximum load is limited by the weight of the complete gutters;
- It does not experience significant wind loads - simply because of its small own area.
That is why lumber with a thickness of 22 - 30 mm is used as a frontal board. The increase in thickness will only and exclusively lead to some increase in costs.

Treatment
In a properly assembled roof, wooden elements are reliably isolated from moisture, which allows you not to worry about their reliable hydrophobization. Exception - processing: it is necessary in any case.
Why?
- The antiseptic prevents not only the appearance of mold and blue, but also insect attacks. Woodworms can cause serious damage to wooden structures in a few years;
- All modern wood preservatives contain flame retardant additives that reduce the flammability of the structure. No, they will not eliminate the possibility of fire completely; however, it is quite possible that it is the fire retardant that will allow you to put out the fire that has begun in time, delaying the spread of fire.
If for some reason the front board is planned to be left completely open, its wood needs protection from water. The simplest and cheapest way to do it is double impregnation with drying oil heated in a water bath. Alternatively, drying oil can be applied cold, after which the board is heated with a building hair dryer.

Hint: heating the drying oil significantly increases the depth of its penetration into the wood.
Among other things, hot impregnation with drying oil is used to protect the wooden elements of the hulls of boats and boats.
If, when choosing a material for a frontal board, you have the opportunity to prefer one or another type of wood, larch will be the best choice for it. It is noticeably heavier than the more common pine and spruce, but it is not afraid of rot and does not absorb water even with prolonged contact with it. The price of a cube of larch is approximately 1.3-1.4 times higher than the cost of a cubic meter of pine board.
Fastening
Traditionally, for fastening the frontal board to the ends of the rafters, ordinary galvanized nails are used, driven through the board into the end of the rafters. The length with a board thickness of 22 - 30 mm is 100 mm.

As always, there are a number of subtleties and nuances.
- A notch on the nails close to the point will strengthen the fastening;
- Nails can be replaced with galvanized self-tapping screws; however, the quality of fastening will not improve from this. In addition, the likelihood of splitting the rafter will increase;
- Black phosphated screws should not be used. With prolonged contact with moisture, they will decorate the overhangs with rusty streaks; in addition, this type of fastener does not have a special mechanical strength.
How is the frontal board attached to the ends of the crate from the side of the gable? Exactly the same, but with a little addition. Since fastening to one crate does not provide sufficient rigidity, from below, between every second - every third board of the crate and the front, an additional piece of bar or board is hemmed, making the connection T-shaped.

Another special case is fastening to a wooden I-beam.
Reference: wooden I-beams are an OSB strip glued between two bars with longitudinal grooves selected in them.
Obviously, butt-joining the front board to the I-rafters with butt nails is a bad idea. You cannot drive a nail into OSB, and the small size of the bar can cause it to split when wedged with fasteners.
To solve this problem, the filing of board segments is again used, but already parallel to the rafters. The board is hemmed to the I-beam OSB with self-tapping screws, after which it is used to connect the parts with the same galvanized weaving nails.
We also recommend
 Productive and reproductive thinking
 Reasonable egoism - what is the theory of reasonable egoism?
 Boris Nikolaevich Yeltsin, the first President of Russia
 Underground fights. Underground kings. What is “fighting not for the masses”? Where can you fight for money?
 Yakov Pavlov and Other Heroes of Stalingrad You Need to Know
 Survive an accident at sea in a dream - in reality experience a new love