Designer lamps made of wood and plywood - we embody ideas from the master class. DIY wooden lamps photo Chandelier made of wooden blocks with your own hands
To create a comfortable and cozy atmosphere in a residential area, it is necessary to organize high-quality and technically competent lighting using different devices.
For lovers of original solutions, we recommend that you pay attention to wooden lamps that you can make yourself. Recently, such products can be found in various cafes, catering establishments, museum and art galleries, and other public places.

Features and practicality of wooden lamps
Natural wood is characterized by high aesthetic properties. This is an excellent raw material that will allow skilled craftsmen to realize the most daring fantasies. Nevertheless, against the background of numerous advantages, the possibility of using wooden products is limited by some of their shortcomings.
First about the benefits:
- Easy to operate.
- Environmental Safety. Even when exposed to high temperatures, no toxic substances are released. The use of natural wood can have a positive effect on a person with chronic respiratory diseases. This is especially true when using products made from coniferous trees.
- Wood is considered a malleable material from which various works of art can be created. The versatility of this raw material allows it to be used for the manufacture of products of various configurations and shapes that will fit into any interiors.
- Natural wood can be used in conjunction with plastic, metal or glass.

disadvantages
Despite the many advantages, the tree has several disadvantages:
- This is one of the most flammable materials, so it is not recommended to use it in rooms with fire sources - fireplaces, burners, etc. To increase fire safety, wood is covered with special protective agents that prevent burning and ignition.
- Without a protective coating, the wood will remain sensitive to sudden changes in temperature and high levels of humidity. This imposes other restrictions on wooden lamps associated with operation in bathrooms and kitchens.
- Wood is a habitat for a variety of small pests, including termites and bed bugs. To protect against them, it must also be covered with protective equipment.
It is important to know! Immunity to temperature changes explains the fact that conventional filament lamps cannot be used in wooden lamps. Ideally, these should be LED products, less often - fluorescent or halogen lamps.

Styles and forms used
Any lighting device, regardless of the material of manufacture, according to the method of installation and use, can be divided into three main categories:
- suspension;
- point;
- ceiling.
Pendant lights are considered more common as vintage and retro styles are making a comeback in recent years. A wooden ceiling chandelier is suitable for use in spacious rooms and living rooms, while spotlights will look perfect in small spaces with low ceilings.
The main style directions when creating the interior of a room and lamps:
- Oriental theme implies the use of natural wood or solid wood that does not contain secondary impurities. Designers try to observe clear geometric shapes, straight lines, decorating appliances with patterns characteristic of oriental culture.
- Products in the style of "country" look as simple as possible, and sometimes rude. But with proper operation and choosing the right interior, the lamps look profitable, increase comfort and create a spirit of unity with nature.
- Retro. It is possible to manufacture extravagant lighting fixtures that were used in the old days.
- Modern - modern lamps, in which they try to combine wooden and forged elements, including lattices and patterned designs.
- The chalet implies the use of only natural wood; according to the idea, the products should enhance unity with nature.
- The classic style can be attributed to a minor retro branch. Luminaires are characterized by smooth lines and graceful forms. In the manufacturing process, wood and stained glass are used.

Wooden lighting fixtures can belong not only to different styles, but also be made in one form or another. The most popular of them:
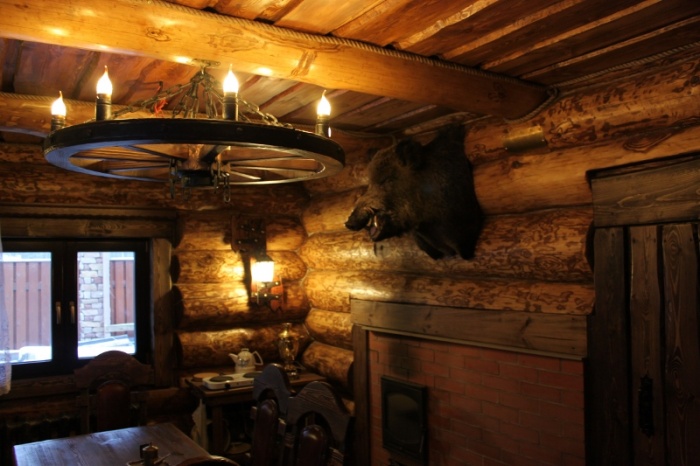
- In recent years, the wheel lamp has been gaining popularity among connoisseurs of antique interiors. It is mounted under the ceiling on beautiful chains or rails using special candles (light bulbs that resemble these products in shape). Light sources are often used in luxurious castles and antique-styled restaurants. Provides uniform illumination throughout the space.
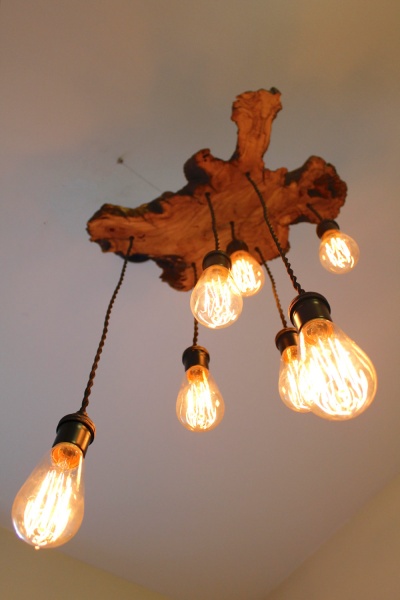
- Large beam with candles. For its production, they take an ordinary log of a solid shape, which is suspended from the ceiling on a chain. The device will be a wonderful element of decor in living rooms, bedrooms and dining rooms, but in the kitchen and other small-sized rooms, the lamp will look too bulky.
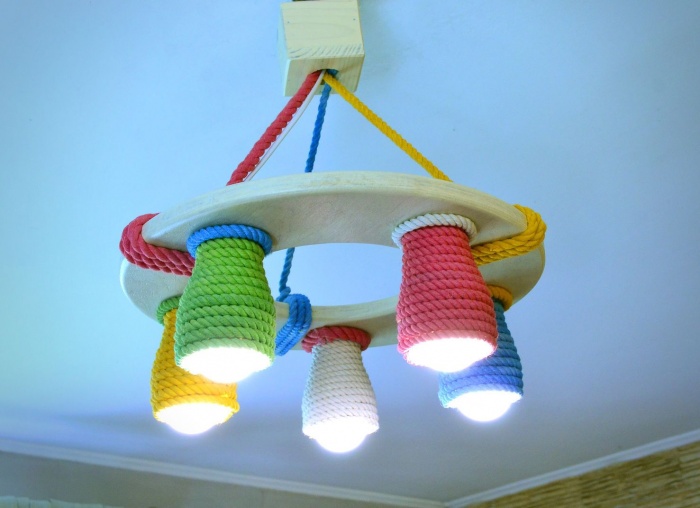
- Hanging chandelier made of boards tied with ropes. Usually made in conjunction with matte shades, made in a simple design. It can be supplemented with various decorative elements - everything is limited only by the author's imagination.
- A tree root lamp is an unusual option, which is made using dry tree roots and ropes. These lighting devices can be used in conjunction with a wooden lining, but it is important to take into account a small nuance: the operation of light sources with a minimum operating temperature is required, since they are in close proximity to the wooden walls of the product.
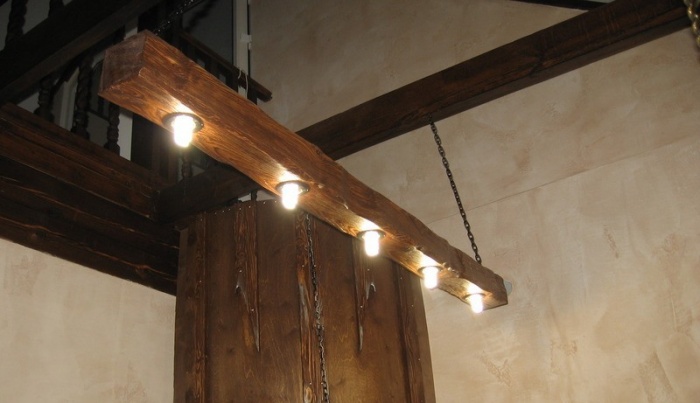
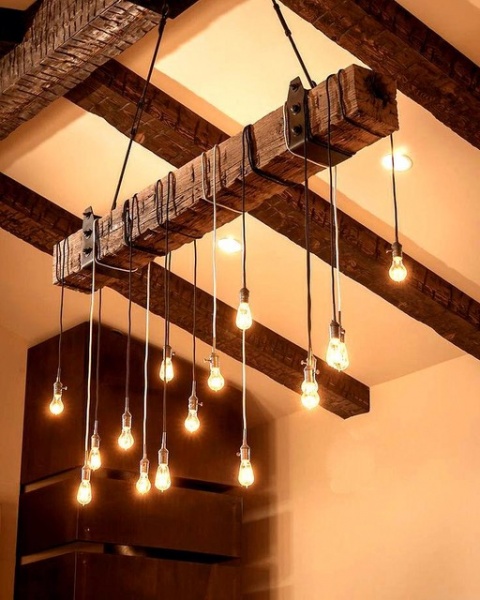
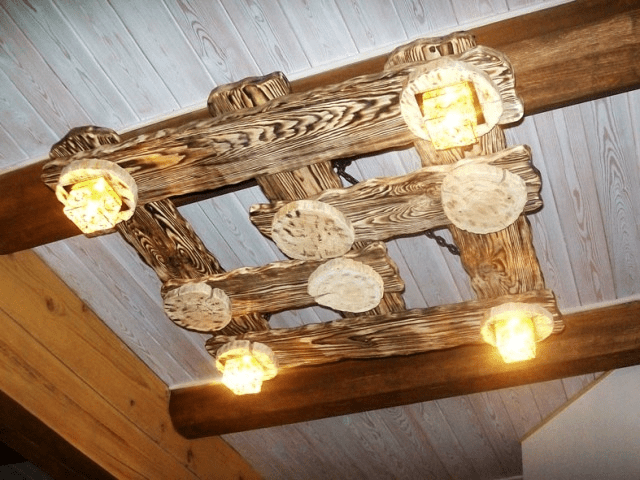
- A timber beam with several pots or lamps. The original solution for the ceiling chandelier.
- Children's lamps shaped like animals, stars, balls, vehicles, etc.

Varieties of lamps
The variety of wooden lamps is not limited to the models listed above. The main limiting factor in their creation is the imagination of the author. A few simple and most obvious solutions that can be taken as a basis for the manufacture of these lighting fixtures:
- A floor high lamp can be created from wooden slats. Usually the product is installed in the center of the room or in some prominent place.
- Wooden case made of thin sheets of pressed veneer, having a non-standard shape.
- A small wall lamp made from sawn timber.
- Floor lamp from an old pallet. A simple yet extraordinary product. For its production, you can take a glass jar and a sawn pallet.
- U-shaped lamp made of wooden slats, which can be decorated with a variety of woven materials.
- From small parts of wooden pallets you can create small table lamps.
- A wooden box can become a frame for a chandelier, under which several matte shades are hidden.
- You can take an ordinary wooden snag, treat it with protective materials and embed neon light sources. The result is a beautiful table lamp.
- Lamps are also made from small stumps, which are usually not processed. The result is an attractive, romantic option.
- Old tin can, two small boards. And nothing else is needed to create an unusual, simple and functional device!
- A wooden snag can serve as a candlestick for a lamp imitating a candle.
- Thin pressed sheets can be used to create a chandelier whose shades resemble flower buds.

DIY designer lamps
We offer you options for the independent manufacture of various wooden lamps, from the preparation of materials to step-by-step instructions.
Preparation of the necessary materials
Wooden lamps can be made from a variety of raw materials: parts of a tree (rhizome, stump, branches, snags), processed wood (boards, plywood sheets, veneer), etc. The final choice depends on what idea you decide to bring to life. On the other hand, it is important to properly process and prepare any material for use:
- dry the wood well;
- impregnate with special substances that increase fire resistance and protection against insects, mold;
- when choosing a material, carefully inspect it and make sure that there is no decay;
- in the process of creating a lampshade, use original cartridges, glue the parts with epoxy.

What lamps to use
Wood is a flammable material, which makes it possible to use certain light sources. It is strictly forbidden to use lamps with a filament, because when glowing, it releases a huge amount of heat, heating not only the cartridge, but also the wood.
On a note! Ideally, LED lamps and strips should be used, most of which emit a “cold” white glow and practically do not heat up the frame of the product. To date, they are the safest elements from a fire point of view.
Master class: lamps from boards
For the production of such a chandelier, you can take several bars of square section (up to 100x100 mm). Specific dimensions depend on how large the final product should be. Apart from them. a mirror is useful. It is recommended to start any work with a sketch of the future chandelier. Be sure to include actual dimensions.
The further process looks like this:
- Stock up on four bars of the same size.
- Form a castle on the edge of each of them. On one side there should be an empty rectangular cavity, on the other - a convex central part that will go into such a cavity. To do this, you need a jigsaw with a wood file.
- Assemble the structure together, be sure to glue the parts together. Paint the desired color over the frame.
- Moving from above, pass the cable and install the cartridge on it. Fix the last element on the inside of the frame using special brackets.
- At the top, install a mirror part that will reflect the rays of light in the right direction.
- Build a chain hanger.
Master class: lampshades and lamps made of plywood
Plywood is considered one of the most convenient and easy-to-use wood materials, for the processing of which you do not need to have special skills. A plywood lamp can be installed almost everywhere - from the terrace of a country house to different rooms of the apartment.
Take a sheet of plywood in your hands and draw a layout of the future product on it, not only indicating the desired dimensions, but also setting them actually on the sheet. The result should be a three-dimensional lamp, so you need to make blanks for all four sides.
Step-by-step instruction:
- Transfer the templates for all sides to plywood of the desired thickness, indicating the actual dimensions of the future device.
- Cut out these shapes with a jigsaw. You can use a manual or automatic type tool. If the shape of the lamp is complex, then a laser machine is indispensable.
- Sand all edges on the cut with sandpaper.
- Do the same with the materials that will be used as roofing. Observe the dimensions, do not forget to sand the edges.
- Then you need to glue all the blanks, making sure that the thin sheets are close to each other and securely fastened. Place the bars to which the walls will be glued.
- Place a cartridge inside the product and secure it. Be sure to make a hole through which the wire will be output.
- Attach the bottom and top pieces. All these elements must be glued to the same corner bars.
- It remains to create a suspension or mount for wall mounting.

Master class: lamps and chandeliers from branches
Branches can be found almost everywhere, so they are rightfully considered the most affordable material for creating unusual wooden lamps. Go to the nearest park or square, collect a few branches and get to work.
Important! Unlike other wooden blanks, branches do not need to be dried. The presence of moisture in them causes flexibility and the ability to create unusual shapes. Over time, they will dry themselves, so that the lighting fixture will retain its final shape.
The lampshade can be made in different ways: weaving or tying thick branches with ropes. Wood can be combined with other materials, including metal frames, forged elements.

Install a cartridge inside the lampshade or secure the LED strip using soft wire. If you wish, you can paint the wooden frame in the desired color.
Master class: log lamp
In the manufacture of such a lighting device, you can use a log or driftwood. First you need to dry the lumber and apply a protective coating that prevents insects and mold. Create a blank of the desired shape and dimensions. Make special holes for the cartridge, fix the hangers and place the electrical wiring inside. On a log, you can install several shades or lampshades made from glass or cans.

If you want to save yourself the trouble, then go to lighting stores and buy ready-made wooden lamps. Now you know their advantages and disadvantages, so it will not be difficult for you to verify the quality of the proposed product, to ensure its correct and competent operation. When making devices yourself, give free rein to your imagination, but do not forget about the simple rules of fire and electrical safety.
Overall dimensions of the lamp, mm: 337x559x419 (width x depth x height)
Form the base
The free-form details of the base provide a good opportunity to practice building contours using the zoom-in-scale method, since these details should first of all look expressive, and the accuracy of dimensional accuracy in this case is not too important.
1. Enlarge all templates to the specified sizes. From 19 mm material, cut out two blanks for base A and one bracket B. From 10 mm boards, make two blanks for racks C. Fasten the base and rack blanks in pairs with double-sided tape.
2. Use spray adhesive to attach the paper templates to the blanks. Mark with an awl the center of a 6mm hole on one of the C-pillars. Then cut the pieces along the contour, leaving a small allowance on the outside, and sand to the line. Save the 19mm offcut to make spacer D shown in fig. one.
3. Now remove the templates, separate and sand the parts. Planing or grinding  align the edges of the halves of the base A, which will be glued together. Mill lamellar nests in both edges and glue the base, squeezing the parts with your hands for several minutes, until the glue begins to set; then gently lay the adhesive on a flat surface to dry. When the glue is completely dry, sand parts A, B and C with #220 sandpaper.
Note. When sanding the C-pillars, keep the center of the hole marked earlier. If necessary, deepen the hole with an awl.
4. Take the cut saved for the D spacer and transfer the contours of the C-pillars to it (photo A). Then mark the height according to the dimensions shown in fig. 1. File the height spacer and sand the top and bottom edges. Apply glue between the lines on both sides of the spacer (photo B) and clamp the part between the posts, aligning it with the marked contour lines.
Note. When gluing the posts, make sure that the marked center of the hole is located on the outside of the gluing.
When the glue dries, saw off the protruding parts and sand the spacer flush with the edges of the uprights.
5. Stick a piece of double-sided tape on the bottom edge of the C / D gluing and attach it to the base A (photo C). Do the same with bracket B, aligning it with the center of the hole in the uprights (photo D). Then drill and countersink pilot holes through the base and secure the B/C/D assembly with screws as shown.
6. Drill a 6mm hole through the posts and bracket at the marked point (photo E) and glue the dowel into the hole. When the glue is dry, cut off the protruding ends of the dowel and sand flush with the surfaces of the C-pillars.
Unscrew the screws from the base, separate the bracket with the uprights and remove the adhesive tape. Then reattach the assembly to the base with screws and some glue.
 Make a wooden lampshade
We made the lampshade using two tools: a circular (for a band saw) and a milling tool (described in the "Advice of the Craftsman").
1. Using a compass, mark a center and a circle with a diameter of 158 mm on a 6 mm board. Drill a 3mm hole in the center, cut out the disc and sand the edges. Mill an annular groove on the underside of disc E,.
2. For shell F, saw off a strip 1 mm thick from the edge of the workpiece with dimensions of 25x32x485 mm.
Note. Install a splinter guard in the saw table and saw off the strip from the outside to avoid dangerous kickback.
Sand the strip and cut it to the final length.
3. Mark the line where the ends of the strip overlap. Then glue the shell F (photos F and G). When the glue is dry, gently sand the outside of the piece to make the overlapped edge invisible. Glue the shell to disc E (photo H) and leave to dry.
4. Countersink the hole on the inside of disk E and attach the lampshade with a screw to bracket B. Apply any finish. (We sprayed semi-gloss nitro varnish from an aerosol can three times.)
The compact LED light with magnetic base is easy to install and provides easy access for changing batteries. Secure the mounting plate with small pan head screws. Then just insert the batteries and turn on the lamp to make the world a little brighter.
Do-it-yourself wooden table lamp - drawings
 Born Pretty, R³ ° Ð Ð Ð Ð Ð Ð Ð ° РРРРРРРРРРРРРРРРРРРРРРРРРРРРРРРРг €Ð°Ð´Ð¸ÐµÐ½Ñ‚ Ð¾ÐºÑƒÐ½Ð°Ð½Ð¸Ñ Ð±Ð»ÐµÑ Ðº…
A photo
In the design of private houses, wood is most often associated with antiquity. Therefore, wood lamps have an old look. The most popular designs are cart wheel chandeliers.
Scheme of the device of a table wooden lamp.
How to make a lamp with your own hands from wood?
Advantages and disadvantages of wooden structures
This type of structure has the following advantages:
- if you evenly place candles, then the design will give the same illumination to all elements of the room;
- the spokes will practically not create obstacles to the light.
Modern stylizations have the same advantages, but today lamps are used instead of candles made of wax and torches. In most cases, such designs are made in the form of a candle.
Wood structures have the following advantages:

Scheme of a round wooden lamp: 1 - segments for the rim, 2 - turned spoke, 3 - hub.
- The material is environmentally friendly. Not only will it not emit harmful substances, but it will also saturate the air with aromatic resins that make it easier for people to breathe.
- Wood can be easily processed. If special tools are needed for the production of a plastic or metal structure, then do-it-yourself lamps from wood can be made using a minimum set of fixtures.
Disadvantages of wooden structures:
- Wood is a combustible material. It is not recommended to place elements of this material next to incandescent lamps. If the contact burns in the lamp socket, the structure may ignite.
- Wooden ceiling fixtures are attacked by bugs, fungus and other pests. Coniferous trees suffer the least from rot and pests. For hardwoods, it is recommended to use antiseptic agents that can reduce the combustibility of the material.
- Wood is a hygroscopic material. It absorbs moisture from the air, as a result of which, during the drying process, the material may change volume, shape, or crack. In order for the structure to serve for a long time, it will be necessary to provide it with a constant temperature and humidity.
Nuances to be considered in the manufacture of wooden structures
In the process of constructing lamps made of wood, the following nuances must be taken into account:

Scheme of assembling a lamp from wooden rings.
- The structures must be of such a shape that all heating elements are removed from fixtures that are made of wood. The lamps should look upwards, because only in this case the upward air flow will not cause deformation of the tree.
- Fire safety rules prohibit placing wooden chandeliers under flammable elements.
- Wood lamp is great for bedroom or living room. In the kitchen or bathroom, where there is a sufficiently large amount of steam, such structures are not allowed to be placed.
In the event of a phase short, you can easily get an electric shock.
Making a lamp in the shape of a coffee service
To make a lamp with your own hands, you will need to prepare the following elements:

Diagram of a LED wooden lamp.
- Dry board made of wood of any kind. You can use both ordinary pine or birch, and ash. Oak is also suitable, which does not need to be painted or varnished.
- Several translucent coffee cups and saucers for them.
- Several cartridges for a small base with fasteners for them.
- The required number of bulbs. In this case, it is recommended to use LED elements.
- A small amount of rubber pads. Their number will depend on the method of fixing the cartridges.
- A two-core copper wire of small cross section and short length. It is best to use a wire with a cross section of 0.75 mm.
- Small chain or twisted cord. These elements will be used to secure the product to the ceiling structure.
- The required number of screws with rings. The luminaire will be suspended using these elements.
- Electric drill.
- Drills for working with wood and tiles.
- Pliers.
- Screwdriver or screwdriver.
The construction process is as follows:
- The planed board is processed with sandpaper (first - rough, then - thin).
- Next, you will need to drill a few holes in the places where you plan to place the cartridges.
- If noble types of wood are used, then further processing of the material will not be required. If other types of wood are used, then the material must be stained, then dried and varnished in several layers. In the open air, nitrolac will dry for several hours, so this process will not take much time.
- In the next step, you will need to drill holes in the coffee cups and saucers, while it is very important not to damage them. In this case, you need to use only a drill for working with glass and tiles. It is not allowed to make great efforts. You need to drill at a low speed, in the process you need to ensure that there are no distortions. If you press hard on the electric drill, the bowl or saucer may break.
- Wires must be attached to all available cartridges. At this stage, you should not fasten them to each other.
- The whole structure is screwed together. If the cartridges will use platforms with holes for fasteners, then they must be pulled to the board through the holes in saucers or cups. If there is a threaded pipe and a nut on the end of the cartridge, then they must be passed through the cups, saucers and board. Rubber gaskets must be installed between metal and glass elements. Such a device can be made independently from an unused camera from a bicycle or car.
- Screws with rings will need to be screwed into the back of the board.
- Cartridges are connected in parallel. No need to leave twists that are wrapped with electrical tape. Carefully you need to make even that part of the lamp that no one can see. To fasten the wires, you will need to use a block.
- The block must be fixed on the back of the board by any method: a small amount of adhesive mixture or screws. In it you need to clamp a piece of wire that will be connected to the wiring.
- On the back, chains or cords are attached to the rings. The second end of these elements is attached to a hook in the ceiling. The wire must be run through one of the circuits. At the end, you need to install light bulbs.
Plywood lace design

Tools for making a wooden lamp.
It should be noted that this design is not ideal in terms of fire safety. However, in this case, LED lamps are used, which are economical. It should be remembered that such devices practically do not heat up. Therefore, the risk of fire in this case is excluded.
From plywood of small thickness, using a manual jigsaw, you can make masterpieces of applied art. You can make such lamps with your own hands as follows:
- First of all, you need to grind a sheet of plywood.
- By using carbon paper, you need to transfer the drawing of the details.
- Structural elements will need to be cut along the contour.
- Inside each of the pieces that will need to be removed, you will need to drill holes. In this case, it is recommended to use a drill with a thickness of 1 mm.
- The next step is to cut out the inner parts.
- Small files of various shapes will need to clean the edges of the structure.
- Next, you need to fasten all the elements together. For this, it is recommended to use an adhesive mixture. It should be noted that PVA glue may turn yellow after a while. Therefore, it is best to use a special adhesive solution for wood. Residues of the adhesive mixture on the visible parts of the structure will need to be carefully removed.
- At the end, the product should be varnished.
If you plan to use incandescent lamps, then you should remember that their power should be less than 40 watts.
You need to place them at the maximum possible distance from the elements of wood. Only in this case can overheating of the lamp be avoided.
Other options for wooden lamps
You can make other lamps with your own hands:
- Plank and rope construction. In this case, several matte shades are used as light sources. There is nothing complicated in the manufacture of such a design. It should be noted that in this case, only energy-saving or LED light bulbs should be used. High power incandescent lamps quite often create a fire.
- Bars with pots. In order to drill the bottoms of the pots, you should use a tile drill. In this case, it is not allowed to install incandescent lamps of any power.
- Chopped log with spotlights. It must be borne in mind that it is difficult to hollow out the product.
It is quite simple to make lamps from wood with your own hands. You just need to show imagination and prepare all the elements that will be needed to make the structure.


Wooden chandeliers are increasingly seen in the interior of country mansions. What is the reason for such popularity of such lighting devices? Of course, first of all, it is important to note the environmental safety of natural wood. This useful and high-quality material is ideal for making a wooden chandelier with your own hands.
Wooden chandeliers made of wood fill the room with pleasant and soft light, allow the owner of an apartment or house to completely relax after a busy day.
Wooden chandeliers have excellent technical and operational characteristics. Professional interior stylists note their unique wear resistance, as well as the possibility of making such lighting fixtures with their own hands.
Attention! A high-quality wooden chandelier has a fairly high cost.
It is not necessary to spend money on buying a ready-made lighting fixture, because it is quite possible to make it yourself, turning your creative ideas and original ideas into reality.
In addition, a do-it-yourself wooden chandelier is a guarantee of uniqueness and individuality.
Reasons for choosing wood for making a lamp
In our age of scientific and technological progress and innovative technologies, polymeric materials have become widespread, which have pushed natural wood into the background. Despite the variety of finishing and decorative materials offered by lighting manufacturers on the modern market, interior designers do not stop using natural wood in their work.
The original do-it-yourself wooden chandelier, step-by-step instructions, as well as photos can be found in the video:
Natural wood has certain advantages. For example, this natural material retains its original characteristics during mechanical processing.
Advice! For relaxation, professionals recommend choosing spruce or pine for the manufacture of a wooden ceiling chandelier. Doctors recommend choosing such wooden chandeliers for people with chronic respiratory diseases, as well as asthmatics.
Also among the advantages of natural wood, we highlight the ease of processing. If desired, you can make semi-antique wooden chandeliers, a modern version, and of any degree of complexity.
When choosing a tree for decorating the interior of a living space, you can make it cozy and harmonious.
Wooden ceiling chandeliers will help to bring an accent to the room, emphasize the main idea chosen for decoration.
Advice! In order to put into practice creative fantasies, you can experiment with the selection of wood species.
For example, “antique” wooden chandeliers can be made from oak or larch, and modern versions of lighting fixtures can be made from pine.
Among the advantages of choosing wood for creating ceiling chandeliers, professional stylists note the excellent combination of this decorative material with other decor options: glass, plastic, metal, fabric.

Disadvantages of wooden ceiling lights
It would seem that with such a huge number of positive characteristics, wood should be an ideal option for the manufacture of ceiling lighting fixtures. But unfortunately, even wood has some significant drawbacks that should be mentioned.
Wooden chandeliers are highly flammable as wood is not resistant to high temperatures.

Attention! It is strictly forbidden to use light bulbs in such chandeliers that will heat up during operation.
For safety reasons, professionals working with this natural material prefer to choose fluorescent or LED lamps that cannot create a fire hazard.
Among the shortcomings of ceiling wooden chandeliers used in rooms with high humidity, we highlight the instability of wood to negative environmental influences: moisture, temperature fluctuations.
Ceiling lights made of wood are exposed to insects.

Advice! In order to provide your ceiling lamp with reliable protection against these factors, it is important to coat the finished product with a special protective impregnation.
Also among the disadvantages of choosing lighting fixtures made by hand from wood, we note their high cost. As it dries, in some cases, the original appearance of the ceiling chandelier may also change.
Given all these shortcomings inherent in wooden products, you can make an original and functional lighting device that will become the pride of the owner of an apartment or house.

Work materials
To assemble a ceiling wooden chandelier with your own hands, you will need tools and materials:
- roulette;
- screwdriver and hammer;
- pencil;
- electric drill;
- hammer and pliers;
- antiseptic for processing a wooden product;
- base, light bulb, electric wire;
- decorative elements
Depending on which particular model of the lighting device will be created, this list can be supplemented with other materials and tools.
There are certain rules that must be observed when starting work related to the creation of wooden ceiling chandeliers.
First of all, you need to take care of the full processing of the material with a special antiseptic composition.
In addition, due attention should be paid to the system for attaching the finished product to the ceiling surface. For example, you can pick up the original metal chain so as not to be afraid that the chandelier will fall from the ceiling.
In the process of connecting a wooden lamp, it is better to use the services of a professional electrician in order to prevent emergencies.
Original design lamps made of wood. Homemade lamps made of wood photo.
If you like to do everything with your own hands, we recommend to your attention a selection of the most original wooden lamps made by designers. But to make such lamps it is not at all necessary to be a designer, just look at these photos, show a little imagination and you will succeed.
Wood is a unique material that has been used for home improvement since the time of our ancestors, wood has positive energy, it is an absolutely environmentally friendly material. In this article we will consider the most original options for making lamps made of wood.
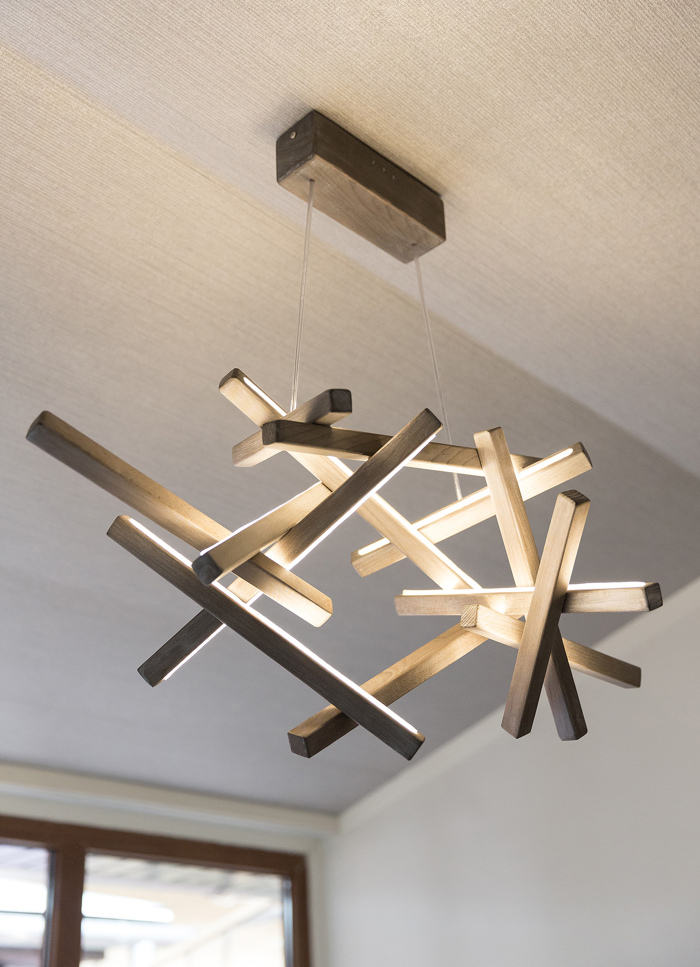
Ceiling lamps made of wood.
Original pendant chandeliers made of wood.


Homemade chandelier flower garden.

Chandelier ball, made of rope. To make such a chandelier, an inflated balloon is used, which is wrapped with a rope, then the rope is covered with glue, when the glue dries, the balloon is blown off and the result is such a design from which you can make a pendant lamp.


Pallet lamp. The wooden pallet is sawn into pieces that are used to make lamps.

original solution.

Lamp made from ordinary kitchen graters.

Woven lamps. Here, a basket is woven from a thin vine and hung from the ceiling.

Table lamps made of wood.

Night light made of wood.


We also recommend
 Productive and reproductive thinking
 Reasonable egoism - what is the theory of reasonable egoism?
 Boris Nikolaevich Yeltsin, the first President of Russia
 Underground fights. Underground kings. What is “fighting not for the masses”? Where can you fight for money?
 Yakov Pavlov and Other Heroes of Stalingrad You Need to Know
 Survive an accident at sea in a dream - in reality experience a new love