Cheap bathroom renovation. Budget bathroom renovation Easy do-it-yourself bathroom renovation
Do-it-yourself budget renovation of the bathroom and toilet.
Good day, gentlemen and ladies! I want to tell my story about the renovation of the bathroom and toilet, separate. From the purchase of the apartment, the renovation of the bathroom was postponed for 3 years, since other rooms were a priority. The right hour has come, we were just on vacation with the whole family in another city, I spontaneously decided to come home a month earlier before the end of the vacation to start work. This was at the beginning of 2016. Therefore, all materials were purchased in the city of Mirny, if they had planned in advance, they could have been ordered from the mainland and would have received significant savings. The budget turned out to be around 150 thousand (approximately + -30 thousand more), purely based on materials. The main amount is collected from the bath, tiles, plumbing. I basically did all the work myself, if others did it, then you can safely add another 150-200 thousand for the work (probably) to the amount of materials. In our city, all prices are very high, it's a fact.
We have a house built in 1996, the square is small, the bathroom, toilet, balcony are very tiny. But the prices of apartments are the same as in Yakutsk, and the squares are less.
Probably I will post in the form of a photo report with notes. There were a lot of photos.
Go. Housing problem.
There were old Soviet square tiles on the floor, which were glued either with concrete or with super glue; Neighbors sorry again. Wallpaper was pasted on the walls, which were painted.
A good semi-professional assistant in repairing and cleaning carpets.
Stocked up with tiles. Honestly, I don’t remember how much they cost. Wall tiles cost 110 rubles / tile. Russian production. Quality for 3 with a minus. Even in one box, the dimensions are different in length and width, so when you glue it, the level starts to play. And if you ordered from the mainland in advance, then for this money you could order branded imported tiles, they don’t have such a jamb, they say.
A simple toilet bowl, for 7 thousand Karl. Big mistake.
The bathroom is acrylic, I like it, it's voluminous. Length 150 cm.
The old tub was metal. cooled down quickly.
We are in full swing preparing the base of the floor. Applying a deep penetration primer. Then a concrete screed.
Neighbor Aunt Luba did the bridles from time to time, Soft delicious buns!
Work to replace old metal pipes. I called the plumbers of the housing and communal services, they turned off the water, made 2 transitions from the hot water and cold water risers to plastic, and also installed 2 counters, 1 heated towel rail. Emptying my wallet by 10,000.
This photo shows how old metal pipes are clogged.
For a complete replacement of pipes, they asked for another 15 thousand rubles. This is without wall slashing. And my wife had an interesting idea. After watching a YouTube video on the installation of polypropylene pipes, I decided to do it myself. I bought a welding machine for 2 thousand rubles. In principle, nothing complicated. The main thing is not to overexpose the pipes in the welding machine.
Didn't like the paint on the wall. To remove paint, I made this design from a 5 liter bottle with a connection to a vacuum cleaner. The result is not particularly pleased, because. very long, dusty and noisy. I’ll tell you in advance, it’s easier how to do it: we clean the paint that comes off by itself, then we go through the paint again with a scraper or chisel, then we buy a solution - concrete contact, apply it and that’s it. The surface becomes flaky, like rough sandpaper. The tile adhesive adheres to it.
Here are the marks from the grinder on the wall.
Since the floors are very uneven, the slope is 3-5 cm per 1 meter, it is necessary to make an even level using the so-called beacons (green dots on the floor). Then between the beacons we throw a solution of concrete and connect the beacons. We will fill in the inner squares along these lines.
As a result, we get a flat floor. There will be a bathtub on the right, so I decided to save concrete there, we can equalize the level with the help of legs.
We glue the tiles, between the tiles we make a distance of 2 mm, using crosses. In the future, the inter-tile space is filled with a special grout.
Bath installation. Behind the bathroom, he ditched the wall and put a pipe from the mixer there. When you switch the mixer mode to a shower, the water will go from above. This is the wife's idea.
On the left is a strobe for electrical wiring, we connected a washing machine and made sockets. Right for the shower. Red is the concrete contact layer.
2 faucets)) The bathroom fills up 2 times faster))
On the wall we begin to glue the tiles from the level of the bath. First we go through 1 horizontal line, then 2 rows of tiles. How to glue tiles can be viewed on the Internet, I watched YouTube)). There you can find the entire technological process of repair.
By the way, our walls are very crooked, sometimes with a propeller, sometimes with an inclination ... a nightmare. And no one knew how to level the walls and would not have had time in time. The most difficult sections were the corners. More glue, time and nerves. Now the walls are not curved at all.
My mistake. Glued the mirror to the tile adhesive. The mirror is old from the previous owners.
Here you can see it very well. From above, the corner goes back to back, and from below it begins to diverge. The issue was solved by grouting and more glue)).
The ceiling is already done. Lighting - 5 point diode lamps, enough for the eyes. A shower was installed, it works well (China), I bought it in Yakutsk, I don’t remember in which store.
Drying glue ruined the reflective layer.
Dismantling with your favorite perforator.
I bought an ordinary countertop, in our city there is nothing but ordinary things. Or they will make it to order "like a cool one" at three prices.
Found a nightstand just the right size.
Not a single centimeter between the wash cabinet and the bathroom. Back to back. My perfectionism kicks in. The tabletop was installed on the corners in the wall and on the nightstand. Holds tight. At least jump.
Voila. The joint was smeared with white sealant.
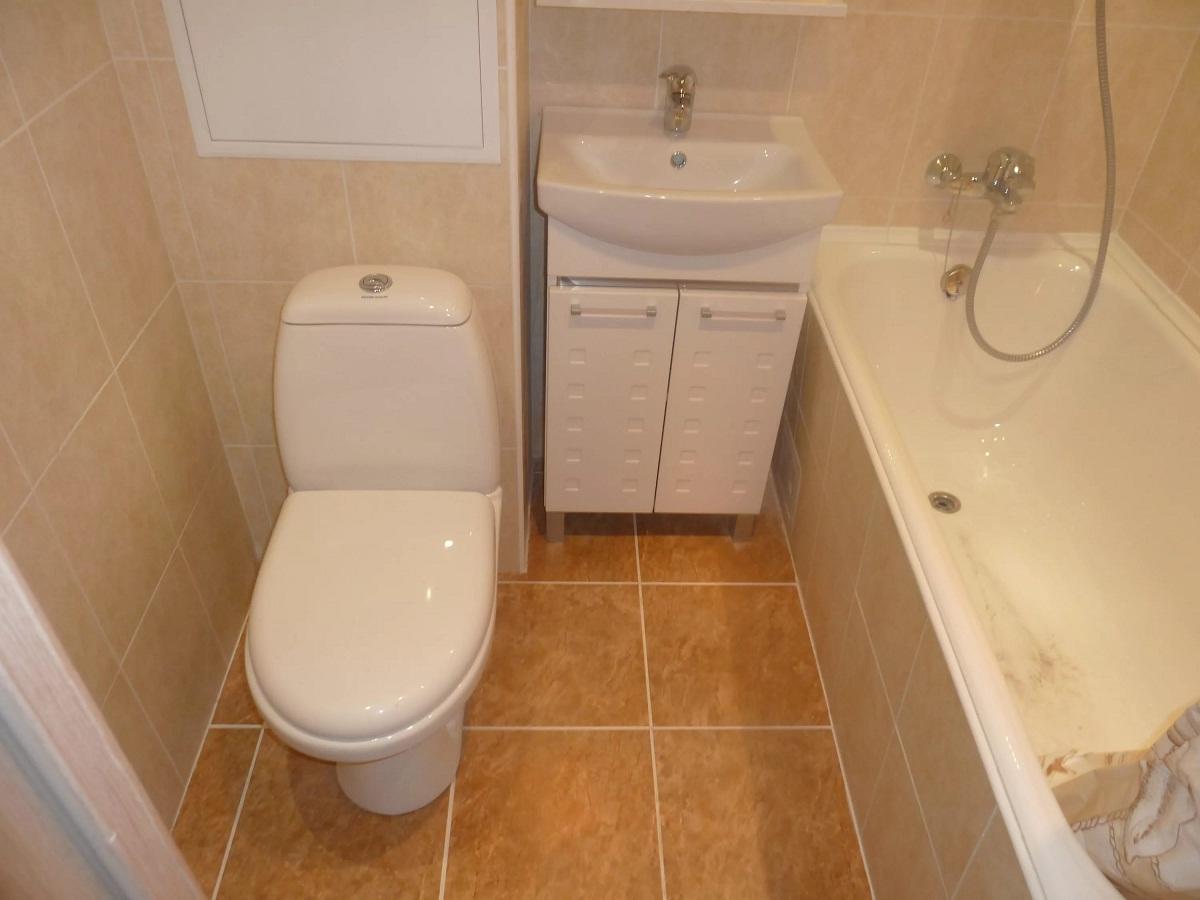
Here is the end result.

When acquiring a new home or living in an old one for a long time, it becomes necessary to repair it. Any updates are associated with costs that even the most economical person cannot always afford. In the absence of a significant amount of money, it is not at all necessary to postpone the replacement of a damaged finish on the back burner. It would be wiser to plan a budget repair using inexpensive, but high-quality materials. And you should start with the bathroom, which is one of the most important rooms in the house.
Repair, like any change, begins with getting rid of the old and unnecessary. And this process can be called the most pleasant and easy part of the work: coatings that have become obsolete can be safely removed from walls and ceilings without worrying about their safety.
Cleaning of the premises is carried out in several stages:
- Disconnecting plumbing;
- Removal of old coating from walls, floors and ceilings;
- Removal of previous layers of plaster, screed and waterproofing residues;
- Cleaning the room from dirt and dust.

After getting rid of debris, all surfaces must be leveled with cement mortar. Slots must be sealed with sealant.
An obligatory stage is the waterproofing of the room. For the floor, you can use a coating composition, which is applied to the screed in one or two layers.
Cheap do-it-yourself bathroom renovation: material requirements
The bathroom is characterized by a special microclimate, which leads to rapid wear of materials. Therefore, when making even low-budget repairs, it is worth choosing a finish whose performance meets the requirements.
The materials used must have the following properties:
- Resistant to high humidity;
- The presence of antiseptic additives that prevent the appearance of fungus and mold;
- Resistance to aggressive compounds used to clean the bathroom;
- Ease of maintenance.
The best option for the bathroom - smooth surfaces. Due to the absence of irregularities and various volumetric patterns, the material does not accumulate dirt on itself, retaining its original appearance for many years.
When choosing a finish, you should also pay attention to the possibility of self-assembly. A simple do-it-yourself repair will cost less (approximately twice).
How to paste over a bathroom cheaply: we decorate the walls
A significant part of the costs falls on the design of the walls, which have the largest area when compared with the rest of the finished surfaces. One of the options for the economy class is wallpaper, but before you paste over the bathroom with them, you should think carefully. This type of finish is very unstable to high humidity in the room.
Painting with a water-repellent emulsion is the cheapest way to decorate walls. For finishing, a special composition is used on a polyester or acrylic basis, which is applied to the surface after it has been leveled. The paint lasts for 5-8 years.

Among the budget options, the following types of finishes also have the necessary properties:
- plastic panels;
- Ceramic tile.
PVC panels are an inexpensive material that saves not only finances, but also time. Plastic strips fastened together do not require preliminary alignment of the walls and removal of old finishes. The installation of the panels is quick and can be done even by a non-professional.
If you want to decorate a small bathroom inexpensively, you can consider laying wall tiles. This material is resistant to moisture and mechanical damage, has a huge number of colors. The tiled bathroom looks nice and neat. A small budget in this case will not be a problem: you can purchase domestic products that have more affordable prices.
Bathroom renovation options: how to finish the ceiling and floor
The ceiling can be decorated in the same way as the walls. For example, paint with white paint or install plastic panels. This option is the most economical and practical.
For a small bathroom, installing a stretch fabric can be an ideal solution. The cost of such a finish depends on the area of \u200b\u200bthe room, so installing a false ceiling in a small restroom will cost less than other options. Especially if you abandon the idea of a designer canvas and make it matte white.
16.jpg)
Finishing the floor is the most important task on which the safety of using all plumbing equipment depends. That is why experts recommend that the first step is to update the waterproofing in the room, and only then repair the coating itself.
For finishing the floor in the bathroom, two materials with high durability and a variety of designs are suitable:
- Linoleum;
- Ceramic tile.
Linoleum will cost less than tiles, but if we are talking about a small bathroom or toilet, there will not be much difference in their cost. Therefore, the choice of coverage in this case depends on personal preferences. However, it should be borne in mind that the installation of linoleum is quite simple and is done by hand, which also significantly reduces costs. Having given preference to the tile, you will have to work hard with its installation. Or finish the floor with the help of a specialist.
Renovation of a small bath: updating plumbing
Buying a bathtub and sink is the biggest expense in a renovation. However, you can save even in this case. The solution to the problem will not be the acquisition of new equipment, but the restoration of the old one.

The update is done in two ways:
- Application of two-component polyester enamel on the inner surface of the bath (the cheapest option);
- Restoration with liquid acrylic (it will cost more, but the result will be more durable and beautiful).
If the bath is in a very poor condition, you can purchase an acrylic liner. This is a special insert that is attached inside the bowl with a sealant.
The listed methods may not seem budgetary, because. are not very cheap. However, in any case, it will be more profitable to restore an old bath than to buy a new one.
Quick budget do-it-yourself bathroom renovation (video)
Self-renovation of the bathroom can be carried out at almost any income. It is only important to carefully plan the whole process and acquire the necessary materials. The modern market offers a variety of finishes, so choosing a high-quality coating of low cost is not difficult. The main thing is not to get carried away, trying to save as much as possible: you need to pay attention not only to the price of the material, but also to its properties.
I inherited an apartment from my grandmother. A small kopeck piece in which there was no repair for twenty years. Entering into legal rights, the first thing I decided to do repairs. There was no money to hire a team of builders, and I decided to do everything myself, with my own hands, so to speak. After reading books and watching a bunch of training videos, I decided that I would start making a budget one.
A small room 1.3 by 2.5 meters with a ceiling height of 2.7. I don’t know if it was possible to call the one who created this an architect, but now there was no time for reflection.

Dismantling (remove all unnecessary)
The first thing I did was remove everything that could be removed. With a friend they took out a bath (cast iron, on the back they found the release date of this miracle - 1961!). He removed it, having previously drowned out the pipes for the water supply and the central sewerage system for draining the bath. Took all the tiles off the walls. (It should be noted that the builders did a very good job, they held up well.
The floor was not touched, was practically free of defects and very durable. In a word, he prepared the front of work.

Garbage scored six bags!
Wall preparation
Started a budget bathroom renovation from the walls.
I impregnated the walls with a primer against mold, looked at the level, turned out to be ideal for the plumb line. I decided that the repair in the bathroom is not forever, budgetary, so I will use it, not as I wanted, but ordinary wall ones. Since I have a budget bathroom renovation, this type of wall covering is the most suitable. Deshego and angrily. Panels in size (240*2700) are fixed on horizontal rails. I decided to make guide rails from wood 50 * 20 * 2000 in size. Fixing them to the wall with dowels and screws.

Pre-painted with acrylic paint pipe. He began to install the panels, fixing them to the rails with a conventional construction stapler.


Installation of PVC plastic panels
I decided to renovate the bathroom not in dull monotony, but using three colors - blue, white and red.
The most difficult thing when repairing a bathroom turned out to be removing the corner, I suffered for a long time before I realized a little trick - insert it using a construction spatula (narrow) gradually leading the next panel into the guide (inner corner)! In short, he coped with the walls.
The next step was taking the bath. The most ordinary steel bath. Size 1700*750mm with legs

and only after that he continued to finish the wall with panels, for better water flow. The only difficulty was laying the panels in the hot and cold water outlets.


but he managed quite successfully, using a wood drill of the appropriate diameter. There were no difficulties and in the place where the front door was, it turns out that installing PVC panels is very simple, you just need to read the instructions and use a good tool

in order to hide the edges of the cuts, I pasted a plastic corner 50 * 50 * 3000. It turned out very well, the door just changed.
Installation of the mixer did not take much time, there were no difficulties.


Ceiling (installation of skirting and ceiling panels)
Having finished with the walls, he began to work on the ceiling. He leveled the ceiling plinth (special fittings for PVC panels) and with the help of white PVC ceiling panels 500 * 3000 began to lay the ceiling, making it slightly lower than the original one.

In parallel, making the lighting wiring for two spotlights.

The ceiling turned out just wonderful - my first ceiling in my life!

Laying tiles on the floor
Sealant walked along the seams of the bath and leveled it with the help of the adjusting bolts on its legs. It's time Since the budget repair in the bathroom, and saved on the walls and ceiling, you can put tiles on the floor. Moreover, the volume is not large. Just learned how to lay tiles, as the floor ended.
I used floor tiles, two colors blue and red. Having successfully combined them, it turned out even very nice!
Didn't use it, gray and blue color are wonderfully combined. I connected the bathtub to the sewerage system and put a screen on the bathtub to hide the insides, which are very unaesthetic. I took the screen ready, hinged, to simplify the approach to drain cleaning systems.


I decided to use the washbasin together with the cabinet in the colors of the tiles on the floor, killed two birds with one stone, hid the sewer drain and decorated the bathroom with a stylish decor element! The faucet's watering can freely reach the sink.


And the final touch - a mirror over the sink! THE BEAUTY!

I realized that the most important thing is to believe in yourself and not stop in front of difficulties! The eyes are afraid, but the hands are doing!
We suggest watching a video on the topic:
Stylish budget bathroom renovation
To make a quality bathroom renovation, it is not necessary to have large finances. After all, if you want, you can save a lot of money.
For example, you can refuse the services of a designer and come up with a style in which the repair will be done.

You can also save money on the construction team and do everything yourself.

But in order for the process to be established and the result to be achieved, it is necessary to draw up a detailed action plan in advance.

So, you will need:
- Come up with a design;
- Stock up on the necessary materials and tools;
- Make a budget;
- Calculate the exact dimensions of the bathroom and plumbing dimensions;

When choosing a design, you need to pay attention to the area of \u200b\u200bthe room. Owners of a small area should take into account that a small space is less functional.


Light colors in the interior and large mirrors on the walls will visually enlarge the room.

You can refuse to install a bathtub and give preference to a shower cabin. Thus, there will be more space in the room.

For hygiene products, instead of bulky floor cabinets, you can hang compact hanging cabinets.

After you have decided on the choice of design, you need to draw up a plan of action. After all, in order for the process to go on continuously, all actions must be performed sequentially.

Negligent attitude to previous work can significantly affect the final result.


Step 1: Calculate the amount of building materials
This is a very important step in the renovation. An unpleasant moment may be that if the calculation is not correct, there may not be enough tiles, panels or other building materials.

Indeed, in the process of cutting and laying, part of the material may be damaged. To avoid such an incident, you should initially purchase building materials with a margin.

Step 2: Remove the old surface
To remove tiles from the walls and tiles from the floor, you need to stock up on a hammer and chisel. However, it will be easier to cope with the work with a puncher or drill. There are two dismantling options: sparing and emergency.

The first is done with a hammer and chisel. First you need to soak the grout, and then carefully separate each tile from the wall or floor.

The second option is much faster, but more "dusty" and "noisy". To do this, you just need to demolish the coating in layers with a perforator.


Step 3: Repair the floor
First of all, install the screed device. If the installation of an additional “warm floor” system is not provided, then the height of the screed will be 1-1.5 cm. The height will be 3-4 cm if the floors are further insulated.

There are several types of "warm floor" system: water, film and electric. Any of the systems retains the microclimate in the bathroom well, at the same time it has a low cost and is easy to install.

Step 4: Wall decoration
To date, the market presents bathroom materials for "any wallet". First of all, it all depends on the finances that you have. Most often, tiles are laid on the walls.

But you can also choose a more budget option, such as plastic panels or special moisture-resistant plaster. At this stage of repair, everything depends on your imagination and finances.

Step 5: Ceiling
When repairing the ceiling, it is worth starting from the materials that were used on the walls. So, for example, with tiles and plastic, an elastic vinyl film looks very nice.


If you plan to make a ceiling with various transitions, then use a special moisture-resistant drywall. However, there is a more budget option: plastic panels.

After all the finishing work is done, you can install the bath, furniture and plumbing. Do-it-yourself repair is not an easy task, but very informative. In addition, it can save money and make the design exactly the way you want!

DIY bathroom renovation photo


Are you thinking about renovating your bathroom with your own hands? This is not surprising, since the implementation of the entire repair process on your own will be much cheaper. On average, the amount of the possible fee is calculated from half the cost of all necessary materials.
But, of course, you should not think that everything will be simple: you will need to calculate all possible costs, have knowledge and sufficiently high skills, if not in repair, then at least in handling tools. If you do not have the above, then it would be better for you to contact the specialists. Think and weigh your decision carefully. Read this article about do-it-yourself bathroom renovation with a photo and then finally decide on your decision. In it, we will dwell in sufficient detail on the production of actions in their chronological order, indicating the materials and the approximate cost of the costs of the necessary materials.
To carry out a bathroom renovation with your own hands, you will have the following:
- Choose plumbing, determine its quantity and nomenclature;
- Develop a bathroom design and choose the color you need:
- Calculate and purchase the necessary finishing materials;
- Prepare the room in which the repair will be carried out;
- Assess the current condition of the bathroom floor. Decide on the method of its repair and purchase materials for the work;
- Repair floor. This item will include:
- its waterproofing - that is, measures to make the floor waterproof.
- screed replacement, under the screed rises the layer created to level the floor, and on which the flooring is usually installed.
- floor insulation;
- Pipeline laying;
- Work with electrical wiring;
- Plastering of the ceiling and walls;
- Wall cladding, grouting and sealing corners;
- flooring;
- Installation of a ventilation system.
- Installation of plumbing of your choice.
The time that you spend on do-it-yourself bathroom renovation is counted from 2 weeks, in case of replacing the bathroom and toilet. It will take at least 2 months to replace the floor screed. Let's go directly to the points of the specified plan:
Selection of plumbing
It is difficult to talk about specific tips here, since everything will depend on your choice of brand and manufacturer. We only mention that when repairing, you should think about what to do with the old bathroom. If it is intact, then below, when considering the preparation of the premises, ways to improve it will be indicated.
Design stage
This stage is directly related to the choice of plumbing, as it will affect the complexity and cost of the repair itself. So, the characteristic of the tiled wall covering depends on the shape of the washbasin. It will be impossible to specify all the details; this is a topic for a separate article. Keep in mind that when building a house, bathtubs are made out the same way with the same materials from the same supplier, respectively, the cost of repairs can reach up to 1/5 of the cost of housing. In an ordinary house, it makes no sense to think about a mixer built into the wall, since such an opportunity is laid even during construction, and breaking the wall is an unacceptable option.
Do not use normal commercial wood and simple steel parts. Such materials absorb moisture or are prone to corrosion, so using them in a place with high humidity does not justify itself. For the same reasons, installing sockets and switches in the bathroom is life-threatening. Of course, there are ways to make them, meeting a number of formal requirements, but we will not consider them here. If your apartment is tight on space, consider installing a walk-in shower. This will help free up some space in which you can install something more necessary. Think and choose a design that you like.
estimate
It makes no sense to explain why it is necessary to evaluate the equipment needed for repair. Remember that it is wrong to be guided by a lower price when choosing materials for do-it-yourself bathroom renovation. There are a number of parameters that are essential, but which are quite difficult to figure out without special knowledge. These are the coefficients of moisture absorption, thermal expansion and porosity of the material. Since the bathroom is a place with a large variation in temperature and high humidity, which affects both the strength of materials and the sanitary and hygienic situation in the home, it will be wrong to proceed from the principle of cheapness.
Some parameters, you most likely will not find in the description of the material, so you should select materials that are directly intended for use in the bathroom. The materials used for outdoor construction may also be suitable, since the conditions of interest to us are similar.
- The price of a tile will be from 40 to 60 rubles per piece, depending on the country of origin. The quality of tiles of domestic and European manufacturers on average do not differ from each other, but European samples usually have a better design. The situation for floor tiles and wall tiles is the same, the difference is only in size. Porcelain tiles will cost more, from 50 rubles apiece, however, it is recommended to use it for flooring. Unlike ordinary ceramic tiles, they have a non-slip surface and greater durability. Considering the rather high traumatism of bathrooms in medical statistics, this is an important circumstance. In the store, you should pay attention to the condition of the surface of the tile. The presence of damage on it will lead to the appearance of uncleaned dirt. In order to make sure the integrity of the tile you choose, lean it against your face and look at it along the light source. Another factor is the aspect ratio. If the tiles are of different sizes, and this is quite possible, then during installation, the surface will look repulsive, and even if it is not installed, you will have to spend time returning the goods to the seller. To check, take a few pairs and attach the edges to each other and take a closer look. The difference in size should not exceed a millimeter. Then test the edges, they should be even.
- Tile adhesive. Considering that the work on installing the tiles will be carried out by you yourself, the best choice would be slow-drying glue, from half a day to a day. This will allow you to correct all possible mistakes made and give you the opportunity to work for your own pleasure. The spatula should be selected specifically for the glue, such information is contained on the package. If for some reason the package does not contain information about the pitch and depth of the teeth, and the glue itself has proven itself, then choose a shallow depth of 3 to 6 millimeters. Using a large-toothed trowel will most likely result in cavities under the tiles.
- Templates for laying tiles. It is best to take plastic crosses, because they are easier to work with.
- Tile grout. It is not necessary to purchase, since a piece of cable 5-6 millimeters in diameter may be suitable for grouting.
- Glass-magnesite sheet from 250 rubles per 1 sheet.
- Laminate from 300 rubles per board.
- Bulk floor. For the bathroom, it is preferable to use two components, this is the initial viscous filling, then comes the liquid one, for leveling. The approximate price is from 220 rubles per 10 liters, the same with the effect of insulation - from 640 rubles per square meter.
- Teak or larch floor. If you decide to make a wooden rather than a tile floor. It will cost more, but it looks and feels better. Price from 500 rubles per square meter.
- Pipes. The best option is polypropylene pipes: for cold water (PPN) from 24 rubles per square meter, for hot (PPR) from 35 rubles. The choice is due to the fact that working with steel pipes is difficult, metal-plastic tends to flow in fittings over time, while polypropylene can be welded and hidden in the wall. Sewer pipes go from 45 rubles. Fittings fall into the same category. Solid plastic fittings are most preferred as this will avoid potential leaks. The transition to metal makes sense when connecting pipes to a boiler. Shut-off valves must be spherical and soldered into plastic. The cost of fittings and fittings will be 60% of the price of pipes. When buying, measure the outer diameter of the pipe with a caliper. To work with pipes, diamond drills are required, if the sizes do not match, you will have to buy more, and such drills are quite expensive.
- PVA emulsion - from 240 rubles for a 5-liter package.
- Plumbing. It all depends on your choice, let's just not skimp on quality - plumbing should serve for a long time and in good faith. When considering options for a heated towel rail, it is recommended to take a stainless steel heated towel rail. Other options are either of poor quality or overpriced. When choosing a faucet, consider purchasing a faucet with an infrared sensor that automatically turns on the water when you bring your hands up with a pre-set temperature. You've probably seen this at airports. The mixer, of course, is not the cheapest, but it will allow you to cut your water costs by half, and heating energy by 40-45%.
Prices are approximate and based on the current market value. Nevertheless, you can somehow navigate at such prices and, taking into account the area, calculate the repair of the bathroom with your own hands. You will not need all of the above directly when performing work, some of the options presented are alternatives, their choice will be discussed in more detail below.
We repeat once again: you should not be guided by cheapness when choosing materials, their use will only lead to more complicated work. When purchasing materials, consider possible marriage and calculation errors: there is almost always a need for some stock. So, with tiles it is recommended to have 3-5% of the excess amount. When renovating a small bathroom, you will do a little more - 5-7%. For other materials, add 35-40%.
Now let's get straight to work.
So, as already mentioned: first of all, the question is in the old bathroom. A cast iron bath can be updated with an acrylic or epoxy resin. Installing a new cast iron bath will not give any advantage in terms of quality and service life, and its dismantling and installation of a new bath is quite time consuming. For a tin bath, in the absence of enamel chips or other serious damage, an acrylic liner can be used. If the tin bath is in poor condition, do not hesitate and choose a new one. To update the bathroom, you do not need special skills. The difference between acrylic and epoxy is price and labor intensity, the latter being cheaper but somewhat more difficult to work with. It is impossible to create an insert on your own - it is made at the factory, where you will have to order it, the installation technology is as follows:
- thoroughly clean and degrease the bath;
- insert the insert and check the correct alignment of the drain holes;
- recheck and apply glue to the inside of the tub.
The method is quite expensive, but still cheaper than a new bath.
Turn off the water. Disconnect the cold water supply from the cistern. If you are not going to move out for the duration of the repair, then it makes sense to run water to the kitchen through a temporary pipeline. Even using an ordinary hose will do, the main thing is not to forget to turn off the water for a period of absence or at night. The quality, as you understand, of such a system is far from ideal. But otherwise, you will have to do without water for about 10 days, which is an even worse prospect.
Proceed to dismantle everything in the bathroom. Only the walls should remain. Do not touch the sewer system at this stage yet, muffle the heating for the heated towel rail with screw plugs. Next, turn off the power in the bathroom.
Now you can start cleaning the surfaces of the bathroom. This part of the work is associated with garbage and dust, work with glasses, a respirator and, if you don’t want to clean the whole apartment later, with a closed door or a film in the opening.
Work starts from the ceiling. For old tiles, use a hammer drill with a chisel for concrete. If cement mortar was used to fasten it, then you will have to remove it completely. Be careful when working with the floor! If your old screed is in good condition, then the puncher can damage it when cleaning the cement substrate, and this is unnecessary trouble for you. If there is reason to save the old screed, then use a grinder with a diamond cup. The work will be done more accurately and will reduce the cost of overhauling floors.
For the top layer of plaster and old paint, a drill with a 80-100 mm round metal brush is used. In old houses, the plaster is often fragile, this must be removed to the ground, whether it be brick or concrete. It is enough to level a solid one with a drill using a cleaning brush and measuring the level. When working with plaster over electrical wiring in the bathroom, you need a hammer drill with a chisel. Remove the wires. Just in case, tap the walls and try to drill them: in a number of houses of the Brezhnev era, gypsum-fiber boards were used for insulation. If you find something like this, you will have to dismantle them. Work will increase, but their replacement is necessary. Be careful when working with the ceiling, it can come to collapse. Take care of the supports.
Cleaning completed, old tiles removed. Time to mop the floors. After wet cleaning, you can begin to inspect the installed screed. The presence of at least one crack will lead to the need to replace it, which means a major overhaul of the floor in the bathroom. Of course, if the damage is small, then this can be avoided by using a self-leveling floor layer. But more on that later. First of all, consider the need to remove the old screed and proceed with the waterproofing of the floor.
In order to waterproof the floor, there are few options: it is aquaizol or its polyester analogue. Ordinary film for the bathroom is not applicable, moisture will seep in one way or another, while Aquaizol will retain water at any temperature. The insulation should be led to the wall at least a quarter meter (25 cm) based on weight. 4000 liters of water per 10 square meters is the ultimate strength of the floor. Folds at the corners should not have cuts. The joints of the waterproofing layer are glued together with mastic or welded using an industrial hair dryer. Before doing such welding, practice, it's not easy.
Having finished with the insulation, proceed with the installation of a new screed. When assessing the possible costs, the required material has already been called. This is a glass-magnesite plate. Its strength will allow you to lay the reinforcing mesh and install beacons without delay. There are no alternatives, foam concrete and foam concrete are too fragile, and expanded clay absorbs water. This is an extremely long stage, the new screed must stand for 40 days before you can continue work. For screed there are special requirements for cement mortar:
- brand of cement from the 400th; sand must be quartz;
- sand and cement are related to each other in a ratio of 4: 1;
- the volume of water must be equal to the volume of cement;
- to water you need to add PVA emulsion in the amount of 1/10 of the volume of water.
The formation of the screed is carried out along the markers in a layer of 4-5 cm. Having leveled the formed surface, bring it to smoothness. A tiled floor requires a level base surface for its flooring.
Let's move on to replacing the pipeline. You should start with sewer pipes, as sealants with sealant are assembled quite quickly, one day is enough. Welded joints are not made on sewer pipes. After that, you can proceed with peace of mind to soldering water pipes.
How to lay them? It’s not worth doing it in the open, it will bring aesthetic pleasure to few people, making strobes, if you don’t know the concept, is a groove in the wall laid to be able to remove the pipe, a tedious and time-consuming task, and in the case of block houses, fittings cannot be violate, and she herself will not allow a strobe to be made. Nevertheless, there is a solution: the pipes can be run parallel to the floor, and then a galvanized slope can be made on them. Next, with the help of silicone on the completed slope, glue the facing tiles in the same color to the future look of the bathroom.
The slope is also glued with silicone to the floor and ceiling, and can be completed even after the work is completed. If necessary, silicone can be cut with a mounting knife. With a standard bathroom layout, the length of the slope will be approximately a meter. You still can’t do without a strobe, but this is only for vertically installed pipes: for a faucet in the bathroom, if there is one in your bathroom, for a faucet in the washbasin, and there may also be a couple if the boiler is installed in the bathroom. Pipes should be foamed in the strobes, this will serve as additional protection against fogging and heat loss. The process of installing polypropylene pipes is very simple, the main advantage is that after thirty minutes from the end of the welding of the last connection, you can use your piping system. uh
Remember, butt joints are not allowed. Use fittings and couplings to connect them.
For welding joints, you will need: a machine for socket welding of pipes made of polypropylene; nozzles for used pipes; pipe cutter; shaver, beveler. Metal-plastic is well suited for a heated towel rail. Thanks to its flexibility, the lower fittings will be hidden under the slope, and the position of the upper ones will not change.
It is worth laying it with a double-insulated wire tightened into a corrugation. The most commonly used is plastic, the price is low, however, if you are planning to replace the wiring throughout the house, use metal, the wiring will be shielded.
Before starting plastering work, glue the protruding waterproofing to the wall with construction tape; as already mentioned, it cannot be cut off. The bathroom is a cramped room, so we recommend using not a trowel, but half a rubber ball to apply plaster. It can be used for all kinds of work with alabaster, plaster or hardening compounds. It will be easier to work that way.
The plaster itself must necessarily be carried out along the lighthouses - a flat surface is required for subsequent wall cladding. It is best to use beacon profiles, which are easy to get at any hardware store. Making lighthouses yourself is not worth it, you will only waste your time and hardly be able to achieve a flat surface. The plastering sequence is normal, to the floor from the ceiling. Apply two layers - for the conditions of the bathroom with its fluctuations in humidity and temperature, this form will be the strongest.
Ceiling insulation is required not to comply with the temperature regime, but to prevent future problems that will certainly arise if condensation is not stopped. The best option would be to use a glass-magnesite sheet, unlike the floor, it will be bonded to the LSU ceiling surface with silicone or mounting adhesive. At the time of work, use the slats as supports, somewhere around 1-2 per meter of ceiling. Do not remove them until the glue has dried.
Having finished with the insulation, we move on to glossing, although this gloss carries a functional value like condensate. A good option is a material such as plastic lining or laminate. Don't worry about the reliability of the material. Moisture-resistant glue, even if it peels off in part of the ceiling, will not cause collapse - since the boards are interconnected, forming a single integral structure. Upon completion of work with the ceiling, you will proceed to the wall cladding. The laid tiles will serve as a support for the laminate.
When preparing the material, follow these points:
- processing the wrong side of the PVA material with an emulsion;
- laying itself is carried out using mounting glue or building silicone;
- the crest of the tongue, it is understood as the protrusions due to which the boards are connected, as well as the method of such a connection itself, a thin layer of glue is applied, its drips must be immediately removed.
For silicone, table vinegar is suitable, for glue, solvent. Please note - the last two boards of the laminate should be laid together, fold them into a house and insert, pressing the joint until it clicks into place. Do not forget about the props before the glue hardens.
Corners should be sealed with silicone to prevent moisture from penetrating under the ceiling sheathing. When making holes for wiring, do not make them at the junction of laminate boards. I think you understand why. When finished with the ceiling sheathing, foam the hole or fill it with silicone.
Of course, there are other options as well. But the independent production of stretch ceilings is often unjustified, and we will not describe its methods here. If you wish to do so, please review the selection criteria. A slatted ceiling is also possible - also a very common option, but its manufacture is the topic of a separate article.
For wall cladding, tiles are usually used. Porcelain stoneware has similar properties, but is more expensive, while the advantages that were mentioned when choosing floor tiles do not matter for walls. Covering the walls of the bathroom with plastic panels is spreading, it is quite cheap and meets the rules of hygiene, but in this article we will not consider how to work with such material.
When laying tiles on the walls, the cutting of the seams should be observed. For this, crosses are used, inserted between the tiles on the glue and immediately removed, as described above. The application of glue is carried out with longitudinal strokes of a spatula, with an average tile size of 30 by 30 centimeters - 0.25-0.35 square meters each. There are no voids under the tiles, so apply glue so that the rustications are parallel to each other and not too deep. Each tile you install should be tapped side by side with a rubber mallet from the previous tile to the free edge. On those tiles that will fall on the outlets of the wiring pipes, you need to pre-drill holes with a diamond crown. Once the glue has set, seal the corners with silicone. The method is simple - a thin plastic film is applied to the silicone, then a piece of electrical cable is applied.
Apply pressure and then remove the silicone streaks with vinegar. A smooth concave surface should form. If desired, the corner seam can also be covered with a decorative overlay due to the same silicone. On the plane, the cutting of the seams is carried out with a special composition, which is cheaper than silicone. The cross is removed, the remaining seam is filled and pressed down with a cable - the film is optional in this procedure - the streaks are removed. Do not cut the seams with your finger - irregularities that are not visible to the eye will appear inside the seam, in which dirt tends to accumulate. The technology for laying wall and floor tiles does not differ in itself, a small feature for the floor will be discussed in the next section.
Please note that if you use a mixer with decorative caps, then you should buy a crown with a larger diameter than pipes. Otherwise, you will have to measure out the places for the holes, which requires jewelry work.
For the floor, there are two options for tiles - the reasons why porcelain stoneware is better than tiles or wooden floors have already been explained.
In the case of a wooden floor, the procedure will cost more, but the result is more pleasant. The boards should be selected tongue-and-groove, the laying procedure will be similar to the ceiling, but leaving an indent from the wall of 2-2.5 centimeters. This space is designed for the swelling of the boards. Do not leave cavities, fill the gaps with polyurethane foam before installing the skirting board. A wooden floor coated with PVA emulsion and liquid acrylic varnish will last a very long time.
For tiles, installation should be done from the door, so that the cut tiles are under the slope or in the bathroom, where they will not be visible. This last row of cut slabs is laid last after the glue has set under the other slabs so as not to knock down the work already done. The only difference from laying on the wall is the absence of seams - the tiles fit together.
First of all, inspect the box, removed in preparation for repair. Often, after cleaning and repainting, they are suitable for further use. Just install it back. It would be better if you additionally install a flapper valve in it to avoid cold air flows in winter. It is recommended to install a fan for the ventilation system, this will ensure better air circulation in the apartment, and prevent the appearance of fungus on the walls.
It has no fundamental features. Often, for new products, you can even find instructions for the sequence of actions for its installation. Your actions include installing a bathtub (it will not be possible to carry it out on your own, without an assistant) or a shower cabin, as well as a sink. Then there are mixers, then a water meter. If you wish, you can connect a water heater to your bathroom.
In the bathroom, it is permissible to mount such stationary electrical appliances as an exhaust fan, the cord must be three-core, have a protective conductor and a Euro plug with a sealed entry into the housing, and a ceiling lamp that requires a waterproof design. A washing machine is a topic for a separate discussion, since it does not apply to stationary appliances.
All the necessary steps for making repairs in the bathroom with their own hands were dismantled. Watch the video, where the bathroom renovation procedure is described step by step. We did not mention bathrooms combined with a toilet due to the numerous features of the work and about twice the laboriousness of repairing two separate rooms, this topic needs to be discussed separately. As you can see, the procedure is time consuming, and if you are unsure of your skills, then it is better not to take it.
It is better to entrust this time-consuming and rather long procedure to specialists. They definitely know how to do things right. But you should still be familiar with all aspects of a bathroom renovation, for a higher chance of completing the entire renovation process successfully and without complications.
At least after reading this article, you will be able to control the work of the performers to whom you decide to entrust the repair in the bathroom. On the other hand, if you are sure of success, go ahead! Repair costs will be significantly reduced. For a more successful do-it-yourself bathroom renovation, we recommend that you watch a video on this procedure.


