We make a greenhouse from pvc pipes with our own hands. We put a greenhouse with our own hands: a frame made of polypropylene, plastic or PVC pipes PVC pipes for a greenhouse
Since the frame of this type of greenhouse is based on plastic pipes, the properties of the entire structure will largely depend on the characteristics of these pipes. Of the positive points, the following is noted:
- expenses for building a greenhouse minimal, because the cheapest pipes are suitable for these purposes;
- simplicity of design and low weight allows you to quickly and effortlessly mount the greenhouse and disassemble it for storage;
- managing the microclimate in a homemade greenhouse is as simple as in the factory version;
- there is a possibility create greenhouses of any size and optimal configuration;
- the service life of such structures is very long, since the plastic does not corrode, does not rot and is not destroyed by insects.
However, the small weight of the structure creates some difficulties in operation:
- there is a risk of destruction by wind;
- Do not use ordinary glass.
ATTENTION! Therefore, even at the design stage, one should choose the most wind-protected locations and abandon heavy covering mats.
rials.
For what?
Functionality largely depends on the presence of a heating system. If it is available, then the greenhouse is classified as warm, used for the following purposes:
- storage and protection of thermophilic plants. Before the onset of frost, they are dug out of the open ground, transplanted into boxes and placed in a greenhouse;
- spring seedling preparation almost any kind of plants grown on open ground. Restrictions can arise only because of the mutual intolerance of certain species;
- germination of cuttings;
- growing early plants from seeds.
IMPORTANT! When choosing a set of plants for planting, one should take into account not only the possibility of their joint cultivation, but also the transmission through the soil of characteristic diseases from plants from the last season.
A cold greenhouse allows gardeners to perform the following procedures:
- winter storage of plants sensitive to severe frosts;
- forcing bulbs;
- hardening before planting in open ground.
In winter, an unheated greenhouse should still check for soil moisture and temperature level. In addition, with insufficiently effective ventilation, putrefactive processes can develop on the soil and plants.
Manufacturing technology
The answer to the question: How to make a greenhouse out of plastic pipes with your own hands? - not so complicated.
Before you directly proceed to the assembly of a home-made greenhouse based on polypropylene pipes, you should decide on the type of covering material. From this moment will depend on the choice of the optimal diameter of the pipes.
In gardening for closed beds, the most commonly used types are:
- agrofibre, which protects well from UV radiation and creates an optimal balance of temperature and humidity;
- cellular polycarbonate, a very warm and durable material, the only drawback of which is the high price;
- PVC film, elastic and durable, but collapsing in severe frost;
- polyethylene film, easy to install, cheap and common material. It is polyethylene film that is most often used as a covering material for greenhouses. Its only drawback is its low physical strength;
- reinforced film- it can last several years, but it costs accordingly.
Actually, the technology of arranging a greenhouse from plastic pipes with your own hands includes several stages, and this can be seen in the photo accompanying the text.
1. Material preparation
The amount of materials must correspond to the estimated size of the building. At the same time, it is not necessary to purchase everything new; for the frame, the sections of pipes and boards remaining after the repair will also fit perfectly. In most cases, you will need the following set:
- boards with a section of approximately 20 × 120 mm, as well as their trimming to strengthen the corners;
- pieces of metal fittings 500-800 mm long;
- self-tapping screws;
- fasteners for plastic pipes (clamps);
- scotch;
- film;
- plastic pipes.
The pipe diameter can be any. However, for structures with a height of more than one and a half meters, it is advisable to take stronger pipes with a diameter of 20 mm.
2. Arrangement of the base of the greenhouse
The general fencing of the beds will serve as the basis. It is made from boards fastened with self-tapping screws into a rectangle.

Since the screws will be screwed at an angle, then get rid of their protruding hats it will be possible if you pre-drill recesses for them on the outside of the boards.
IMPORTANT! There are moles and other pests in the soil on the site, then it makes sense to put a frequent metal mesh under the frame of the greenhouse.
3. Along the long sides outside the base of the greenhouse, close to the boards at a distance of 40-60 cm from each other, pieces of reinforcement are stuck into the ground. 300-350 mm of the rod should remain above the ground. If fasteners for pipes (clamps) are available, then at this moment they should be fixed on the outer sides of the frame boards at the level of the pins stuck into the ground.
4. A plastic pipe is put on the pin with one end, bent and put on the pin with the other end from the opposite side.

5. Pipes are fixed in pre-installed clamps. There is also a cheaper option for attaching pipes to the greenhouse base boards. To do this, after installing the frame of pipes, it is attracted to the boards by segments of the metal mounting profile.

6. The resulting frame is closed with a covering material. The simplest fixative for the film can be pieces of boards laid out on top of the film overlaps on the ground along the perimeter of the structure. Despite the simplicity of such a solution, it is quite practical, because. allows you to easily open the desired side of the greenhouse for ventilation.
If desired, you can arrange a doorway at the end of the greenhouse. The basis for it can be wooden bars of a small section, installed vertically.
You can see another but not more complicated version of making a greenhouse with your own hands from plastic pipes in this video:
How to strengthen a greenhouse?

The need to strengthen the structure of the greenhouse arises before the onset of winter. The snow settling on the surface of the film will thaw and freeze with a very heavy crust. In addition to the timely cleaning of this snow, you can carry out the following activities:
- - installation of props from a wooden beam inside the greenhouse. Supports can be placed both in the longitudinal and in the transverse direction;
- - replace the covering material with a denser and more durable one;
- - add additional arcs of plastic pipes to the frame.
In general, a plastic pipe greenhouse is a very easy way to expand your agricultural capabilities. At the same time, the simplicity of the design allows you to install and remove such a structure as soon as necessary, without serious physical and material costs.
If you find an error, please highlight a piece of text and click Ctrl+Enter.
Own greenhouse is always convenient and profitable. When it’s still cold outside, and the vegetables in the supermarket are too expensive, you can serve food on your table by growing it yourself.
Greenhouses are now being built from different materials, but with the advent of innovative technologies, you can quickly and easily make a greenhouse out of PVC pipes.
Previously, old window frames and other similar household items were used to create a greenhouse. Currently, everyone has the opportunity to make a cheap but reliable design.
Choosing a place for a greenhouse
The convenience of work, lighting conditions and heat saving depend on the correct location of this design.
It is necessary to install the structure on a site that is well lit by the sun and also in an area protected from the wind. For example, you can build this structure between other buildings - this will help save heat inside the structure.
The distance between the buildings and the greenhouse must be at least 3 meters, otherwise they may obscure the structure.
The level of groundwater must be taken into account. If the personal plot is located in a lowland, then it will be necessary to build a foundation and a waterproofed basement. Therefore, when choosing a place for the construction of such a simple structure as a greenhouse made of PVC pipes, you should choose a small hill or plain.
Material selection
To create a greenhouse, an arched structure with doors and several opening windows from the end of the structure is usually used. This design is not intended for . Polyethylene film is used for the coating, this material is inexpensive, but it must be replaced every two years. You can install, giving the greenhouse reliability. To assemble the frame, you will need the following materials:
- PVC pipes;
- fasteners with different diameters (the larger the greenhouse, the larger the diameter of the fasteners must be used);
- ends;
- special clamping elements for polyethylene film;
- for fastening - PVC tees;
- self-tapping screws for fastening pipes and other elements;
- different PVC elements for corner adapters.
You will also need metal rod pegs that are driven into the ground so that the structure is stable and reliable. The distance between such supporting elements is not more than one meter, and it is necessary to drive in the rods to a depth of 25 centimeters.

The table calculates the amount of building materials required for the construction of a PVC pipe greenhouse
The choice of PVC pipes is based on the calculation of the required footage of this material. To build a small greenhouse, you will need pipes of this length:
- 190 cm (4 pieces);
- 68 cm (10 pieces);
- to create hinges 10 cm (10 pcs);
- 350 cm (2 pcs);
- 558 cm (4 pcs);
- 170 cm (2 pcs);
- 360 cm (2 pcs)
- 90 cm (4 pcs).
The choice of material for sheathing can be made in favor of polyethylene, reinforced film, spunbond, or others. Polycarbonate is a durable material, but it has a high cost.
The cheapest materials are polyethylene or reinforced film. If it is planned to change the material with which the frame is covered once every two years, then polyethylene can be used. It is cheap and can withstand small wind loads.
If strong winds prevail in the region, then it is better to use reinforced film, it is more reliable, although its cost is slightly higher than that of polyethylene.
Lutrasil and spunbond have a non-woven structure and many gardeners also use these materials to create greenhouses. They will perfectly protect plants from cold and wind, they need to be replaced once every two years.
Estimated Cost Calculation
According to the above calculations, you will need a little more than 70 meters of PVC pipe. Water pipes cost from 30 rubles. In hardware stores you can find similar products costing from 97 to 155 rubles, depending on the manufacturer (domestic ones are cheaper, imported ones are more expensive). For the construction of a greenhouse, you do not need to choose the most expensive PVC products, inexpensive products will do.

If you make a calculation, then it turns out that the pipes will need 70 meters x 30 rubles = 2100 rubles. To this amount should be added 400 - 500 rubles for tees, fasteners, corner transitions and self-tapping screws.
Polyethylene is an inexpensive material for covering the frame of a greenhouse. Let's say the size of the greenhouse turned out to be 6x2.4 m, then the polyethylene film will need about 30 m2 (standard width 3 m) - this is 10 linear meters. The cost of one linear meter of this material is 182 - 185 rubles per meter.
Reinforced film costs a little more - 240 rubles per meter. The rest of the materials are about the same cost. Accordingly, the material for covering the greenhouse will need from 1800 to 2500 rubles. As a result, the cost of materials for the entire structure is just over 5,000 rubles.
The technology of building a greenhouse from PVC pipes
Also you need to additionally fix the arcs on a wooden base using clamps in the form of the symbol Ω. This can be done with ordinary self-tapping screws 3-4 cm long.
Installation of doors and windows
On a wooden base in width, on the segment that will be the entrance, install two pegs of metal reinforcement. This is where the door will be attached. Now you need to do the following:
- draw a straight line up from the reinforcement and make a mark on the extreme arc (you will need a long wooden ruler, a marker of any color and a level);
- embed tees in the marked place. To do this, cut off a piece of pipe, attach a tee to get a segment with a tee at the top. It is necessary to manipulate the arc with extreme caution, since it is under load.
It will be good for the craftsman who builds the structure if someone helps in this work and can hold the arcuate segments.
Got a door. To make windows, you need to do the same in the right place. Hinges are screwed on one of the sides, on which a rectangle of fastened PVC pipes will be fixed - this is the door or windows itself. As canopies, you can use pipes, but of a smaller diameter, or you can use real canopies from the store.
A convenient and lightweight do-it-yourself greenhouse made of PVC pipes can be built within 2-3 days, without the need for expensive materials. For a simple assembly, you only need a standard set of tools, correctly made calculations and an exact scheme according to which the structure will be installed. For small household plots, the choice of plastic profiles for the greenhouse is the best solution.
Such properties of polyvinyl chloride pipes as strength, thermoplasticity, ability to withstand heavy loads, as well as resistance to thermal and chemical exposure, make them a popular material.

They weigh little, so the frame of the greenhouse can be moved around the site, and you can choose any coating - from a film to a polycarbonate sheet.
Choosing PVC pipes for the construction of a greenhouse, the owner of the site receives the following benefits:
- Ease of construction, which is important when moving and transporting without dismantling;
- Polyvinyl chloride is not afraid of high temperatures and is refractory;
- The plasticity of the PVC profile - it can be given any shape, bent and cut into the necessary segments;
- The resistance of the frame to high humidity, unlike metal, which rusts, and wood, which can rot.
The material tolerates high and low temperatures well, and their differences, which increases its wear resistance under environmental influences. As a result, plastic pipes can be used for 45-50 years in a row.
What kind of coating to use for a PVC pipe greenhouse
When making a greenhouse frame from plastic profiles, indoor shelves can also be made from the same material.

As for the coverage, it can be different:
- Polyethylene film;
- bubble construction film;
- Polycarbonate sheet or cellular polycarbonate;
- Three-layer reinforced film;
- Synthetic fabric.
Polycarbonate is attached to the frame using special thermal washers and self-tapping screws, and the film can be fixed using latches from the same PVC. The section of the profile, cut along the length, should be unbent, and its diameter should slightly exceed the dimensions of the frame pipes.
Do-it-yourself varieties of greenhouses made of PVC pipes: drawings
A finished greenhouse made at the factory is not cheap, so not every site owner can afford it.

Knowing certain rules and following the instructions, you can build a greenhouse with your own hands.
The frames of greenhouse structures made of plastic pipes have a different shape, and depending on it, all kinds of heating, humidifying systems and other equipment.
Main types:
- Wall greenhouse;
- Arched type, when the frame has a semicircular shape;
- Greenhouse in the form of a house with a gable roof;
- Polygonal complex shape.
The wall type is attached to the wall of a residential building from the south or southwest side. The wall of the house performs a protective function, protecting the greenhouse from strong and cold winds. On hot days, heating up from the sun's rays, it can play the role of a heat accumulator.
An arched greenhouse allows you to create a voluminous room, it is stable and reliable, and in addition, it has a minimum of joints.
The structure in the form of a house is resistant to external influences. In this case, it is recommended to make an increased angle of inclination of the slopes, which will improve the snowmelt.
The type of polygonal structure is similar to the arched one - it is difficult for self-construction due to the many connecting nodes.
For any type of PVC greenhouse, you will need to make drawings. When designing a structure, one must not forget that at least 50 cm of free space for air exchange should remain above the seedlings. For arched buildings, it is important to verify the optimal length of the arc. To do this, you can use the table of standard values.
Do-it-yourself PVC greenhouse construction
For a summer cottage, you can build a small greenhouse structure made of plastic profiles and polycarbonate.

The main stages of construction are:
- Foundation construction;
- Mounting the frame;
- Frame covered with polycarbonate.
If you do not want to make a concrete or brick base, you can limit yourself to wooden flooring. To do this, boards impregnated with a protective composition are installed on a leveled area, measured and fastened with self-tapping screws. Pieces of reinforcement are installed in the corners. The area under the frame is marked out every 90 cm and reinforcing bars are driven into these places from the outside.
Two pipes up to 3 meters long are connected with a cross and welded. This is how the inside of the greenhouse is obtained. To create external elements, straight single-plane tees are used instead of a cross. The ends of the pipes are inserted into the reinforcement pins, while they are bent, forming a semicircular frame.
To form a window opening, reinforcing bars are already driven in from the end. To make markings, a vertical line is drawn to the intersection of the arched pipe.
After that, it remains to measure the length from the top to the bottom of the pipe and cut off a piece of the required size. A connecting tee is welded to it, the arc is cut, and a tee is placed in the resulting hole. The pipe is fixed with a clamp. After creating the ventilation windows, the door is welded using PVC corners, and you can proceed to the polycarbonate coating.
Do-it-yourself greenhouse from pvc pipes (video)
When wood materials are used as a foundation, the structure cannot be used for a long time. Sometimes this is done to further transfer the structure to another location. The owner can always use more durable types of foundation and build them on their own. There is nothing difficult in such work. At the same time, plastic pipes remain the most profitable and durable material for the construction of any kind of greenhouses.
Examples of greenhouses made of pvc pipes with their own hands (photo)


Any summer resident will be able to build a greenhouse on his site - it is enough to make simple calculations, prepare the necessary materials and free yourself for one or two days from other activities in order to calmly and without haste to start construction. A small greenhouse made of plastic pipes with your own hands is built very quickly and simply, it requires very little effort and financial investment. The reward for your time will be the opportunity to enjoy your organic vegetables almost all year round.
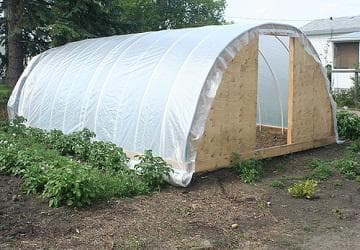
Arched greenhouse made of pipes and film
In terms of their quality and performance characteristics, plastic structures are not inferior, and in some ways even superior to wooden and metal ones. Plastic pipes are not subject to rotting, like wood, and corrosion, like metal. They are light and at the same time strong, do not weigh down the structure and do not require the installation of a complex foundation, and at the same time withstand heavy loads. Service life exceeds ten years.
Plastic is a flexible material and bends well, which allows you to independently give it the desired configuration without much effort. Thanks to this, it is not difficult at all to translate into reality any shape of a greenhouse made of plastic pipes with your own hands, for example, in the form of an arch, in the form of a house with a gable or shed roof, and even a complex geometric design.

Greenhouse made of pipes with a gable roof
Preparatory stage of construction
Before you make a greenhouse with your own hands from plastic pipes, you need to prepare its drawing and calculate how much and what material is required for construction. This will help you avoid overbuying.
Where is the best place to put a greenhouse
This question is far from being idle, since not only how the planted plants will develop, but also the amount of the crop grown depends on the installation site. For a greenhouse made of plastic pipes, it is advisable to choose an open and sunny area, where there is no shadow from trees and summer cottages.
With a lack of natural light, vegetable crops will grow slowly and develop poorly, which will require the organization of additional lighting.
It is best to place the greenhouse from east to west. In this case, it creates optimal conditions for plants, since it will be illuminated throughout the daylight hours.
Construction plan and calculation of the amount of material required
It is quite difficult for a non-professional to make a design drawing on their own. But this is not a problem, today you can find many ready-made projects, and on their basis, make the necessary calculations. Below is a drawing of an arch type greenhouse. Based on it, it is easy to make an approximate calculation of the material that will be needed for the construction of a greenhouse.

Scheme of a greenhouse made of pipes in the form of an arch
So, a greenhouse made of plastic pipes has a length of 6 m, a width of 3 m and a height of 2 m. For manufacturing you will need:
- fifteen plastic pipes 6 m long for the arch, screed, two gables and additional elements;
- boards or timber 6 m long for the base and thin wooden planks for fixing the film;
- crosses and tees for connecting pipes;
- polyethylene film for greenhouses 6 m wide - 36 m2;
- fittings 0.75 m long - 24 pieces;
- self-tapping screws, nails, corners, staples, plastic clamps, door hinges, hinges and handles.
In the above drawing, one pipe located in the center is used as a screed, however, to strengthen the structure, it is better to make the same screeds on the sides of the greenhouse. Front doors can be installed only on one side, and on the other, a blank wall with a window can be made.
When calculating the total length of pipes, add 10% for any unforeseen cases.
Requirements for basic materials
Plastic pipes come in different types, for greenhouses it is advisable to choose polypropylene or made from polyvinyl chloride (PVC). They are resistant to frost, do not deteriorate from exposure to high temperatures and withstand temperature extremes well. For a greenhouse, pipes with an inner diameter of 13 to 25 mm are suitable.
Since it is not necessary to install a foundation to build a greenhouse made of plastic pipes with your own hands, wooden boards with a thickness of 20 to 40 mm or a bar with a section of 30x30 mm are suitable for arranging the base. If a film is supposed to be used as a coating, then it is better to choose a reinforced one with a density of 120 to 200 g / m2.

Reinforced film for covering the greenhouse
A cheaper option is agrotex textile material, but it has a low degree of thermal insulation. Polycarbonate is considered the most durable and strong coating, but in this case the cost of the structure will increase markedly. Sheets with a thickness of 4 to 8 mm are suitable for the greenhouse.
How to prepare a place for future construction
To install a greenhouse made of plastic pipes, a flat area without bumps, pits and other irregularities is required - before building the base, it is necessary to prepare the site. To do this, you need to remove a small layer of soil a meter wider and longer than the future structure.
To make the structure more stable and durable, dig a trench around the perimeter. Its depth and width depend on the size of the board or beam, which should be half ruined into the ground. Pour crushed stone at the bottom, and then lay the roofing material.
You can check how even the site turned out with the help of a building level, if necessary, level the surface. The height difference should not exceed 5 cm. If there is a significant slope on the site, then the platform for the greenhouse can be leveled with boards, as shown in the photo.

Installing a greenhouse on a site with a large slope
The main stages of the construction of the greenhouse
After all the calculations have been made, the necessary materials have been purchased, the preparatory work has been completed, you can proceed to the construction of the structure.
How to make a base for a greenhouse
For the manufacture of the base of the home greenhouse, wooden boards are used. It is advisable to pre-clean them with a planer or sand them with sandpaper. It should also be noted that a tree without treatment with special compounds may rot over time. Therefore, be sure to cover it with protective antiseptic preparations that prevent decay processes.

wooden base
The wooden frame is assembled directly on the site prepared for the greenhouse. The boards are fixed together with galvanized screws or nails. If bars are used for the base, then they are connected without metal elements by cutting into half a tree.
Then the frame is installed in a trench and tightly covered with earth so that there are no cracks or gaps left. To strengthen the wooden foundation, it is recommended to additionally fasten the internal joints of the boards with steel corners.
To check the accuracy of the design, measure its diagonals, their length should be equal. To fix the frame, reinforcement is driven into each corner.
The protruding part of the metal rods must correspond to the height of the base. From the outer or inner side of the long boards, reinforcement is also clogged in increments of 67 cm, which should protrude 40 cm above the surface. The rods should be located clearly opposite each other.

Fastening boards from the inside
Making a frame from plastic pipes
There are several options for installing the frame. One of them:
- Take a plastic pipe and put one end of it on a metal pin driven into the ground.
- Fasten the other end to the opposite rod. You should get an arc.
- For strength, screw them on both sides to the wooden base with metal brackets.
Another option is to make a greenhouse out of plastic pipes with your own hands, as shown in the photo.

Greenhouse with a lower horizontal bar
For this:
- Cut the pipe into pieces 40-50 cm long.
- Put them on the reinforcement, and then, using plastic crosses, connect them to the horizontal guides and to the main arcs. Thus, a pipe will pass in the lower part of the greenhouse, which, on the one hand, will add strength to the frame, and on the other hand, will increase its height.
- Next, you need to install horizontal screeds in the center and on the sides of the structure. They are recommended to be made of rigid PVC pipes. They are attached to the main arched skeleton with plastic clamps.
- To strengthen the frame, it is desirable to install a wooden beam or a hard plastic pipe in the center of the greenhouse. One end of it needs to be ruined into the ground, and the other end should be supported by an arched structure.
How to install the ends of the greenhouse
Door structures can be made from pipes or from wooden boards. For convenience, it is better to assemble the doors separately, and then install the finished block on the front of the greenhouse.
You will need four plastic pipes. Two of them should have a length equal to the height of the door, the other two for the opening should be 10-15 cm higher. Also prepare three transverse strips 80 cm wide and one 10 cm wider.

Door assembly drawing
- Assemble the doors and opening with plastic corners and tees, as shown in the diagram above.
- To reinforce the door, you can also lay a diagonal bar from the middle to the bottom line.
- Put two tees on the extreme arched arc at a distance equal to the width of the opening, and fix the door block on it.
- If you want to make a window in the greenhouse from plastic pipes, you can assemble the opening for its installation according to the previous scheme. The photo below shows how the window is assembled.
- Before installing the openings in the main structure, wrap them with plastic wrap, which can be fixed to the pipes with self-tapping screws or double-sided tape.
Scheme of assembly of a blind opening with a window leaf
How to cover the frame with a film
- Distribute the plastic film over the entire structure of the greenhouse so that there is an even margin on both sides.
- Then, fixing the film with planks, nail it to the wooden frame. Fasten one side first, moving from the center to the corners, then stretch the material well and nail the opposite side as well.
- Lastly, take care of the blind ends of the greenhouse. To fix the film instead of planks, you can use a furniture stapler.
So that the film does not inflate from the wind and fits more tightly to the frame, it is recommended to additionally fix it on the pipes. This is especially true in cases where the greenhouse is covered with ordinary, and not reinforced, film. To do this, you can use special clips, a piece of flexible hose or a small piece of the same plastic pipe cut along. Pipe clamps and stationery clips hold the film well.

Possible options for attaching the film to the frame
Covering the greenhouse with polycarbonate
Covering the greenhouse should begin with the end parts. After assembling the openings, take the necessary measurements, lay out the polycarbonate on a flat surface and cut off the pieces of the desired size with a small margin. Sheets can only be installed in a vertical position, keep this in mind when you take measurements.

First, the end parts of the structure are covered
- Remove the protective film from the inside of the material and fasten it using special roofing screws with thermal washers to the door block, vents and blind parts of the ends of the greenhouse. Tighten very carefully so as not to damage the material. Cut off excess polycarbonate with a knife.
- To cover the rest of the arched structure, screw the polycarbonate to the wooden base on one side.
- Then carefully lift the sheet up and simultaneously tighten the screws on the plastic pipes every 60-70 cm.
- On the opposite side of the greenhouse, also fix the cover to the wooden frame.
- The next sheet of polycarbonate is overlapped on the previous one and fixed with self-tapping screws.

Installation of polycarbonate sheets
You can learn more about how a greenhouse is assembled from plastic pipes with your own hands in the video.
To make a greenhouse from plastic pipes with your own hands, it is not necessary to have special skills and be a professional builder. Having all the necessary materials available, you can build a shelter in just one or two days.
By making a greenhouse on your own in the country, you will not only save money, but also get a reason to invite friends to appreciate your work. And most importantly - from early spring until late autumn you will have vegetables grown at home on the table.
Durable and inexpensive PVC pipes began to be used in agriculture as a material for a greenhouse frame. However, due to distrust of plastic, even those who have old stocks of PVC pipes left, they are neglected, preferring metal or wood. And as practice shows, it’s completely in vain - subject to certain reliability conditions of such a design, it is enough for a self-made greenhouse made of polycarbonate and plastic pipes to withstand 5–8 years of operation.
Greenhouse project made of pipes and polycarbonate
PVC pipes have many advantages: first of all, they are much cheaper than the same rolled metal or wood. At the same time, the material surpasses them in many technical properties - for example, in durability, density, weight. It also does not have such problems as corrosion and decay, and the coefficient of thermal conductivity, which is lower than that of metal, allows you not to worry about the safety of the covering material in the heat.

Installation, thanks to a large selection of standard sizes, is a simple matter that does not require special tools or many years of experience. Do-it-yourself repair of a greenhouse made of PVC pipes is also simple - without inviting a specialist, you can quickly replace any damaged area.
As for the minuses, there are also enough of them, and the light weight of the structure, which is the reason for the high windage, should be attributed to the first drawback. To prevent tearing of polycarbonate by wind or distortion of the greenhouse due to wind load, the frame must be installed on the foundation, and the pipes themselves must be rigidly fastened to each other.

The cross connection is reinforced with self-tapping screws
Opponents of the use of such material for greenhouses also argue that it quickly becomes brittle in the sun, and therefore the frame becomes unusable by the next season.
This is partly true - old-style PVC pipes have low light resistance, which means that they can really crumble into small pieces after 2-3 years. Modern material due to special additives in the composition is more stable with respect to ultraviolet radiation.

Sliding roof model
Often there is an opinion that such a frame will not withstand any other coating other than film or spunbond. In fact, if it was not possible to achieve its optimal rigidity, it is better not to use polycarbonate, since any loosening of the frame, especially in the fastener area, will lead to cracking or complete destruction of the sheet, which, as you know, cannot be restored by anything.

To increase the UV resistance of the pipes, wrap them with wide electrical tape
Master class on the construction of an arched greenhouse
If you make a greenhouse exactly according to the instructions, you will get a structure 3.5 m wide, 3.6 m long and about 2 m high. However, you can vary the length according to your own requirements by increasing the length of the foundation and adding the required number of arcs.
In terms of time, the construction takes no more than one full working day, and the cost of a do-it-yourself greenhouse made of PVC pipes will be at least two times lower than a purchased counterpart.

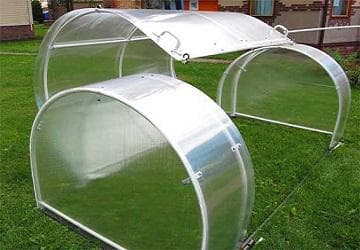
Mini-greenhouse made of pipes and polycarbonate
Getting Started - Building the Foundation
Properly made foundation is one of the key factors in the durability of the greenhouse. Since polycarbonate as a covering material implies its multi-season use, shallow point supports are not suitable for the task, and a strip base must be prepared. The strapping in the form of a wooden beam is laid on a sand cushion.
The foundation of the timber will significantly strengthen the structure
Before you start building, prepare the following materials:
- a bar made of pine or spruce with a section of 100x100 and a length of 3.6 m - 2 pcs.;
- the same beam 3.5 m long - 2 pcs.;
- metal brackets or threaded studs for fixing the frame - 8 pcs.;
- sand-soil mixture for a pillow - the amount depends on the type of soil on the site;
- antiseptic impregnation - its quantity and type depend on the quality of the wood you have.
The laying of the strapping for the polycarbonate greenhouse consists of several successive stages:
- Choosing a place and marking it out for the foundation - to facilitate the process, use pre-prepared lumber, setting right angles and aligning the geometry of the rectangle with a tape measure, twine and wooden poles.
- Excavation - dig a trench 10-15 cm deep, pour into it and compact the sand mixture, forming a pillow, 5-10 cm above the soil level.
- Laying the strapping - on a perfectly flat area, assemble the base of the future foundation, joining the beams into a paw or half a tree.
- Checking the accuracy of installation with a level - make sure that all points of the foundation lie in the same horizontal line, as this is important for the trouble-free laying of polycarbonate.
- Fixing the beams - fasten the joints of the lumber together with self-tapping screws, studs and brackets.

Finished wooden base
If your site is dominated by poorly drained soils, and the level of groundwater is high, the piping must be laid in the form of a grillage on supports made of brick, screw piles or concrete blocks.
In this case, the foundation must be fixed with anchors on the bearings, and in all subsequent calculations of materials, changes in dimensions due to the height of the grillage must be taken into account.
Consumption of plastic and fixing materials
The undoubted advantage of plastic pipes is their flexibility, thanks to which manually bending an arch of the desired size does not seem to be something daunting. If necessary, the process can be simplified even more - by installing a greenhouse in hot weather or by slightly heating it with a building hair dryer.
So, what materials, and in what quantity, will be needed to create a PVC pipe greenhouse with your own hands according to the drawing:

Greenhouse scheme for calculation and installation
- A - PVC pipe with an inner diameter of 25 mm, a wall thickness of 2.4 mm (PN 16), a length of 3.5 m - 2 pcs.;
- B - PVC pipe 3.6 m long - 2 pcs.;
- C - PVC pipe 5.8 m long - 5 pcs.;
- D - PVC pipe 0.9 m long - 4 pcs.;
- E - PVC pipe 1.9 m long - 4 pcs.;
- F - PVC pipe 0.68 m long - 10 pcs.;
- G - PVC pipe 1.7 m long - 2 pcs.;
- H - PVC pipe 32 mm (1–1/4″) 0.1 m long - 10 pcs. (will be used as hinges);
- I - clamps for covering material (if at first the greenhouse will be covered not with polycarbonate, but with a film);
- J - plastic tee for 1″ pipe - 30 pcs;
- K - angle tee - 4 pcs.;
- L - corner transition (90 ″) - 8 pcs.;
- M - metal reinforcing bars of class A1, 500 mm long - 10 pcs.;
- W - self-tapping screws 20 mm - 120 pcs.;
- Z - adhesive for plastic surfaces.

Scheme of the door frame and doors
If there are doubts about the rigidity of the structure, supplement it with two side ties. In this case, the number of pipes B will increase to four, and six crosses and four tees will be added to connect them to the transverse arches.
How to build a frame from plastic pipes
A greenhouse is assembled from PVC pipes like a children's designer - by sequentially collecting individual elements into nodes, which are then connected to each other. For ease of assembly, tees can be modified by boring them in such a way that the pipes pass through them. You can fix them with ordinary galvanized screws.
The assembly algorithm looks like this:
- Close to the foundation at a distance of 90 mm from each other, drive in the reinforcement to a depth of 300 mm, thereby fixing the base on the site.
- After laying pipes B next to the foundation, mark the places for fixing the tees.
- Install the tees in the marked locations on pipes B and in the center on future arches C.
- Lay pipes A as they will lie in the finished frame, and symmetrically about the center, mark the position of the tees for fixing the door and window frame (the distance between them is 68 cm).
- Firmly attach the ridge pipe segments to the sockets of the tees.
- Bend pipe C and slide both ends of it onto the reinforcing bars. Repeat the process to mount all the arches, connecting the ridge tubes and, if present, the side rail tubes with tees.
- Using a string stretched between the extreme arcs, check if the arches differ in height. If so, adjust them to the same level.
- Pull the reinforcement with the arches put on it to the wooden base with metal clamps.
- Make sure the resulting structure is rigid and, if necessary, reinforce it with additional stiffening ribs made of wooden or plastic planks.
- Firmly fix the attachment points with self-tapping screws.

Making a latch for doors
An important condition for the installation of the greenhouse frame is to strictly maintain the horizontality of all the upper points of the greenhouse and the verticality of the arched supports. Only in this case you will be able to lay polycarbonate sheets quickly and evenly.
Production of a door and a window of a greenhouse
At this stage, it is necessary to build a door and a window, which will be part of the ventilation system. Make them for an arched greenhouse with your own hands from PVC pipes - the photos with assembly diagrams posted above will help you with this. Perform assembly on a flat surface and at each stage control the squareness of the corners of the structure.

The window is important for ventilation
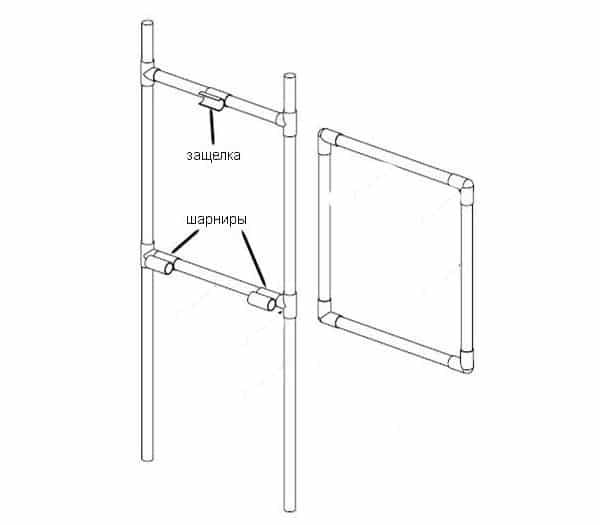
First, assemble the door frame:
- Lay 2 pipe sections E parallel to each other at a distance of 68 cm.
- Put two hinges on one of them (the side of their placement determines whether the door will be left or right), and on the other - a latch.
- At a distance of 200 mm from the top edges of pipes E, install two tees J, one for each pipe.
- Insert pipe F into the tees.
Diagram of the window frame and vents
The door frame is ready, now it remains to mount the door itself:
- Place a tee J on each pipe G.
- Insert one of the pipes into the hinges of the door frame.
- Connect elements G to pipe cross sections F with tees J and corner adapters L.
It is possible that it will be convenient for you to assemble the door frame and the door together after they are sewn up with polycarbonate.
To make a window frame and a window, use the same technology:
- Place tees J on pipes E, with one pair at a distance of 880 mm from the top edge, and the second at a distance of 200 mm.
- On one of the remaining pipes F, pull two hinges, on the other - a latch.
- Insert pipes F horizontally into tees J.
- Separately, from 4 pipes F, using the corner transitions L, assemble a square - it will serve as an opening window.

Finished frame
Assemble the window and door frames with the help of hinges (to do this, temporarily remove one of the fittings, insert the pipe into the hinges and put the fitting back in place). Test their operation in a horizontal and vertical position. In the presence of gaps, distortions and overlapping of parts on each other, eliminate defects by aligning the position of the connecting elements. After that, secure all connections with self-tapping screws.
Polycarbonate laying - the subtleties of installation
Cellular polycarbonate has earned a lot of laudatory reviews, but it also caused enough complaints, and all because many builders neglect the basic installation rules. Lightweight and durable sheets require strict adherence to the rules, otherwise the material will not last the 10-15 years promised by the manufacturers.
On the video offered for viewing, the master covers the greenhouse made of PVC pipes with polycarbonate with his own hands. At the same time, he focuses on the main features of the process:
- the thickness of the material should be at least 4, and preferably 6 or 8 mm;
- for reliable fastening, it is necessary to use special thermal washers;
- it is important to immediately find out which side of the sheet is UV-stabilized - usually, the manufacturer marks it on it;
- polycarbonate must be placed vertically with honeycombs, carefully closing all ends of the web with sealant or U-shaped profiles (but not with adhesive tape!);
- during installation, it is impossible to allow the screws to be undertightened or, conversely, to cut the material due to overtightening;
- it must be laid on a flat surface, leveling it where necessary, using wooden slats of appropriate thickness.
First, clad with polycarbonate and install door and window frames, as well as doors and vents. After that, sheet by sheet, lay and attach polycarbonate sheets directly to the arches. Between the panels connected by profiles, leave a gap of up to 5 mm to compensate for their thermal expansion.

Pipe shelving
In view of the high cost of polycarbonate sheets, it is quite rational if a trial period is arranged for the plastic structure, temporarily covering it not with polycarbonate, but with a greenhouse film.
Over a short period of operation, you will be able to identify the weak points of the greenhouse and evaluate the cost-effectiveness of replacing the coating with polycarbonate. So, with minimal risk, you will get a reliable, and most importantly, inexpensive greenhouse made of polycarbonate and plastic pipes.
If you want to speed up the process of organizing covered ground, buy a ready-made greenhouse or seek help from specialists.


