Do-it-yourself barrel bath using frame technology. Do-it-yourself bath in the form of a barrel
The construction of a capital bath is not cheap and long-term. But there is an option that you can do yourself in a few days (if you have at least some experience in construction work). Bath-barrel - a budget option for a small bath / sauna. Moreover, the building itself has an unusual and attractive appearance, so there is no need for exterior decoration.
The dimensions of the bath-barrel can be from 2 to 6 meters. The smallest ones consist of a single room - a steam room with a stove installed in it.

Larger structures can also have a washing room and a rest room, sometimes a porch with a canopy is attached to the bathhouse. There are, in fact, a lot of options.

For the manufacture of barrel baths, you can use wood of different species, but since it will be used in the most unfavorable conditions (precipitation, sun or frost outside, steam, high temperatures and humidity from the inside), it is best to use wood varieties that are resistant to moisture. These include, first of all, cedar and larch. Although they cost a lot, the costs pay off due to the long service life of structures made of these rocks.
In the manufacture of bath-barrels, an edged board with a thorn-groove connection is used.

Some companies can make a special kind of recess in the form of a part of a circle. Such a connection is convenient to use when assembling a round structure.

If you use a connection of the usual type, then you need to take boards of small width so that they "fit" into the circle.
The weight of the structure is not very large and the structure does not require a special separate foundation. All you need is to find a flat, solid platform on which to install the bath, and make a base that will hold the round structure. That's all.
As a platform, you can use a concreted, asphalted area lined with paving slabs, just a well-compacted and leveled area covered with turf.


The base is made of high quality edged boards, at least 5 mm thick. Supporting cross boards should be installed at a distance of no more than 1.5 meters, so their number depends on the size of the bath. A rounded notch is cut out on the transverse parts, which follows the contours of the future bath. The contours are applied using a pattern cut from a dense material. The rest of the board should be at least 10 cm wide.
The prepared parts are connected with screws, additional structural rigidity will be given by metal corners screwed at the corners or at the junction of the longitudinal and transverse parts of the base (depending on the design).

Important! Do not forget to treat all parts with impregnation or other protective agent before assembly. After installing the barrel, this will be very problematic.
Assembly of bath partitions
The next step is to assemble the partitions. End wall boards are attached to several base bars. When assembling partitions, do not forget to leave an opening for installing a door (doors, if there are several rooms) and a window. All boards must be treated with a special impregnation for the bath.
Everyone chooses the diameter of the barrel himself, based on the composition of the family, or those who will bathe in the bath. Please note that it is uncomfortable to be in very small rooms, and it will take a long time to heat too large rooms.
Several boards of the required length are laid out on the prepared base, connecting them according to the tenon-groove method. When a certain part is assembled, sufficient to install the end partitions, they are installed and fixed. Then they continue to collect boards around them, completing the circle.

Nuance! In order to make partitions easier to install, grooves are cut out on the longitudinal boards in certain places on the inside, equal to the width of the partition board. They then install a finished partition.

To ensure the rigidity of the structure, it is desirable to pull the finished barrel with iron hoops. To connect the parts of the hoop, iron clamps are used (preferably on both sides). Then, during the operation and drying of the wood, the clamps can be tightened, making the gaps minimal.
A video on how to assemble a barrel bath with your own hands: a man collects and his wife helps him.
Internal equipment of the bath-barrel
The main thing in such a bath is comfortable shelves. They are recommended to be made from linden or aspen. What else needs to be done in such a bath is the floors. They need to be laid at a slight angle so that the water flows into the place allotted for it. To improve air circulation, you can put a wooden grate on the floor, with a distance between the boards of at least 1 cm. In this case, the feet will be warm and dry, and the water will flow without obstacles.
Where to divert water - depends on each specific case. If there is a sewerage system on the site, organize the drainage of water into the pipe branch (so that an unpleasant odor does not leak, put a special valve), if there is no sewerage on the site, you can arrange a drain pit into which water will be drained.
If you use the bath only in warm weather, then there is no need to insulate it. If year-round use is expected, then it is better to insulate with modern roll materials, but then it is necessary to additionally take care of vapor barrier and interior decoration of the entire room.
And one more important nuance: which stove to put in the bath-barrel. There can be only two options: either an electric heater or a small wood-burning stove. When installing the stove, do not forget to carefully and reliably protect the wooden walls, floor and ceiling near it, the place where the chimney exits (when using a wood-burning stove).

Exterior finish of the bath-barrel
The last necessary step is the installation of the roof. You can make just a soft roof, or assemble a simple truss system, on which you can then mount the roofing material.
When installing a soft roof, the upper part of the barrel is covered with a waterproofing material, on which soft roofing material (roofing material or bituminous tiles) is laid on top. For the manufacture of rafters, bars with a section of 50x50 mm are used, and as a roofing material, you can use corrugated board or metal tiles (placed on the crate).

From the outside and from the inside, the barrel-bath can be treated with linseed oil, or you can. What to handle, everyone decides for himself, based on his views and preferences.
A barrel bath is assembled in a maximum of a few days, and it can delight you and give you health for years. A very good option for country use and not only.
Is it difficult to get to the site and there is no way to order a ready-made bath-barrel? Not a problem! You can order a bath in disassembled form, i.e. assembly kit. It includes absolutely everything except electrical wiring. Those. and the stove, and the water tank, and all the shelves-windows of the ladder - all this will be. You will only have to follow the instructions as a designer to assemble a finished bath. Ready?
In this article, we will consider with you detailed step-by-step instructions for assembling a barrel bath. There is nothing difficult in this. To assemble such a wonderful bathhouse, you will need 2 assistants, a little patience and a certain tool. And if you have any questions along the way, our master will always answer them and advise you by phone.
Barrel bath assembly tool
- Kuyanka
- A hammer
- Small sledgehammer
- screwdriver
- jigsaw
- tassel
- Open-end wrench M 14
- grinder
Assembling a barrel bath step by step
Step 1
We collect the carriage of the bath-barrel.
We install the base legs on a flat surface at a distance of sawn locks in profiled boards. If there is a veranda, an additional leg-base is installed at a distance of 100 mm from the edge of the entrance to the bath-barrel.
Step 2
We fasten the central board "Bottom" in the center (according to the marks on the legs) to all
bases with self-tapping screws 5 * 70 mm (2 self-tapping screws in each base).
Pre-drill holes for self-tapping screws with a 5 mm drill.
 Important!
The central board "Bottom" must be strictly oriented, since it already has drain-vent holes D 50 mm

Step 3
We collect the bottom of the bath:
On the left and right sides of the central board “Bottom”, on each side we lay 6 short (if there is a veranda - long) boards, knocking the boards with a rubber mallet so that there are no gaps.
We fix all 12 boards to the bases with 5 * 70 mm self-tapping screws and one 6 * 120 mm self-tapping screw to the adjacent board in each compartment (in the steam room, washing department and locker room).
When screwing in 6*120 mm self-tapping screws, it is necessary to control the entry angle so that the self-tapping screws do not come out through on the next beam.
If there is a veranda we fix the base leg under the veranda through two boards(at two points to the left and right of the central board so that the next board covers the fixing screw).

Step 4
We paint the grooves for the bottoms with a colorless antiseptic base.
The coating must be applied at a temperature not lower than +5 C

Step 5
We install the carriage strictly horizontally in level (to avoid skew
doors after installation of the bath)

Step 6
We install the transverse walls of the bath (2-3 people will be required for installation):
- We install a blank wall on the bottom of the bath with bars inside the steam room.
- We install walls with doors on the bottom of the bath so that the doors open outward.
- We temporarily fix (for stability) the entire structure with two boards on the left and right and two boards on top.
If there are markings on the part of the remaining boards (the letter “k”), these boards must be used for fixing boards. - We check the correct installation of the walls according to the level (vertical and horizontal).
- We fix each wall from below with two self-tapping screws 5 * 70 mm at an angle of 45 degrees to the base to prevent its shift during the installation of boards.

Step 7
We install two short boards on each side of the bottom of the bath, knocking the boards with a rubber mallet so that there are no gaps.
We fasten one board on each side with 5 * 70 mm self-tapping screws to the transverse walls

Step 8
Installing the rest left and right boards in a circle to the middle of the bath and
fasten on each side with self-tapping screws 5 * 70 mm to the walls, after which we bring and
we place (without installation) shelves in all departments.
Step 9
We control the straightness of the installed boards.
Boards must be installed straight without bulges or concavities..
Step 10
We install all the other left and right boards in a circle to the very top
baths, knocking out the boards with a rubber mallet so that there are no gaps.
We fasten with self-tapping screws 5 * 70 mm to the transverse walls of the bath-barrel.

Step 11
When installing the last boards, we simultaneously install the “Top” board (it consists of two parts).
Due to the different density of fit of the profiled boards to each other in a circle during installation, the width of the board "Top" (consists of two parts) may be excessive.
Steps to Install the Top Board
- We determine the size of the gap under the board "Top", for which we lay out the last
boards without attaching them with screws. - If necessary, we dissolve one of the two boards "Top" with a circular
saw along to obtain a board of the required size. - We collect from all the boards a “mound” on the roof.
- Evenly with a mallet we compare the "mound" along the entire length of the roof. The boards are in tight engagement.
- We attach all the boards with 5 * 70 mm screws to the bottoms.
- We align the top two boards and fasten them with stainless steel plates for
shear exceptions (especially in the places of the visor and veranda)


Step 12
We grind the ends of the bath

Step 13
We process the outer surfaces (bottoms + sides)
We process the surface in two stages:
- colorless antiseptic base,
- antiseptic of the desired color.
The coating is carried out in one layer with an interval of 12 - 24 hours. Drying 24 hours. Under the roof we cover only with a colorless antiseptic base. The coating must be applied at a temperature not lower than +5 C
Step 14
We install steel ties (hoops).
note to:
a) the hoop does not get under the installed chimney of the stove on the roof. The distance from the left and right edges of the bath to the hoops should be 150 mm. We install the remaining hoops at the junction of the profile and the bottoms, thereby blocking the junctions of the bottoms with the profile. If the compartment is longer than 1700 mm, we install an additional hoop in the middle of the compartment.
b) the hoop did not close the drain holes under the bath.
c) the locks of the hoops must be at the bottom from different sides (each one alternates) at a height of 700 mm from the floor.
The direction of rotation of the pin of all locks is the same for tensioning (clockwise) and loosening (counterclockwise) hoops. Use a 14 wrench to rotate the pin.


Step 15
We install shelves in the steam room (2 pieces) and the locker room (2 pieces). We install the shelves according to the level on the bars mounted on the transverse wall. We fasten to the bar with self-tapping screws 5 * 70 mm


Step 16
In the middle of each shelf with a length of more than 1000 mm, under the middle bar, we fasten a bar for additional support in order to prevent the shelf from deflecting under load. We fix the support to the floor and the shelf with self-tapping screws 5 * 70 mm

Step 17
To the base of the rear transverse wall on the bars we attach a refractory flame plate for thermal protection (600 * 1200 mm + 600 * 600 mm), the distance between the bars should be 300 mm.
In this case, the distance from the edges of the plate to the shelves should be the same

Step 18
We install the base for the stove from flam stove and stainless steel.
The base for the stove is laid flat on the floor in such a way that the edge of the base and the cut of the stove behind the stove coincide. We fix the base to the floor of the bath with screws

Step 19
We cut a hole for the chimney above the stove with a jigsaw. To do this, it is necessary to install a stove in the steam room, put a chimney and circle a place for a slot around it with a pencil. The diameter of the hole depends on the model of the chimney, in the standard version it is 205 mm. Please note that the center of the circle for the chimney slot may not coincide with the junction of the boards.
We make a mark of the center with a pencil. We measure the distance from the bath partition to the center of the hole for the chimney and mark it with a pencil. We mark with a pencil from the resulting center a circle with a radius of 100 mm.

Step 20
Roof installation:

That's all. Now you can assemble the barrel bath. All that remains is to install a wood-burning stove inside, lay out stones, pour water into the tank and flood it. A cedar bath heats up quickly - in summer it will warm up in 30-40 minutes, and in winter in 1-1.5 hours. While the stove is heating, water is heated from the chimney in the tank. Take a phytocollection, steam a broom - and a light steam for you!
No related posts
The construction of a full-fledged bath building on a summer cottage used in the summer is not always advisable, since the costs of its manufacture are quite high. Sometimes it is preferable to use the budget option of a bath, made from scratch in just a couple of days. At the same time, externally, such a structure can have a completely finished and attractive appearance (due to the use of special methods of exterior decoration).
In the article we will talk about how to make a barrel bath with your own hands, what materials to use, as well as drawings, diagrams, photo and video instructions.
The longitudinal dimensions of such structures range from 2 to 6 meters; moreover, the smallest buildings usually consist of only one steam room with a stove.
Buildings of large dimensions may include a washing room, a rest room, as well as an impromptu porch with a canopy.
Material

To build a barrel bath, you can use wood from such well-known species as fir, spruce or larch. Taking into account the special operating conditions in the summer cottage (precipitation, sudden changes in outside temperatures, as well as high humidity), it is best to use moisture-resistant types of wood. These species include cedar and larch, the high cost of which fully pays off with the possibility of their long-term operation.
 As for the shape of the blanks for the manufacture of an impromptu bath, then a well-planed edged board with a special “thorn-to-groove” connection can be used as such.
For the convenience of assembling the structure, it is desirable to give the typesetting elements rounded outlines by selecting a part of the material according to a special template. When using ordinary flat boards, workpieces of small width should be selected, the radial size of which allows you to bring the shape of the structure as close as possible to a circle.
Base

There is usually no need for a foundation. It is enough to prepare a flat area and place a special base on it, which serves as a reliable support for a rounded structure.
As such a platform can be used:
- fully concreted or asphalted area;
- concreted platform with paving slabs laid out along the screed;
- an ordinary well-compacted soil surface with a wooden shield laid on it;
In addition, an old reinforced concrete slab of a suitable size can be used to prepare a flat area.

When assembling the support base, try to adhere to the following recommendations:
- For its arrangement, a high-quality edged board with a thickness of at least 5 cm, pre-treated with a special impregnation or any other compound that protects the wood from decay, should be used.
- The distance between the transverse supporting boards should be no more than 1.5 meters, and their total number should be selected based on the size of the bath.
- During the assembly process, a rounded recess is made on the cross-beam boards, exactly repeating the contours of the structure installed on them (when preparing the recess, be sure to ensure that the unselected part of the board is at least 10 cm on each side of it).
- To give the structure additional rigidity during the assembly of the structure, metal blanks should be used that are installed in the corner joints and at the junctions of the individual elements of the base.
Assembly order

The assembly of the body of the bath begins with the installation of partitions fixed on the cross members of the base. When arranging them, one should not forget about the special openings intended for the installation of door and window blocks, as well as the treatment of wood material with a special protective impregnation.

Then, several boards of the required length are laid on the already finished oval base, interconnected by the “thorn in the groove” method. Upon completion of the preparation of a part of the circle sufficient to fix the end partitions, the latter are installed in place and securely fixed. After that, you can safely continue to form a circle from the boards based on the partitions.

The required rigidity of the construction of the bath-barrel is provided through the use of tightening metal hoops. For reliable adhesion of the enclosing hoops, special iron clamps are used, through which later (after the wood has dried) it will be possible to tighten the structure, preventing the formation of cracks.

As for the exterior finish of the building, its function can be performed by a traditional soft roof mounted on the upper sector of the bath. When arranging it, this part of the barrel is first covered with a waterproofing material (polyethylene film, for example), and then covered with roofing material or bituminous tiles.
Video
Bath barrel assembly:
A photo
In the photo you can see the various executions of the barrel bath:


Scheme
And now, you can familiarize yourself with the diagrams and drawings for the manufacture of a barrel bath:


A barrel bath is a truly unique invention that organically combines the healing properties of an ordinary bath, the beneficial qualities of natural wood, mobility and maximum convenience of a collapsible design.
Subject to competent assembly, a bath in the form of a barrel turns out to be very reliable and as durable as possible. Such a design can be attached to a car without any problems and taken to any desired place.

The bath has a small volume and warms up in the shortest possible time. Despite its modest size, such a steam room can be equipped with all the necessary devices for a full and most comfortable rest. At the same time, you can handle the assembly of the barrel on your own.


Mobility
The bath can be transported or even rolled (transferred) manually with the help of several friends. The weight of the bath-barrel is on average 1.5 tons, so it will be possible to handle the transportation of the structure over short distances manually, and almost any machine is capable of pulling such a weight.
For comparison, only a brick oven for an ordinary bath can weigh much more than 1500 kg.

High warm-up rate
In warm weather in such a bath in half an hour it will be very hot.
compactness

The average area occupied by a bath in the form of a barrel does not exceed 10 m 2, so this design is ideal for placement in small areas.
original design
The bath has an attractive and very pleasant appearance. Psychologists around the world say that the contemplation of rounded shapes helps a person to relax, and this is very useful when visiting a bath.
frugality
You will spend much less money on assembling a bath in the form of a barrel compared to building a capital steam room of a similar area.
Also among the advantages of the considered design should be attributed the absence of the need to equip the foundation. For a stationary installation, it will be enough to prepare a pair of strong beams, rigidly and securely connected to each other, and install the barrel on them.
Extreme ease of maintenance and operation
Fewer corners - less dirt in hard-to-reach places, less area - less cleaning hassle.
Ergonomics
Even with a modest area inside such a bath, you can equip a shower, a dressing room and all the necessary equipment. On average, a barrel bath can accommodate 4-8 people.


Thanks to high-quality thermal insulation and multi-layered barrels, the effect of a thermos is created inside such a bath, which can significantly reduce fuel and electricity costs.
The averaged data of numerous calculations show that, thanks to the round shape alone, 20-30% less money will be spent on the operation of a barrel-bath than on the maintenance of an ordinary steam room.
What materials are used to make a bath-barrel?
With the assembly and further operation of the barrel, there will be no problems and difficulties if you initially pay due attention to the choice of suitable materials.
To assemble the bath, use only well-dried and correctly sawn wood into pieces of a suitable size. Choose the type of wood according to your preferences and material capabilities. It is recommended to give preference to oak, linden, pine, spruce, and cedar.
The optimal width of the boards is 9 cm, the thickness is 4-5 cm. It is desirable that the wooden boards initially have a tongue-and-groove connection - this will allow you to assemble the structure with the least amount of time and effort.
But even if such spikes and grooves are absent initially, make the said connection yourself. It allows you to get durable, reliable, stable and durable prefabricated systems, which, if necessary, can be repeatedly disassembled and assembled without compromising the performance properties of the structure.
Additionally, you need to purchase or make your own a few strong steel hoops. These products will provide additional fixation of the barrel around the entire perimeter.
All the required devices are purchased without any problems in specialized stores that sell various products for baths and saunas.
Calculate the required number of metal hoops and wooden boards individually according to the size of your future steam room. Typically, the length of such a barrel varies from 250 to 500 cm. Additionally, this design can be equipped with various extensions.
A bath in the form of a barrel, if it is planned to be used throughout the year, needs to be equipped with high-quality thermal insulation. Traditionally, mineral wool materials are used for insulation.


The top of such a steam room can be decorated at your discretion. Here, focus on personal preference. The main thing is that the roof reliably protects the bath from adverse atmospheric phenomena and ensures effective and timely removal of moisture.
Barrel bath assembly guide

Ready-made kits for assembling the barrel are available for sale. Prefabricated elements have a variety of sizes, so you can easily choose and buy the right material. This will save time and energy.
Also, all the necessary structural elements can be made by hand. The assembly of the barrel is carried out in the following sequence.

First step. Make the base of the steam room. Saw a board measuring 5x20 cm into pieces according to the diameter of the barrel. Place the supports in increments of up to 150 cm. Determine the specific number of supports individually in accordance with the length of the structure.
To connect, cut grooves in the upper ends of the boards. The shape of such grooves should follow the circumference of the barrel. Determine the dimensions of the grooves so that the remaining uncut part of the board has a width of 100 mm or more.

Second step. Collect the required number of internal partitions, as well as the end walls of the future bath. For assembly, use a grooved board. The connection of wooden boards is carried out using transverse bars. Fix the transverse bars themselves in such a way that in the future they do not interfere with the installation of windows and doors.
In ready-made kits, the necessary end elements are sold assembled, which is very convenient.
Third step. Cut the grooved board according to the length of the barrel. Sand the ends of the elements, and then treat the boards with antiseptic impregnation.
Fourth step. Install the supports with the same pitch. Lay out the bottom of the bath-barrel on them from several wooden boards connected using the tongue-and-groove method. As soon as a sector of the circle is formed, the size of which would be sufficient for the installation of the end walls, place these walls in the appropriate places and continue laying out the boards until the circle is completed.

Fifth step. Fasten the assembled barrel with metal hoops.
Sixth step. Install windows and doors.
seventh step. Set up the roof. A reliable option is a roof on rafters. To create rafters, use a beam with a section of 5 cm. You can cover such a roof with corrugated board, metal tiles or other similar material. Attach the finish coat to the pre-assembled plank batten.

If the bath will be visited only in warm weather, insulation can be abandoned. The design of the steam room is such that it can warm up enough in about half an hour and retain heat for 2-3 hours, and this time is enough for most visitors to the steam room.

In conclusion, it remains to treat the outer surfaces of the walls with a fire retardant, and the inner ones with an antiseptic, then you can proceed to the internal arrangement of the steam room.
Internal arrangement of a mobile bath

Inside, such a bath can be equipped like any other steam room. It even has enough space for a small dressing room and a compact shower.
When choosing a stove, focus on modern electric models. Such units do not take up much space and do not need a chimney. For a barrel bath, a 6 kW electric heater will be more than enough. However, such furnaces are capable of producing exceptionally dry steam.

If you don't like it, give preference small metal wood stove. Choose a specific model and dimensions of the structure with a focus on the volume of the steam room. Do not forget about fire safety measures: wooden structures must be protected from all heating elements with sheet non-combustible materials, and the places where the chimney passes are insulated with fire-resistant insulation.

When arranging the floor, be sure to make a slope in the direction of the drain. There should be a slope of approximately 1 degree per 1 m of surface length.
For interior decoration of floors, walls and benches it is best to use larch. Such wood will not burn the skin. Place the benches along the wall opposite the stove. You can also install benches at the side walls.
Lay electrical wires in fire-resistant insulation. Sockets, switches, lamps - all this must have an appropriate protection class.
It is very easy to care for such a bath.- it is enough to regularly ventilate the steam room and at least annually treat the walls with high-quality protective equipment.
Thus, in just a couple of days you can independently assemble a barrel bath, which will delight you and your guests with its light steam for many years. Follow the instructions and everything will definitely work out.
Successful work!
Taking a steam bath after a hard day's work is the dream of almost any person. But going somewhere to the steam room, renting a room and paying for it, by the way, really a lot of money, will not please everyone. If you have built your own house and are thinking about how to equip the site, then be sure to consider creating your own bathhouse, which you can visit at any time convenient for you with minimal fuel costs. In addition, it will be possible to take a steam bath in the company of friends who also like this format of recreation. But if you appreciate this idea, but don’t know where to start, then first of all, check out the existing building projects and choose among them the one that you like best. Recently, barrel baths have begun to be especially popular, which have a lot of advantages, in addition to obvious accessibility and practicality. In this article, we will consider all the features of creating such steam rooms, as well as materials that you cannot do without.
The advantages of such facilities
Undoubtedly, it is not advisable to build a capital bath complex next to a small cottage or cottage, especially if you do not live in the house all year round, but only during the summer. In addition, it is worth noting that the bath is a somewhat expensive pleasure. Yes, such a construction will pay for itself quite quickly, but no one has canceled the initial expenses, which, alas, cannot be dispensed with. But what about those people who do not want to abandon the idea of creating a bath, but do not have the necessary funds? In this case, it is recommended to pay attention to the budget options of the complexes, which in terms of their functionality and durability are in no way inferior to massive outbuildings. 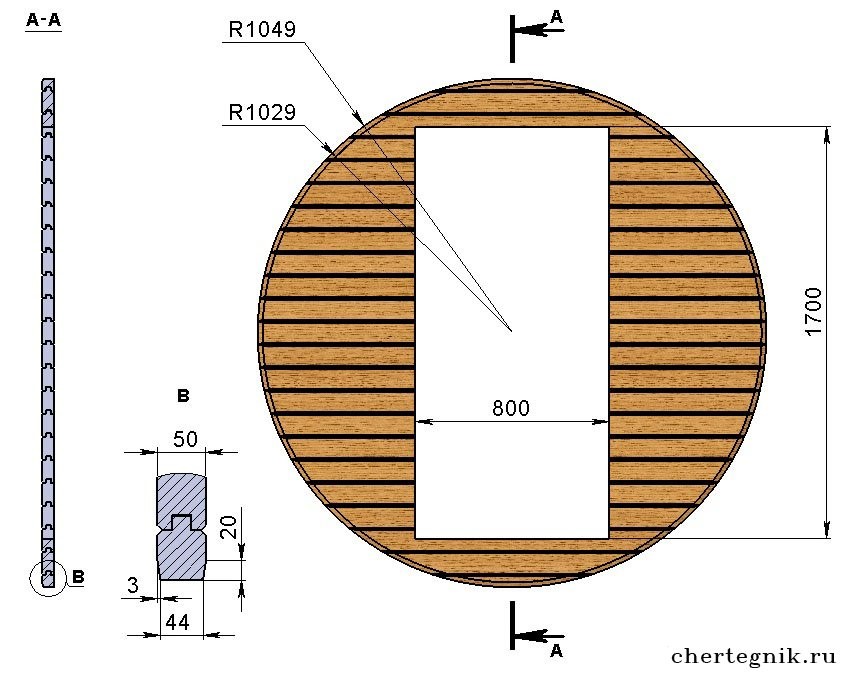
A barrel bath is a structure that you can create on your own without much difficulty, spending a minimum of finances and your precious time on it. You can build a steam room in a matter of days, and its appearance will be very attractive and complete thanks to the finishing work. The most important thing is to adhere to the chosen scheme and the advice of specialists in the field of construction and design. 
The length of such a structure can be at your discretion - from two to six meters. If your budget is severely cut, you can create a compact "barrel" in which there will be only a place for a steam room and the stove itself. If we talk about well-equipped and large baths, then they can have a relaxation room, a shower room, an imitated loggia, as well as almost any other room that your soul desires.
In addition, it is worth noting the following advantages, namely:
- original appearance;
- a small amount of space is required for the creation of a structure;
- high-speed work performance;
- a barrel bath has exactly the same functionality as capital structures, in no way inferior to them;
- no need for a massive base;
- you can create a steam room from materials that remain, for example, after building a house;
- availability and low price;
- you can build a barrel bath according to drawings and diagrams yourself.
- if you wish, you can create an individual building project and implement it based on your own wishes and preferences.
- Sauna barrel do-it-yourself drawings of which you can easily find on the net and choose among them exactly those that are suitable for your site, and, of course, the budget.
Choosing a building material
The most affordable and practical option are tongue-and-groove boards.
To create a bath barrel on your own, without involving a team of craftsmen, of course, you should use wood. You can choose the breed at your discretion, but pine, spruce and fir will be the safest for human health and the environment. But if we are talking about the creation of such a structure in the conditions of a summer cottage, then you should definitely take into account the climatic conditions, the amount of precipitation and the planned service life. That is why, for such objects, it is best to give preference to cedar, as well as larch, which, although they are not cheap, will last long enough and will please with their aesthetic characteristics. 
It is especially important to carefully consider the form in which wooden blanks for the future bath will be made. A planed edged board with a tenon-groove fastening type is perfect for these purposes.
To simplify the assembly process, construction experts strongly recommend processing the material so that it takes on slightly rounded shapes. To do this, you can use pre-created templates. The material should have a small thickness and width, so that it is most convenient and easy to work with it, both at the preparatory and final stages.
Barrel bath: do I need a foundation?

People who have thought about building their own barrel bath according to simplified drawings, first of all, think about whether it is necessary to create a foundation for this kind of construction? Often, no foundation is required. All you need to do is prepare the area. To do this, remove from it all debris, vegetation, as well as other objects that may interfere with installation. It is also important to level the surface. Support elements should be placed on it, which will serve as the base.
The support for the barrel bath can be:
- The territory that was previously concreted or asphalted; ;
- The area on which the tile was laid;
- Cover with a well-fixed shield (usually made of wood).
If you do not have the opportunity to carry out such work, then it is safe to say that an old reinforced concrete slab of the dimensions you need can be perfectly used as an impromptu foundation. 
At the time of creating the foundation of the supports, try to follow a few tips:
- When creating bases, it is recommended to use a reliable edged board, which has a thickness of at least 5 centimeters, having previously been treated with high-quality impregnation in order to prevent the formation of fungi and mold.
- Make sure that there is not too much distance between each support. The most optimal is one and a half meters, and the number of boards varies depending on the size of the tank bath.
- When assembling the structure, make a small rounded notch on the transverse boards so that the support exactly follows the contour of the bath (it should not be created from the edge, but closer to the center, leaving at least 10 centimeters at the free edge).
- To make the foundation rigid, when creating the structure, all kinds of metal elements are used, which are fixed at the corners of each constituent base.

Assembly order

The process of assembling the body of the structure itself should begin with the installation of partition walls, which are fixed transversely to the base. Equipping them, do not forget that any bath should have several door and window openings, and that this material should be additionally treated with a protective solution. 
After that, boards of the most optimal length are laid alternately on the finished foundation (based on the parameters of the future bath). They are connected according to the principle of "thorn in the groove" in order to give the structure a rounded shape. Upon completion of these works, the end partitions are fixed, which are mounted at the site specified in the drawing.
Decoration of the interior of the bath
The necessary rigidity of such a structure is provided through the use of special metal hoops. To ensure their reliable fastening, it is recommended to purchase special clamps, which, after the timber has completely dried, will tighten the structure and prevent the appearance of gaps and cracks. 
The exterior finish of the barrel bath is optional. If you still decide that you need it, then an ordinary soft roof, which is installed directly on the top of the structure, is quite suitable for work. First, the surface should be treated with a special waterproofing material (the budget option is simple polyethylene), and bituminous tiles. After everything is ready, you need to wait a few weeks for the wood to dry completely. It will be possible to equip the steam room with everything necessary and start full operation in a month. Of course, this rule is not necessary to follow, but if you want the bath to please you with its practicality and durability, experts in the construction industry still advise taking these recommendations into account.
In this article, we have reviewed all the main features, as well as the advantages of barrel baths. Such facilities are a really worthy alternative to capital buildings, so if you have a desire to build a sauna in your home, be sure to consider them.


