Do-it-yourself landscape fantasies: do-it-yourself crafts for the garden and summer cottages. Crafts for the garden with your own hands: all the new items for the original design of the site
Casting a masterful glance over its garden expanses, the soul simply rejoices at such beauty and abundance, and a timid ray of discontent breaks through this joy. That's the way people are - you always want something more. We start to sort through in the head various options, and we understand that we urgently need crafts for a garden or vegetable garden with our own hands, and such that all the neighbors in the area are envious! It is these options that are proposed in our article - beautiful, spectacular, original, functional, and what is especially pleasing - any beginner will master their production.
DIY flower pots and flower beds


no more scenic area than the one that is buried in flowers. With improvised materials, you can make beautiful and spectacular flower pots with your own hands.
Let's look at the most simple options craft flower pots for the garden with your own hands, which are easy to make even for beginners. Perhaps you have a bunch of old whole things lying around that you haven’t used for a long time, but it’s a pity to throw them away. I think everyone has a pantry with such antiquities. You just need to look at them from the other side! For flowers, anything that they can be planted in will do. Here, for example, is a painted rubber boot.
- An old bed, more spectacular crafts are hard to find.
- Old cups, teapots, cans, chairs and even a boat are also perfect for this purpose.
- It remains only to show imagination, a little creativity and in your garden, the garden will be decorated with bright and unusual flower beds.

Surprise your guests with tropical birds, and this step-by-step instruction will help you how to make them, but first we choose a tire. Perfect for us crafters. winter tires, made by a foreign manufacturer, they have softer rubber. The more the protector is worn out, the better, it will be easier to work with it. Take a closer look at tires without steel cord, but with a radial tread. If they are heavily soiled, be sure to clean and dry them.
In addition to the tire, we need the following materials:
- Sharp knife and wrenches;
- Drill with drill No. 10;
- A pair of M8 washers, bolt and nut;
- Multicolored paints.
We take a knife and start cutting the tire. To make the work go better, constantly moisten it in water. To do this, we make transverse cuts at 240 degrees. We cut off the side parts on both sides by about a third of the entire circumference.
Manufacturing process:
- Cut out the tail of the resulting workpiece;
- From the remains we cut out the beak and screw it into the head in advance drilled hole. We correct it by cutting the tire a little;
- We form the tail, straighten it well again, now you can decorate it;
- In the company of a parrot, you can make an equally spectacular toucan or a bright rooster. Just cut out the beak in a different shape.

This is the most popular do-it-yourself model of a homemade flower garden from an old tire. Today it can be found in almost every yard.
We will need:
- 1 tire;
- Chalk for marking;
- Sharp knife;
- Paints.
Let's start our craft:
- Before you start crafting from tires, clearly imagine what petals your flower bed will have;
- Now their contour can be transferred to the bus;
- Cut out according to the pattern and turn the petals outward;
- It remains only to give brightness and plant flowers!

To make this extraordinary architectural form in your garden or garden, you will need:
- 3 tires (1 from a scooter and 2 large from a regular car, one slightly larger than the other);
- Knife and screws;
- If there is, a piece of corrugation for electrical wiring;
- Paints and other little things for decoration.
Let's start doing:
- First, we take the largest tire, cut off its top, level it and put it in the place where it will be located on the section of the mug with flowers;
- We cut off the top of the smallest tire and install it in our saucer;
- We put the largest tire on it, and into it the remaining one, with a pre-cut top, we fasten everything with self-tapping screws;
- We mount the handle from the corrugation or a piece of cut rubber;
- Coloring and decorating. Podelgo for the garden is ready!

To create this little garden masterpiece, we need not only materials, but also a lively creative imagination and modeling skills. We start creating.
Materials and tools:
- Large plastic bottle;
- Wooden slats;
- Thick wire;
- Cement, water, fine sand and building gypsum;
- Paint and varnish.
Manufacturing process:
- We cut the bottle for the base of the flower bed and install it on wooden frame from wood;
- We thoroughly wrap everything with wire, this is so that the cement does not slip and holds the shape we need;
- We dilute the cement mortar, in proportions of 1: 1. Gypsum is added only to ready solution for a faster grip.
- Carefully and gradually apply the solution layer by layer, giving desired shape, we fashion ears;
- From balls of different sizes we make a face, eyes and fingers on the paws;
- Having finished modeling, we cover the sculpture with a film and wait for complete hardening for about four days;
- We decorate, varnish and enjoy a wonderful craft for a garden or vegetable garden.
DIY figurines for the garden
For the decoration of the garden and vegetable garden, you can make bright landscape figurines with your own hands.

To create such a miracle, you will need:
- 1 any tire;
- Plastic bottles;
- Self-tapping screws and drill;
- Dye.
Manufacturing process:
- We wash the tire and bury it halfway into the ground;
- We drill holes in the tire, where the rays will be located. We fasten bottle caps into these places;
- We return to them plastic container and decorate our wonderful craft.

To make 1 such bird for the garden you will need:
- 1 ten-liter or five-liter bottle;
- Bottoms from plastic bottles. The larger the sculpture, the larger the bottoms should be;
- Packages, fishing line and metal rods;
- Dye;
- Sharp awl.
- First of all, we prepare the "feathers". To do this, we process the cut bottoms on hot sand in a pan. So the cut edges will be smooth and beautiful.
- We pierce holes in the finished bottoms with an awl one opposite the other, with the help of a fishing line we collect them into a long garland.
- We insert a long rod into the cork of a large bottle, which is a body, and bend it into the shape that you like - this is the neck of a bird.
- All this must be wrapped in bags so that a streamlined bird shape appears. On top, the final layer - a film, for a neat look.
- Now we decorate the body with our plastic garland and firmly fix it. We make a beak from plywood or from a bottle.
- We mount the legs of their twigs, according to the same principle as the neck, we fix them well in the ground. Now we can decorate our bird. Our plastic bottle craft is ready!
Gorgeous peacock made of plastic bottles

Continuing the garden theme, check out this master class on making fabulous beautiful peacock from plastic bottles with their own hands.
Required materials and tools:
- For the body - a canister with a volume of 10 liters;
- Durable metal leg bar and mesh;
- Glue, wire;
- bottles different colors and sizes about 120 pieces;
- Styrofoam for the head;
- Stitching and cutting objects.
Manufacturing process:
- Having cut off the strip from the top and side, we combine them a little back and fasten them with a stapler;
- We bend the rod under the body and fix it in the stand;
- Putting the body on metal carcass, give it right direction and thoroughly fixed with a strong wire;
- We cut off the necks of 15 cm from white or milk bottles, cut them, fold them into a bag, put them on our feet and fasten them;
- We cut long feathers from dark bottles and fasten them to the lower part of the body;
- We fit the body with a mesh, form the wings and tail. We round it on the chest;
- Cut out long feathers for the wings and fasten them to the grid. On top of them we mount small feathers;
- Cut out the bird's head from foam;
- We make tufts, eyelids and a beak out of plastic, tightly mount them to the head;
- From the bottles we form a neck, and we fix it well, we put our head on it;
- We sheathe it all with feathers;
- Cut out paws from the bottle;
- Now we decorate all our work.
From green bottles we cut out feathers for the tail. From 1 bottle you get 1 large or a couple of small feathers. To do this, you need to cut out the middle, round it and cut it with a fringe, draw the eyes with paint. Form each row of feathers with a stapler and lay one on one.
Dacha is not only a place where you grow vegetables and fruits. On the standard six acres (and some may have more) you can let your imagination unleash for real! In the country, you can bring to life a variety of and, at times, even wild ideas. Many of them will not only decorate your garden, but will also be very useful in the hard work of a gardener. And most importantly, country homemade products will give new life to things that, it would seem, are long overdue to go to a landfill.
From what can you create country crafts with your own hands? Now you will be surprised, but everything can be used! Do not rush to throw things in the trash that have served their time or at first glance seem like garbage. Imagine a little - maybe this old shoe is still good for something?
| Things | Transformation Ideas |
|---|---|
| Plastic bottles | Lemonade, milk, juice bottles are perfect as any details for creating interesting figures, as well as for creating fences around beds or an irrigation system. The material from which they are made is very durable and moisture resistant and will last more than one season in the country. |
| Milk boxes | Excellent "pots" for seedlings! This has been known to gardeners for many years. |
| old shoes | Create original flower pots from the "battalion" of old shoes. |
| Tires | Car tires can be used not only as flower beds: you can create amazing animals and birds from them, and if you sheathe them with fabric or twine, you will get excellent seats. |
| Lumber trimmings | There is no need to burn the remains of the boards in the oven - it is better to use them to decorate the fence, creating an interesting ornament, or to create small flower beds, paths, shelves. |
| old technology | The skeleton of an ordinary Soviet bicycle, a rusty wheelbarrow, a broken motorcycle do not have to be scrapped - arrange them as a flower bed! |
| aluminum cans | Of these, you can make a device that repels moles. It is enough to put a jar on a stick buried in the ground. |
| Broken glass | color broken glass will help decorate the fence: drill holes in the boards and insert glass pieces there. On a sunny day, you won't recognize your fence! |
| Plastic bottle caps | They will help shape your country house unique. Create patterns using lids attached to the walls of the house with small studs. |
| Old clothes | Scarecrows are still in demand. Put together two slats crosswise, dig the frame of the scarecrow into the ground and dress it up in your old things. To make the scarecrow "kind", make him a pretty face and dress him in a colorful dress. |
| old rake | Do you have an old and rusty rake that has served its time? Don't rush to get rid of them. Hang it on the wall of a barn or house and you will have a great hanger for garden tools. |
This is just some of the obsolete things that can be used in the country. Remember: each item can find a new use, you just have to dream up a little. Now it's time to give more detailed instructions to create various country homemade products that serve both to decorate the estate and bring considerable benefits.

Do-it-yourself mini-pond
A do-it-yourself mini-pond, vaguely reminiscent of a fabulous swamp where the Frog Princess lives, is very easy to create. For this we need:
- an old bathtub or other large water-tight container;
- old slate;
- old rubber hose;
- a piece of polyethylene dense film;
- stones, sand and other elements of "decor";
- plants that live in water.
Technology for creating a mini pond on the site
- We bury the bath so that its edges are flush with the ground.
- We dig in slate around the bathtub so that its edges are 20 centimeters higher than the surface of the earth.
- We stretch a hose cut along the edge of the slate (it will protect the polyethylene from rupture).
- We close the bathtub and slate with polyethylene, carefully spreading it along the bottom of the future reservoir. The edges of the film can be sprinkled with earth and pressed down with stones.
- Pour water into the "reservoir".
- We decorate with stones, plant around the plant, and water lilies can be placed in the pond itself.

Idea - small pond Location on
Neat beds
Who doesn’t love it when the beds in the garden are not just raised above the ground, but also neatly decorated? Everything must be in order! We offer to decorate the beds with plastic bottles. We will need:
- a lot of plastic bottles;
- sand;
- paint - optional;
- shovel.
Work performance technology
- Choose bottles of the same size and color. Colors can be combined as desired.
- Fill the bottles halfway with sand.
- Dig a shallow trench along the bed.
- Place the bottles upside down in the trench and dig in.
- You can paint the bottles water-based paint, but this is optional.


Video - interesting crafts for giving
"Safari"
Do you want lions and tigers, chubby pigs, bright bugs, giraffes and zebras to live in your country house? Bring the idea called "Safari" to life. An impromptu do-it-yourself zoo can be created using completely different objects. We will need:
- plastic bottles of different sizes;
- old tires;
- brushes and paint;
- stones different sizes or old construction helmets, basins;
- shovel.
The most common representatives of the fauna that summer residents create are giraffe, zebra, pig, beetles. We will try to arrange them with you on our site.
Giraffe and zebra are made using the same technology. Differences - in the color and length of the neck of animals.
- Dig an old tire halfway into the ground - this will be the body of the animal.
- After cutting off the bottom and tops, connect several plastic bottles to each other to make a neck. Dig in the "neck" in front of the dug-in tire.
- Cut one bottle lengthwise, cut off the neck - you get a head. Attach it to the "neck".
- The animal is almost ready! It remains to paint. Color your ungulate in the necessary colors: giraffe in yellow and orange, zebra in black and white.

An interesting idea - a safari at their summer cottage
By analogy, you can also make palm trees, birches and other plants, decorating your "oasis" with them.
Making a piglet is even easier:
- Take a large "pot-bellied" plastic bottle and fill it with sand to give it mass.
- Make ears out of a piece of plastic and insert them into the area of \u200b\u200bthe “head” of the piglet (where the neck of the bottle is).
- With pink paint, paint the bottle, and with black paint, draw the eyes and piglet on the piglet. Piggy is ready!

An interesting idea - piglets from plastic bottles
Cheerful multi-colored bugs can be made from any rounded containers and put on beds and flower beds as a decoration. Even stones are suitable for manufacturing: it’s enough just to paint them with paint by drawing dots like ladybugs, mustache, eyes.
And from an old basin you can make a turtle Tortilla. By cutting the tires and bending their parts in a certain way, and then painting them with white paint, we get a swan.
Convenient sprinklers
Another convenient and practical way to use plastic bottles is to create convenient system watering the beds. We will need:
- plastic bottles;
- thick nail;
- shovel;
- water.
Work performance technology
- In plastic bottles on the sides, we make small holes with a nail or a thick awl.
- We dig the blanks upside down into the soil next to the plant.
- Water is poured into bottles through the neck.
- Water from bottles through the holes will gradually flow into the ground and nourish the roots of the plant.

Hands-On - Plant Waterers
From soda bottles you can organize and drip irrigation, which is very convenient for use in greenhouses. To do this, cut off the bottom of the bottle, and pierce several holes in the cork so that the water flows slowly. In order not to be mistaken, first make very small holes - it is better to expand them later.
After creating the blank, dig a hole (about 15 cm deep) not far from the bush, at a distance of 20 cm from the stem, and dig the bottle down there with the neck at an angle. It remains to fill the bottles with water, and the system is ready.

You can organize watering with bottles in another way. To do this, a bottle without a bottom is hung upside down on the side of the plant, filled with water. By unscrewing the cork a little, you can regulate the flow of water. Place tiny pieces of polyethylene under the bottle to avoid soil erosion from dripping.
Winged swing
After working in the garden, you also want to relax: for example, sit on a bench and drink tea. But it is more interesting to relax on a swing, especially with children. We offer to make an unusual and even shocking swing from ... an old sofa! The main thing is that a strong and tall tree with powerful branches grows on your site, for which you need to firmly fix it with strong ropes or chains. old sofa. And it will be soft and comfortable to swing on it. From the rain, it is better to cover such a means of entertainment with a film, and clean it indoors for the winter. But on the other hand, no one will definitely have such a swing!

You can also make a swing from an old chair seat: just hang it from a thick and strong tree branch and swing to your health.
Such different flower beds
Flowerbeds from old tires, used both in their original form and cut in every possible way, are known to every housewife. But not everyone will guess to make “homes” for flowers from old bicycles, cars, cars, shoes or teapots.

It is quite possible to fix an old bicycle in the ground by digging in the wheels, and supplement it with small pots in which flowers are planted. In addition, let him climbing plant: it will grab the skeleton of a two-wheeled vehicle and turn it into an unusual flower bed.

An interesting idea - a flower bed from an old bicycle
From old rubber boots, painted different paint, bright flower pots are obtained. Fill them with soil and plant plants there. Don't forget the drainage holes in the soles of your old shoes! You can place such planters anywhere: on the veranda, fence, between the beds, and this is where they huge advantage. By the way, do not write off non-rubber shoes: they can also be filled with earth and flowers can be planted in them, they will simply serve less than rubber ones.

A flower bed of old shoes is an amazing and very beautiful idea.

We save correctly
Old metal teapot- also a great flower bed. Attach ropes or chains to the handle, hang it on the veranda from the ceiling, pour earth and plant a birch-type climbing plant.

An old metal teapot is a great flower bed
Video - do-it-yourself homemade products for giving
Dacha for many is not just a place of rest, but also an attempt to express the creative potential of their personality. Wanting to decorate their plots or make them as convenient as possible, many of their owners begin to make crafts for giving with their own hands.
The benefits of a variety of crafts for giving
Can not imagine private house no handmade items. They serve calling card any owner, his desire to ennoble the site, making it more suitable for comfort on vacation.
Crafts for giving have a number of advantages. For example:
- This is a great time to spend with family. By involving children, you can instill in them diligence in such a simple and interesting form for them, as well as draw imagination from restless kids yourself, which will help diversify the creative process and bring something new to products.
- In addition, you can use those improvised means that will not hit your pocket. DIY material:
- wood;
- laser discs;
- car tires;
- Styrofoam;
- concrete;
- plastic bottles;
- stone and more others
- A hand-made craft will give self-confidence and a special joy from rest, while the cottage will look much more attractive.
Well, the most important thing is that you can make it quickly and without much effort. Even the tool will need the one that is in every home. It is very easy to choose a suitable craft for, photos of products located on this site will help with this.
The art of crafts for giving from bottles
The simplest and most common material is bottles. In each house during the winter they accumulate in sufficient quantities. It's time to take them all to the country in the spring, and, instead of garbage, the bottles will easily turn into a masterpiece that will please the eye. Products made from this material serve two purposes. You can make from them practical crafts, for example, a fence in the garden, an openwork curtain on the door or a bird feeder. Also crafts have decorative properties, for example, artificial flowers and animals, original flowerpots.

Crafts for giving from bottles are quite practical:
- Due to the advantageous characteristics of the thin plastic from which the bottles are made.
- In addition, you can use different parts of the bottle, from the cap to the bottom.
- And another advantage of bottles is that they are easy to cut and can be connected. different ways, and materials: wire, thread, fishing line, elastic band and even glue.
- The color scheme of such crafts is also striking, because they can be painted.
Therefore, products from bottles are very diverse, beautiful and useful. They are easy and interesting to make, you can even start designing yourself and come up with something new.

 There are trees on every homestead. This suggests that another common material can be used. Wooden crafts for giving are useful and giving positive emotions. Old stumps are also used, branches that are regularly cut down from trees as an autumn or spring pruning, leftovers from repairs and unnecessary boxes.
Large and small wooden structures can be very necessary in the country. What cottage does without a cozy bench, without an arch or a fence? All these products are intended for a cozy holiday the whole family. But also original lamps, birdhouses and flowerpots can also give the cottage warmth and a great view of the holiday.

What crafts can you make with your own hands from tires?
 To make crafts for a summer house with your own hands, you don’t need a special skill, because the shape and elastic flexible material all the time suggest a lot of ideas.
What can be made from tires? These are just some suggestions:
- tracks;
- garden fence;
- furniture (tables and chairs);
- high beds;
- rugs;
- flowerpots;
- and much more.
 From this incomplete list, it is clear that this durable material who is not afraid of any weather makes it possible to design perfect country crafts. Their purpose will be as diverse as possible. Taking into account all the possibilities of tires, it is easy and interesting to practice landscape design personal plot.
Original ideas for crafts
There are other improvised means from which excellent products are obtained. Given their shape and material, you can come up with many different crafts. Bright, creative designs can transform a boring look garden plot, turning it into an ideal world for children to relax and play. For example, original sculptures and beautiful flowerpots successfully decorate the garden and yard.

Many crafts are created for the convenience of the summer resident. So if old tire, cut into small pieces, and strengthen these parts on the wall, you get suitable shelves for small parts and tools. And cut plastic bottles connected to each other turn into a water gutter.
Children will also benefit from crafts, because these are sandboxes and specially designed playhouses for them.
 To decorate your allotment, and make it much more convenient, crafts for summer cottages and gardens will help. What functions do these products perform?
- They make the site much more comfortable, and gives a perspective. So humble wooden canopy or a birdhouse unusual lamp or a small one turns a summer house into cozy place recreation.
- Help to demarcate different zones dachas. For example, the recreation area is separated from the work area by a conveniently located garden bench.
- Decorate the yard and garden. Even, and decorated with a curious craft, it helps to see the makings of a designer in yourself, enjoy the opportunity, and pleasantly surprise guests and neighbors.
Some photos of do-it-yourself crafts for a summer residence can convince you of the practicality of this idea, and kindle a desire to try to design something like that yourself.
We will send the material to you by e-mail
If you are the happy owner of your own land plot, then you have a great opportunity to decorate adjoining territory and a garden to your heart's content. You, probably, too, like many site owners, want to know what you can do with your own hands for garden decor, after all decorative ornaments the store is so expensive. In this review, we will tell and show all the new items - do-it-yourself crafts for the garden. You can find improvised material at your own summer cottage.
Original and stylish products are obtained from the most unexpected materials.
The house territory, decorated independently, always looks more attractive compared to the purchased decor.
You can see all the options presented in the photo. The following materials will help to carry out the design of the garden and the garden with your own hands:
- used tires;
- unnecessary furniture;
- pieces of pipes and fittings;
- stumps different shapes and cut branches;
- jars, bottles and other utensils;
- torn shoes;
- unnecessary Appliances or old vehicles.

In general, all old things that should not be thrown away will go into action.
Choosing a garden and garden design option with your own hands: photo ideas
Before you start, look at the photo original ideas decor with your own hands. The easiest way to decorate household territory this is to make a beautiful stand for flower pots. You can make special pallets from old boxes, car tires or plywood to make a beautiful art palette for the garden.

A common option is sculptures for the garden. You may find the following information useful:
- beautiful figures can be made from natural materials- branches and stumps;
- original sculptures are made of cement or concrete. In this case, the material is poured into a specially prepared form. Also for products, a reinforcing structure is used;
- from wood you can build statues of animals, fairytale heroes or even castles. They are installed near gazebos, rockeries or rock gardens;
- abstract figures are made from reinforcing and wire parts. And if you wrap the reinforcement with mesh, burlap and fill it with soil. Then you get a three-dimensional product from plants;
- an unusual figure is a scarecrow in the garden, which can be made from worn clothes and straw. This character is very popular with children.

flower steam locomotive

From logs and branches you can create original little men


Mushroom theme will be appropriate in almost any area
Advice! Used to create crafts acrylic paints, as well as cold enamel and glass paint. After drying, the surface is varnished.
Crafts from painted stones: photos of original options
Stones make excellent DIY garden crafts. We will showcase all new items.To make original cacti, you will need paints, pots, sea stones and stone chips. First, the stones are covered with green paint, and then light stripes or dots are applied on top. When the products dry up, cover them with varnish and put them in pots with pre-poured stone chips.

If there is a reservoir or a pond on the site, then it can be decorated with such crafts

Ladybugs and others funny crafts decorate any area

For fans of fairy tales

To create such crafts, you need to be able to draw well.
Related article:
Concrete outdoor flowerpots. Step-by-step instructions for making, types of forms, materials, decoration techniques and many photo examples in a special publication of our online magazine.
Large stones are suitable as decor for the garden. They are covered with paint and varnish.Various houses can be depicted on stones of different shapes. From elongated and rounded specimens, magnificent owls are obtained. From flat and oval - cars or buses. You can also create snails, frogs, hedgehogs, birds and fish from stones.
Advice! An easy way to draw a picture on a stone: draw the contours of the picture on the stone with a pencil, and then paint it with acrylic paints.
Luxurious flower bed with your own hands - an unusual design
DIY garden decorations can be quite large in shape, there are many original ideas on how to create lush and original flower beds.
Advice! Do not forget that children really like to participate in the creation of such crafts.
You can use the following options:
- alpine slides are built from stones, pieces of brick and stumps. All elements are attached with a solution;
- all kinds of reservoirs are suitable for stone structures, which you can do yourself. You will have to buy only a special motor for supplying water;
- original multi-tiered flower beds are easy to make from branches, tires, basins and plastic bottles;
- are obtained from old furniture, washbasins, barrels, old boots or ceramic dishes.
Related article:
Photo examples of bright and original flower beds made of car tires, plastic bottles, logs, stones and other waste material in a special material.


With limited space, you can build hanging planters. They are hung on verandas, trees and in. You can make similar crafts from hats, boots, toys and even old bags.
Helpful information! Ready alpine slide it is recommended to pour kefir. At the same time, moss spores will take root perfectly. Moss looks great among flower vegetation.
Stylish animal figurines for the garden
It is impossible to list the variants of all new products. DIY garden crafts should be in harmony with the overall style of the garden and. Here are some tips to help you choose the right type of garden composition:


Figurines of real and fabulous animals will decorate any personal plot. A variety of sculptures are made from brushwood, corrugated board, plaster or wood.
Mushroom decor for the garden
You can diversify the local area with the help of country tricks with your own hands. Photos show original models of mushrooms from different materials. Decoration in the form of mushrooms is easy to make from pieces of foam or polyurethane foam. Such figures in winter can be rearranged on the window. As an option, perform mushrooms from a concrete solution. For this, a solution is prepared in proportions, as for construction works and fill in the forms. Plastic bottles can be used for the legs, and a round basin for the hat. Such figures are painted over with paint or decorated with mosaics.
Homemade designs are an economical solution to improvement problems. Some structures are able to successfully perform not only aesthetic, but also practical functions. Learn with the help of this article how to create crafts for the garden with your own hands: all new items are presented with descriptions. You can repeat the options you like, taking into account your own skills and desires.
Various products are used as blanks for the implementation of creative
Why do you need crafts for the garden with your own hands: all the new items and basic requirements
An old bicycle, a leaky kettle, a broken cart - these and many other items cannot be restored without excessive costs. Modern ways production and trade are aimed at attracting buyers to new acquisitions. Often new model Buying is more profitable than repairing broken equipment.


These examples illustrate the master's attitude to things and careful attitude to nature. Various things are transformed in the way that future users need. Of these, they create exclusive decorations for the garden with their own hands, and the cost of translating original ideas into reality will not be high. Some products will begin to perform new useful functions.
In any case, sufficient durability will come in handy. Therefore, in the process of creating structures, high-quality, reliable joints should be used. It will be useful to pre-compile a list of additional components. You should prepare drawings in advance, choose a harmonious decorative design.
Changing the design of the garden and the garden with your own hands: photos and action algorithms
Descriptions of manufacturing technologies have been added to the pictures of some products. To simplify the choice of suitable crafts for the garden with your own hands, all new items are presented in thematic groups. This information will help you make the right decision quickly.
Flowers in a beautiful frame
Typical ones look too simple even when planting beautiful and diverse plants. If, however, they are more likely to attract enthusiastic attention.

But after painting the body of the old car, the aesthetic parameters will be much better.

If you apply a deep modern primer and a clear varnish coating, an excellent appearance will be preserved in rain and direct sunlight.

For laying the lawn, a homemade wooden box is fixed on a metal frame.

This plastic housing without additional treatment successfully resists the destructive processes of corrosion. The only drawback is the rarity of such equipment in the domestic territory. The production of cars of this brand was discontinued in 1991.

It was released until 2003. A well-recognized appearance will help create a bright do-it-yourself decor for the garden.

This technique was inexpensive even when it was able to move along the roads. Here, artificial turf and plastic flowers are used to cover the outside of the hull.


In the construction process and in the care of the garden, you can find many different stones. Do not throw away such strong and reliable Construction Materials. In this figure, which is erected without the use of cement mortar. It is installed without a foundation. It maintains integrity without special protective measures.


To make such a product, it was enough to wash the workpiece and paint the ribs in a contrasting white color.

This material is well suited for creating complex structures.

The process of making such a flower bed consists of the following steps:
- AT suitable place the land plot is marked with sand. It represents the outline of the basket. Provides good visibility ready product will have good aesthetic characteristics from all sides.
- With an interval of approximately 8-10 cm, frame rods are inserted into the ground. The depth must be sufficient for the fixation to be secure. If the earth is loose, it is rammed to the desired state.
- Flexible rods, with a smaller thickness, are woven between the vertical elements. Their end parts are fixed firmly. If necessary, use polyethylene retainers or metal wire.
- After the construction of the wall of the desired height, the remains of the frame rods are cut off. In the upper part, the weaving is made denser. You can attach vine handles to this area.
- To wooden structure kept for a long time, it is impregnated protective compounds. If their contact with plants is not recommended, an insulating layer of polymer film is installed inside.
Artificial flora and fauna
These flowers will not wither, keep the freshness of colors in the most very coldy. Such plumage of birds is not found in the rich world of the tropical jungle. Such giant insects can only be seen in science fiction films. There is nothing surprising in these statements. For original design it is not difficult to create any images of a garden and a vegetable garden with your own hands, the photos below show only part of the potential.
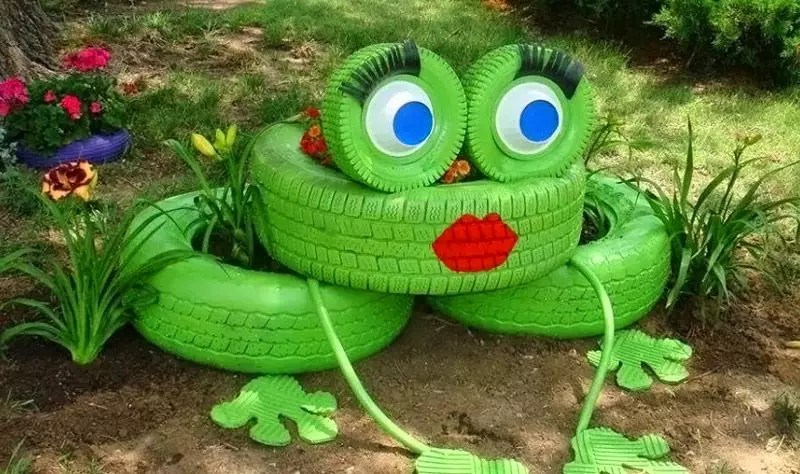
The crown of this character can be made from improvised materials. The base of the figure is formed from tires of different sizes. Eyes are plastic plates. The luxurious lashes are made from the soft rubber of automotive tubes. Paws - from segments of a garden hose.

This woodpecker should be installed higher, outside the direct access zone. His perky tuft is made of a fragment circular saw with sharp edges

The largest flowers in the center of the flower bed retain their aesthetic characteristics in unchanged excellent condition. all year round. On the mesh design, dirt is not noticeable, so careful maintenance is not required.

To create muzzles cute hedgehogs will have to work with a knife. This part is made of wood. The spines are formed by heat-loving cacti. This solution is only suitable for enclosed spaces where the required temperature will be maintained.

dead tree not necessarily uprooted. However, the author clearly did not spend much time and effort on creating this unique image.

carnivorous flower from a terrible fairy tale it can become a bright element of a decorative composition. For its manufacture, you can use metal and plastic
Painted stones: photo and technology
It is not difficult to make such crafts for the garden with your own hands, all new items can be made in just a few tens of minutes:
- After stones of suitable shape and size are found, they are washed and dried.
- First, a red layer is created, then black and white spots are painted with a brush.
- The general background can be quickly created from a spray bottle. It fills in all the imperfections well.
- If you want to extend the service life, apply a final coat of clear lacquer.


Functional homemade
In addition to do-it-yourself decor photos, original practical ideas also deserve attention.

To create this, you will need the following components:
- board or wooden shield. This element is impregnated with stain until the desired shade is obtained. Useful on the street protective layer preventing moisture penetration and biological damage.
- Chains and screws for attaching to the ceiling beam. The galvanized surface of such parts will not allow traces of rust to form.
- Cartridges and wires. Cables are rigidly connected to back wall plastic clips to.


A similar chandelier can be purchased at the store, as design model, or do it yourself. In the latter case, the costs will be reduced tenfold. To make a lampshade, you will need threads and a properly selected
We also recommend
 Switching power supply: repair and refinement
 Remote control of light
 Swimming lessons for preschool children
 Notes for the master - home household alarms
 Clock propeller on Atmega8
 Device and relay application examples, how to choose and connect a relay correctly Microcontroller and relay simple switching circuits